Forms
At the end of Managing Data, the online store application has a product catalog and a shopping cart.
In this section, you'll finish the app by adding a form-based checkout feature. You'll create a form to collect user information as part of checkout.
Forms in Angular
Forms in Angular take the standard capabilities of the HTML based forms and add an orchestration layer to help with creating custom form controls, and to supply great validation experiences. There are two parts to an Angular Reactive form, the objects that live in the component to store and manage the form, and the visualization of the form that lives in the template.
Define the checkout form model
First, you'll set up the checkout form model. The form model is the source of truth for the status of the form and is defined in the component class.
-
Open
cart.component.ts. -
Angular's
FormBuilderservice provides convenient methods for generating controls. As with the other services you've used, you need to import and inject the service before you can use it:-
Import the
FormBuilderservice from the@angular/formspackage.src/app/cart/cart.component.ts import { Component } from '@angular/core'; import { FormBuilder } from '@angular/forms'; import { CartService } from '../cart.service';The
FormBuilderservice is provided by theReactiveFormsModule, which is already defined in theAppModuleyou modified previously (inapp.module.ts). -
Inject the
FormBuilderservice.export class CartComponent { items; constructor( private cartService: CartService, private formBuilder: FormBuilder, ) { } }
-
-
In the
CartComponentclass, define thecheckoutFormproperty to store the form model.export class CartComponent { items; checkoutForm; } -
During checkout, the app will prompt the user for a name and address. So that you can gather that information later, set the
checkoutFormproperty with a form model containingnameandaddressfields, using theFormBuilder#group()method.- export class CartComponent {
- items;
- checkoutForm;
- constructor(
- private formBuilder: FormBuilder,
- private cartService: CartService
- ) {
- this.items = this.cartService.getItems();
- this.checkoutForm = this.formBuilder.group({
- name: '',
- address: ''
- });
- }
-
For the checkout process, users need to be able to submit the form data (their name and address). When the order is submitted, the form should reset and the cart should clear.
In
cart.component.ts, define anonSubmit()method to process the form. Use theCartService#clearCart()method to empty the cart items and reset the form after it is submitted. (In a real-world app, this method also would submit the data to an external server.)The entire cart component is shown below:
src/app/cart/cart.component.ts - import { Component } from '@angular/core';
- import { FormBuilder } from '@angular/forms';
- import { CartService } from '../cart.service';
- @Component({
- selector: 'app-cart',
- templateUrl: './cart.component.html',
- styleUrls: ['./cart.component.css']
- })
- export class CartComponent {
- items;
- checkoutForm;
- constructor(
- private cartService: CartService,
- private formBuilder: FormBuilder,
- ) {
- this.items = this.cartService.getItems();
- this.checkoutForm = this.formBuilder.group({
- name: '',
- address: ''
- });
- }
- onSubmit(customerData) {
- // Process checkout data here
- console.warn('Your order has been submitted', customerData);
- this.items = this.cartService.clearCart();
- this.checkoutForm.reset();
- }
- }
The form model is defined in the component class. To reflect the model in the view, you'll need a checkout form.
Create the checkout form
Next, you'll add a checkout form at the bottom of the "Cart" page.
-
Open
cart.component.html. -
At the bottom of the template, add an empty HTML form to capture user information.
-
Use a
formGroupproperty binding to bind thecheckoutFormto theformtag in the template. Also include a "Purchase" button to submit the form.<form [formGroup]="checkoutForm"> <button class="button" type="submit">Purchase</button> </form>
-
On the
formtag, use anngSubmitevent binding to listen for the form submission and call theonSubmit()method with thecheckoutFormvalue.<form [formGroup]="checkoutForm" (ngSubmit)="onSubmit(checkoutForm.value)"> ... </form> -
Add input fields for
nameandaddress. Use theformControlNameattribute binding to bind thecheckoutFormform controls fornameandaddressto their input fields. The final complete component is shown below:src/app/cart/cart.component.html - <h3>Cart</h3>
- <p>
- <a routerLink="/shipping">Shipping Prices</a>
- </p>
- <div class="cart-item" *ngFor="let item of items">
- <span>{{ item.name }} </span>
- <span>{{ item.price | currency }}</span>
- </div>
- <form [formGroup]="checkoutForm" (ngSubmit)="onSubmit(checkoutForm.value)">
- <div>
- <label>Name</label>
- <input type="text" formControlName="name">
- </div>
- <div>
- <label>Address</label>
- <input type="text" formControlName="address">
- </div>
- <button class="button" type="submit">Purchase</button>
- </form>
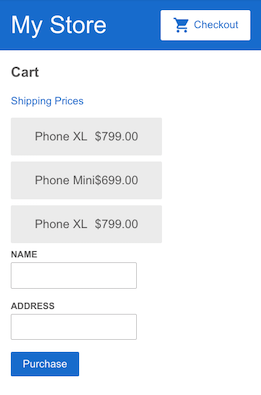
After putting a few items in the cart, users can now review their items, enter name and address, and submit their purchase:
Next steps
Congratulations! You have a complete online store application with a product catalog, a shopping cart, and a checkout function.
Continue to the "Deployment" section to deploy your app to Firebase or move to local development.