|
OpenCV
4.1.0
Open Source Computer Vision
|
|
OpenCV
4.1.0
Open Source Computer Vision
|
This tutorial was designed to help you with installation and configuration of OpenCV4Android SDK.
This guide was written with MS Windows 7 in mind, though it should work with GNU Linux and Apple Mac OS as well.
This tutorial assumes you have the following software installed and configured:
If you need help with anything of the above, you may refer to our Introduction into Android Development guide.
If you encounter any error after thoroughly following these steps, feel free to contact us via OpenCV4Android discussion group or OpenCV Q&A forum. We'll do our best to help you out.
OpenCV4Android SDK package enables development of Android applications with use of OpenCV library.
The structure of package contents looks as follows:
OpenCV-2.4.9-android-sdk
|_ apk
|   |_ OpenCV_2.4.9_binary_pack_armv7a.apk
|   |_ OpenCV_2.4.9_Manager_2.18_XXX.apk
|
|_ doc
|_ samples
|_ sdk
|    |_ etc
|    |_ java
|    |_ native
|          |_ 3rdparty
|          |_ jni
|          |_ libs
|               |_ armeabi
|               |_ armeabi-v7a
|               |_ x86
|
|_ LICENSE
|_ README.android
sdk folder contains OpenCV API and libraries for Android:sdk/java folder contains an Android library Eclipse project providing OpenCV Java API that can be imported into developer's workspace;sdk/native folder contains OpenCV C++ headers (for JNI code) and native Android libraries (*.so and *.a) for ARM-v5, ARM-v7a and x86 architectures;sdk/etc folder contains Haar and LBP cascades distributed with OpenCV.apk folder contains Android packages that should be installed on the target Android device to enable OpenCV library access via OpenCV Manager API (see details below).
On production devices that have access to Google Play Market (and Internet) these packages will be installed from Market on the first start of an application using OpenCV Manager API. But devkits without Market or Internet connection require this packages to be installed manually. Install the Manager.apk and optional binary_pack.apk if it needed. See Manager Selection for details.
samples folder contains sample applications projects and their prebuilt packages (APK). Import them into Eclipse workspace (like described below) and browse the code to learn possible ways of OpenCV use on Android.doc folder contains various OpenCV documentation in PDF format. It's also available online at http://docs.opencv.org. Starting from version 2.4.3 OpenCV4Android SDK uses OpenCV Manager API for library initialization. OpenCV Manager is an Android service based solution providing the following benefits for OpenCV applications developers:
C:\Work\OpenCV4Android\ directory.Unpack the SDK archive into the chosen directory.
You can unpack it using any popular archiver (e.g with 7-Zip):
On Unix you can use the following command:
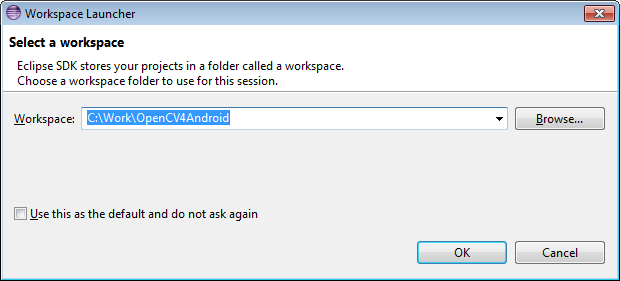
Start Eclipse and choose your workspace location.
We recommend to start working with OpenCV for Android from a new clean workspace. A new Eclipse workspace can for example be created in the folder where you have unpacked OpenCV4Android SDK package:
Import OpenCV library and samples into workspace.
OpenCV library is packed as a ready-for-use Android Library Project. You can simply reference it in your projects.
Each sample included into the OpenCV-2.4.9-android-sdk.zip is a regular Android project that already references OpenCV library. Follow the steps below to import OpenCV and samples into the workspace:
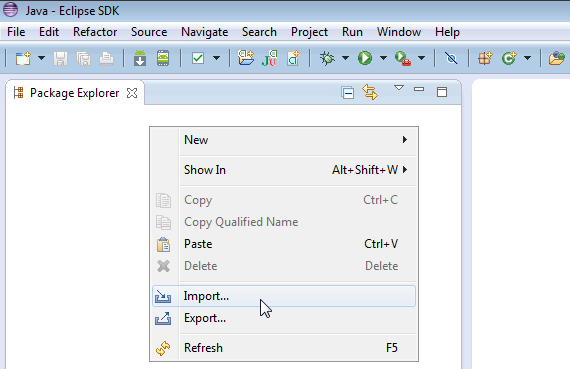
Right click on the Package Explorer window and choose Import... option from the context menu:
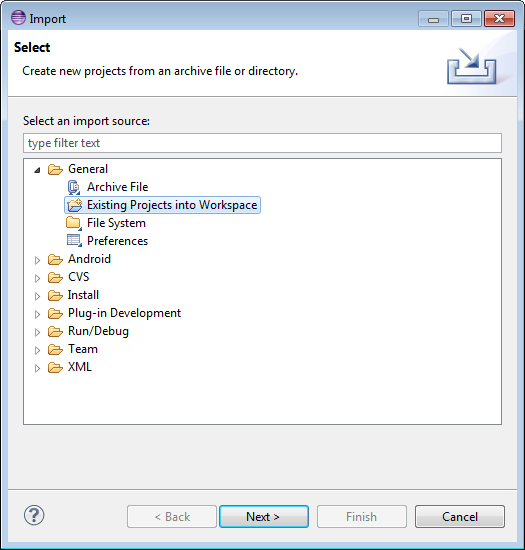
In the main panel select General –> Existing Projects into Workspace and press Next button:
In the Select root directory field locate your OpenCV package folder. Eclipse should automatically locate OpenCV library and samples:
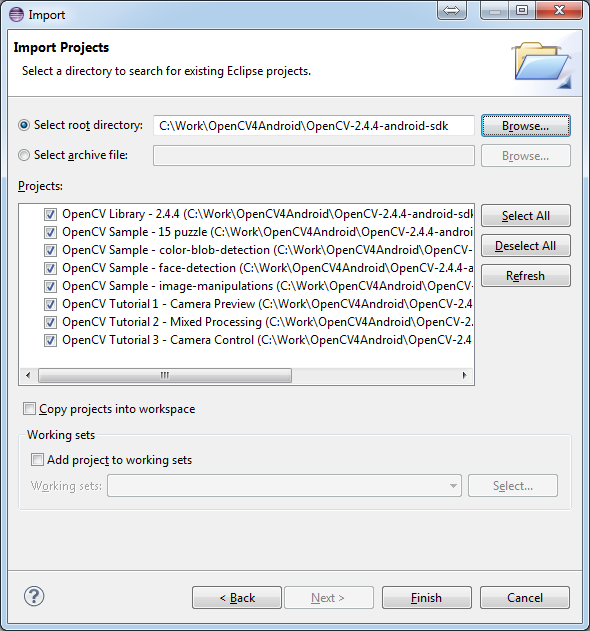
After clicking Finish button Eclipse will load all selected projects into workspace, and you have to wait some time while it is building OpenCV samples. Just give a minute to Eclipse to complete initialization.  Once Eclipse completes build you will have the clean workspace without any build errors: 
At this point you should be able to build and run the samples. Keep in mind, that face-detection and Tutorial 2 - Mixed Processing include some native code and require Android NDK and NDK/CDT plugin for Eclipse to build working applications. If you haven't installed these tools, see the corresponding section of Introduction into Android Development.
warning
Please consider that some samples use Android Java Camera API, which is accessible with an AVD.
Well, running samples from Eclipse is very simple:
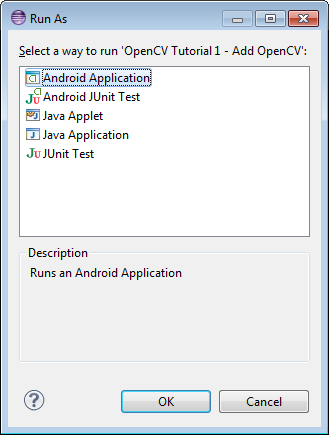
Select the Android Application option and click OK button. Eclipse will install and run the sample.
Chances are that on the first launch you will not have the OpenCV Manager package installed. In this case you will see the following message:
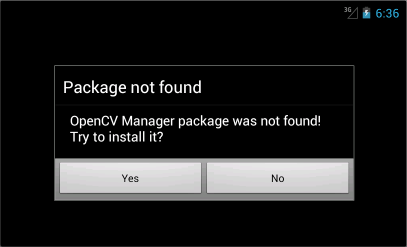
To get rid of the message you will need to install OpenCV Manager and the appropriate OpenCV binary pack. Simply tap Yes if you have Google Play Market installed on your device/emulator. It will redirect you to the corresponding page on Google Play Market.
If you have no access to the Market, which is often the case with emulators - you will need to install the packages from OpenCV4Android SDK folder manually. See Manager Selection for details.
Manager Selection for details.When done, you will be able to run OpenCV samples on your device/emulator seamlessly.
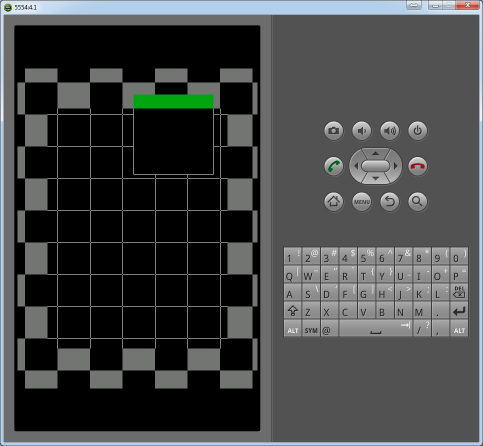
Here is Sample - image-manipulations sample, running on top of stock camera-preview of the emulator.
Now, when you have your instance of OpenCV4Adroid SDK set up and configured, you may want to proceed to using OpenCV in your own application. You can learn how to do that in a separate Android Development with OpenCV tutorial.
 1.8.3
1.8.3