Comments in WordPress
Languages: English • 한국어 • におけるコメント 日本語 (Add your language)
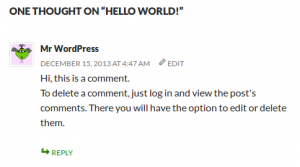
Comments allow your website's visitors to have a discussion with you and each other. When you activate comments on a Page or post, WordPress inserts several text boxes after your content where users can submit their comments. Once you approve a comment, it appears underneath your content. Whether you want to customize how you receive comments or tweak how your site displays comments, WordPress provides a thorough set of options to build a community from the visitors to your site.
Contents
Discussion Settings
Before you enable comments on posts or Page, reviewing the options under Settings > Discussion can help make your life as a moderator easier. Settings > Discussion contains a list of options that change how WordPress processes comments. Experimenting with these settings can help you find a balance between restricting comments to reduce the amount of spam or less-relevant comments you receive and encouraging your users to actively participate on your site.
Notification
- Attempt to notify any blogs linked to from the article: This option will enable your site to automatically notify the sites you linked to that you have linked to them. They can then choose to tell their users that another site linked to them through a trackback or pingback.
- Allow link notifications from other blogs (pingbacks and trackbacks.): This is similar to the previous option, only your position is reversed. Instead of allowing your site to notify other sites, you are allowing other sites to notify your site. If you enable this option, pingbacks and trackbacks are managed in a similar way to comments.
Commenter Rules
- Allow people to post comments on new articles: This will turn comments on for all future articles. The easiest way to prevent comment spam is to not allow any comments. If you don’t need comments, you can disable them by default by unchecking this option.
- Comment author must fill out name and e-mail: This prevents people from leaving anonymous comments (however, people could still use a fake name and e-mail address).
- Users must be registered and logged in to comment: This option will only allow registered users of your site to post comments.
- Automatically close comments on articles older than _____ days: Closing comments on posts that are no longer active is a good way to limit spam comments. This option will allow your site to do this automatically.
Comment Display
- Enable threaded (nested) comments _____ levels deep: Enabling threaded comments allows your users to reply to one another. A reply to a comment is shown "nested" underneath the original comments. You can limit how many levels (a reply to a reply) of replies your site will allow by changing the number of levels here as well.
- Break comments into Pages with _____top level comments per Page and the _____ Page displayed by default: This option changes how your comments are displayed. You can set how many comments you see per Page and if oldest or newest comments are displayed first.
- Comments should be displayed with the _____ comments at the top of each Page: Set if you want newer or older comments at the top of each Page.
Comment Administration
- Email me whenever … Anyone posts a comment and/or A comment is held for moderation: If you don't check your site often, this feature can help you stay up to date on your comments.
- Comment must be manually approved: If you don’t check this option, comments can appear on your site without your permission. This will not only allow an influx of spam comments, but they will appear on your posts and pages immediately after being submitted. Check this box to maintain the maximum amount of control over your site's comments.
- Comment author must have a previously approved comment: This option will allow you to cut down on the number of comments you have to approve. Once you approve one comment by an author, their future comments will be automatically approved.
Comment Spam
- Hold a comment in the queue if it contains _____ links: Spam comments are designed to get users to click on links in order to drive traffic to other sites. As a result, many spam comments contain multiple links. Setting this option to hold all comments that contain 2 or more links will help catch more spam.
- Comment Moderation and Comment Blacklist: You can experiment with these text boxes to catch spam that contains certain words or is posted from a particular IP address. Comments caught through blacklisting are not deleted, but instead moved to your spam folder.
Avatars
The settings under "Avatars" control the images your site displays next to comments. For an introduction to Gravatars, read the WordPress Lesson about How to Use Gravatars in WordPress.
Comment Spam
Because spam is pervasive on the Web, some of the comments you receive will most likely be spam. However, WordPress developers and administrators have already developed a number of successful strategies to help you prevent spam comments from appearing on your site. In addition to experimenting with different options in Settings > Discussion, you can install a WordPress Plugin like Akismet or make other changes to help you keep spam comments under control.
Enabling Comments on Your Site
Once you have decided on your discussion options, you are ready to enable comments. If you chose not to enable comments on all articles automatically, you can turn on comments for a specific post or Page in several ways.
Turning on Comments for a Single Post or Page
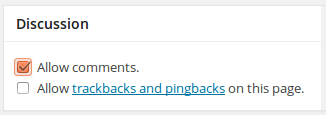
After navigating to the editing screen for the post or Page you wish to add comments to, find the “Discussion” box and check “Allow Comments.” (If you do not see the “Discussion” box on the edit Page, click “Screen Options” in the upper right corner of the browser window. Make sure the box next to “Discussion” is checked.) Save your changes by clicking “Publish”, “Save Draft” or “Update."
Turning on Comments from the Posts or Pages Screen
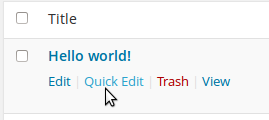
Navigate to the Posts or Pages screen. In the list of Pages or posts, find the one you want and hover your cursor over the title of the post. You will see several links appear underneath the title. Click "Quick Edit" and check “Allow Comments.” Click “Update” to turn comments on for that post.
Turning on Comments for Multiple Posts or Pages
From the Posts/Pages screen, check the boxes next to the posts or Pages on which you want to enable comments. Select "Edit" from the "Bulk Edit" Dropdown box and click Apply. Then, select "Allow" next in the Comments dropdown box and finish by clicking "update."
Managing Incoming Comments
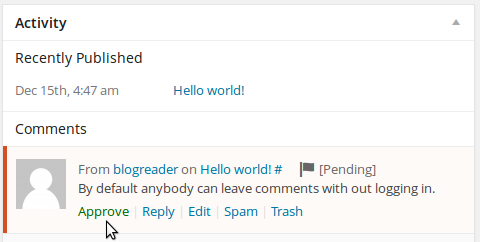
Once you start receiving comments on your site, you can check the status of comments quickly by looking at the dashboard, the admin bar, or the left navigation menu. When you log in, the dashboard's "Activity" box will show you the status of your comments. Hover over a comment to see your moderation options. From "Activity - Comments" you can approve, reply, edit, mark as spam, or trash comments. Alternatively, you can look to see if there is a number next to the comment bubble in the admin bar or "Comments" in the left navigation. This number represents how many pending comments require your attention.
Moderating Comments with the Comment Screen
WordPress makes moderating your users' comments a simple process. The Comments Screen lays out the basic information about each comment and lets you decide what to do with it.
The Comments screen is divided into three columns: Author, Comment and In Response To. Each of these columns provide you with a different category of information about a particular comment.
Number Key
- Commenter Gravatar
- Commenter Name
- Commenter Website URL
- Commenter Email Address
- Commenter IP Address
- Time and Date Comment was submitted
- Comment Text
- Comment Moderation Options. You can approve, spam or trash a comment with one click. Reply, Quick Edit or Edit will open up a new screen for you to write a reply to the comment or edit the comment.
- Post Name
- Number of Comments on the Post, Link to View Post
Bulk Edit Comments
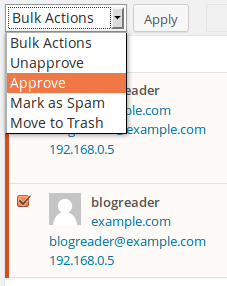
Like the posts and Pages screens, the Comments screen supplies a Bulk Action dropdown box. Select the comments you want to edit, and then select Unapprove, Approve, Mark as Spam, or Move to Trash from the dropdown and click "Apply."
