
iOS QuickStart
From Xojo Documentation
Welcome to Xojo the best cross-platform you've never heard of. With Xojo you can make apps for Windows, macOS, Linux, Raspberry Pi, iOS and the web. Xojo is made up of a rich set of graphical user interface objects, a modern object-oriented language, an integrated debugger, and a multi-platform compiler. Together they make up the Xojo Integrated Development Environment or IDE.
With the IDE, you can build your app’s interface simply by dragging and dropping interface objects into the app’s layout views. In this QuickStart, you will see how easy it is. Xojo provides you with all the tools you need to build virtually any app you can imagine.
This QuickStart is for people who are new to programming and new to Xojo. It will give you a gentle introduction to the Xojo development environment and lead you through the development of a working iOS app (a simple web browser). It should take you about 15 minutes to complete this QuickStart. If you are short on time, you can also watch the 5-minute video or download the finished project:
Contents
Getting Started
If you haven’t done so already, now is the time to start Xojo.
- Double-click the Xojo app icon to start Xojo. After it finishes loading, the Project Chooser window appears.

- Xojo lets you build several different types of apps (Desktop, Web, Console and iOS). For this QuickStart, you are building an iOS app, so click on iOS. You have to be running Xojo on a Mac in order to create iOS projects.
- You should now see three fields that need values: Application Name, Company Name and Application Identifier.
- Application Name is the name of your app. This will be the filename of the actual app file that gets created.
- Company Name is the name of your company. You may choose to leave this blank.
- Application Identifier is a unique identifier for this app. It will automatically populate using what you enter for the Application and Company Names, but you can also change it to whatever you want.
- Enter "SimpleBrowser" as the Application Name. You can leave Company Name as it is or change it.
- Click OK to open the main Xojo window (called the Workspace), where you will begin designing your app.

Workspace
Xojo opens the Workspace with the default view for your app automatically selected in the Navigator and displayed in the Layout Editor.

Navigator: The area on the top left shows you all the items in your project. By default you can see View1 (which is selected), the App object and the iPhone and iPad screen items. You use the Navigator to navigate to the various items within your project.
Layout Editor: The center area is the Layout Editor. You use the Layout Editor to design the user interface for the views in your app. It shows the view and previews how it looks when the app runs. In this illustration, the view is blank because you haven't yet added any user interface controls from the Library.
Library: The area on the right is the Library and shows the controls and interface elements that you can add to a view or to the project. You design the view by dragging controls from the Library to the view. You can also add a control to the view by double-clicking it. You can change how the controls display in the Library by clicking the small gear icon and choosing a different setting.
Note: If the Library is not visible, click the Library button on the toolbar to show it.
Inspector: Not shown in the above illustration is the Inspector, which allows you to see and change the properties for the selected control. This area of the Workspace window is shared with the Library. You can show the Inspector by clicking the Inspector button on the toolbar. The Inspector shows information about the selected item in the Navigator or Editor. The contents of the Inspector changes as you click on different items. You change an Inspector value by entering a new value in the field to the right of the field label.
Making the Simple Browser App
Overview
The best way to quickly learn how to use Xojo is to create an app. For this QuickStart, you will create a simple web browser.

A Xojo app consists of a collection of objects, called classes. Nearly everything in Xojo is a class, including your views and its controls. In the SimpleBrowser project, you use the default View class to create your view and you add controls (user interface classes) to the view to create the design.
The app uses three controls:
- Text Field: A Text Field control is used to enter text. In this project, the URL to display is typed into a Text Field at the top of the view.
- Button: A Button is used to trigger an action. The user clicks the button to load the web page at the URL into the HTML Viewer.
- HTML Viewer: An HTML Viewer is used to display HTML (a web page). In this project, it is what displays the web site at the URL.
The next sections walk you through creating the user interface and adding the necessary code to make the app work.
Building the User Interface
You should have Xojo running and View1 open in the Layout Editor. Now you are ready to start adding controls to the view.
- Starting with Text Field: In the Library, click on the Text Field icon and drag it to the top-left corner of the view in the Layout Editor. As you get close to the edges of the view, you will see alignment indicators that help you position the control.
- Next, add the Button: In the Library, click on the Button icon and drag it to the top-right corner of the view.
- The final control is the HTML Viewer: Drag the HTML Viewer icon to the remaining empty area on the view. Resize this control (using the selection handles so that it fills most of the view below the Text Field and Button) and use the locking guides that appear to help align it to the edges.
- The final step is to resize the Text Field so that it is larger. Click on it to show the selection handles. Click the center-right handle and drag it to the right until the alignment guides tell you it is close enough to the Button.
Your finished view layout should look like this:

Setting the Properties
What is a Property?
A property is a value of a class. Changing property values allows you to change the behavior of the class. For this project, you want to change various properties for the view and the controls you added. Some of the things you need to do are:
- Rename all controls (and the view) so that they describe their behavior and are easy to refer to in code.
- Add a Caption to the Button.
- Set Auto-Layout properties so that the controls resize properly for different sized iOS devices.
Inspector
The Inspector is used to change view and control properties. It shares the same area on the right of the Workspace as the Library. In order to show the Inspector, click the Inspector button on the toolbar or press ⌘-I (Ctrl+I on Windows and Linux).
Setting the Properties for the View
If you haven’t already, display the Inspector by clicking the Inspector button on the toolbar and select View1 in the Navigator. You need to change the Name, NavigationBarVisible and Title properties.

- First, in the Layout Editor, click on the iPhone border of the view to select it. The Inspector now shows the properties for the view.
- In the Name field (located in the ID group), change the name from "View1" to "BrowserView". Press Return to see the name change in the Navigator.
- In the NavigationBarVisible field, set the switch to ON. This displays the Navigation Bar for the view. When you do this, the Text Field and Button may disappear as they are covered by the Navigation Bar. You can fix this in the next sections.
- In the Title field, change the name to “SimpleBrowser”. Press Return and you will see the name change in the Navigation Bar.
Setting the Properties for the Text Field
The Text Field is where your user enters the URL they want to see in the browser. You want to change the following properties in the Inspector: Name, KeyboardType, PlaceHolder, Text and Auto-Layout.

- In the Navigator, select the TextField1 control on BrowserView. The Inspector changes to show the Text Field properties.
- In the Name field, change the name from "TextField1" to "URLField". Press Return to see the name change in the Navigator.
- In the KeyboardType field, select the value "URL" from the popup menu. This displays the special URL keyboard on the iOS device when the user taps in the field.
- In the Text field, change the text from "Untitled" to "https://www.wikipedia.org".
If you did not align the Text Field using the layout guides, you may need to make changes to Auto-Layout so that the Text Field gets larger or smaller as the size of the view changes when different devices are used.
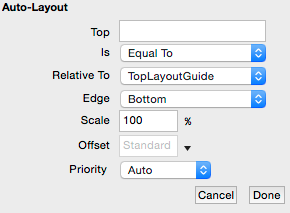
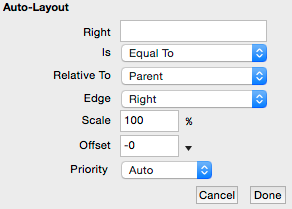
- In the Auto-Layout section you will see a list of rules that control how the Text Field appears on the view. In particular, you want to change the Top rule so that it indicates to put the Text Field at a standard gap below the TopLayoutGuide. To do this, click on the "Top" rule and then click the Edit button.
- Set the values for the Auto-Layout rule as below and click Done:


Setting the Properties for the Button
When running the app, clicking the button to display the web page. You need to change these properties: Name, Caption and Auto-Layout.

- On BrowserView, select the Button1 control. The Inspector changes to show the Button properties.
- In the Name field, change the name from "Button1" to "ShowButton". Press Return to see the name change in the Navigator.
- Give your button a caption by changing the Caption field from "Untitled" to "Show".
If you did not align the Button using the layout guides, you may need to make changes to Auto-Layout so that the Button stays below the navigation bar and stays attached to the right side of the view when the device size changes.
- In the Auto-Layout section you will see a list of rules that control how the Button appears on the view. In particular, you want to change the Top rule so that it aligns the button with the top of the Text Field and the Right rule to ensure the Button stays on the right side of the view.
- First click on the "Top" rule and then click the Edit button. If the Top rule is not displayed, you can add it using the "+" button at the bottom of the Auto-Layout area. Set the values for the Auto-Layout rule as below and click Done:
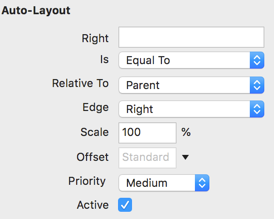
- Lastly, click on the Right rule, click Edit, set its values as below and click Done:


Setting the Properties for the HTML Viewer
The last user interface change you need to make is for the HTML Viewer. Here you need to change these properties: Name and Auto-Layout.

- On BrowserView, select the HTMLViewer1 control. The Inspector changes to show the HTML Viewer properties.
- In the Name field, change the name from "HTMLViewer1" to "WebViewer". Press Return to see the name change in the Navigator.
Finally, you may need to change Auto-Layout so that the HTML Viewer displays using the rest of the area in the View. Specifically you will change these Auto-Layout rules: Top, Left and Right (You may not have to change all rules if you used the layout guides to position the HTML Viewer).
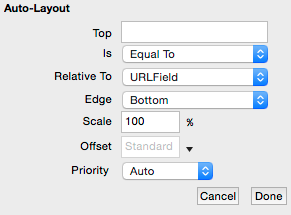
- Select the Top rule, click Edit and set is values as below:
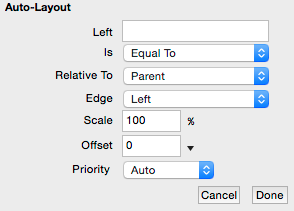
- Select the Left rule, click Edit and set its values as below:
- Select the Right rule, click Edit and set its values as below:


Remember, if any rule you want to edit is not in the list of rules, you can add it by using the "+" button at the bottom of the Auto-Layout section of the Inspector.
Adding Code
Your app is almost complete. Now it is time to add the code that will tell the HTML Viewer (called WebViewer) the web page to display. Xojo uses an object-oriented programming language which is quite easy to learn. You need only one line of code to finish your project!
The steps you need to do are:
- Figure out when your user clicks the ShowButton, called "Show" on the view.
- Get the URL that your user entered in URLField.
- Have WebViewer display the URL.
Follow these steps to add the code:
- On BrowserView, double-click the ShowButton control, labelled "Show".
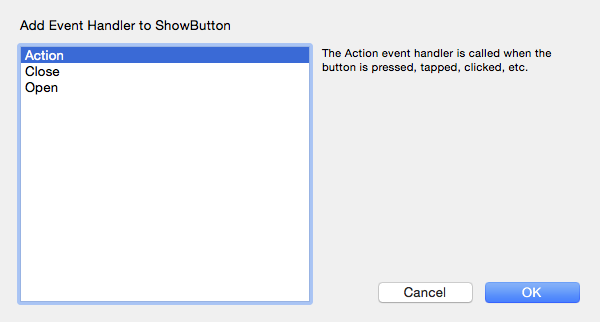
- The Add Event Handler window appears. Event Handlers occur when the user initiates an action. In this case, when a user clicks on a Button, your app runs any code in its Action event handler. This means you want to add your code to the Action event handler, so select Action from the Event Handler list and click OK. Notice the Navigator updates to show the Action event underneath the ShowButton control and the Code Editor displays. This step solves your first problem of when to know when the user clicks on the ShowButton.
- Now you need to get the URL that the user typed. The value that a user types into a Text Field is stored in the Text property of the Text Field. You access the Text property like this <rbcode>URLField.Text</rbcode>
- The last step is to have WebViewer display the web page. This is done by calling the LoadURL method of the HTML Viewer control and sending it the URL that the user typed. Your code now looks like this:<rbcode>WebViewer.LoadURL(URLField.Text)</rbcode>
- Go ahead and add this code to the Code Editor. Start by clicking in the white space below the Action() event name and then type this code (do type it rather than copy and pasting it): <rbcode>WebViewer.LoadURL(URLField.Text)</rbcode>

That's it! Your first app is complete.
Running the App
Before you go any further, you should save your work:
- Save the project by choosing File ↠ Save As.
- In the File Dialog, name the project "SimpleBrowser" and click Save.
Running Your Project
Now you can test your finished app:
- In order to run an iOS project, you first need to download and install Xcode in order to get the iOS Simulator app that is used to run iOS apps on a Mac. You can download Xcode for free from the Mac App Store. After you have downloaded and installed Xcode, you need to run it one time to accept its License Agreement. After doing this, you can quit Xcode as you will not need it.
- Click the Run button in Xojo to run the app in the iOS Simulator.
- Type a (secure, https) URL of your choice (or use the default) and click the "Show" button.
- You will see the web page.
- When you are finished experimenting with the Simple Browser app, you can quit the iOS Simulator to return to Xojo.
If you want to use non-secure (standard http URLs) with iOS 9 or later, you will need to configure iOS App Transport Security as described in this blog post. Or refer to the iOSHTMLViewer page for additional information.
What's Next
This QuickStart has introduced you to Xojo and showed you how to make a simple app.
Next, you should view the the User Guide and iOS Language Reference.