Colors
From Xojo Documentation
Contents
Colors are specified using the Color data type. There are several ways to define a color, using several different formats including RGB, HSV and CMY.
RGB
RGB (red, green, blue) is the most common way to specify a color. With RGB you specify the red, green and blue components of a color using an Integer ranging from 0 to 255. This can be done using the RGB method or a hexadecimal color literal.
For example, to create a red color using the RGB method:
You can also specific a Color using a color literal, which consists of the characters "&c" followed by the hexadecimal value RGB color in this format: &cRRGGBB. This specifies red using a color literal:
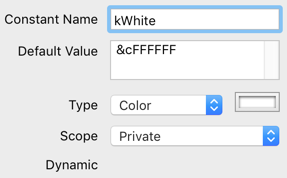
You can also use these color literals to create constants on a project item.
HSV
The HSV method specifies a color using the hue, saturation and value which are each represented by Doubles between 0 and 1.
CMY
The CMY method specifies a color using the cyan, magenta and yellow components of the color, also as Double values between 0 and 1. CMY is a global function s you code it like this:
Color Constants
The Color data type has several constants for commonly used colors. These constants are: Black, Blue, Brown, Clear, Cyan, DarkGray, Gray, Green, LightGray, Magenta, Orange, Purple, Red, Teal, White and Yellow. This specifies red using the constant:
Inspector
When using the Inspector with Color properties you will see a small "color box" next to the color property. You can click it to display the OS color chooser to choose a color for the property.
Transparency
Transparency indicates how much of the background shows through the color. When you use any of the techniques described above, the color value is not transparent at all and is referred to as opaque. If you want to have a color with transparency, use the RGBA or HSVA methods which have an additional parameter where you can supply an alpha value from 0, the default of opaque, to 255 which is fully transparent. The alpha parameter is optional with the CMY method. Here are examples:
Dim c2 As Color = Color.HSVA(0.8, 0.5, 0.75, 50)
Dim c3 As Color = Color.CMY(0.8, 0.5, 0.75, 50)
For the &c color literal, you can specify the transparency as an additional hexadecimal value. This would be a fully transparent red color:
Usage
All of the above techniques return a Color that you can then use with various color properties available on classes.
For example, in Paint event of a Canvas the ForeColor property of the Graphics object is set to blue-is so the text drawn will be in that color:
g.DrawString("Hello World", 50, 50)
Transparency
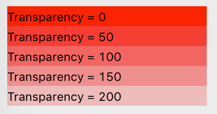
This code draws sample color patches in a Canvas at varying levels of transparency. The code is in the Paint event:
For i As Integer = 0 To 4
red = Color.RGBA(255, 0, 0, i * 50)
g.ForeColor = red
g.FillRect(0, i * 20, 200, 20)
g.ForeColor = &c000000
g.DrawString("Transparency = " + Str(i * 50), 0, i * 20 + 15)
Next
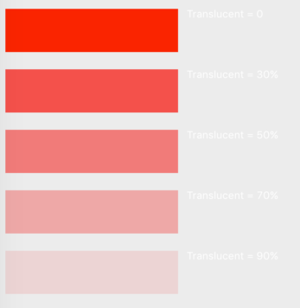
This code code (in the Paint event of a Canvas) uses the CMY function to draw sample color patches in a Canvas with varying levels of transparency:
g.DrawRect(0, 0, 200, 50)
g.FillRect(0, 0, 200, 50)
g.ForeColor = CMY(0.0, 0.0, 0.0)
g.DrawString("Translucent = 0", 210, 10)
g.ForeColor = CMY(0.0, 1.0, 1.0, 76) // transparency = 0.3
g.FillRect(0, 70, 200, 50)
g.ForeColor = CMY(0.0, 0.0, 0.0)
g.DrawString("Translucent = 30%", 210, 80)
g.ForeColor = CMY(0.0, 1.0, 1.0, 127) // transparency = 0.5
g.FillRect(0, 140, 200, 50)
g.ForeColor = CMY(0.0, 0.0, 0.0, 0)
g.DrawString("Translucent = 50%", 210, 150)
g.ForeColor = CMY(0.0, 1.0, 1.0, 178) // transparency = 0.7
g.FillRect(0, 210, 200, 50)
g.ForeColor = CMY(0.0, 0.0, 0.0, 0)
g.DrawString("Translucent = 70%", 210, 220)
g.ForeColor = CMY(0.0, 1.0, 1.0, 229) // transparency = 0.9
g.FillRect(0, 280, 200, 50)
g.ForeColor = CMY(0.0, 0.0, 0.0, 0)
g.DrawString("Translucent = 90%", 210, 290)
Selecting a Color with the Color Picker
If you want to let the user choose a color at runtime you can use the Color Picker by calling the SelectColor method. The following code displays the Color Picker:
Dim b As Boolean
b = SelectColor(c, "Choose a color")
If b Then // user chose a color
// do something with the color (c)
End If
If the user cancels out of the Color Picker dialog box, the boolean variable, b, is False; otherwise, the selected color is returned in the color object parameter, c which you can then use to assign to a color property.
In the macOS color pickers, you click on a color and a sample of the color appears in the patch area at the top of the screen. When you click OK, the RGB values appear.
The Windows version of the Color Picker uses only one format. You can either select one of the predefined colors or click the Define Custom Colors button to display the “advanced” color picker, which depicts colors on a continuum and lets you specify the color using either the RGB or HSV models. Select a color by clicking on a point in the color spectrum or enter values in the RGB or HSV areas. Click Add to Custom Colors to add the custom color to one of the Custom Color samples on the left side of this dialog.
In the Code Editor you can also right-click and select "Insert Color" to display the Color Picker so that you can choose a color. When you choose a color, the literal color hex value is placed at the current position of the cursor in the Code Editor.
See Also
Color data type; SelectColor function; UserGuide:Framework topic


