
Deploy to Device With Free Xcode Provisioning Profile
From Xojo Documentation
Starting with Xcode 7 and OS X 10.11 El Capitan, Apple now provides a free provisioning profile you can use to deploy your apps to an iOS device without requiring a paid Apple Developer membership.
Setting this up is a bit of work and you'll have to do it for each and every app you want to deploy on the device.
Requirements
You will need the following in order to use the free provisioning profile:
- Xcode 7 or later as required by Xojo
- An Apple ID that is not associated to an Apple Developer account
Xcode Configuration
- If you do not have an Apple ID you can use, you can create a new one at appleid.apple.com.
- Start Xcode and open Preferences (Xcode menu -> Preferences).
- Select the Accounts tab and click the "+" button to add your Apple ID. This adds a Team Name which should be selected by default.
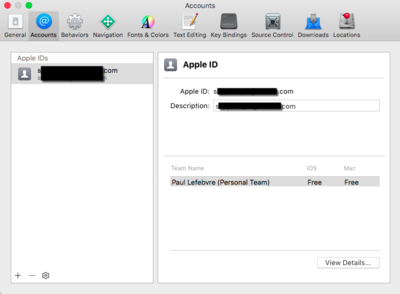
- Click View Details for the selected Team Name. In the dialog that appears, click the Create button next to iOS Development. This creates the Signing Identity. When it has finished, click the Done button.
- Plug in the iOS device (via USB) that you will deploy you app to.
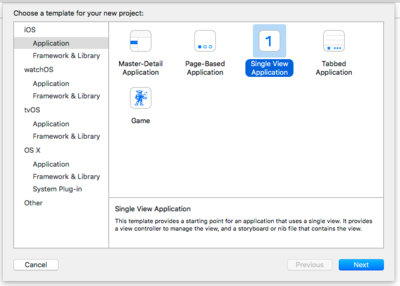
- Create a new Xcode project: Choose File->New Project and select "Single View Application" in the dialog and the click the Next button.
- For the Product Name, enter the name you will use (or have used) for your Xojo app.
- For the Organization identifier, enter the first part of the Bundle Identifier (i.e. com.example). Click the Next button.
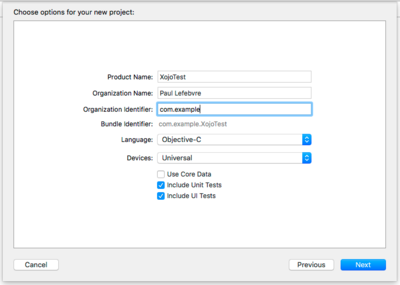
- Select a folder to save the project. You will want to uncheck the Source Control option since you're not really going to use this project for anything. Click the Create button to create the project.
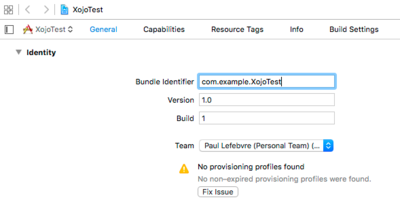
- In the General section that appears, verify that the Bundle Identifier exactly matches what you will use (or have used) for your Xojo app. The next steps will only create a provisioning profile for a single app, so this Bundle Identifier is important. And you'll need to follow steps 5 and later for each new app you want to deploy.
- In the Team drop-down, make sure your Apple ID is selected.
- Check the Project Name gadget in the toolbar at the top to make sure that the iOS device you have plugged in is selected. If it is not, click the gadget and select your device from the list.
- Now click the Fix Issue button that is in the General area.


This will send the profile over to the device. You are now done with this Xcode project, so you can close it. Keep Xcode running as you'll want to use its Devices window to transfer the app you build with Xojo to the device.
You will have to repeat steps 5 to 13 for each new app that you want to deploy to the device in this manner.
Xojo Setup
With Xcode configured, you can now configure you Xojo project to use the Bundle Identifier and Team.
- Start Xojo and open your iOS project (or create a new one).
- In the iOS Build Settings, enter the Bundle Identifier that you used in the Xcode project. It must match exactly.
- In the Team drop-down, select your Apple ID you used with the Xcode project.
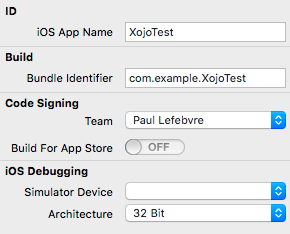
- Click Build to build the app.

Deploy to Device
You can now transfer the built app to your device using the Xcode Devices window:
- Ensure your iOS device is plugged into the Mac via USB.
- If the Devices window is not displayed, select it from the Window menu.
- Click on the iOS device in the sidebar.
- Click the "+" button (In the Installed Apps section) and select the app you previously built (or drag the app into the Installed Apps section). This immediately installs it on the iOS device.
- On the device, tap on the app to launch it.
Troubleshooting
- In order to run the app on the device, you may have to tell the device to trust the "developer". To do so, go to Settings->General and scroll to Profile (iOS 10 and earlier). There you should see your Apple ID, which you should tap. If you see a message about “Trust” and your Apple ID, then you can click that button and click Trust in the dialog to allow the app to run.
- If you are unable to Run/Build from Xojo, check your Xcode Command Lines Tools setting. Start Xcode, open Preferences and click the Locations tab. Check the Command Lines Tools setting to make sure it has a selection that matches the version of Xcode you have installed.
This information is based on this tutorial.