Web File Uploader
From Xojo Documentation
Contents
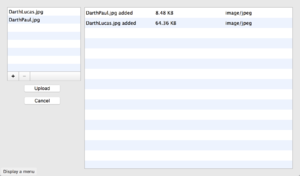
The File Uploader control allows users to make a list of files to upload to the web server. File Uploader has its own user interface that cannot be changed. The user can add files to the upload list one at a time or can select multiple files at once. To upload the files, you call the Upload method, usually from an accompanying Button.
Uploaded files larger than 256K are written directly to the temporary folder if it is writeable. The file is kept in memory if the temporary folder is not writeable or the file is 256K or smaller. For files kept in memory, be aware that the maximum available RAM you have on your web server will limit the size of files that can be uploaded.
Below is a list of commonly used events, properties and methods. For the complete list, refer to WebFileUploader in the Language Reference.
Events
- Called when the files have finished uploading. The event provides an array of the uploaded files for you to loop through and process.
Properties
- The number of files that were uploaded.
- When true, the user can add multiple files at one time to the File Uploader control.
Methods
- Call this method to start uploading the files that were added to the control.
Uploaded File
When the UploadComplete event is called, the parameter contains an array of the uploaded files. You can loop through these files to read them in or so save them to permanent locations.
Below are common properties and methods. Refer to WebUploadedFile in the Language Reference for the complete list.
Properties
- The contents of the file.
- A Folder Item that points to the file, if it was uploaded to the temporary folder.
- The name of the uploaded file.
Methods
- Use this method to see the uploaded file to a permanent location.
Usage
This code in the Action event handler for a Button starts uploading the files that have been added to the File Uploader:
After the upload has completed, you can process the files in the UploadComplete event handler. This code saves the uploaded files to the Documents folder:
Var f As FolderItem
For Each file As WebUploadedFile In Files
f = SpecialFolder.Documents.Child(file.Name)
Try
bs = BinaryStream.Create(f, True)
bs.Write(file.Data)
bs.Close
Catch e As IOException
// Error, skip file
Continue
End Try
Next
However, it is simpler and uses less memory to just call the Save method of the uploaded file to save it to a permanent location:
For Each file As WebUploadedFile In Files
saveFile = SpecialFolder.Documents.Child(file.Name)
Try
file.Save(saveFile)
Catch e As IOException
// File Error, skip file
Continue
End Try
Next
Example Project
The WebFileUploader example shows you how to let the user choose files to add and then upload them.
Examples/Web/Controls/WebFileUploader
See Also
WebFileUploader, WebUploadedFile classes; UserGuide:Web UI, UserGuide:Web Files topics

