iOS Device Deployment
From Xojo Documentation
Contents
This topic describes the steps to deploy your iOS apps onto iOS devices for testing.
Getting Started
In order to deploy your app to an iOS device for testing, you need to be a member of the Apple Developer Program. There are two main steps to this. First, you need to create your certificates and provisioning profiles which are required to deploy onto a device. Then you need to install the profile onto the device. For these steps you will need to use Xcode. Some steps can also be done using the Apple Configurator tool. Generally speaking, you only need to do these steps once. But you may have to revisit them if you add devices or are setting up another Mac for deployment testing. If you run into trouble, refer to the Troubleshooting section.
- Start Xcode and open Preferences.
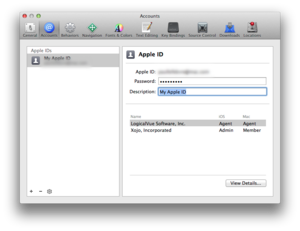
- Select Accounts.

- Add the Apple ID you used for your iOS developer account.
- Select the account for the Apple ID.
- Xcode 8.2 or earlier:
- Click the "View Details" button.
- Click the "Create" button next to "iOS Development" to create the necessary certificates.
- Click "Done" to close the window.
- Xcode 8.3.x or Xcode 9.x:
- Click "Manage Certificates".
- Click the "+" button in the lower right and select "iOS Development" to create the necessary certificates.
- Click "Done" to close the window.
Configuring Provisioning Profile
Now you need to add any devices on which you will do testing.
- Log into the Apple Developer Portal at https://developer.apple.com/account and select "Certificates, Identifiers & Profiles".

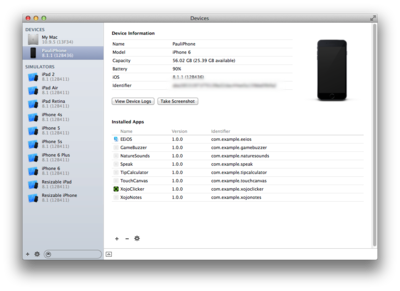
- Select "iOS, tvOS, watchOS" In the popup menu on the left. In the Devices section, click the appropriate device to add (iPhone, iPad or iPod Touch). Click on the "+" button to add a new device. You'll need to supply a name and the UDID (Universal Device Identifier) for any devices you want to add (and thus deploy to). You can get the UDID by using the Xcode Devices window (Windows ↠ Devices). This UDID is displayed in the "Identifier" field when you select your device in the list. From this window you can copy the value to paste it on the Add Device screen.

If you don't already have one, you will also need to create an App ID. You may want to start with a wildcard App ID first:
- Click on App IDs in the Identifiers section.
- Click "+" to add an ID.
- Enter a name such as "Wildcard App ID".
- Choose "Wildcard App ID" in the "App ID Suffix" section and enter a reverse domain ID, such as "com.mycompany.*".
- Click Continue and then Register.
This ID must match what you use as the Bundle Identifier for your Xojo iOS app (located in iOS Build Settings). For example, if you use "com.mycompany.*" as a wildcard App ID, then the Bundle Identifier for your Xojo iOS app should be something like "com.mycompany.myapp".
With the devices added and an App ID created, you can now create the Provisioning Profile:
- In the Dev Portal, select Development in the Provisioning Profiles section.
- Click "+" to add a provisioning profile.
- Select "iOS App Development" and then Continue.
- Choose the App ID and then Continue.
- Select the Certificate and then Continue.
- Select the Devices and then Continue.
- Enter a name for the profile (it's for your reference and can be anything) and then Continue.
- Click the Download button to download and note the location of the downloaded file.
- Click Done.
Add Provisioning Profile to Xcode and Devices
You first need to install the Provisioning Profile to Xcode which puts it in a location that Xojo can also use:
- In Xcode, go back to the Preferences, select Accounts, and highlight your account.
- Xcode 8.2 or earlier
- Click "View Details"
- In the Provisioning Profiles section you should see the profile you created above. Click Download.
- Click "Done".
- Xcode 8.3.x
- Click "Download All Profiles".
- Xcode 9.x
- Click "Download Manual Profiles".
You can now copy the Provisioning Profile file you previously downloaded to the device:
- Plug in the device via USB.
- Back in Xcode, select Windows ↠ Devices (or Devices and Simulators)

- Right-click on the device and select "Show Provisioning Profiles".

- In the dialog, click "+" and select the profile file that you previously downloaded from the iOS Dev Portal.
- Click Done.
Follow the Xcode instructions to unlock the device and click "Trust" in order to allow the provisioning profile to be added to it.
You may need to close and re-open Xcode in order for the Provisioning Profile to appear.
If you would rather use Apple Configurator instead of Xcode, you can click the "Install Profiles" button on the Prepare Settings screen to add the profile you downloaded and then click the Prepare button.
Build the App
Now that your Mac and iOS device are configured with the provisioning profile, you can now build your iOS app using Xojo. If you had Xojo open during this process, you should close and re-launch it so it can correctly identify the newly created Provisioning Profile.
- Open or create an iOS project using Xojo. Try one of the included examples, such as XojoDoodle (iOS/Apps/XojoDoodle).
- Make sure the Bundle Identifier (in iOS Build Settings) matches the App ID you included in your Provisioning Profile.
- Click on iOS Build Settings and in the Code Signing section of the Inspector select your Team. This ought to match the team for your Apple ID.
- Leave "Build for App Store" OFF.
- Click the Build button in Xojo to build the app. This code-signs your apps and compiles it for ARM using LLVM. This may take a little longer than running in the Simulator.
When your app is built you will get the app bundle (this is what gets installed on the device) and a .dSYM file (the debugging symbols).
It is important that you retain both of these files for builds you deploy. The dSYM file is used for analyzing crash reports that you may receive from your users and without it, it will be difficult to determine the cause of the crash. For more information, refer to the Apple document Understanding and Analyzing iOS Application Crash Reports.
If you submit device crash logs in a Xojo Feedback case, you will also need to include the dSYM file in order for us to interpret them.
Install the App on the Device
Now you are ready to install the app onto your device. You can do this using the Xcode Devices window or the Apple Configurator app.
Using Xcode Devices Window
- Start Xcode.
- Ensure your iOS device is plugged into the Mac via USB.
- Open the Devices window.
- Xcode 8.x: Select Devices from the Window menu.
- Xcode 9.x or later: Select Devices and Simulators from the Window menu.
- Click on the iOS device in the sidebar.

- Click the "+" button (In the Installed Apps section) and select the app you previously built (or drag the app into the Installed Apps section). This immediately installs it on the iOS device.
- On the device, tap on the app to launch it.
Using Apple Configurator
Apple Configurator 2 is a free download from the Mac App Store. This tool is primarily used for enterprise deployment of apps, so it can do much more than just deploy built apps to devices. Some people might prefer using it instead of the Xcode Devices window (you'll still have to set up your device using Xcode as described above, however):
- Ensure your iOS device is plugged into the Mac via USB.
- Run Apple Configurator.
- On the "All Devices" view, double-click your iOS device.
- Click on Apps in the Navigator on the left. This displays all the apps on the device.
- Click the Add button in the toolbar, select "Apps" from the menu and in the dialog, click "Choose from my Mac...".
- Select the app you previously built. Click OK to copy the app to the device.
- On the device, tap on the app to launch it.
Getting Crash Logs
You can retrieve crash logs from your iOS device using the Devices window in Xcode. Plug your device in via USB and select it in the Devices window. Then click the "View Device Logs" button. You'll see a list of crash logs (it may take a few minutes to download if you have a lot of them). Find your app in the list and click it to see the log. When submitting Feedback cases with crash logs, wait to ensure that the symbols for your log are loaded before you send the log.
This tool is also useful to reading iOS console logs:
Troubleshooting
Unfortunately, some people have run into trouble deploying to their iOS device even after following these steps. This is generally due to certificate expiration or profile installation problems and is something even users of Xcode have to deal with. Here are some suggestions that might help:
- One of the most common solutions is to revoke and remove all certificates and profiles (including those in the Keychain) and go through the steps again.
- Profiles are located here: ~/Library/Mobile Device/Provisioning Profiles/
- Remove all expired certficates using Keychain Access app.
- Consult StackOverflow or the Xojo forum for any specific error message your are getting. Keep in mind that few of these errors are Xojo-specific, so you may find help in the general iOS development community.
- For more information about the specifics of certificates, profiles and deployment, be sure to read the Apple docs in the iOS Developer Portal.
- Wildcard App IDs are typically of the form "com.company.*". If you are having trouble getting Xojo to recognize the provisioning profile, you may want to instead create a wildcard App ID of just "*" and then regenerate your Provisioning Profile.
- Creating a blank test app in Xcode using your developer profile and deploying the app to the iPhone (just a blank iOS app) can sometimes fix issues.
