In CSS, selectors are used to target the HTML elements on our web pages that we want to style. There are a wide variety of CSS selectors available, allowing for fine grained precision when selecting elelents to style. In this article we'll run through the different types in great detail, seeing how they work.
| Prerequisites: | Basic computer literacy, basic software installed, basic knowledge of working with files, HTML basics (study Introduction to HTML), and an idea of How CSS works. |
|---|---|
| Objective: | To learn how CSS selectors work in detail. |
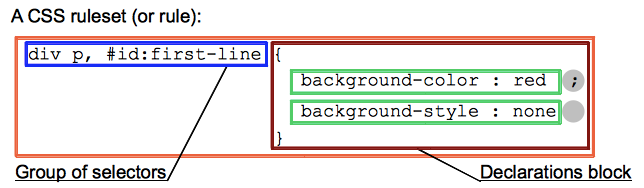
In the last article we explained general CSS syntax and terminology in detail. To recap, selectors are one part of a CSS rule and come just before CSS declaration blocks.
Selectors can be divided into the following categories:
- Simple selectors: Match one or more elements based on element type,
class, orid. - Attribute selectors: Match one or more elements based on their attributes/attribute values.
- Pseudo-classes: Match one or more elements that exist in a certain state, such as an element that is being hovered over by the mouse pointer, or a checkbox that is currently disabled or checked, or an element that is the first child of its parent in the DOM tree.
- Pseudo-elements: Match one or more parts of content that are in a certain position in relation to an element, for example the first word of each paragraph, or generated content appearing just before an elelment.
- Combinators: These are not exactly selectors themselves, but ways of combining two or more selectors in useful ways for very specific selections. So for example, you could select only paragraphs that are direct descendants of divs, or paragraphs that come directly after headings.
Let's dig into each one of them.
Simple selectorsEdit
These selectors are called "simple" because they directly match one or more elements of a document, based on the type of element (or its class or id.)
Type selectors aka element selectors
This selector is just a case-insensitive match between the selector name and a given HTML element name. This is the simplest way to target all elements of a given type. Let's take a look at an example:
Here is some HTML:
<p>What color do you like?</p>
<div>I like blue.</div>
<p>I prefer red!</p>
A simple style sheet:
/* All p elements are red */
p {
  color: red;
}

/* All div elements are blue */
div {
  color: blue;
}
And we get this:
Active learning: Selecting different elements
For this active learning, we'd like you to try changing the selector on the single CSS rule so that different elements in the example are styled. Do you know how to write a selector to apply the ruleset to multiple elements at once?
If you make a mistake, you can always reset it using the Reset button. If you get really stuck, press the Show solution button to see a potential answer.
Playable code
<div class="body-wrapper" style="font-family: 'Open Sans Light',Helvetica,Arial,sans-serif;">
  <h2>HTML Input</h2>
  <textarea id="code" class="html-input" style="width: 90%;height: 10em;padding: 10px;border: 1px solid #0095dd;"><h1>Hello World!</h1>

<p>This is a paragraph.</p>

<ul>
  <li>This is</li>
  <li>A list</li>
</ul></textarea>

  <h2>CSS Input</h2>
  <textarea id="code" class="css-input" style="width: 90%;height: 10em;padding: 10px;border: 1px solid #0095dd;">h1 {
  color: red;
  text-shadow: 1px 1px 1px black;
  background: linear-gradient(to bottom, rgba(0,0,0,0.25), rgba(0,0,0,0.1));
  padding: 3px;
  text-align: center;
  box-shadow: inset 2px 2px 5px rgba(0,0,0,0.5), inset -2px -2px 5px rgba(255,255,255,0.5);
}</textarea>

  <h2>Output</h2>
  <div class="output" style="width: 90%;height: 10em;padding: 10px;border: 1px solid #0095dd;"></div>
  <div class="controls">
    <input id="reset" type="button" value="Reset" style="margin: 10px 10px 0 0;">
    <input id="solution" type="button" value="Show solution" style="margin: 10px 0 0 10px;">
  </div>
</div>
var htmlInput = document.querySelector(".html-input");
var cssInput = document.querySelector(".css-input");
var reset = document.getElementById("reset");
var htmlCode = htmlInput.value;
var cssCode = cssInput.value;
var output = document.querySelector(".output");
var solution = document.getElementById("solution");
var styleElem = document.createElement('style');
var headElem = document.querySelector('head');
headElem.appendChild(styleElem);
function drawOutput() {
output.innerHTML = htmlInput.value;
styleElem.textContent = cssInput.value;
}
reset.addEventListener("click", function() {
htmlInput.value = htmlCode;
cssInput.value = cssCode;
drawOutput();
});
solution.addEventListener("click", function() {
htmlInput.value = htmlCode;
cssInput.value = 'p {\n color: red;\n text-shadow: 1px 1px 1px black;\n background: linear-gradient(to bottom, rgba(0,0,0,0.25), rgba(0,0,0,0.1));\n padding: 3px;\n text-align: center;\n box-shadow: inset 2px 2px 5px rgba(0,0,0,0.5), inset -2px -2px 5px rgba(255,255,255,0.5);\n}';
drawOutput();
});
htmlInput.addEventListener("input", drawOutput);
cssInput.addEventListener("input", drawOutput);
window.addEventListener("load", drawOutput);Class selectors
The class selector consists of a dot, '.', followed by a class name. A class name is any value without spaces put within an HTML class attribute. It is up to you to choose a name for the class. It is also worth knowing that multiple elements in a document can have the same class value and a single element can have multiple class names separated by white space. Here's a quick example:
Here is some HTML:
<ul>
  <li class="first done">Create an HTML document</li>
  <li class="second done">Create a CSS style sheet</li>
  <li class="third">Link them all together</li>
</ul>
A simple style sheet:
/* The element with the class "first" is bolded */
.first {
  font-weight: bold;
}

/* All the elements with the class "done" are strike through */
.done {
  text-decoration: line-through;
}
And we get this result:
Active learning: Handling multiple classes
For this active learning, we'd like you to try changing the class attributes on the paragraph elements so that you can apply multiple separate effects. Try applying a base-box class plus a role class (editor-note or warning), and optionally important if you want to give the box strong importance. Think about how this kind of rule set allows you to build up a modular system of styles.
If you make a mistake, you can always reset it using the Reset button. If you get really stuck, press the Show solution button to see a potential answer.
Playable code 2
<div class="body-wrapper" style="font-family: 'Open Sans Light',Helvetica,Arial,sans-serif;">
  <h2>HTML Input</h2>
  <textarea id="code" class="html-input" style="width: 90%;height: 10em;padding: 10px;border: 1px solid #0095dd;"><p class="">My first paragraph.</p>
<p class="">My second paragraph.</p>
<p class="">My third paragraph</p></textarea>

  <h2>CSS Input</h2>
  <textarea id="code" class="css-input" style="width: 90%;height: 12em;padding: 10px;border: 1px solid #0095dd;">.base-box {
  background-image: linear-gradient(to bottom, rgba(0,0,0,0.1), rgba(0,0,0,0.3));
  padding: 3px 3px 3px 7px;
}

.important {
  font-weight: bold;
}

.editor-note {
  background-color: #9999ff;
  border-left: 6px solid #333399;
}

.warning {
  background-color: #ff9999;
  border-left: 6px solid #993333;
}</textarea>

  <h2>Output</h2>
  <div class="output" style="width: 90%;height: 10em;padding: 10px;border: 1px solid #0095dd;"></div>
  <div class="controls">
    <input id="reset" type="button" value="Reset" style="margin: 10px 10px 0 0;">
    <input id="solution" type="button" value="Show solution" style="margin: 10px 0 0 10px;">
  </div>
</div>
var htmlInput = document.querySelector(".html-input");
var cssInput = document.querySelector(".css-input");
var reset = document.getElementById("reset");
var htmlCode = htmlInput.value;
var cssCode = cssInput.value;
var output = document.querySelector(".output");
var solution = document.getElementById("solution");
var styleElem = document.createElement('style');
var headElem = document.querySelector('head');
headElem.appendChild(styleElem);
function drawOutput() {
output.innerHTML = htmlInput.value;
styleElem.textContent = cssInput.value;
}
reset.addEventListener("click", function() {
htmlInput.value = htmlCode;
cssInput.value = cssCode;
drawOutput();
});
solution.addEventListener("click", function() {
htmlInput.value = '<p class="base-box warning important">My first paragraph.</p>\n\n<p class="">My second paragraph.</p>\n\n<p class="">My third paragraph</p>';
cssInput.value = cssCode;
drawOutput();
});
htmlInput.addEventListener("input", drawOutput);
cssInput.addEventListener("input", drawOutput);
window.addEventListener("load", drawOutput);ID selectors
The ID selector consists of a hash/pound symbol (#), followed by the ID name of a given element. Any element can have a unique ID name set with the id attribute. It is up to you what name you choose for the ID. It's the most efficient way to select a single element.
Important: An ID name must be unique in the document. Behaviors regarding duplicated IDs are unpredictable, for example in some browsers only the first instance is counted, and the rest are ignored.
Let's look at a quick example — here is some HTML:
<p id="polite"> — "Good morning."</p>
<p id="rude"> — "Go away!"</p>
A simple style sheet:
#polite {
  font-family: cursive;
}

#rude {
  font-family: monospace;
  text-transform: uppercase;
}
And we get this as an output:
Active learning: assigning the winner's colors with IDs
For this active learning, we'd like you to give the winner, second and third place in the competition an appropriate gold, silver and bronze color by giving CSS rules 2–4 appropriate selectors that select the relevant elements based on their ID.
If you make a mistake, you can always reset it using the Reset button. If you get really stuck, press the Show solution button to see a potential answer.
Playable code 3
<div class="body-wrapper" style="font-family: 'Open Sans Light',Helvetica,Arial,sans-serif;">
  <h2>HTML Input</h2>
  <textarea id="code" class="html-input" style="width: 90%;height: 10em;padding: 10px;border: 1px solid #0095dd;"><p id="first"><strong>Winner</strong>: Velma Victory</p>
<p id="second"><strong>2nd</strong>: Colin Contender</p>
<p id="third"><strong>3rd</strong>: Phoebe Player</p></textarea>

  <h2>CSS Input</h2>
  <textarea id="code" class="css-input" style="width: 90%;height: 10em;padding: 10px;border: 1px solid #0095dd;">p {
  text-transform: uppercase;
  padding: 5px;
}

 {
  background-color: goldenrod;
}

 {
  background-color: silver;
}

 {
  background-color: #CD7F32;
}</textarea>

  <h2>Output</h2>
  <div class="output" style="width: 90%;height: 10em;padding: 10px;border: 1px solid #0095dd;"></div>
  <div class="controls">
    <input id="reset" type="button" value="Reset" style="margin: 10px 10px 0 0;">
    <input id="solution" type="button" value="Show solution" style="margin: 10px 0 0 10px;">
  </div>
</div>
var htmlInput = document.querySelector(".html-input");
var cssInput = document.querySelector(".css-input");
var reset = document.getElementById("reset");
var htmlCode = htmlInput.value;
var cssCode = cssInput.value;
var output = document.querySelector(".output");
var solution = document.getElementById("solution");
var styleElem = document.createElement('style');
var headElem = document.querySelector('head');
headElem.appendChild(styleElem);
function drawOutput() {
output.innerHTML = htmlInput.value;
styleElem.textContent = cssInput.value;
}
reset.addEventListener("click", function() {
htmlInput.value = htmlCode;
cssInput.value = cssCode;
drawOutput();
});
solution.addEventListener("click", function() {
htmlInput.value = htmlCode;
cssInput.value = 'p {\n text-transform: uppercase;\n padding: 5px;\n}\n\n#first {\n background-color: goldenrod;\n}\n\n#second {\n background-color: silver;\n}\n\n#third {\n background-color: #CD7F32;\n}';
drawOutput();
});
htmlInput.addEventListener("input", drawOutput);
cssInput.addEventListener("input", drawOutput);
window.addEventListener("load", drawOutput);Universal selector
The universal selector (*) is the ultimate joker. It allows selecting all elements in a page. As it is rarely useful to apply a style to every element on a page, it is often used in combination with other selectors (see Combinators below.)
Important: Careful when using the universal selector. As it applies to all elements, using it in large web pages can have a perceptible impact on performance: web pages can be displayed slower than expected. There are not many instances where you'd want to use this selector.
Now for an example; first some HTML:
<div>
  <p>I think the containing box just needed
  a <strong>border</strong> or <em>something</em>,
  but this is getting <strong>out of hand</strong>!</p>
</div>
And a simple style sheet:
* {
  padding: 5px;
  border: 1px solid black;
  background: rgba(255,0,0,0.25)
}
Together, these give the following result:
Attribute selectorsEdit
Attribute selectors are a special kind of selector that will match elements based on their attributes and attribute values. Their generic syntax consists of square brackets ([]) containing an attribute name followed by an optional condition to match against the value of the attribute. Attribute selectors can be divided into two categories depending on the way they match attribute values: Presence and value attribute selectors and Substring value attribute selectors.
Presence and value attribute selectors
These attribute selectors try to match an exact attribute value:
[attr]: This selector will select all elements with the attributeattr, whatever its value.[attr=val]: This selector will select all elements with the attributeattr, but only if its value isval.[attr~=val]: This selector will select all elements with the attributeattr, but only if the valuevalis one of a space-separated list of values contained inattr's value, for example a single class in a space-separated list of classes.
Let's look at an example featuring the following HTML snippet:
Ingredients for my recipe: <i lang="fr-FR">Poulet basquaise</i>
<ul>
  <li data-quantity="1kg" data-vegetable>Tomatoes</li>
  <li data-quantity="3" data-vegetable>Onions</li>
  <li data-quantity="3" data-vegetable>Garlic</li>
  <li data-quantity="700g" data-vegetable="not spicy like chili">Red pepper</li>
  <li data-quantity="2kg" data-meat>Chicken</li>
  <li data-quantity="optional 150g" data-meat>Bacon bits</li>
  <li data-quantity="optional 10ml" data-vegetable="liquid">Olive oil</li>
  <li data-quantity="25cl" data-vegetable="liquid">White wine</li>
</ul>
And a simple style sheet:
/* All elements with the attribute "data-vegetable"
   are given green text */
[data-vegetable] {
  color: green
}

/* All elements with the attribute "data-vegetable"
   with the exact value "liquid" are given a golden
   background color */
[data-vegetable="liquid"] {
  background-color: goldenrod;
}

/* All elements with the attribute "data-vegetable",
   containing the value "spicy", even among others,
   are given a red background color */
[data-vegetable~="spicy"] {
  color: red;
}
The result is as follows:
Substring value attribute selectors
Attribute selectors in this class are also known as "RegExp-like selectors", because they offer flexible matching in a similar fashion to regular expression (but to be clear, these selectors are not true regular expression):
[attr|=val]: This selector will select all elements with the attributeattrfor which the value is exactlyvalor starts withval-(careful, the dash here isn't a mistake, this is to handle language codes.)[attr^=val]: This selector will select all elements with the attributeattrfor which the value starts withval.[attr$=val]: This selector will select all elements with the attributeattrfor which the value ends withval.[attr*=val]: This selector will select all elements with the attributeattrfor which the value contains the stringval(unlike[attr~=val], this selector doesn't treat spaces as value separators but as part of the attribute value.)
Let's continue our previous example and add the following CSS rules:
Ingredients for my recipe: <i lang="fr-FR">Poulet basquaise</i>
<ul>
  <li data-quantity="1kg" data-vegetable>Tomatoes</li>
  <li data-quantity="3" data-vegetable>Onions</li>
  <li data-quantity="3" data-vegetable>Garlic</li>
  <li data-quantity="700g" data-vegetable="not spicy like chili">Red pepper</li>
  <li data-quantity="2kg" data-meat>Chicken</li>
  <li data-quantity="optional 150g" data-meat>Bacon bits</li>
  <li data-quantity="optional 10ml" data-vegetable="liquid">Olive oil</li>
  <li data-quantity="25cl" data-vegetable="liquid">White wine</li>
</ul>
/* All elements with the attribute "data-vegetable"
are given green text */
[data-vegetable] {
color: green
}
/* All elements with the attribute "data-vegetable"
with the exact value "liquid" are given a golden
background color */
[data-vegetable="liquid"] {
background-color: goldenrod;
}
/* All elements with the attribute "data-vegetable",
containing the value "spicy", even among others,
are given a red background color */
[data-vegetable~="spicy"] {
color: red;
}
/* Classic usage for language selection */
[lang|=fr] {
font-weight: bold;
}
/* All elements with the attribute "data-vegetable"
containing the value "not spicy" are turned back
to green */
[data-vegetable*="not spicy"] {
color: green;
}
/* All elements with the attribute "data-quantity",
for which the value ends with "kg" */
[data-quantity$="kg"] {
font-weight: bold;
}
/* All elements with the attribute "data-quantity",
for which the value starts with "optional" */
[data-quantity^="optional"] {
opacity: 0.5;
}With those new rules, we will get this:
Active learning: Styling football results
In this active learning, we'd like you to try your hand at adding attribute selectors to some rules to style a simple football results listing. There are three things to try to do here:
- The first three rules add a UK, German, and Spanish flag icon respectively to the left hand side of the list items. You need to fill in appropriate attribute selectors so that the teams are given their correct country flags, matched by language.
- Rules 4–6 add a background color to the list items to indicate whether the team has gone up in the league (green,
rgba(0,255,0,0.7)), down (red,rgba(255,0,0,0.5)), or stayed in the same place (blue,rgba(0,0,255,0.5).) Fill in the appropriate attribute selectors to match the correct colors to the correct teams, matched by theinc,sameanddecstrings that appear in thedata-perfattribute values. - Rules 7–8 make teams that are set to be promoted bold, and teams that are in danger of being relegated italic and gray. Fill in appropriate attribute selectors to match these styles to the correct teams, matched by the
proandrelstrings that appear in thedata-perfattribute values.
If you make a mistake, you can always reset it using the Reset button. If you get really stuck, press the Show solution button to see a potential answer.
Playable code 4
<div class="body-wrapper" style="font-family: 'Open Sans Light',Helvetica,Arial,sans-serif;">
  <h2>HTML Input</h2>
  <textarea id="code" class="html-input" style="width: 90%;height: 10em;padding: 10px;border: 1px solid #0095dd;"><ol>
  <li lang="en-GB" data-perf="inc-pro">Manchester United</li>
  <li lang="es" data-perf="same-pro">Barcelona</li>
  <li lang="de" data-perf="dec">Bayern Munich</li>
  <li lang="es" data-perf="same">Real Madrid</li>
  <li lang="de" data-perf="inc-rel">Borussia Dortmund</li>
  <li lang="en-GB" data-perf="dec-rel">Southampton FC</li>
</ol></textarea>

  <h2>CSS Input</h2>
  <textarea id="code" class="css-input" style="width: 90%;height: 10em;padding: 10px;border: 1px solid #0095dd;">li[] {
   background: url("http://mdn.github.io/learning-area/css/introduction-to-css/css-selectors/en-GB.png") 5px center no-repeat;
 }

li[] {
   background: url("http://mdn.github.io/learning-area/css/introduction-to-css/css-selectors/de.png") 5px center no-repeat;
 }

li[] {
   background: url("http://mdn.github.io/learning-area/css/introduction-to-css/css-selectors/es.png") 5px center no-repeat;
 }

li[] {
   background-color: rgba(0,255,0,0.7);
 }

li[] {
   background-color: rgba(0,0,255,0.5);
 }

li[] {
   background-color: rgba(255,0,0,0.7);
 }

li[] {
   font-weight: bold;
 }

li[] {
   font-style: italic;
   color: #666;
 }

ol {
   padding: 0;
 }

li {
   padding: 3px 3px 3px 34px;
   margin-bottom: 5px;
   list-style-position: inside;
 }</textarea>

  <h2>Output</h2>
  <div class="output" style="width: 90%;height: 10em;padding: 10px;border: 1px solid #0095dd;overflow:auto;"></div>
  <div class="controls">
    <input id="reset" type="button" value="Reset" style="margin: 10px 10px 0 0;">
    <input id="solution" type="button" value="Show solution" style="margin: 10px 0 0 10px;">
  </div>
</div>
var htmlInput = document.querySelector(".html-input");
var cssInput = document.querySelector(".css-input");
var reset = document.getElementById("reset");
var htmlCode = htmlInput.value;
var cssCode = cssInput.value;
var output = document.querySelector(".output");
var solution = document.getElementById("solution");
var styleElem = document.createElement('style');
var headElem = document.querySelector('head');
headElem.appendChild(styleElem);
function drawOutput() {
output.innerHTML = htmlInput.value;
styleElem.textContent = cssInput.value;
}
reset.addEventListener("click", function() {
htmlInput.value = htmlCode;
cssInput.value = cssCode;
drawOutput();
});
solution.addEventListener("click", function() {
htmlInput.value = htmlCode;
cssInput.value = 'li[lang="en-GB"] {\n background: url("http://mdn.github.io/learning-area/css/introduction-to-css/css-selectors/en-GB.png") 5px center no-repeat;\n}\n\nli[lang="de"] {\n background: url("http://mdn.github.io/learning-area/css/introduction-to-css/css-selectors/de.png") 5px center no-repeat;\n}\n\nli[lang="es"] {\n background: url("http://mdn.github.io/learning-area/css/introduction-to-css/css-selectors/es.png") 5px center no-repeat;\n}\n\nli[data-perf*="inc"] {\n background-color: rgba(0,255,0,0.7);\n}\n\nli[data-perf*="same"] {\n background-color: rgba(0,0,255,0.5);\n}\n\nli[data-perf*="dec"] {\n background-color: rgba(255,0,0,0.7);\n}\n\nli[data-perf*="pro"] {\n font-weight: bold;\n}\n\nli[data-perf*="rel"] {\n font-style: italic;\n color: #666;\n}\n\nol {\n padding: 0;\n}\n\nli {\n padding: 3px 3px 3px 34px;\n margin-bottom: 5px;\n list-style-position: inside;\n}';
drawOutput();
});
htmlInput.addEventListener("input", drawOutput);
cssInput.addEventListener("input", drawOutput);
window.addEventListener("load", drawOutput);Pseudo-classesEdit
A CSS pseudo-class is a keyword preceded by a colon (:) that is added on to the end of selectors to specify that you want to style the selected elements only when they are in certain state. For example you might to style an element only when it is being hovered over by the mouse pointer, or a checkbox when it is disabled or checked, or an element that is the first child of its parent in the DOM tree.
:active:any:checked:default:dir():disabled:empty:enabled:first:first-child:first-of-type:fullscreen:focus:hover:indeterminate:in-range:invalid:lang():last-child:last-of-type:left:link:not():nth-child():nth-last-child():nth-last-of-type():nth-of-type():only-child:only-of-type:optional:out-of-range:read-only:read-write:required:right:root:scope:target:valid:visited
We will not dig into every pseudo-class right now — it is not the object of the Learning Area to teach you everything in exhaustive detail, and you'll certainly come across some of these in more detail later on where appropriate. For now, let's just see a simple example of how to use these. First, an HTML snippet:
<a href="https://developer.mozilla.org/" target="_blank">Mozilla Developer Network</a>Then, some CSS rules:
/* These styles will style our link
   in all states */
a {
  color: blue;
  font-weight: bold;
}

/* We want visited links to be the same color
   as non visited links */
a:visited {
  color: blue;
}

/* We highlight the link when it is
   hovered (mouse), activated
   or focused (keyboard) */
a:hover,
a:active,
a:focus {
  color: darkred;
  text-decoration: none;
}
and now let's play with the link we just styled!
Active learning: A zebra striped info list
Your turn again — in this active learning segment we'd like you to add some zebra striping to a list of info links, and also add an appropriate pseudo-classes to style the links differently when they are hovered over. You'll only need to edit the last three rules in this exercise. Some hints:
- You have already seen how to write the second pseudo class for the hover styles.
- For the zebra striping you'll need to use a pseudo class like
:nth-of-type(), giving the two color rules a slightly different version of the pseudo class to style the even and odd numbered list items. See if you can look up how to do this!
If you make a mistake, you can always reset it using the Reset button. If you get really stuck, press the Show solution button to see a potential answer.
Playable code 5
<div class="body-wrapper" style="font-family: 'Open Sans Light',Helvetica,Arial,sans-serif;">
  <h2>HTML Input</h2>
  <textarea id="code" class="html-input" style="width: 90%;height: 10em;padding: 10px;border: 1px solid #0095dd;"><ul>
  <li><a href="#">United Kingdom</a></li>
  <li><a href="#">Germany</a></li>
  <li><a href="#">Finland</a></li>
  <li><a href="#">Russia</a></li>
  <li><a href="#">Spain</a></li>
  <li><a href="#">Poland</a></li>
</ul></textarea>

  <h2>CSS Input</h2>
  <textarea id="code" class="css-input" style="width: 90%;height: 10em;padding: 10px;border: 1px solid #0095dd;">ul {
  padding: 0;
}

li {
  padding: 3px;
  margin-bottom: 5px;
  list-style-type: none;
}

a {
  text-decoration: none;
  color: black;
}

 {
  text-decoration: underline;
  color: red;
}

 {
  background-color: #ccc;
}

 {
  background-color: #eee;
}</textarea>

  <h2>Output</h2>
  <div class="output" style="width: 90%;height: 10em;padding: 10px;border: 1px solid #0095dd;overflow:auto;"></div>
  <div class="controls">
    <input id="reset" type="button" value="Reset" style="margin: 10px 10px 0 0;">
    <input id="solution" type="button" value="Show solution" style="margin: 10px 0 0 10px;">
  </div>
</div>
var htmlInput = document.querySelector(".html-input");
var cssInput = document.querySelector(".css-input");
var reset = document.getElementById("reset");
var htmlCode = htmlInput.value;
var cssCode = cssInput.value;
var output = document.querySelector(".output");
var solution = document.getElementById("solution");
var styleElem = document.createElement('style');
var headElem = document.querySelector('head');
headElem.appendChild(styleElem);
function drawOutput() {
output.innerHTML = htmlInput.value;
styleElem.textContent = cssInput.value;
}
reset.addEventListener("click", function() {
htmlInput.value = htmlCode;
cssInput.value = cssCode;
drawOutput();
});
solution.addEventListener("click", function() {
htmlInput.value = htmlCode;
cssInput.value = 'ul {\n padding: 0;\n}\n\nli {\n padding: 3px;\n margin-bottom: 5px;\n list-style-type: none;\n}\n\na {\n text-decoration: none;\n color: black;\n}\n\na:hover {\n text-decoration: underline;\n color: red;\n}\n\nli:nth-of-type(2n) {\n background-color: #ccc;\n}\n\nli:nth-of-type(2n+1) {\n background-color: #eee;\n}';
drawOutput();
});
htmlInput.addEventListener("input", drawOutput);
cssInput.addEventListener("input", drawOutput);
window.addEventListener("load", drawOutput);Pseudo-elementsEdit
Pseudo-elements are very much like pseudo-classes, but they have differences. They are keywords — this time preceded by two colons (::) — that can be added to the end of selectors to select a certain part of an element.
They all have some very specific behaviors and interesting features but digging into them all in detail is beyond scope for now. Here we'll just show a simple CSS example that selects the space just after all absolute links and adds an arrow in that space:
<ul>
  <li><a href="https://developer.mozilla.org/en-US/docs/Glossary/CSS">CSS</a> defined in the MDN glossary.</li>
  <li><a href="https://developer.mozilla.org/en-US/docs/Glossary/HTML">HTML</a> defined in the MDN glossary.</li>
</ul>
Let's add this CSS rule:
/* All elements with an attribute "href", which values
   start with "http", will be added an arrow after its
   content (to indicate it's an external link) */
[href^=http]::after {
  content: '⤴';
}
and we get this result:
Active learning: A fancy paragraph
Next up for active learning, we have a fancy paragraph to style! All you've got to do here is apply the two rulesets to the paragraph's first line and first letter, using the ::first-line and ::first-letter pseudo elements. This should style the first line of the paragraph in ALL-CAPS and the first letter as a nice drop cap, giving it an old-style feel.
If you make a mistake, you can always reset it using the Reset button. If you get really stuck, press the Show solution button to see a potential answer.
Playable code 6
<div class="body-wrapper" style="font-family: 'Open Sans Light',Helvetica,Arial,sans-serif;">
  <h2>HTML Input</h2>
  <textarea id="code" class="html-input" style="width: 90%;height: 10em;padding: 10px;border: 1px solid #0095dd;"><p>This is my very important paragraph.
 I am a distinguished gentleman of such renown that my paragraph
 needs to be styled in a manner befitting my majesty. Bow before
my splendour, dear students, and go forth and learn CSS!</p></textarea>

  <h2>CSS Input</h2>
  <textarea id="code" class="css-input" style="width: 90%;height: 10em;padding: 10px;border: 1px solid #0095dd;"> {
  text-transform: uppercase;
}

 {
  font-size: 3em;
  border: 1px solid black;
  background: red;
  display: block;
  float: left;
  padding: 2px;
  margin-right: 4px;
}</textarea>

  <h2>Output</h2>
  <div class="output" style="width: 90%;height: 10em;padding: 10px;border: 1px solid #0095dd;overflow:auto;"></div>
  <div class="controls">
    <input id="reset" type="button" value="Reset" style="margin: 10px 10px 0 0;">
    <input id="solution" type="button" value="Show solution" style="margin: 10px 0 0 10px;">
  </div>
</div>
var htmlInput = document.querySelector(".html-input");
var cssInput = document.querySelector(".css-input");
var reset = document.getElementById("reset");
var htmlCode = htmlInput.value;
var cssCode = cssInput.value;
var output = document.querySelector(".output");
var solution = document.getElementById("solution");
var styleElem = document.createElement('style');
var headElem = document.querySelector('head');
headElem.appendChild(styleElem);
function drawOutput() {
output.innerHTML = htmlInput.value;
styleElem.textContent = cssInput.value;
}
reset.addEventListener("click", function() {
htmlInput.value = htmlCode;
cssInput.value = cssCode;
drawOutput();
});
solution.addEventListener("click", function() {
htmlInput.value = htmlCode;
cssInput.value = 'p::first-line {\n text-transform: uppercase;\n}\n\np::first-letter {\n font-size: 3em;\n border: 1px solid black;\n background: red;\n display: block;\n float: left;\n padding: 2px;\n margin-right: 4px;\n}';
drawOutput();
});
htmlInput.addEventListener("input", drawOutput);
cssInput.addEventListener("input", drawOutput);
window.addEventListener("load", drawOutput);CombinatorsEdit
Using one selector at a time is useful, but can be inefficient in some situations. CSS selectors become evem more useful when you start combining them to perform fine-grained selections. CSS has several ways to select elements based on how they are related to one another. Those relationships are expressed with combinators as follows (A and B represent any selector seen above):
| Combinators | Select |
|---|---|
| AB | Any element matching both A and B at the same time. |
| A B | Any element matching B that is a descendant of an element matching A (that is: a child, or a child of a child, etc.) |
| A > B | Any element matching B that is a direct child of an element matching A. |
| A + B | Any element matching B that is the next sibling of an element matching A (that is: the next child of the same parent.) |
| A ~ B | Any element matching B that is among the next sibling of an element matching A (that is: one of the next children of the same parent.) |
Let's look at an example with all of this working together:
<table lang="en-US" class="with-currency">
  <thead>
    <tr>
      <th scope="col">Product</th>
      <th scope="col">Qty.</th>
      <th scope="col">Price</th>
    </tr>
  </thead>
  <tfoot>
    <tr>
      <th colspan="2" scope="row">Total:</th>
      <td>148.55</td>
    </tr>
  </tfoot>
  <tbody>
    <tr>
      <td>Lawnchair</td>
      <td>1</td>
      <td>137.00</td>
    </tr>
    <tr>
      <td>Marshmallow rice bar</td>
      <td>2</td>
      <td>1.10</td>
    </tr>
    <tr>
      <td>Book</td>
      <td>1</td>
      <td>10.45</td>
    </tr>
  </tbody>
</table>
Then let's use the following style sheet:
/* Basic table setup */
table {
  font: 1em sans-serif;
  border-collapse: collapse;
  border-spacing: 0;
}

/* All <td>s within a <table and all <th>s within a <table>
   Comma is not a combinator, it just allows you to target
   several selectors with the same CSS ruleset */
table td, table th {
  border : 1px solid black;
  padding: 0.5em 0.5em 0.4em;
}

/* All <th>s within <thead>s that are within <table>s */
table thead th {
  color: white;
  background: black;
}

/* All <td>s preceded by another <td>,
   within a <tbody>, within a <table> */
table tbody td + td {
  text-align: center;
}

/* All <td>s that are a last child,
   within a <tbody>, within a <table> */
table tbody td:last-child {
  text-align: right
}

/* All <th>s, within a <tfoot>s, within a <table> */
table tfoot th {
  text-align: right;
  border-top-width: 5px;
  border-left: none;
  border-bottom: none;
}

/* All <td>s preceded by a <th>, within a <table> */
table th + td {
  text-align: right;
  border-top-width: 5px;
  color: white;
  background: black;
}

/* All pseudo-elements "before" <td>s that are a last child,
   appearing within elements with a class of "with-currency" that
   also have an attribute "lang" with the value "en-US" */
.with-currency[lang="en-US"] td:last-child::before {
  content: '$';
}

/* All pseudo-elements "after" <td>s that are a last child,
   appearing within elements with the class "with-currency" that
   also have an attribute "lang" with the value "fr" */
.with-currency[lang="fr"] td:last-child::after {
  content: ' €';
}
This given us the following rather nice table styles:
Active learning: Writing your own combinatorsEdit
The above example was designed to show the sort of complexity you can start to achieve with combinators. In this active learning, we will get you to write some of your own, more simple selectors that include combinators. In this exercise you need to add a selector to rules 2–4, to:
- Style links, but only links that are inside the unordered list.
- Style links inside the unordered list, only when they are being hovered over.
- Style only the paragraph that comes directly after the top level heading.
If you make a mistake, you can always reset it using the Reset button. If you get really stuck, press the Show solution button to see a potential answer.
Playable code 7
<div class="body-wrapper" style="font-family: 'Open Sans Light',Helvetica,Arial,sans-serif;">
  <h2>HTML Input</h2>
  <textarea id="code" class="html-input" style="width: 90%;height: 10em;padding: 10px;border: 1px solid #0095dd;"><ul>
  <li><a href="#">Home</a></li>
  <li><a href="#">Portfolio</a></li>
  <li><a href="#">About</a></li>
</ul>

<h1>Welcome to my website</h1>

<p>Hello, and welcome! I hope you enjoy your time here.</p>

<h2>My philosophy</h2>

<p>I am a believer in chilling out, and not getting grumpy. I think everyone else should follow this ideal, and <a href="#">drink green tea</a>.</p></textarea>

  <h2>CSS Input</h2>
  <textarea id="code" class="css-input" style="width: 90%;height: 10em;padding: 10px;border: 1px solid #0095dd;">ul {
  padding: 0;
  list-style-type: none;
}

 {
  text-decoration: none;
  display: block;
  color: black;
  background-color: red;
  padding: 5px;
  margin-bottom: 10px;
}

 {
  color: red;
  background-color: black;
}

 {
  font-style: bold;
  color: blue;
}</textarea>

  <h2>Output</h2>
  <div class="output" style="width: 90%;height: 10em;padding: 10px;border: 1px solid #0095dd;overflow:auto;"></div>
  <div class="controls">
    <input id="reset" type="button" value="Reset" style="margin: 10px 10px 0 0;">
    <input id="solution" type="button" value="Show solution" style="margin: 10px 0 0 10px;">
  </div>
</div>
var htmlInput = document.querySelector(".html-input");
var cssInput = document.querySelector(".css-input");
var reset = document.getElementById("reset");
var htmlCode = htmlInput.value;
var cssCode = cssInput.value;
var output = document.querySelector(".output");
var solution = document.getElementById("solution");
var styleElem = document.createElement('style');
var headElem = document.querySelector('head');
headElem.appendChild(styleElem);
function drawOutput() {
output.innerHTML = htmlInput.value;
styleElem.textContent = cssInput.value;
}
reset.addEventListener("click", function() {
htmlInput.value = htmlCode;
cssInput.value = cssCode;
drawOutput();
});
solution.addEventListener("click", function() {
htmlInput.value = htmlCode;
cssInput.value = 'ul {\n padding: 0;\n list-style-type: none;\n}\n\nul a {\n text-decoration: none;\n display: block;\n color: black;\n background-color: red;\n padding: 5px;\n margin-bottom: 10px;\n}\n\nul a:hover {\n color: red;\n background-color: black;\n}\n\nh1 + p {\n font-style: bold;\n color: blue;\n}';
drawOutput();
});
htmlInput.addEventListener("input", drawOutput);
cssInput.addEventListener("input", drawOutput);
window.addEventListener("load", drawOutput);Multiple selectors on one ruleEdit
You have seen multiple examples of this in action already, but let's spell it out clearly for clarification. You can write multiple selectors separated by commas, to apply the same to rule to multiple sets of selected elements at once. For example:
p, li {
  font-size: 1.6em;
}
Or this:
h1, h2, h3, h4, h5, h6 {
  font-family: helvetica, 'sans serif';
}
What's nextEdit
Selectors are fun and exploring their power is a long journey. Even the most skilled web developers are still amazed by what's possible using selectors. In our next article we'll turn to another really important fundamental CSS topic — the kinds of values properties can have, and what units are involved in expressing the length, color, or other values you want. Let's explore CSS values and units.