Mocha is a feature-rich JavaScript test framework running on Node.js and the browser, making asynchronous testing simple and fun. Mocha tests run serially, allowing for flexible and accurate reporting, while mapping uncaught exceptions to the correct test cases. Hosted on GitHub.

Features
- browser support
- simple async support, including promises
- test coverage reporting
- string diff support
- javascript API for running tests
- proper exit status for CI support etc
- auto-detects and disables coloring for non-ttys
- maps uncaught exceptions to the correct test case
- async test timeout support
- test-specific timeouts
- growl notification support
- reports test durations
- highlights slow tests
- file watcher support
- global variable leak detection
- optionally run tests that match a regexp
- auto-exit to prevent "hanging" with an active loop
- easily meta-generate suites & test-cases
- mocha.opts file support
- clickable suite titles to filter test execution
- node debugger support
- detects multiple calls to
done() - use any assertion library you want
- extensible reporting, bundled with 9+ reporters
- extensible test DSLs or "interfaces"
- before, after, before each, after each hooks
- arbitrary transpiler support (coffee-script etc)
- TextMate bundle
- and more!
Table of Contents
- Features
- Installation
- Getting Started
- Assertions
- Synchronous Code
- Asynchronous Code
- Arrow Functions
- Hooks
- Pending Tests
- Exclusive Tests
- Inclusive Tests
- Dynamically Generating Tests
- Timeouts
- Diffs
- Usage
- Interfaces
- Reporters
- Running Mocha in the Browser
mocha.opts- The
test/Directory - Editor Plugins
- Examples
- Testing Mocha
- More Information
Installation
Install with npm:
$ npm install -g mocha
Getting Started
$ npm install -g mocha
$ mkdir test
$ $EDITOR test/test.js
In your editor:
var assert = require('assert');
describe('Array', function() {
  describe('#indexOf()', function () {
    it('should return -1 when the value is not present', function () {
      assert.equal(-1, [1,2,3].indexOf(5));
      assert.equal(-1, [1,2,3].indexOf(0));
    });
  });
});
Back in the terminal:
$ mocha
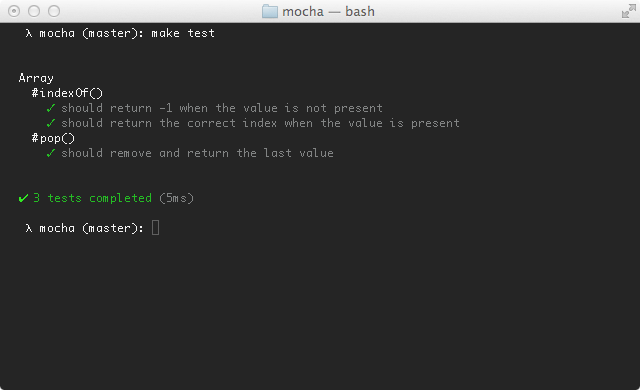
.
✔ 1 test complete (1ms)
Assertions
Mocha allows you to use any assertion library you want, if it throws an error, it will work! This means you can utilize libraries such as:
- should.js BDD style shown throughout these docs
- expect.js expect() style assertions
- chai expect(), assert() and should style assertions
- better-assert c-style self-documenting assert()
- unexpected the extensible BDD assertion toolkit
Synchronous Code
When testing synchronous code, omit the callback and Mocha will automatically continue on to the next test.
describe('Array', function() {
  describe('#indexOf()', function() {
    it('should return -1 when the value is not present', function() {
      [1,2,3].indexOf(5).should.equal(-1);
      [1,2,3].indexOf(0).should.equal(-1);
    });
  });
});
Asynchronous Code
Testing asynchronous code with Mocha could not be simpler! Simply invoke the callback when your test is complete. By adding a callback (usually named done) to it() Mocha will know that it should wait for completion.
describe('User', function() {
  describe('#save()', function() {
    it('should save without error', function(done) {
      var user = new User('Luna');
      user.save(function(err) {
        if (err) throw err;
        done();
      });
    });
  });
});
To make things even easier, the done() callback accepts an error, so we may use this directly:
describe('User', function() {
  describe('#save()', function() {
    it('should save without error', function(done) {
      var user = new User('Luna');
      user.save(done);
    });
  });
});
Working with Promises
Alternately, instead of using the done() callback, you may return a Promise. This is useful if the APIs you are testing return promises instead of taking callbacks:
beforeEach(function() {
  return db.clear()
    .then(function() {
      return db.save([tobi, loki, jane]);
    });
});

describe('#find()', function() {
  it('respond with matching records', function() {
    return db.find({ type: 'User' }).should.eventually.have.length(3);
  });
});
(The latter example uses Chai as Promised for fluent promise assertions.)
Arrow functions
Passing arrow functions to Mocha is discouraged. Their lexical binding of the this value makes them unable to access the Mocha context, and statements like this.timeout(1000); will not work inside an arrow function.
Hooks
Mocha provides the hooks before(), after(), beforeEach(), and afterEach(), which can be used to set up preconditions and clean up after your tests.
describe('hooks', function() {

  before(function() {
    // runs before all tests in this block
  });

  after(function() {
    // runs after all tests in this block
  });

  beforeEach(function() {
    // runs before each test in this block
  });

  afterEach(function() {
    // runs after each test in this block
  });

  // test cases
});
Describing Hooks
All hooks can be invoked with an optional description, making it easier to pinpoint errors in your tests. If hooks are given named functions, those names will be used if no description is supplied.
beforeEach(function() {
  // beforeEach hook
});

beforeEach(function namedFun() {
  // beforeEach:namedFun
});

beforeEach('some description', function() {
  // beforeEach:some description
});
Asynchronous Hooks
All "hooks" (before(), after(), beforeEach(), afterEach()) may be sync or async as well, behaving much like a regular test-case. For example, you may wish to populate database with dummy content before each test:
describe('Connection', function() {
  var db = new Connection,
    tobi = new User('tobi'),
    loki = new User('loki'),
    jane = new User('jane');

  beforeEach(function(done) {
    db.clear(function(err) {
      if (err) return done(err);
      db.save([tobi, loki, jane], done);
    });
  });

  describe('#find()', function() {
    it('respond with matching records', function(done) {
      db.find({type: 'User'}, function(err, res) {
        if (err) return done(err);
        res.should.have.length(3);
        done();
      });
    });
  });
});
Root-Level Hooks
You may also pick any file and add "root"-level hooks. For example, add beforeEach() outside of all describe() blocks. This will cause the callback to beforeEach() to run before any test case, regardless of the file it lives in (this is because Mocha has a hidden describe() block, called the "root suite").
beforeEach(function() {
  console.log('before every test in every file');
});
Delayed Root Suite
If you need to perform asynchronous operations before any of your suites are run, you may delay the root suite. Simply run Mocha with the --delay flag. This will provide a special function, run(), in the global context.
setTimeout(function() {
  // do some setup

  describe('my suite', function() {
    // ...
  });

  run();
}, 5000);
Pending Tests
"Pending"--as in "someone should write these test cases eventually"--test-cases are simply those without a callback:
describe('Array', function() {
  describe('#indexOf()', function() {
    // pending test below
    it('should return -1 when the value is not present');
  });
});
Pending tests will be reported as such.
Exclusive Tests
The exclusivity feature allows you to run only the specified suite or test-case
by appending .only() to the function. Here's an example of executing only a particular suite:
describe('Array', function() {
  describe.only('#indexOf()', function() {
    // ...
  });
});
Note: All nested suites will still be executed.
Here's an example of executing a particular test case:
describe('Array', function() {
  describe('#indexOf()', function() {
    it.only('should return -1 unless present', function() {
      // ...
    });

    it('should return the index when present', function() {
      // ...
    });
  });
});
Note: Hooks, if present, will still be executed.
Warning: Having more than one call to .only() in your tests or suites may result in unexpected behavior.
Inclusive Tests
This feature is the inverse of .only(). By appending .skip(), you may tell Mocha to simply ignore these suite(s) and test case(s). Anything skipped will be marked as pending, and reported as such. Here's an example of skipping an entire suite:
describe('Array', function() {
  describe.skip('#indexOf()', function() {
    // ...
  });
});
Best practice: Use
.skip()instead of commenting tests out.
Or a specific test-case:
describe('Array', function() {
  describe('#indexOf()', function() {
    it.skip('should return -1 unless present', function() {
      // ...
    });

    it('should return the index when present', function() {
      // ...
    });
  });
});
Dynamically Generating Tests
Given Mocha's use of Function.prototype.call and function expressions to define suites and test cases, it's straightforward to generate your tests dynamically. No special syntax is required — plain ol' JavaScript can be used to achieve functionality similar to "parameterized" tests, which you may have seen in other frameworks.
Take the following example:
var assert = require('assert');

function add() {
  return Array.prototype.slice.call(arguments).reduce(function(prev, curr) {
    return prev + curr;
  }, 0);
}

describe('add()', function() {
  var tests = [
    {args: [1, 2],       expected: 3},
    {args: [1, 2, 3],    expected: 6},
    {args: [1, 2, 3, 4], expected: 10}
  ];

  tests.forEach(function(test) {
    it('correctly adds ' + test.args.length + ' args', function() {
      var res = add.apply(null, test.args);
      assert.equal(res, test.expected);
    });
  });
});
The above code will produce a suite with three specs:
$ mocha

  add()
    ✓ correctly adds 2 args
    ✓ correctly adds 3 args
    ✓ correctly adds 4 args
Test duration
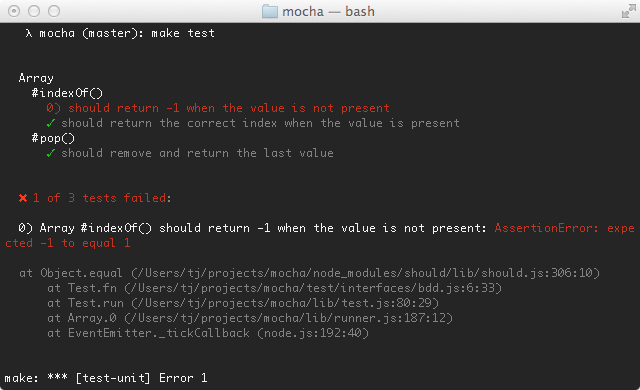
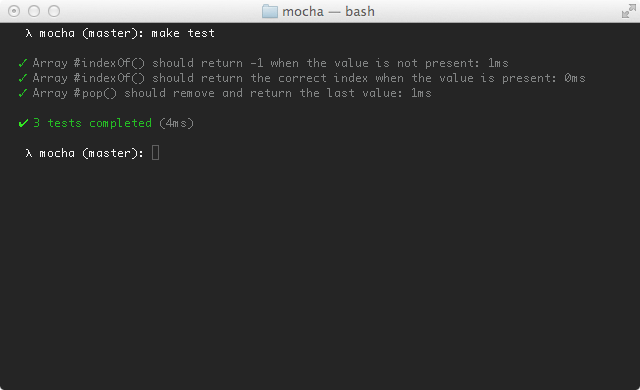
Many reporters will display test duration, as well as flagging tests that are slow, as shown here with the "spec" reporter:

To tweak what's considered "slow", you can use the slow() method:
describe('something slow', function() {
  this.slow(10000);

  it('should take long enough for me to go make a sandwich', function() {
    // ...
  });
});
Timeouts
Suite-level
Suite-level timeouts may be applied to entire test "suites", or disabled via this.timeout(0). This will be inherited by all nested suites and test-cases that do not override the value.
describe('a suite of tests', function() {
  this.timeout(500);

  it('should take less than 500ms', function(done){
    setTimeout(done, 300);
  });

  it('should take less than 500ms as well', function(done){
    setTimeout(done, 200);
  });
})
Test-level
Test-specific timeouts may also be applied, or the use of this.timeout(0) to disable timeouts all together:
it('should take less than 500ms', function(done){
  this.timeout(500);
  setTimeout(done, 300);
});
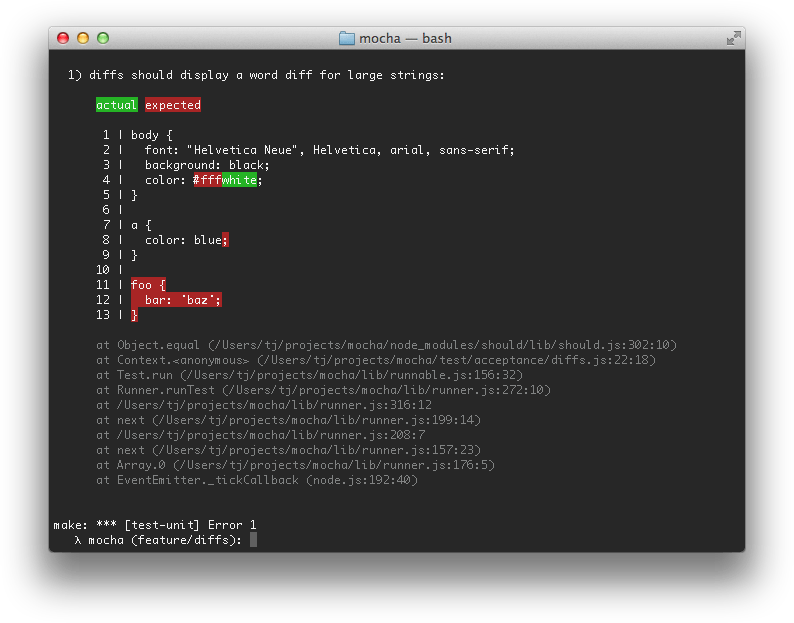
Diffs
Mocha supports the err.expected and err.actual properties of any thrown AssertionErrors from an assertion library. Mocha will attempt to display the difference between what was expected, and what the assertion actually saw. Here's an example of a "string" diff:
Usage
Usage: mocha [debug] [options] [files]

Commands:

  init <path>
  initialize a client-side mocha setup at <path>

Options:

 -h, --help                              output usage information
 -V, --version                           output the version number
 -A, --async-only                        force all tests to take a callback (async) or return a promise
 -c, --colors                            force enabling of colors
 -C, --no-colors                         force disabling of colors
 -G, --growl                             enable growl notification support
 -O, --reporter-options <k=v,k2=v2,...>  reporter-specific options
 -R, --reporter <name>                   specify the reporter to use
 -S, --sort                              sort test files
 -b, --bail                              bail after first test failure
 -d, --debug                             enable node's debugger, synonym for node --debug
 -g, --grep <pattern>                    only run tests matching <pattern>
 -f, --fgrep <string>                    only run tests containing <string>
 -gc, --expose-gc                        expose gc extension
 -i, --invert                            inverts --grep and --fgrep matches
 -r, --require <name>                    require the given module
 -s, --slow <ms>                         "slow" test threshold in milliseconds [75]
 -t, --timeout <ms>                      set test-case timeout in milliseconds [2000]
 -u, --ui <name>                         specify user-interface (bdd|tdd|exports)
 -w, --watch                             watch files for changes
 --check-leaks                           check for global variable leaks
 --compilers <ext>:<module>,...          use the given module(s) to compile files
 --debug-brk                             enable node's debugger breaking on the first line
 --delay                                 wait for async suite definition
 --es_staging                            enable all staged features
 --full-trace                            display the full stack trace
 --globals <names>                       allow the given comma-delimited global [names]
 --harmony                               enable all harmony features (except typeof)
 --harmony-collections                   enable harmony collections (sets, maps, and weak maps)
 --harmony-generators                    enable harmony generators
 --harmony-proxies                       enable harmony proxies
 --harmony_arrow_functions               enable "harmony arrow functions" (iojs)
 --harmony_classes                       enable "harmony classes" (iojs)
 --harmony_proxies                       enable "harmony proxies" (iojs)
 --harmony_shipping                      enable all shipped harmony fetaures (iojs)
 --inline-diffs                          display actual/expected differences inline within each string
 --interfaces                            display available interfaces
 --no-deprecation                        silence deprecation warnings
 --no-exit                               require a clean shutdown of the event loop: mocha will not call process.exit
 --no-timeouts                           disables timeouts, given implicitly with --debug
 --opts <path>                           specify opts path
 --prof                                  log statistical profiling information
 --recursive                             include sub directories
 --reporters                             display available reporters
 --throw-deprecation                     throw an exception anytime a deprecated function is used
 --trace                                 trace function calls
 --trace-deprecation                     show stack traces on deprecations
 --watch-extensions <ext>,...            additional extensions to monitor with --watch
-w, --watch
Executes tests on changes to JavaScript in the CWD, and once initially.
--compilers
CoffeeScript is no longer supported out of the box. CS and similar transpilers
may be used by mapping the file extensions (for use with --watch) and the module
name. For example --compilers coffee:coffee-script with CoffeeScript 1.6- or
--compilers coffee:coffee-script/register with CoffeeScript 1.7+.
-b, --bail
Only interested in the first exception? use --bail!
-d, --debug
Enables node's debugger support, this executes your script(s) with node debug <file ...> allowing you to step through code and break with the debugger statement. Note the difference between mocha debug and mocha --debug: mocha debug will fire up node's built-in debug client, mocha --debug will allow you to use a different interface — such as the Blink Developer Tools.
--globals <names>
Accepts a comma-delimited list of accepted global variable names. For example, suppose your app deliberately exposes a global named app and YUI, you may want to add --globals app,YUI. It also accepts wildcards. You could do --globals '*bar' and it would match foobar, barbar, etc. You can also simply pass in '*' to ignore all globals.
--check-leaks
By default, Mocha will not check for global variables leaked while running tests, to enable this pass --check-leaks, to specify globals that are acceptable use --globals, for example --globals jQuery,MyLib.
-r, --require <module-name>
The --require option is useful for libraries such as should.js, so you may simply --require should instead of manually invoking require('should') within each test file. Note that this works well for should as it augments Object.prototype, however if you wish to access a module's exports you will have to require them, for example var should = require('should'). Furthermore, it can be used with relative paths, e.g. --require ./test/helper.js
-u, --ui <name>
The --ui option lets you specify the interface to use, defaulting to "bdd".
-R, --reporter <name>
The --reporter option allows you to specify the reporter that will be used, defaulting to "spec". This flag may also be used to utilize third-party reporters. For example if you npm install mocha-lcov-reporter you may then do --reporter mocha-lcov-reporter.
-t, --timeout <ms>
Specifies the test-case timeout, defaulting to 2 seconds. To override you may pass the timeout in milliseconds, or a value with the s suffix, ex: --timeout 2s or --timeout 2000 would be equivalent.
-s, --slow <ms>
Specify the "slow" test threshold, defaulting to 75ms. Mocha uses this to highlight test-cases that are taking too long.
-g, --grep <pattern>
The --grep option when specified will trigger mocha to only run tests matching the given pattern which is internally compiled to a RegExp.
Suppose, for example, you have "api" related tests, as well as "app" related tests, as shown in the following snippet; One could use --grep api or --grep app to run one or the other. The same goes for any other part of a suite or test-case title, --grep users would be valid as well, or even --grep GET.
describe('api', function() {
  describe('GET /api/users', function() {
    it('respond with an array of users', function() {
      // ...
    });
  });
});

describe('app', function() {
  describe('GET /users', function() {
    it('respond with an array of users', function() {
      // ...
    });
  });
});
Interfaces
Mocha's "interface" system allows developers to choose their style of DSL. Mocha has BDD, TDD, Exports, QUnit and Require-style interfaces.
BDD
The BDD interface provides describe(), context(), it(), before(), after(), beforeEach(), and afterEach().
context() is just an alias for describe(), and behaves the same way; it just provides a way to keep tests easier to read and organized.
All of the previous examples were written using the BDD interface.
  describe('Array', function() {
    before(function() {
      // ...
    });

    describe('#indexOf()', function() {
      context('when not present', function() {
        it('should not throw an error', function() {
          (function() {
            [1,2,3].indexOf(4);
          }).should.not.throw();
        });
        it('should return -1', function() {
          [1,2,3].indexOf(4).should.equal(-1);
        });
      });
      context('when present', function() {
        it('should return the index where the element first appears in the array', function() {
          [1,2,3].indexOf(3).should.equal(2);
        });
      });
    });
  });
TDD
The TDD interface provides suite(), test(), suiteSetup(), suiteTeardown(), setup(), and teardown():
suite('Array', function() {
  setup(function() {
    // ...
  });

  suite('#indexOf()', function() {
    test('should return -1 when not present', function() {
      assert.equal(-1, [1,2,3].indexOf(4));
    });
  });
});
Exports
The Exports interface is much like Mocha's predecessor expresso. The keys before, after, beforeEach, and afterEach are special-cased, object values are suites, and function values are test-cases:
module.exports = {
  before: function() {
    // ...
  },

  'Array': {
    '#indexOf()': {
      'should return -1 when not present': function() {
        [1,2,3].indexOf(4).should.equal(-1);
      }
    }
  }
};
QUnit
The QUnit-inspired interface matches the "flat" look of QUnit, where the test suite title is simply defined before the test-cases. Like TDD, it uses suite() and test(), but resembling BDD, it also contains before(), after(), beforeEach(), and afterEach().
function ok(expr, msg) {
  if (!expr) throw new Error(msg);
}

suite('Array');

test('#length', function() {
  var arr = [1,2,3];
  ok(arr.length == 3);
});

test('#indexOf()', function() {
  var arr = [1,2,3];
  ok(arr.indexOf(1) == 0);
  ok(arr.indexOf(2) == 1);
  ok(arr.indexOf(3) == 2);
});

suite('String');

test('#length', function() {
  ok('foo'.length == 3);
});
Require
The require interface allows you to require the describe and friend words directly using require and call them whatever you want. This interface is also useful if you want to avoid global variables in your tests.
Note: The require interface cannot be run via the node executable, and must be run via mocha.
var testCase = require('mocha').describe;
var pre = require('mocha').before;
var assertions = require('mocha').it;
var assert = require('assert');

testCase('Array', function() {
  pre(function() {
    // ...
  });

  testCase('#indexOf()', function() {
    assertions('should return -1 when not present', function() {
      assert.equal([1,2,3].indexOf(4), -1);
    });
  });
});
Reporters
Mocha reporters adjust to the terminal window, and always disable ANSI-escape coloring when the stdio streams are not associated with a TTY.
Spec
This is the default reporter. The "spec" reporter outputs a hierarchical view nested just as the test cases are.
Dot Matrix
The dot matrix (or "dot") reporter is simply a series of dots that represent test cases, failures highlight in red, pending in blue, slow as yellow. Good if you would like minimal output.
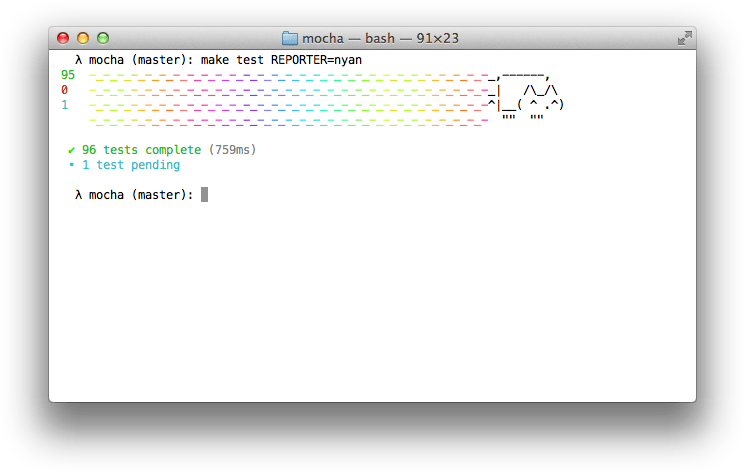
Nyan
The "nyan" reporter is exactly what you might expect:
TAP
The TAP reporter emits lines for a Test-Anything-Protocol consumer.
Landing Strip
The 'Landing Strip' reporter is a gimmicky test reporter simulating a plane landing :) unicode ftw
List
The "list" reporter outputs a simple specifications list as test cases pass or fail, outputting the failure details at the bottom of the output.
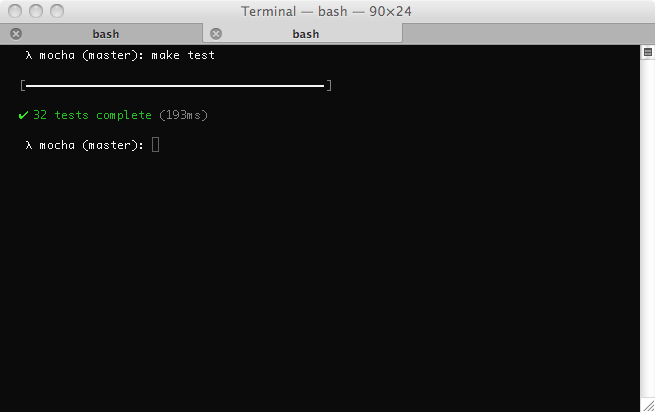
Progress
The "progress" reporter implements a simple progress-bar:
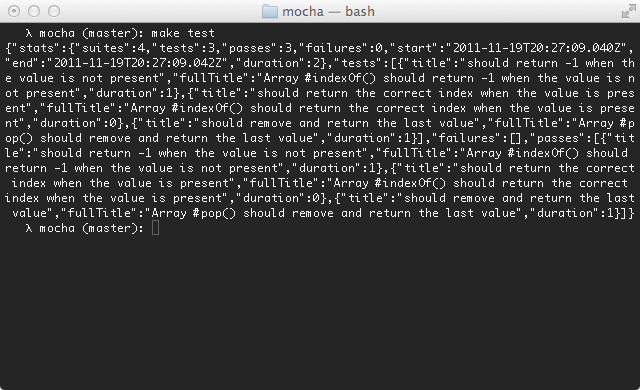
JSON
The "JSON" reporter outputs a single large JSON object when the tests have completed (failures or not).
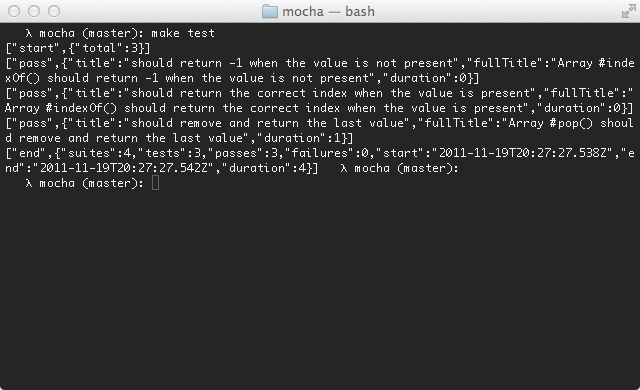
JSON Stream
The "JSON stream" reporter outputs newline-delimited JSON "events" as they occur, beginning with a "start" event, followed by test passes or failures, and then the final "end" event.
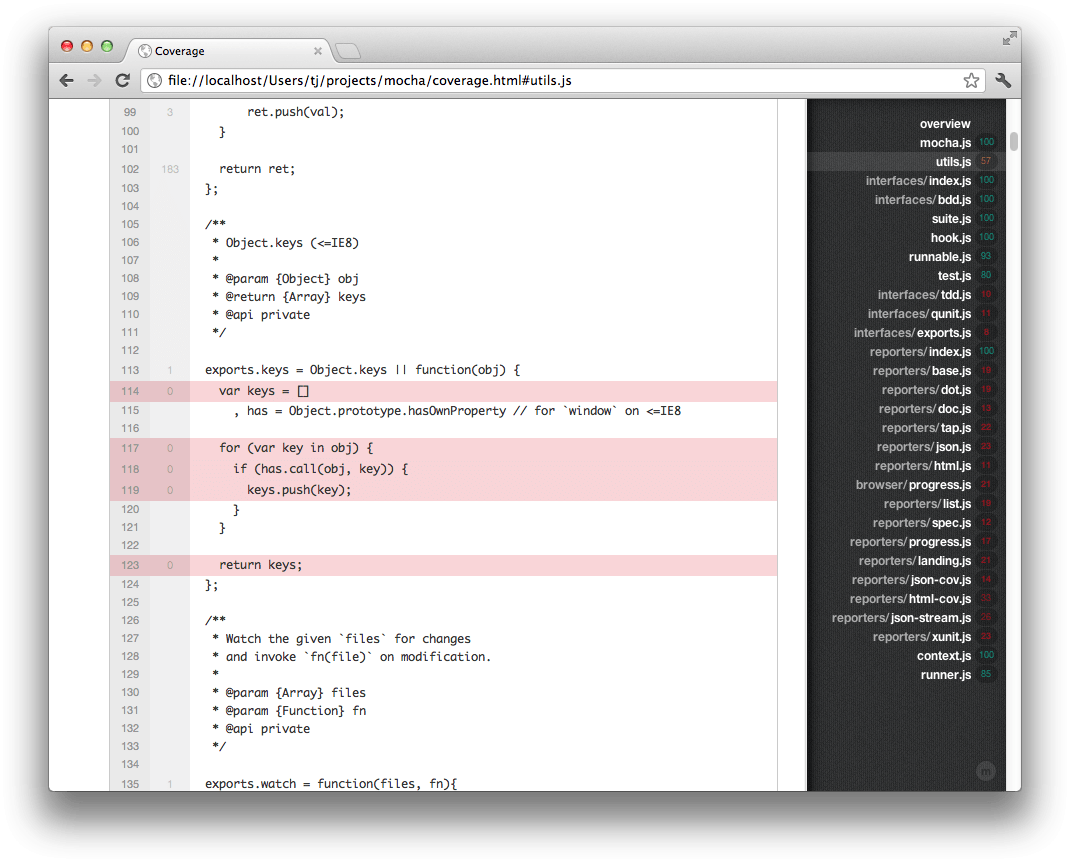
JSONCov
The "JSONCov" reporter is similar to the JSON reporter, however when run against a library instrumented by node-jscoverage it will produce coverage output.
HTMLCov
The "HTMLCov" reporter extends the JSONCov reporter. The library being tested should first be instrumented by node-jscoverage, this allows Mocha to capture the coverage information necessary to produce a single-page HTML report.
For an integration example, view the mocha test coverage support commit for Express.
Min
The "min" reporter displays the summary only, while still outputting errors on failure. This reporter works great with --watch as it clears the terminal in order to keep your test summary at the top.
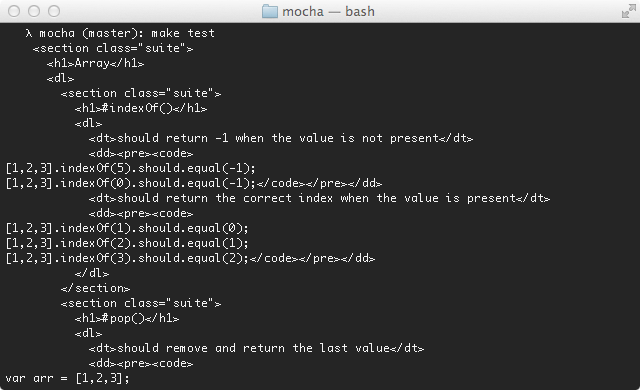
Doc
The "doc" reporter outputs a hierarchical HTML body representation of your tests. Wrap it with a header, footer, and some styling, then you have some fantastic documentation!
For example, suppose you have the following JavaScript:
describe('Array', function() {
  describe('#indexOf()', function() {
    it('should return -1 when the value is not present', function() {
      [1,2,3].indexOf(5).should.equal(-1);
      [1,2,3].indexOf(0).should.equal(-1);
    });
  });
});
The command mocha --reporter doc array would yield:
<section class="suite">
  <h1>Array</h1>
  <dl>
    <section class="suite">
      <h1>#indexOf()</h1>
      <dl>
      <dt>should return -1 when the value is not present</dt>
      <dd><pre><code>[1,2,3].indexOf(5).should.equal(-1);
[1,2,3].indexOf(0).should.equal(-1);</code></pre></dd>
      </dl>
    </section>
  </dl>
</section>
The SuperAgent request library test documentation was generated with Mocha's doc reporter using this simple make target:
  test-docs:
    make test REPORTER=doc \
      | cat docs/head.html - docs/tail.html \
      > docs/test.html
View the entire Makefile for reference.
Markdown
The "markdown" reporter generates a markdown TOC and body for your test suite. This is great if you want to use the tests as documentation within a Github wiki page, or a markdown file in the repository that Github can render. For example here is the Connect test output.
HTML
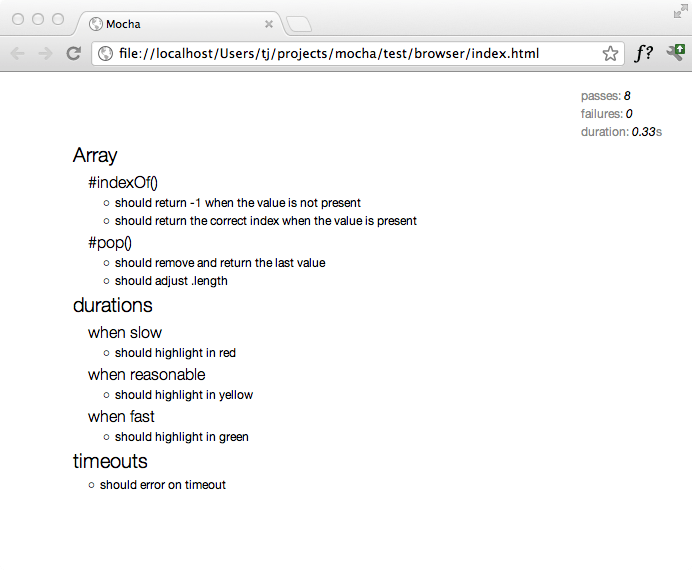
The "HTML" reporter is currently the only browser reporter supported by Mocha, and it looks like this:
Undocumented Reporters
The "XUnit" and "TeamCity" reporters are also available, but someone needs to write the documentation.
Running Mocha in the Browser
Mocha runs in the browser. Every release of Mocha will have new builds of ./mocha.js and ./mocha.css for use in the browser.
Browser-specific methods
The following method(s) only function in a browser context:
mocha.allowUncaught() : If called, uncaught errors will not be absorbed by the error handler.
A typical setup might look something like the following, where we call mocha.setup('bdd') to use the BDD interface before loading the test scripts, running them onload with mocha.run().
<html>
<head>
  <meta charset="utf-8">
  <title>Mocha Tests</title>
  <link href="https://cdn.rawgit.com/mochajs/mocha/2.2.5/mocha.css" rel="stylesheet" />
</head>
<body>
  <div id="mocha"></div>

  <script src="https://cdn.rawgit.com/jquery/jquery/2.1.4/dist/jquery.min.js"></script>
  <script src="https://cdn.rawgit.com/Automattic/expect.js/0.3.1/index.js"></script>
  <script src="https://cdn.rawgit.com/mochajs/mocha/2.2.5/mocha.js"></script>

  <script>mocha.setup('bdd')</script>
  <script src="test.array.js"></script>
  <script src="test.object.js"></script>
  <script src="test.xhr.js"></script>
  <script>
    mocha.checkLeaks();
    mocha.globals(['jQuery']);
    mocha.run();
  </script>
</body>
</html>
Grep
The browser may use the --grep as functionality. Append a query-string to your URL: ?grep=api.
Browser Configuration
Mocha options can be set via mocha.setup(). Examples:
// Use "tdd" interface.  This is a shortcut to setting the interface;
// any other options must be passed via an object.
mocha.setup('tdd');

// This is equivalent to the above.
mocha.setup({
  ui: 'tdd'
});

// Use "tdd" interface, ignore leaks, and force all tests to be asynchronous
mocha.setup({
  ui: 'tdd',
  ignoreLeaks: true,
  asyncOnly: true
});
Browser-specific Option(s)
The following option(s) only function in a browser context:
noHighlighting: If set to true, do not attempt to use syntax highlighting on output test code.
mocha.opts
Back on the server, Mocha will attempt to load ./test/mocha.opts as a configuration file of sorts. The lines in this file are combined with any command-line arguments. The command-line arguments take precedence. For example, suppose you have the following mocha.opts file:
  --require should
  --reporter dot
  --ui bdd
This will default the reporter to dot, require the should library, and use bdd as the interface. With this, you may then invoke mocha with additional arguments, here enabling Growl support, and changing the reporter to list:
$ mocha --reporter list --growl
The test/ Directory
By default, mocha looks for the glob ./test/*.js, so you may want to put your tests in test/ folder.
Editor Plugins
The following editor-related packages are available:
TextMate
The Mocha TextMate bundle includes snippets to make writing tests quicker and more enjoyable. To install the bundle, clone a copy of the Mocha repo, and run:
$ make tm
JetBrains
JetBrains provides a NodeJS plugin for its suite of IDEs (IntelliJ IDEA, WebStorm, etc.), which contains a Mocha test runner, among other things.
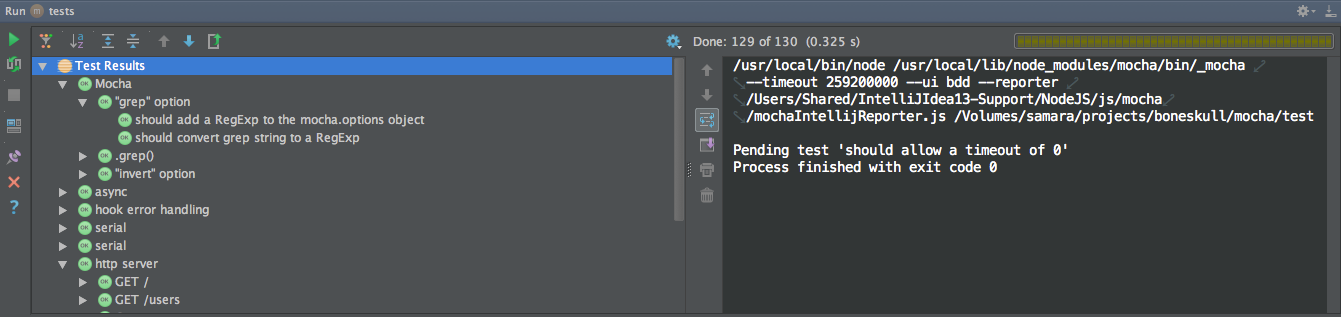
The plugin is titled NodeJS, and can be installed via Preferences > Plugins, assuming your license allows it.
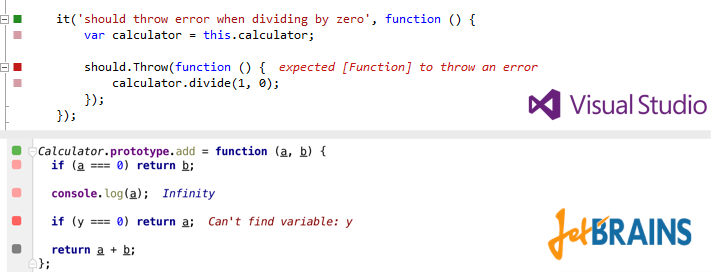
Wallaby.js
Wallaby.js is a continuous testing tool that enables real-time code coverage for Mocha with any assertion library in JetBrains IDEs (IntelliJ IDEA, WebStorm, etc.) and Visual Studio for both browser and node.js projects.
Examples
Real live example code:
Testing Mocha
To run Mocha's tests:
$ make test
Run all tests, including interfaces:
$ make test-all
Alter the reporter:
$ make test REPORTER=list
More Information
In addition to chatting with us on Gitter, for additional information such as using spies, mocking, and shared behaviours be sure to check out the Mocha Wiki on GitHub. For discussions join the Google Group. For a running example of Mocha, view example/tests.html. For the JavaScript API, view the source.