Ragdoll Wizard
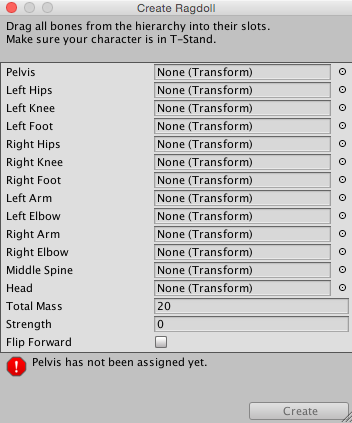
Unity has a simple wizard that lets you quickly create your own ragdoll. You simply have to drag the different limbs on the respective properties in the wizard. Then select create and Unity will automatically generate all CollidersAn invisible shape that is used to handle physical collisions for an object. A collider doesn’t need to be exactly the same shape as the object’s mesh - a rough approximation is often more efficient and indistinguishable in gameplay. More info
See in Glossary, RigidbodiesA component that allows a GameObject to be affected by simulated gravity and other forces. More info
See in Glossary and JointsA physics component allowing a dynamic connection between rigidbodies, usually allowing some degree of movement such as a hinge. More info
See in Glossary that make up the Ragdoll for you.
Creating the Character
Ragdolls make use of Skinned Meshes, that is a character meshThe main graphics primitive of Unity. Meshes make up a large part of your 3D worlds. Unity supports triangulated or Quadrangulated polygon meshes. Nurbs, Nurms, Subdiv surfaces must be converted to polygons. More info
See in Glossary rigged up with bones in the 3D modeling application. For this reason, you must build ragdoll characters in a 3D package like Autodesk® Maya® or Cinema4D.
When you’ve created your character and rigged it, save the assetAny media or data that can be used in your game or Project. An asset may come from a file created outside of Unity, such as a 3D model, an audio file or an image. You can also create some asset types in Unity, such as an Animator Controller, an Audio Mixer or a Render Texture. More info
See in Glossary normally in your Project Folder. When you switch to Unity, you’ll see the character asset file. Select that file and the Import Settings dialog will appear inside the inspectorA Unity window that displays information about the currently selected GameObject, Asset or Project Settings, alowing you to inspect and edit the values. More info
See in Glossary. Make sure that Mesh CollidersA free-form collider component which accepts a mesh reference to define its collision surface shape. More info
See in Glossary is not enabled.
Using the Wizard
It’s not possible to make the actual source asset into a ragdoll. This would require modifying the source asset file, and is therefore impossible. You will make an instance of the character asset into a ragdoll, which can then be saved as a PrefabAn asset type that allows you to store a GameObject complete with components and properties. The prefab acts as a template from which you can create new object instances in the scene. More info
See in Glossary for re-use.
Create an instance of the character by dragging it from the Project ViewA view that shows the contents of your Assets folder (Project tab) More info
See in Glossary to the Hierarchy View. Expand its Transform Hierarchy by clicking the small arrow to the left of the instance’s name in the Hierarchy. Now you are ready to start assigning your ragdoll parts.
Open the Ragdoll Wizard by choosing GameObject > 3D Object > Ragdoll… from the menu bar. You will now see the Wizard itself.

Assigning parts to the wizard should be self-explanatory. Drag the different Transforms of your character instance to the appropriate property on the wizard. This should be especially easy if you created the character asset yourself.
When you are done, click the Create Button. Now when you enter Play Mode, you will see your character go limp as a ragdoll.
The final step is to save the setup ragdoll as a Prefab. Choose Assets -> Create -> Prefab from the menu bar. You will see a New Prefab appear in the Project View. Rename it to “Ragdoll Prefab”. Drag the ragdoll character instance from the Hierarchy on top of the “Ragdoll Prefab”. You now have a completely set-up, re-usable ragdoll character to use as much as you like in your game.
Note
For Character JointsAn extended ball-socket joint which allows a joint to be limited on each axis. Mainly used for Ragdoll effects. More info
See in Glossary made with the Ragdoll wizard, take a note that the setup is made such that the joint’s Twist axis corresponds with the limb’s largest swing axisA joint property that defines the axis around which the joint can swing. More info
See in Glossary, the joint’s Swing 1 axis corresponds with limb’s smaller swing axis and joint’s Swing 2 is for twisting the limb. This naming scheme is for legacy reasons.
Did you find this page useful? Please give it a rating: