Appearance Menus Screen
Languages: English • Menus SubPanel 日本語 Português do Brasil • Slovenčina • 中文(简体) • (Add your language)
Contents
Appearance → Menus
The Appearance Menus Screen enables a user to create custom navigation menu in place of a theme’s default menu. Support for this feature must be registered in the theme's functions.php file. The WordPress Menu User Guide describes the details of adding, deleting, and maintaining menus.
Screen Options
The Screen Options allow you to choose which modules are displayed, or not displayed, in the underlying Screen. Clicking on the Screen Options tab shows a list of the possible modules and options with a check-box next to each. Check the box for each module or option you want displayed, or uncheck the box to not display that module. Click the Screen Options tab again to close the Screen Options.
Certain modules, like Posts are hidden by default.
Expanding, Collapsing, and Rearranging, Modules
The modules, such as Posts, can be expanded, or collapsed, by clicking on the module title bar.
In addition, those modules can be moved by hovering the mouse cursor over the module title bar, when the mouse cursor changes to 4-arrows, hold the left-mouse button down, drag the module to where you want to place it, then release the mouse button (this is called drag-and-drop).
Create a Menu
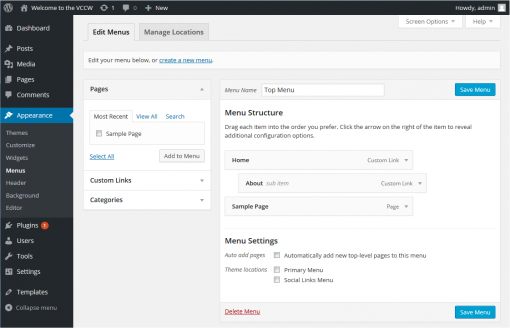
To create a new custom menu, click the "create a new menu" link, give the menu a name, and click Create Menu button.
Note: If the current theme does not support menus, the message, "The current theme does not natively support menus, but you can use the “Custom Menu” widget to add any menus you create here to the theme’s sidebar." will display informing you that widgets can be used to put custom menus in a sidebar.
You can create multiple menus. If your theme includes support for more than one menu, you can choose which custom menu to associate with each. You can also use custom menus in conjunction with the Custom Menus widget.
Once a menu is created these options are available:
- Automatically add new top-level pages
- Check this box so that anytime a new top-level Page is created, that Page will automatically be added to the menu
- Theme Locations
- If more than one menu is supported, you can select where this menu should go.
- Delete Menu
- Click this link to delete the menu. Deleting also deletes the menu items.
- Save menu
- Click this button to save the menu.
Add Menu Items
After a menu is created, then detail items can be added to the menu. Choose items like custom links, pages, and categories, from the left column to add to the menu. If you have created custom post types or custom taxonomies those too can be added to menus. If you don't see your custom post types or taxonomies, look under the Screen Options to make sure they are checked to be Show on Screen.
After items have been added to a menu, drag and drop to put them in the order you want. You can also click each item to reveal additional configuration options. You can also drag a menu item a little to the right to make it a submenu, to create menus with hierarchy. You'll see when the position of the drop target shifts over to portray the nested placement. When you have finished building your custom menu, make sure you click the Save Menu button.
You can specify a different navigation label for a menu item as well as other attributes. You can create multiple menus. If your theme includes more than one menu, you can choose which custom menu to associate with each. You can also use custom menus in conjunction with the Custom Menus widget.
This screenshot shows an example of the About Menu Item displayed in a hierarchy under the Home Menu Item.
Theme Locations
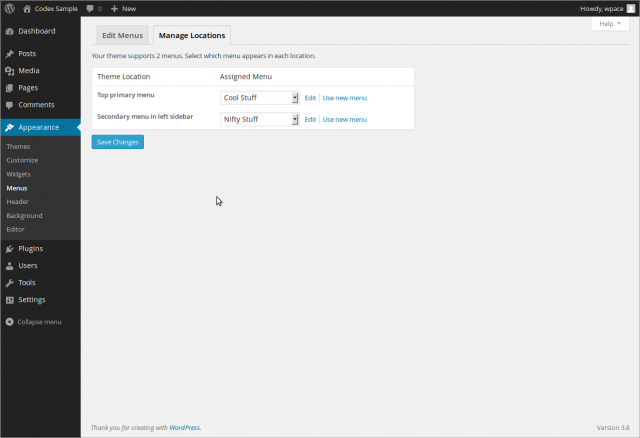
Theme locations allow the definition of the placement of your menu. The WordPress Twenty Fifteen theme supports two menu locations. For themes that only support one menu the message 'Your theme supports 1 menu. Select which menu you would like to use. displays. (If you have added support for more navigation menus in your theme, you will see more pull-down location options)
- Location
- From the pull down box, select the menu that will be presented in the location such as Primary Location
- Save
- Click to save the location selection.
Note: You have to open your site to confirm the menu appearance. The Theme Customizer enable live preview of the placement of your menu. Administration > Appearance > Customize and click Navigation. Still you need this screen because there are no function to create new menu in the Theme Customizer.
Custom Links
Custom links allow links defined by you that don't fit into the other types of menu items.
- URL
- Enter the URL of the custom link.
- Label
- Enter the label describing the custom link URL.
- Add to Menu
- Click this button to add this as a Custom item to the menu.
Once added to the menu, the item will display to the right with the label, the word Custom and a configuration arrow that can be used to change the URL or Label as well as Remove the custom link from the menu.
Posts
Links to specific posts can be added to the menu. Three tabs, Most Recent, View All, and Search, determines what posts are displayed for selection as a menu item.
- Checkbox
- Check the box next to the item to add to the menu.
- Select All
- Cause the Checkbox to be checked on all items. If you click this link again, all items will be unchecked.
- Add to Menu
- Click this button to add the selected items to the menu.
Pages
Links to specific pages can be added to the menu. Three tabs, Most Recent, View All, and Search, determines what posts are displayed for selection as a menu item. When the View All tab is displayed, a Home choice, while not an actual page, also becomes available to add to the menu. The Checkbox, Select All, and Add to Menu options, describe in the Posts section, are also displayed in this module.
Categories
Categories can also be added to the menu. Three tabs, Most Recent, View All, and Search, determines what categories are displayed for selection as a menu item. The list of categories to select from do not display with any hierarchy, though that may be subject to change in future versions of WordPress. The Checkbox, Select All, and Add to Menu options, describe in the Posts section, are also displayed in this module.
Post Tags
Post Tags can also be added to menus. Three tabs, Most Recent, View All, and Search, determines what categories are displayed for selection as a menu item. The Checkbox, Select All, and Add to Menu options, describe in the Posts section, are also displayed in this module.
Custom Post Types and Taxonomies
If you have added custom post types and taxonomies, those types will also be available to add as menu items. If you don't see your custom post types or taxonomies, check the Screen Options to ensure those modules are set to display. The options under each of the custom post type and taxonomy modules correspond to those used for Posts, Pages, Categories, and Post Tags.
Rearranging, Configuring, and Deleting Menu Items
Once an item is added to a menu, those menu items can be rearranged. Placing the mouse cursor over the menu item title, when the mouse cursor changes to 4-arrows, hold the left-mouse button down, drag the module to where you want to place it, then release the mouse button (this is called drag-and-drop). Remember you can drag a menu item slightly to the right of the menu item above it to create a hierarchy (parent/child) relationship in the menu.
Each Menu Item has a configuration arrow on the right side of the Menu Item title, that when clicked opens the configuration box. Click the arrow a second time closed the configuration box. If you don't see Link Target, CSS Classes, Link Relationship (XFN), and Description, then under Screen Options make sure those boxes are checked to expose them here.
Then configuration choices are:
- Navigation Label
- The label for this particular menu item
- Title Attribute
- The attribute used when displaying the label
- Link Target
- Select "Same window or tab" or "New window or tab" from the pulldown.
- CSS Classes
- Optional CSS Classes for this menu item
- Link Relationship (XFN)
- Allows for the generation of XFN attributes automatically so you can show how you are related to the authors/owners of site to which you are linking. See Link Relationship for details.
- Description
- Description for this link. The description will be displayed in the menu if the current theme supports it.
- Original
- A link to the original source of the menu item (e.g. a link to view the post or page).
- Remove
- Remove this menu item from the menu.
- Cancel
- Cancel the configuration of the menu item and
Adding Menu Support to Themes
The WordPress Twenty Seventeen theme supports navigation Menus. If your theme does not support the custom menu feature, you can do it yourself by adding the appropriate code to your theme's function.php file. To implement Menus for a theme see:
External Resources
- Create Custom Menus in WordPress Redux A visual guide to creating and editing custom menus
Changelog
- 3.0 : New Screen

