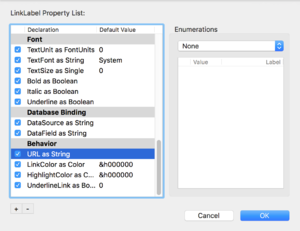
Inspector Behavior
From Xojo Documentation
When creating custom controls, you may want to make some of its properties changeable at design time in the Inspector.
To do this, open the contextual menu for the control in the Navigator and select Inspector Behavior. This opens the Inspector Behavior dialog. In this dialog, you can control all the properties that appear in the Inspector. You can add any new public properties on your control and you can also remove existing properties so they do not appear in the Inspector. You will need to scroll to the end to view new properties. Check the box next to a property name and click OK to have the property displayed in the Inspector for the control when it is on a layout.
Here are the steps in general:
- Create your custom control.
- Select the proper Inspector Behavior entries to expose in the IDE.
- Drag and drop the custom control onto your layout.
- Scroll the Inspector to the appropriate section (usually Behaviors) to see your exposed properties.
Other Features of the Inspector Behavior Dialog
The Inspector Behavior dialog allows you to control all aspects of what appears in the Inspector. You can:
- Add or remove group headings: Use the “+” or “-” buttons below the list or use the contextual menu.
- Change the order of the properties, including moving them to different groups: Drag properties around as needed.
- Set or modify default values: Double-click in the Default Value column for the property to set or modify the default value. When specifying the default value for an enumeration, use the enumeration's Integer value.
- Change whether a property is shown or hidden: Check the property to display it; uncheck it to hide it.
- Add enumerations: Use the Enumerations control on the right to add values that the user can select from a list.
See Also
UserGuide:IDE Overview, UserGuide:Desktop Custom Controls topics

