IDE Overview
From Xojo Documentation
Xojo is an Integrated Development Environment (IDE). This means that all its components (layout editor, code editor, compiler, debugger, etc.) are all integrated into one package. In traditional programming languages, these items would each be a separate application.
Contents
Getting Started
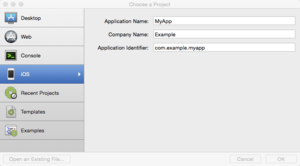
The first thing you see when you start Xojo is the Project Chooser window. It displays each time you start Xojo and when you select File ↠ New Project. With the Project Chooser window, you can choose to create a new project, work on a recent project, open any project file.
- New Projects
- The Project Chooser lets you quickly decide what project you want to work with. You can choose to create a new blank Desktop, Web, Console or iOS project or open an existing project. For new projects, fill in the Application Name and Company Name to automatically create the Application Identifier (which is used by Mac, iOS and web apps). You can also manually change the Application Identifier as necessary. You need to use Xojo on a Mac in order to create iOS projects.
- Recent Projects
- You can view the most recently used projects and choose to open one of them. If the recent project is no longer available, clicking on it will prompt you to remove it. To remove an individual recent project, select it and then press the Backspace or Delete key.
- You can also clear the entire list of recent projects when a project is open by selecting File ↠ Open Recent ↠ Clear Menu.
- Templates
- Templates are Xojo projects that are saved in the Templates folder alongside the Xojo application.
- If you have a set of commonly used modules, classes or anything else, you can put them all in a project and then save it to the Templates folder. When you open the template, you get a new project with all your project items already included. Xojo includes templates for creating Service Applications, CGI Applications and Event-Driven Console Applications.
- You can read more about Templates and how to create your own in the Project Types section.
- Examples
- Select Examples to view the example projects included with Xojo. The examples demonstrate how to use specific features and functions of Xojo. When you choose an example, it is opened in a new project for you to run, edit or save where you like. Over 400 examples are included.
- Open an Existing File
- Click this button to get a file selector for you to choose an existing Xojo project to open.
Once you have chosen the project to work with, the Xojo Workspace window is displayed.
If you open a Xojo project that is read-only on disk, then it will be read-only in the IDE as well.
Workspace
When you open Xojo and choose to open or create a project, a single window, called the Workspace displays. Within this window you can navigate among project items by clicking on their names. You can also choose to open project items in their own tabs for more flexibility.
You have more than one project open at the same time; each will be shown in its own Workspace window.
You can open multiple workspace windows for a single project by using File ↠ New Workspace, which can be useful when working with multiple displays. The Workspace consists of these areas:
- Top: Toolbar
- Left: Navigator
- Center: Editor Area, containing layout and code editors
- Right: Library/Inspector
- Bottom: Find/Errors/Messages Panels
Toolbar
The toolbar at the top of the main window is called the Workspace toolbar. It has these buttons:
| Button | Description |
|---|---|
| Insert | Adds an item to the project or to the selected project item. |
| Back | Moves to the previously used item in the tab. |
| Forward | Moves to the next used item in the tab. |
| Run | Runs your project using the debugger. |
| Build | Creates stand-alone applications that you can distribute to others. |
| Deploy | Builds and uploads your app to Xojo Cloud. This is only visible for web projects. |
| Help | Displays the Xojo Language Reference window. |
| Feedback | Launches the Xojo Feedback application. |
| Library | Toggles the visibility of the Library. |
| Inspector | Toggles the visibility of the Inspector. |
You can hide the toolbar by selecting View ↠ Hide Toolbar from the menu.
Full Screen Mode
On macOS you can also click the “full screen” button in the window to put the Workspace into full screen mode. When in full screen mode, the window title bar and the main menu bar are hidden to give you more space and allow you to focus better. Full screen mode is especially useful on smaller laptop screens. To see the main menu bar when in full screen mode, move the mouse cursor to the top of the screen; the menu bar will slide down. To exit full screen mode, click the full screen icon in the menu bar.
Menu
The main Xojo menu has these top-level menus: File, Edit, View, Insert, Project, Window and Help.
File
- New Project
- New Workspace
- New Tab
- Open
- Open Recent
- Close Tab
- Close Window
- Save
- Save As
- Revert to Saved
- IDE Scripts
- Import
- Export
- Export Localized Values
- Collect Project Items
- Page Setup
Edit
- Undo, Redo
- Cut, Copy, Paste, Delete, Duplicate
- Select All, Deselect All
- Comment
- Set Default Value of
- Encrypt
- Find
View
- Tab Order
- Go To Layout/Code
- Zoom In, Zoom Out
- Hide Toolbar
- Hide Tab Bar
- Library
- Inspector
- Toggle Palettes
- Hide Find
- Enter Full Screen
Insert
- Build Step
- Various Project Items
- Event Handler
- [Project Members]
Project
- Run
- Run Paused
- Run Remotely
- Pause
- Stop Debugging
- Step
- Breakpoint
- Bookmarks
- Break On Exceptions
- Profile Code
- Analyze Project
- Analyze Item
- Analysis Warnings
- Build Application
- Deploy Application
- Go To Location
Window
- Next Tab
- Previous Tab
- [Open Workspace Windows]
Help
- User Guide
- Xojo Documentation Center
- QuickStart
- Tutorials
- Introduction to Programming
- New In This Release
- Language Reference
- Xojo on the Web
- Xojo Support Forum
- Xojo Feedback
Language Reference
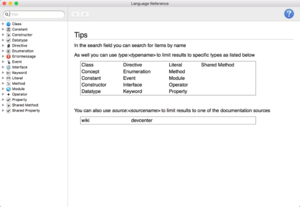
The Language Reference window is displayed when you choose "Language Reference" in the Help menu or use contextual help in its various forms. This window displays Language and Framework Reference content organized by topic. Use the Zoom In and Zoom Out items in the View menu to increase or decrease the size of the text. All content displayed in this window is stored offline, so you do not need an Internet connection to view it. This content is refreshed as part of major Xojo releases. For the latest content, always visit the online Documentation Center: http://docs.xojo.com.
If you do not see this window, make sure you have "Use built-in documentation" selected in General Preferences.
Searching
To use the search qualifiers, append them to the end. For example, to find only the classes with "folder" in their name use this in the search field: folder type:class


