Preferences
From Xojo Documentation
There are several preferences that you can use to alter default behavior. The preferences are grouped into these areas: General, Printing, Coding, Layout, Building and Debugging.
On Windows and Linux, the Preferences window is called Options and is in the Edit menu. On macOS, the Preference window is located in the App menu.
Contents
General
The General area contains the most common preferences.
Show Library and Inspector
Specifies how you want to see the Library and Inspector. By default they appear on the right side of the Workspace, both sharing the same area. You can instead choose to display them as floating palettes so that they are both visible on the screen at the same time and do not take up space in the Workspace.
Default project format
When you save your projects, Xojo uses the standard single-file binary format by default (xojo_binary_project). Use this setting to change the default project format. Refer to the Project Types topic to learn more about the project formats.
When seeking help
Xojo looks up commands using the Language Reference. By default, it uses the built-in Language Reference for best performance.
If you would rather use the online Language Reference, change this setting.
You can also choose to display the online Language Reference using your default web browser rather than the Xojo built-in web viewer.
When closing last window
This setting is only available on Windows.
When “Keep Xojo running” is selected, a new icon appears in the Taskbar Notifications area (also known as the System Tray) and Xojo remains running when you close the last Workspace window (instead of quitting). You can right-click on the Notification icon to display a menu with “New Project”, “About Xojo” and “Exit”. “New Project” opens the Project Chooser window, “About Xojo” displays the About window and “Exit” quits Xojo completely.
Number of Recent Items
This is the number of recent items that are remembered in the File ↠ Open Recent menu and the Project Chooser.
Find
Here you can choose to have find results appear immediately when you pause typing or only when you press return in the find field of the Find panel or the Filter field.
Menu short cuts
You can change and assign short cuts to any Xojo menu item. Click the "Edit" button to display the menu shortcut editor. The editor displays the Xojo menu structure in a hierarchical list. Click on a row to change the shortcut key and its related modifier keys. Click the "Restore Defaults" button to restore the original set of short cuts. Click the "Save" button to save your changes, which take effect immediately.
The "Use large font" setting uses a larger font size to display the text in in the Navigator, Library, and Inspector. This setting is also used by the Constant, Enumeration, and Structure editors.
The Navigator preferences control how the Navigator works.
Show Item Scope
This setting determines how the scope for properties and methods is displayed in the Navigator. Choosing “Behind item text” has the scope color displayed as the background color behind the item in the Navigator. Choosing “Over item icon” displays an overlay on the item in the Navigator indicating its scope.
The “Double-click opens item in a new tab” setting controls the behavior of double-clicking project items in the Navigator. The default behavior is to “drill into” the project item using the Jump Bar.
Check the box to instead open the project item in its own tab when it is double-clicked.
Default Values
The "Show default values in navigator" setting controls whether defaults values assigned to properties appear next to the property name in the Navigator.
Types
The "Show types in navigator" setting controls whether the types of properties appear next to the property name in the Navigator.
Printing
The Printing preferences control how your code looks when it is printed.
Font
Choose the font to use for the printed text.
Size
Choose the font size to use for the printed text.
Features
Check "Print in color" if you want the source code printed using the syntax colors specified in the Coding preferences.
Check "Include images of layouts" if you want printouts to include images of your user interface layouts (windows and web pages).
Coding
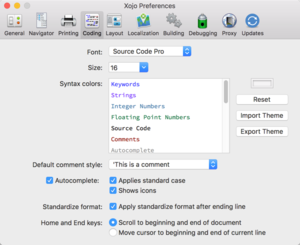
The Coding preferences control how the code is displayed in the Code Editor.
Font
Select the font to use in the Code Editor from the list of available fonts installed on your system. For best results, use a monospaced font.
Size
Specifies the font size to use in the Code Editor.
Syntax colors
You can customize the colors of various parts of your source code. Select a particular syntax and then click the color box to choose a color for it. You can save these changes as an XML "Theme" to share with others using the Import Theme and Export Theme buttons. Use the Reset button to return the default syntax colors.
Default comment style
This setting determines the comment style that is used by the Comment button and function on the contextual menu.
Autocomplete
These two options allow you to control how Autocomplete works. Apply standard case will use the correct case when autocompleting (MessageBox instead of messagebox, for example).
Show icons will show icons next to the values in the autocomplete list.
“Home” and “End” keys
Determine how you want the Home and End keys to work in the Code Editor.
Standardize Format
When "Apply "standardize format after ending line" is checked Code Editor will automatically apply "standardized format" (which automatically case-corrects keywords for you) when you press return on the line or move to a new line.
Layout
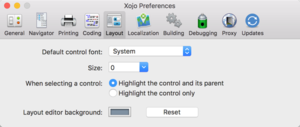
The Layout preferences adjust how the Layout Editors work.
Default control font
By default, System is used as the Font for all controls. This allows the platform to substitute its own default font at run-time. If you would rather use a specific font as the default, you can choose it here.
Size
By default, 0 is used as the Font Size for all controls. This allows the platform to substitute is own default font size at run-time. If you would rather use a specific font size as the default, you can set it here.
When selecting a control
When you have nested controls (one control on top of another control or control parenting), the Layout Editor highlights the parent control with a red outline. If you would rather not see this, you can turn it off here.
Layout Editor Background
Used to change the background color of the layout editor. Click the Reset button to restore the default layout background.
Localization
The Localization preferences controls the order of languages in localization menus (such as Shared Build Settings and Constant Editors).
In the list of languages, you can drag to re-order the languages or use the Move Up/Move Down buttons. By default, the more common languages are listed at the top, followed by less common languages at the bottom.
Building
The Building preferences control what Xojo does when building or running projects.
Reveal apps
After Building your app, the built app can be displayed using the built-in OS file viewer.
When not using build folders and a file already exists
When Building your app (with Use Build Folders set to OFF in Shared Build Settings), existing built apps (and related files) are normally replaced automatically. If you would rather be prompted when a file will be overwritten, you can change this here.
Build unsaved apps in
If you try to build an unsaved project, this location is used to store the built app.
Clear Caches
Click the Clear button to clear Xojo build caches for plugin precompliation and conditional compilation.
Debugging
The debugging preferences are used to control debugging and remote debugging.
Network Interface
Specify the networking interface to use to connect to the remote debugger.
Remote Debug Hosts
Here you can add, edit or remove remote debugging locations.
Show Object IDs in variable lists
Displays Object IDs in the debugger Variable area.
Hide Bottom Pane on Run
This setting controls whether the bottom panel (Find/Errors/Messages) is automatically hidden when you run the project.
Proxy
The Proxy preferences are used to specify proxy information so that Xojo can connect to the server to validate your licenses and check for new versions. These settings are also used when you “Sign In” to Xojo.
Select the “Connect using a proxy server” checkbox to enable use of the specified proxy server. Fill in the appropriate fields to specify the location of the proxy server and any information needed for authentication.
Updates
The Updates preferences allow you to choose how often Xojo checks for new versions. You can also specify whether you will allow your system information to be sent to Xojo servers to improve system support.


