About Electron
Electron is an open source library developed by GitHub for building cross-platform desktop applications with HTML, CSS, and JavaScript. Electron accomplishes this by combining Chromium and Node.js into a single runtime and apps can be packaged for Mac, Windows, and Linux.
Electron began in 2013 as the framework on which Atom, GitHub's hackable text editor, would be built. The two were open sourced in the Spring of 2014.
It has since become a popular tool used by open source developers, startups, and established companies. See who is building on Electron.
Read on to learn more about the contributors and releases of Electron or get started building with Electron in the Quick Start Guide.
Core Team and Contributors
Electron is maintained by a team at GitHub as well as a group of active contributors from the community. Some of the contributors are individuals and some work at larger companies who are developing on Electron. We're happy to add frequent contributors to the project as maintainers. Read more about contributing to Electron.
Releases
Electron releases frequently. We release when there are significant bug fixes, new APIs or are updating versions of Chromium or Node.js.
Updating Dependencies
Electron's version of Chromium is usually updated within one or two weeks after a new stable Chromium version is released, depending on the effort involved in the upgrade.
When a new version of Node.js is released, Electron usually waits about a month before upgrading in order to bring in a more stable version.
In Electron, Node.js and Chromium share a single V8 instance—usually the version that Chromium is using. Most of the time this just works but sometimes it means patching Node.js.
Versioning
As of version 2.0 Electron follows semver. For most applications, and using any recent version of npm, running $ npm install electron will do the right thing.
The version update process is detailed explicitly in our Versioning Doc.
LTS
Long term support of older versions of Electron does not currently exist. If your current version of Electron works for you, you can stay on it for as long as you'd like. If you want to make use of new features as they come in you should upgrade to a newer version.
A major update came with version v1.0.0. If you're not yet using this version, you should read more about the v1.0.0 changes.
Core Philosophy
In order to keep Electron small (file size) and sustainable (the spread of dependencies and APIs) the project limits the scope of the core project.
For instance, Electron uses Chromium's rendering library rather than all of Chromium. This makes it easier to upgrade Chromium but also means some browser features found in Google Chrome do not exist in Electron.
New features added to Electron should primarily be native APIs. If a feature can be its own Node.js module, it probably should be. See the Electron tools built by the community.
History
Below are milestones in Electron's history.
| :calendar: | :tada: |
|---|---|
| April 2013 | Atom Shell is started . |
| May 2014 | Atom Shell is open sourced . |
| April 2015 | Atom Shell is re-named Electron . |
| May 2016 | Electron releases v1.0.0
. |
| May 2016 | Electron apps compatible with Mac App Store . |
| August 2016 | Windows Store support for Electron apps . |
Accelerator
Define keyboard shortcuts.
Accelerators are Strings that can contain multiple modifiers and key codes, combined by the + character, and are used to define keyboard shortcuts throughout your application.
Examples:
CommandOrControl+ACommandOrControl+Shift+Z
Shortcuts are registered with the globalShortcut module using the register method, i.e.
const {app, globalShortcut} = require('electron')

    app.on('ready', () => {
      // Register a 'CommandOrControl+Y' shortcut listener.
      globalShortcut.register('CommandOrControl+Y', () => {
        // Do stuff when Y and either Command/Control is pressed.
      })
    })
Platform notice
On Linux and Windows, the Command key does not have any effect so use CommandOrControl which represents Command on macOS and Control on Linux and Windows to define some accelerators.
Use Alt instead of Option. The Option key only exists on macOS, whereas the Alt key is available on all platforms.
The Super key is mapped to the Windows key on Windows and Linux and Cmd on macOS.
Available modifiers
Command(orCmdfor short)Control(orCtrlfor short)CommandOrControl(orCmdOrCtrlfor short)AltOptionAltGrShiftSuper
Available key codes
to9AtoZF1toF24- Punctuations like
~,!,@,#,$, etc. PlusSpaceTabBackspaceDeleteInsertReturn(orEnteras alias)Up,Down,LeftandRightHomeandEndPageUpandPageDownEscape(orEscfor short)VolumeUp,VolumeDownandVolumeMuteMediaNextTrack,MediaPreviousTrack,MediaStopandMediaPlayPausePrintScreen
Accessibility
Making accessible applications is important and we're happy to introduce new functionality to Devtron and Spectron that gives developers the opportunity to make their apps better for everyone.
Accessibility concerns in Electron applications are similar to those of websites because they're both ultimately HTML. With Electron apps, however, you can't use the online resources for accessibility audits because your app doesn't have a URL to point the auditor to.
These new features bring those auditing tools to your Electron app. You can choose to add audits to your tests with Spectron or use them within DevTools with Devtron. Read on for a summary of the tools.
Spectron
In the testing framework Spectron, you can now audit each window and <webview> tag in your application. For example:
app.client.auditAccessibility().then(function (audit) {
      if (audit.failed) {
        console.error(audit.message)
      }
    })
You can read more about this feature in Spectron's documentation.
Devtron
In Devtron, there is a new accessibility tab which will allow you to audit a page in your app, sort and filter the results.

Both of these tools are using the Accessibility Developer Tools library built by Google for Chrome. You can learn more about the accessibility audit rules this library uses on that repository's wiki.
If you know of other great accessibility tools for Electron, add them to the accessibility documentation with a pull request.
Enabling Accessibility
Electron applications keep accessibility disabled by default for performance reasons but there are multiple ways to enable it.
Inside Application
By using app.setAccessibilitySupportEnabled(enabled), you can expose accessibility switch to users in the application preferences. User's system assistive utilities have priority over this setting and will override it.
Assistive Technology
Electron application will enable accessibility automatically when it detects assistive technology (Windows) or VoiceOver (macOS). See Chrome's accessibility documentation for more details.
On macOS, third-party assistive technology can switch accessibility inside Electron applications by setting the attribute AXManualAccessibility programmatically:
CFStringRef kAXManualAccessibility = CFSTR("AXManualAccessibility");

    + (void)enableAccessibility:(BOOL)enable inElectronApplication:(NSRunningApplication *)app
    {
        AXUIElementRef appRef = AXUIElementCreateApplication(app.processIdentifier);
        if (appRef == nil)
            return;

        CFBooleanRef value = enable ? kCFBooleanTrue : kCFBooleanFalse;
        AXUIElementSetAttributeValue(appRef, kAXManualAccessibility, value);
        CFRelease(appRef);
    }
app
Control your application's event lifecycle.
Process: Main
The following example shows how to quit the application when the last window is closed:
const {app} = require('electron')
    app.on('window-all-closed', () => {
      app.quit()
    })
Events
The app object emits the following events:
Event: 'will-finish-launching'
Emitted when the application has finished basic startup. On Windows and Linux, the will-finish-launching event is the same as the ready event; on macOS, this event represents the applicationWillFinishLaunching notification of NSApplication. You would usually set up listeners for the open-file and open-url events here, and start the crash reporter and auto updater.
In most cases, you should just do everything in the ready event handler.
Event: 'ready'
Returns:
launchInfoObject macOS
Emitted when Electron has finished initializing. On macOS, launchInfo holds the userInfo of the NSUserNotification that was used to open the application, if it was launched from Notification Center. You can call app.isReady() to check if this event has already fired.
Event: 'window-all-closed'
Emitted when all windows have been closed.
If you do not subscribe to this event and all windows are closed, the default behavior is to quit the app; however, if you subscribe, you control whether the app quits or not. If the user pressed Cmd + Q, or the developer called app.quit(), Electron will first try to close all the windows and then emit the will-quit event, and in this case the window-all-closed event would not be emitted.
Event: 'before-quit'
Returns:
eventEvent
Emitted before the application starts closing its windows. Calling event.preventDefault() will prevent the default behaviour, which is terminating the application.
Note: If application quit was initiated by autoUpdater.quitAndInstall() then before-quit is emitted after emitting close event on all windows and closing them.
Note: On Windows, this event will not be emitted if the app is closed due to a shutdown/restart of the system or a user logout.
Event: 'will-quit'
Returns:
eventEvent
Emitted when all windows have been closed and the application will quit. Calling event.preventDefault() will prevent the default behaviour, which is terminating the application.
See the description of the window-all-closed event for the differences between the will-quit and window-all-closed events.
Note: On Windows, this event will not be emitted if the app is closed due to a shutdown/restart of the system or a user logout.
Event: 'quit'
Returns:
eventEventexitCodeInteger
Emitted when the application is quitting.
Note: On Windows, this event will not be emitted if the app is closed due to a shutdown/restart of the system or a user logout.
Event: 'open-file' macOS
Returns:
eventEventpathString
Emitted when the user wants to open a file with the application. The open-file event is usually emitted when the application is already open and the OS wants to reuse the application to open the file. open-file is also emitted when a file is dropped onto the dock and the application is not yet running. Make sure to listen for the open-file event very early in your application startup to handle this case (even before the ready event is emitted).
You should call event.preventDefault() if you want to handle this event.
On Windows, you have to parse process.argv (in the main process) to get the filepath.
Event: 'open-url' macOS
Returns:
eventEventurlString
Emitted when the user wants to open a URL with the application. Your application's Info.plist file must define the url scheme within the CFBundleURLTypes key, and set NSPrincipalClass to AtomApplication.
You should call event.preventDefault() if you want to handle this event.
Event: 'activate' macOS
Returns:
eventEventhasVisibleWindowsBoolean
Emitted when the application is activated. Various actions can trigger this event, such as launching the application for the first time, attempting to re-launch the application when it's already running, or clicking on the application's dock or taskbar icon.
Event: 'continue-activity' macOS
Returns:
eventEventtypeString - A string identifying the activity. Maps toNSUserActivity.activityType.userInfoObject - Contains app-specific state stored by the activity on another device.
Emitted during Handoff when an activity from a different device wants to be resumed. You should call event.preventDefault() if you want to handle this event.
A user activity can be continued only in an app that has the same developer Team ID as the activity's source app and that supports the activity's type. Supported activity types are specified in the app's Info.plist under the NSUserActivityTypes key.
Event: 'will-continue-activity' macOS
Returns:
eventEventtypeString - A string identifying the activity. Maps toNSUserActivity.activityType.
Emitted during Handoff before an activity from a different device wants to be resumed. You should call event.preventDefault() if you want to handle this event.
Event: 'continue-activity-error' macOS
Returns:
eventEventtypeString - A string identifying the activity. Maps toNSUserActivity.activityType.errorString - A string with the error's localized description.
Emitted during Handoff when an activity from a different device fails to be resumed.
Event: 'activity-was-continued' macOS
Returns:
eventEventtypeString - A string identifying the activity. Maps toNSUserActivity.activityType.userInfoObject - Contains app-specific state stored by the activity.
Emitted during Handoff after an activity from this device was successfully resumed on another one.
Event: 'update-activity-state' macOS
Returns:
eventEventtypeString - A string identifying the activity. Maps toNSUserActivity.activityType.userInfoObject - Contains app-specific state stored by the activity.
Emitted when Handoff is about to be resumed on another device. If you need to update the state to be transferred, you should call event.preventDefault() immediately, construct a new userInfo dictionary and call app.updateCurrentActiviy() in a timely manner. Otherwise the operation will fail and continue-activity-error will be called.
Event: 'new-window-for-tab' macOS
Returns:
eventEvent
Emitted when the user clicks the native macOS new tab button. The new tab button is only visible if the current BrowserWindow has a tabbingIdentifier
Event: 'browser-window-blur'
Returns:
eventEventwindowBrowserWindow
Emitted when a browserWindow gets blurred.
Event: 'browser-window-focus'
Returns:
eventEventwindowBrowserWindow
Emitted when a browserWindow gets focused.
Event: 'browser-window-created'
Returns:
eventEventwindowBrowserWindow
Emitted when a new browserWindow is created.
Event: 'web-contents-created'
Returns:
eventEventwebContentsWebContents
Emitted when a new webContents is created.
Event: 'certificate-error'
Returns:
eventEventwebContentsWebContentsurlStringerrorString - The error codecertificateCertificate-
callbackFunctionisTrustedBoolean - Whether to consider the certificate as trusted
Emitted when failed to verify the certificate for url, to trust the certificate you should prevent the default behavior with event.preventDefault() and call callback(true).
const {app} = require('electron')

    app.on('certificate-error', (event, webContents, url, error, certificate, callback) => {
      if (url === 'https://github.com') {
        // Verification logic.
        event.preventDefault()
        callback(true)
      } else {
        callback(false)
      }
    })
Event: 'select-client-certificate'
Returns:
eventEventwebContentsWebContentsurlURLcertificateListCertificate[]-
callbackFunctioncertificateCertificate (optional)
Emitted when a client certificate is requested.
The url corresponds to the navigation entry requesting the client certificate and callback can be called with an entry filtered from the list. Using event.preventDefault() prevents the application from using the first certificate from the store.
const {app} = require('electron')

    app.on('select-client-certificate', (event, webContents, url, list, callback) => {
      event.preventDefault()
      callback(list[0])
    })
Event: 'login'
Returns:
eventEventwebContentsWebContents-
requestObjectmethodStringurlURLreferrerURL
-
authInfoObjectisProxyBooleanschemeStringhostStringportIntegerrealmString
-
callbackFunctionusernameStringpasswordString
Emitted when webContents wants to do basic auth.
The default behavior is to cancel all authentications, to override this you should prevent the default behavior with event.preventDefault() and call callback(username, password) with the credentials.
const {app} = require('electron')

    app.on('login', (event, webContents, request, authInfo, callback) => {
      event.preventDefault()
      callback('username', 'secret')
    })
Event: 'gpu-process-crashed'
Returns:
eventEventkilledBoolean
Emitted when the gpu process crashes or is killed.
Event: 'accessibility-support-changed' macOS Windows
Returns:
eventEventaccessibilitySupportEnabledBoolean -truewhen Chrome's accessibility support is enabled,falseotherwise.
Emitted when Chrome's accessibility support changes. This event fires when assistive technologies, such as screen readers, are enabled or disabled. See https://www.chromium.org/developers/design-documents/accessibility for more details.
Methods
The app object has the following methods:
Note: Some methods are only available on specific operating systems and are labeled as such.
app.quit()
Try to close all windows. The before-quit event will be emitted first. If all windows are successfully closed, the will-quit event will be emitted and by default the application will terminate.
This method guarantees that all beforeunload and unload event handlers are correctly executed. It is possible that a window cancels the quitting by returning false in the beforeunload event handler.
app.exit([exitCode])
exitCodeInteger (optional)
Exits immediately with exitCode. exitCode defaults to 0.
All windows will be closed immediately without asking user and the before-quit and will-quit events will not be emitted.
app.relaunch([options])
Relaunches the app when current instance exits.
By default the new instance will use the same working directory and command line arguments with current instance. When args is specified, the args will be passed as command line arguments instead. When execPath is specified, the execPath will be executed for relaunch instead of current app.
Note that this method does not quit the app when executed, you have to call app.quit or app.exit after calling app.relaunch to make the app restart.
When app.relaunch is called for multiple times, multiple instances will be started after current instance exited.
An example of restarting current instance immediately and adding a new command line argument to the new instance:
const {app} = require('electron')

    app.relaunch({args: process.argv.slice(1).concat(['--relaunch'])})
    app.exit(0)
app.isReady()
Returns Boolean - true if Electron has finished initializing, false otherwise.
app.focus()
On Linux, focuses on the first visible window. On macOS, makes the application the active app. On Windows, focuses on the application's first window.
app.hide() macOS
Hides all application windows without minimizing them.
app.show() macOS
Shows application windows after they were hidden. Does not automatically focus them.
app.getAppPath()
Returns String - The current application directory.
app.getPath(name)
nameString
Returns String - A path to a special directory or file associated with name. On failure an Error is thrown.
You can request the following paths by the name:
homeUser's home directory.-
appDataPer-user application data directory, which by default points to:%APPDATA%on Windows$XDG_CONFIG_HOMEor~/.configon Linux~/Library/Application Supporton macOS
userDataThe directory for storing your app's configuration files, which by default it is theappDatadirectory appended with your app's name.tempTemporary directory.exeThe current executable file.moduleThelibchromiumcontentlibrary.desktopThe current user's Desktop directory.documentsDirectory for a user's "My Documents".downloadsDirectory for a user's downloads.musicDirectory for a user's music.picturesDirectory for a user's pictures.videosDirectory for a user's videos.logsDirectory for your app's log folder.pepperFlashSystemPluginFull path to the system version of the Pepper Flash plugin.
app.getFileIcon(path[, options], callback)
pathString-
optionsObject (optional)-
sizeStringsmall- 16x16normal- 32x32large- 48x48 on Linux, 32x32 on Windows, unsupported on macOS.
-
-
callbackFunctionerrorErroriconNativeImage
Fetches a path's associated icon.
On Windows, there a 2 kinds of icons:
- Icons associated with certain file extensions, like
.mp3,.png, etc. - Icons inside the file itself, like
.exe,.dll,.ico.
On Linux and macOS, icons depend on the application associated with file mime type.
app.setPath(name, path)
nameStringpathString
Overrides the path to a special directory or file associated with name. If the path specifies a directory that does not exist, the directory will be created by this method. On failure an Error is thrown.
You can only override paths of a name defined in app.getPath.
By default, web pages' cookies and caches will be stored under the userData directory. If you want to change this location, you have to override the userData path before the ready event of the app module is emitted.
app.getVersion()
Returns String - The version of the loaded application. If no version is found in the application's package.json file, the version of the current bundle or executable is returned.
app.getName()
Returns String - The current application's name, which is the name in the application's package.json file.
Usually the name field of package.json is a short lowercased name, according to the npm modules spec. You should usually also specify a productName field, which is your application's full capitalized name, and which will be preferred over name by Electron.
app.getLocale()
Returns String - The current application locale. Possible return values are documented here.
To set the locale, you'll want to use a command line switch at app startup, which may be found here.
Note: When distributing your packaged app, you have to also ship the locales folder.
Note: On Windows you have to call it after the ready events gets emitted.
app.addRecentDocument(path) macOS Windows
pathString
Adds path to the recent documents list.
This list is managed by the OS. On Windows you can visit the list from the task bar, and on macOS you can visit it from dock menu.
app.clearRecentDocuments() macOS Windows
Clears the recent documents list.
app.setAsDefaultProtocolClient(protocol[, path, args])
protocolString - The name of your protocol, without://. If you want your app to handleelectron://links, call this method withelectronas the parameter.pathString (optional) Windows - Defaults toprocess.execPathargsString Windows - Defaults to an empty array
Returns Boolean - Whether the call succeeded.
This method sets the current executable as the default handler for a protocol (aka URI scheme). It allows you to integrate your app deeper into the operating system. Once registered, all links with your-protocol:// will be opened with the current executable. The whole link, including protocol, will be passed to your application as a parameter.
On Windows you can provide optional parameters path, the path to your executable, and args, an array of arguments to be passed to your executable when it launches.
Note: On macOS, you can only register protocols that have been added to your app's info.plist, which can not be modified at runtime. You can however change the file with a simple text editor or script during build time. Please refer to Apple's documentation for details.
The API uses the Windows Registry and LSSetDefaultHandlerForURLScheme internally.
app.removeAsDefaultProtocolClient(protocol[, path, args]) macOS Windows
protocolString - The name of your protocol, without://.pathString (optional) Windows - Defaults toprocess.execPathargsString Windows - Defaults to an empty array
Returns Boolean - Whether the call succeeded.
This method checks if the current executable as the default handler for a protocol (aka URI scheme). If so, it will remove the app as the default handler.
app.isDefaultProtocolClient(protocol[, path, args]) macOS Windows
protocolString - The name of your protocol, without://.pathString (optional) Windows - Defaults toprocess.execPathargsString Windows - Defaults to an empty array
Returns Boolean
This method checks if the current executable is the default handler for a protocol (aka URI scheme). If so, it will return true. Otherwise, it will return false.
Note: On macOS, you can use this method to check if the app has been registered as the default protocol handler for a protocol. You can also verify this by checking ~/Library/Preferences/com.apple.LaunchServices.plist on the macOS machine. Please refer to Apple's documentation for details.
The API uses the Windows Registry and LSCopyDefaultHandlerForURLScheme internally.
app.setUserTasks(tasks) Windows
tasksTask[] - Array ofTaskobjects
Adds tasks to the Tasks category of the JumpList on Windows.
tasks is an array of Task objects.
Returns Boolean - Whether the call succeeded.
Note: If you'd like to customize the Jump List even more use app.setJumpList(categories) instead.
app.getJumpListSettings() Windows
Returns Object:
minItemsInteger - The minimum number of items that will be shown in the Jump List (for a more detailed description of this value see the MSDN docs).removedItemsJumpListItem[] - Array ofJumpListItemobjects that correspond to items that the user has explicitly removed from custom categories in the Jump List. These items must not be re-added to the Jump List in the next call toapp.setJumpList(), Windows will not display any custom category that contains any of the removed items.
app.setJumpList(categories) Windows
categoriesJumpListCategory[] ornull- Array ofJumpListCategoryobjects.
Sets or removes a custom Jump List for the application, and returns one of the following strings:
ok- Nothing went wrong.error- One or more errors occurred, enable runtime logging to figure out the likely cause.invalidSeparatorError- An attempt was made to add a separator to a custom category in the Jump List. Separators are only allowed in the standardTaskscategory.fileTypeRegistrationError- An attempt was made to add a file link to the Jump List for a file type the app isn't registered to handle.customCategoryAccessDeniedError- Custom categories can't be added to the Jump List due to user privacy or group policy settings.
If categories is null the previously set custom Jump List (if any) will be replaced by the standard Jump List for the app (managed by Windows).
Note: If a JumpListCategory object has neither the type nor the name property set then its type is assumed to be tasks. If the name property is set but the type property is omitted then the type is assumed to be custom.
Note: Users can remove items from custom categories, and Windows will not allow a removed item to be added back into a custom category until after the next successful call to app.setJumpList(categories). Any attempt to re-add a removed item to a custom category earlier than that will result in the entire custom category being omitted from the Jump List. The list of removed items can be obtained using app.getJumpListSettings().
Here's a very simple example of creating a custom Jump List:
const {app} = require('electron')

    app.setJumpList([
      {
        type: 'custom',
        name: 'Recent Projects',
        items: [
          { type: 'file', path: 'C:\\Projects\\project1.proj' },
          { type: 'file', path: 'C:\\Projects\\project2.proj' }
        ]
      },
      { // has a name so `type` is assumed to be "custom"
        name: 'Tools',
        items: [
          {
            type: 'task',
            title: 'Tool A',
            program: process.execPath,
            args: '--run-tool-a',
            icon: process.execPath,
            iconIndex: 0,
            description: 'Runs Tool A'
          },
          {
            type: 'task',
            title: 'Tool B',
            program: process.execPath,
            args: '--run-tool-b',
            icon: process.execPath,
            iconIndex: 0,
            description: 'Runs Tool B'
          }
        ]
      },
      { type: 'frequent' },
      { // has no name and no type so `type` is assumed to be "tasks"
        items: [
          {
            type: 'task',
            title: 'New Project',
            program: process.execPath,
            args: '--new-project',
            description: 'Create a new project.'
          },
          { type: 'separator' },
          {
            type: 'task',
            title: 'Recover Project',
            program: process.execPath,
            args: '--recover-project',
            description: 'Recover Project'
          }
        ]
      }
    ])
app.makeSingleInstance(callback)
-
callbackFunctionargvString[] - An array of the second instance's command line argumentsworkingDirectoryString - The second instance's working directory
Returns Boolean.
This method makes your application a Single Instance Application - instead of allowing multiple instances of your app to run, this will ensure that only a single instance of your app is running, and other instances signal this instance and exit.
callback will be called by the first instance with callback(argv, workingDirectory) when a second instance has been executed. argv is an Array of the second instance's command line arguments, and workingDirectory is its current working directory. Usually applications respond to this by making their primary window focused and non-minimized.
The callback is guaranteed to be executed after the ready event of app gets emitted.
This method returns false if your process is the primary instance of the application and your app should continue loading. And returns true if your process has sent its parameters to another instance, and you should immediately quit.
On macOS the system enforces single instance automatically when users try to open a second instance of your app in Finder, and the open-file and open-url events will be emitted for that. However when users start your app in command line the system's single instance mechanism will be bypassed and you have to use this method to ensure single instance.
An example of activating the window of primary instance when a second instance starts:
const {app} = require('electron')
    let myWindow = null

    const isSecondInstance = app.makeSingleInstance((commandLine, workingDirectory) => {
      // Someone tried to run a second instance, we should focus our window.
      if (myWindow) {
        if (myWindow.isMinimized()) myWindow.restore()
        myWindow.focus()
      }
    })

    if (isSecondInstance) {
      app.quit()
    }

    // Create myWindow, load the rest of the app, etc...
    app.on('ready', () => {
    })
app.releaseSingleInstance()
Releases all locks that were created by makeSingleInstance. This will allow multiple instances of the application to once again run side by side.
app.setUserActivity(type, userInfo[, webpageURL]) macOS
typeString - Uniquely identifies the activity. Maps toNSUserActivity.activityType.userInfoObject - App-specific state to store for use by another device.webpageURLString (optional) - The webpage to load in a browser if no suitable app is installed on the resuming device. The scheme must behttporhttps.
Creates an NSUserActivity and sets it as the current activity. The activity is eligible for Handoff to another device afterward.
app.getCurrentActivityType() macOS
Returns String - The type of the currently running activity.
app.invalidateCurrentActivity() macOS
typeString - Uniquely identifies the activity. Maps toNSUserActivity.activityType.
Invalidates the current Handoff user activity.
app.updateCurrentActivity(type, userInfo) macOS
typeString - Uniquely identifies the activity. Maps toNSUserActivity.activityType.userInfoObject - App-specific state to store for use by another device.
Updates the current activity if its type matches type, merging the entries from userInfo into its current userInfo dictionary.
app.importCertificate(options, callback) LINUX
-
optionsObjectcertificateString - Path for the pkcs12 file.passwordString - Passphrase for the certificate.
-
callbackFunctionresultInteger - Result of import.
Imports the certificate in pkcs12 format into the platform certificate store. callback is called with the result of import operation, a value of indicates success while any other value indicates failure according to chromium net_error_list.
app.disableHardwareAcceleration()
Disables hardware acceleration for current app.
This method can only be called before app is ready.
app.disableDomainBlockingFor3DAPIs()
By default, Chromium disables 3D APIs (e.g. WebGL) until restart on a per domain basis if the GPU processes crashes too frequently. This function disables that behaviour.
This method can only be called before app is ready.
app.getAppMetrics()
Returns ProcessMetric[]: Array of ProcessMetric objects that correspond to memory and cpu usage statistics of all the processes associated with the app.
app.getGPUFeatureStatus()
Returns GPUFeatureStatus - The Graphics Feature Status from chrome://gpu/.
app.setBadgeCount(count) Linux macOS
countInteger
Returns Boolean - Whether the call succeeded.
Sets the counter badge for current app. Setting the count to will hide the badge.
On macOS it shows on the dock icon. On Linux it only works for Unity launcher,
Note: Unity launcher requires the existence of a .desktop file to work, for more information please read Desktop Environment Integration.
app.getBadgeCount() Linux macOS
Returns Integer - The current value displayed in the counter badge.
app.isUnityRunning() Linux
Returns Boolean - Whether the current desktop environment is Unity launcher.
app.getLoginItemSettings([options]) macOS Windows
-
optionsObject (optional)
If you provided path and args options to app.setLoginItemSettings then you need to pass the same arguments here for openAtLogin to be set correctly.
Returns Object:
openAtLoginBoolean -trueif the app is set to open at login.openAsHiddenBoolean macOS -trueif the app is set to open as hidden at login. This setting is not available on MAS builds.wasOpenedAtLoginBoolean macOS -trueif the app was opened at login automatically. This setting is not available on MAS builds.wasOpenedAsHiddenBoolean macOS -trueif the app was opened as a hidden login item. This indicates that the app should not open any windows at startup. This setting is not available on MAS builds.restoreStateBoolean macOS -trueif the app was opened as a login item that should restore the state from the previous session. This indicates that the app should restore the windows that were open the last time the app was closed. This setting is not available on MAS builds.
app.setLoginItemSettings(settings) macOS Windows
-
settingsObjectopenAtLoginBoolean (optional) -trueto open the app at login,falseto remove the app as a login item. Defaults tofalse.openAsHiddenBoolean (optional) macOS -trueto open the app as hidden. Defaults tofalse. The user can edit this setting from the System Preferences soapp.getLoginItemStatus().wasOpenedAsHiddenshould be checked when the app is opened to know the current value. This setting is not available on MAS builds.pathString (optional) Windows - The executable to launch at login. Defaults toprocess.execPath.argsString Windows - The command-line arguments to pass to the executable. Defaults to an empty array. Take care to wrap paths in quotes.
Set the app's login item settings.
To work with Electron's autoUpdater on Windows, which uses Squirrel, you'll want to set the launch path to Update.exe, and pass arguments that specify your application name. For example:
const appFolder = path.dirname(process.execPath)
    const updateExe = path.resolve(appFolder, '..', 'Update.exe')
    const exeName = path.basename(process.execPath)

    app.setLoginItemSettings({
      openAtLogin: true,
      path: updateExe,
      args: [
        '--processStart', `"${exeName}"`,
        '--process-start-args', `"--hidden"`
      ]
    })
app.isAccessibilitySupportEnabled() macOS Windows
Returns Boolean - true if Chrome's accessibility support is enabled, false otherwise. This API will return true if the use of assistive technologies, such as screen readers, has been detected. See https://www.chromium.org/developers/design-documents/accessibility for more details.
app.setAccessibilitySupportEnabled(enabled) macOS Windows
enabledBoolean - Enable or disable accessibility tree rendering
Manually enables Chrome's accessibility support, allowing to expose accessibility switch to users in application settings. https://www.chromium.org/developers/design-documents/accessibility for more details. Disabled by default.
Note: Rendering accessibility tree can significantly affect the performance of your app. It should not be enabled by default.
app.setAboutPanelOptions(options) macOS
-
optionsObjectapplicationNameString (optional) - The app's name.applicationVersionString (optional) - The app's version.copyrightString (optional) - Copyright information.creditsString (optional) - Credit information.versionString (optional) - The app's build version number.
Set the about panel options. This will override the values defined in the app's .plist file. See the Apple docs for more details.
app.startAccessingSecurityScopedResource(bookmarkData) macOS (mas)
bookmarkDataString - The base64 encoded security scoped bookmark data returned by thedialog.showOpenDialogordialog.showSaveDialogmethods.
Returns Function - This function must be called once you have finished accessing the security scoped file. If you do not remember to stop accessing the bookmark, kernel resources will be leaked and your app will lose its ability to reach outside the sandbox completely, until your app is restarted.
// Start accessing the file.
    const stopAccessingSecurityScopedResource = app.startAccessingSecurityScopedResource(data)
    // You can now access the file outside of the sandbox
    stopAccessingSecurityScopedResource()
Start accessing a security scoped resource. With this method electron applications that are packaged for the Mac App Store may reach outside their sandbox to access files chosen by the user. See Apple's documentation for a description of how this system works.
app.commandLine.appendSwitch(switch[, value])
switchString - A command-line switchvalueString (optional) - A value for the given switch
Append a switch (with optional value) to Chromium's command line.
Note: This will not affect process.argv, and is mainly used by developers to control some low-level Chromium behaviors.
app.commandLine.appendArgument(value)
valueString - The argument to append to the command line
Append an argument to Chromium's command line. The argument will be quoted correctly.
Note: This will not affect process.argv.
app.enableMixedSandbox() Experimental macOS Windows
Enables mixed sandbox mode on the app.
This method can only be called before app is ready.
app.isInApplicationsFolder() macOS
Returns Boolean - Whether the application is currently running from the systems Application folder. Use in combination with app.moveToApplicationsFolder()
app.moveToApplicationsFolder() macOS
Returns Boolean - Whether the move was successful. Please note that if the move is successful your application will quit and relaunch.
No confirmation dialog will be presented by default, if you wish to allow the user to confirm the operation you may do so using the dialog API.
NOTE: This method throws errors if anything other than the user causes the move to fail. For instance if the user cancels the authorization dialog this method returns false. If we fail to perform the copy then this method will throw an error. The message in the error should be informative and tell you exactly what went wrong
app.dock.bounce([type]) macOS
typeString (optional) - Can becriticalorinformational. The default isinformational
When critical is passed, the dock icon will bounce until either the application becomes active or the request is canceled.
When informational is passed, the dock icon will bounce for one second. However, the request remains active until either the application becomes active or the request is canceled.
Returns Integer an ID representing the request.
app.dock.downloadFinished(filePath) macOS
filePathString
Bounces the Downloads stack if the filePath is inside the Downloads folder.
app.dock.setBadge(text) macOS
textString
Sets the string to be displayed in the dock’s badging area.
app.dock.getBadge() macOS
Returns String - The badge string of the dock.
app.dock.hide() macOS
Hides the dock icon.
app.dock.show() macOS
Shows the dock icon.
app.dock.isVisible() macOS
Returns Boolean - Whether the dock icon is visible. The app.dock.show() call is asynchronous so this method might not return true immediately after that call.
app.dock.setIcon(image) macOS
image(NativeImage | String)
Sets the image associated with this dock icon.
Electron Application Architecture
Before we can dive into Electron's APIs, we need to discuss the two process types available in Electron. They are fundamentally different and important to understand.
Main and Renderer Processes
In Electron, the process that runs package.json's main script is called the main process. The script that runs in the main process can display a GUI by creating web pages. An Electron app always has one main process, but never more.
Since Electron uses Chromium for displaying web pages, Chromium's multi-process architecture is also used. Each web page in Electron runs in its own process, which is called the renderer process.
In normal browsers, web pages usually run in a sandboxed environment and are not allowed access to native resources. Electron users, however, have the power to use Node.js APIs in web pages allowing lower level operating system interactions.
Differences Between Main Process and Renderer Process
The main process creates web pages by creating BrowserWindow instances. Each BrowserWindow instance runs the web page in its own renderer process. When a BrowserWindow instance is destroyed, the corresponding renderer process is also terminated.
The main process manages all web pages and their corresponding renderer processes. Each renderer process is isolated and only cares about the web page running in it.
In web pages, calling native GUI related APIs is not allowed because managing native GUI resources in web pages is very dangerous and it is easy to leak resources. If you want to perform GUI operations in a web page, the renderer process of the web page must communicate with the main process to request that the main process perform those operations.
Aside: Communication Between Processes
In Electron, we have several ways to communicate between the main process and renderer processes. Like
ipcRendererandipcMainmodules for sending messages, and the remote module for RPC style communication. There is also an FAQ entry on how to share data between web pages.
Using Electron APIs
Electron offers a number of APIs that support the development of a desktop application in both the main process and the renderer process. In both processes, you'd access Electron's APIs by requiring its included module:
const electron = require('electron')All Electron APIs are assigned a process type. Many of them can only be used from the main process, some of them only from a renderer process, some from both. The documentation for each individual API will state which process it can be used from.
A window in Electron is for instance created using the BrowserWindow class. It is only available in the main process.
// This will work in the main process, but be `undefined` in a
    // renderer process:
    const { BrowserWindow } = require('electron')

    const win = new BrowserWindow()
Since communication between the processes is possible, a renderer process can call upon the main process to perform tasks. Electron comes with a module called remote that exposes APIs usually only available on the main process. In order to create a BrowserWindow from a renderer process, we'd use the remote as a middle-man:
// This will work in a renderer process, but be `undefined` in the
    // main process:
    const { remote } = require('electron')
    const { BrowserWindow } = remote

    const win = new BrowserWindow()
Using Node.js APIs
Electron exposes full access to Node.js both in the main and the renderer process. This has two important implications:
1) All APIs available in Node.js are available in Electron. Calling the following code from an Electron app works:
const fs = require('fs')

    const root = fs.readdirSync('/')

    // This will print all files at the root-level of the disk,
    // either '/' or 'C:\'.
    console.log(root)
As you might already be able to guess, this has important security implications if you ever attempt to load remote content. You can find more information and guidance on loading remote content in our security documentation.
2) You can use Node.js modules in your application. Pick your favorite npm module. npm offers currently the world's biggest repository of open-source code – the ability to use well-maintained and tested code that used to be reserved for server applications is one of the key features of Electron.
As an example, to use the official AWS SDK in your application, you'd first install it as a dependency:
npm install --save aws-sdkThen, in your Electron app, require and use the module as if you were building a Node.js application:
// A ready-to-use S3 Client
    const S3 = require('aws-sdk/clients/s3')
There is one important caveat: Native Node.js modules (that is, modules that require compilation of native code before they can be used) will need to be compiled to be used with Electron.
The vast majority of Node.js modules are not native. Only 400 out of the ~650.000 modules are native. However, if you do need native modules, please consult this guide on how to recompile them for Electron.
Application Debugging
Whenever your Electron application is not behaving the way you wanted it to, an array of debugging tools might help you find coding errors, performance bottlenecks, or optimization opportunities.
Renderer Process
The most comprehensive tool to debug individual renderer processes is the Chromium Developer Toolset. It is available for all renderer processes, including instances of BrowserWindow, BrowserView, and WebView. You can open them programmatically by calling the openDevTools() API on the webContents of the instance:
const { BrowserWindow } = require('electron')

    let win = new BrowserWindow()
    win.webContents.openDevTools()
Google offers excellent documentation for their developer tools. We recommend that you make yourself familiar with them - they are usually one of the most powerful utilities in any Electron Developer's tool belt.
Main Process
Debugging the main process is a bit trickier, since you cannot open developer tools for them. The Chromium Developer Tools can be used to debug Electron's main process thanks to a closer collaboration between Google / Chrome and Node.js, but you might encounter oddities like require not being present in the console.
For more information, see the Debugging the Main Process documentation.
Application Distribution
To distribute your app with Electron, you need to download Electron's prebuilt binaries. Next, the folder containing your app should be named app and placed in Electron's resources directory as shown in the following examples. Note that the location of Electron's prebuilt binaries is indicated with electron/ in the examples below.
On macOS:
electron/Electron.app/Contents/Resources/app/
    ├── package.json
    ├── main.js
    └── index.html
On Windows and Linux:
electron/resources/app
    ├── package.json
    ├── main.js
    └── index.html
Then execute Electron.app (or electron on Linux, electron.exe on Windows), and Electron will start as your app. The electron directory will then be your distribution to deliver to final users.
Packaging Your App into a File
Apart from shipping your app by copying all of its source files, you can also package your app into an asar archive to avoid exposing your app's source code to users.
To use an asar archive to replace the app folder, you need to rename the archive to app.asar, and put it under Electron's resources directory like below, and Electron will then try to read the archive and start from it.
On macOS:
electron/Electron.app/Contents/Resources/
    └── app.asar
On Windows and Linux:
electron/resources/
    └── app.asar
More details can be found in Application packaging.
Rebranding with Downloaded Binaries
After bundling your app into Electron, you will want to rebrand Electron before distributing it to users.
Windows
You can rename electron.exe to any name you like, and edit its icon and other information with tools like rcedit.
macOS
You can rename Electron.app to any name you want, and you also have to rename the CFBundleDisplayName, CFBundleIdentifier and CFBundleName fields in the following files:
Electron.app/Contents/Info.plistElectron.app/Contents/Frameworks/Electron Helper.app/Contents/Info.plist
You can also rename the helper app to avoid showing Electron Helper in the Activity Monitor, but make sure you have renamed the helper app's executable file's name.
The structure of a renamed app would be like:
MyApp.app/Contents
    ├── Info.plist
    ├── MacOS/
    │   └── MyApp
    └── Frameworks/
        ├── MyApp Helper EH.app
        |   ├── Info.plist
        |   └── MacOS/
        |       └── MyApp Helper EH
        ├── MyApp Helper NP.app
        |   ├── Info.plist
        |   └── MacOS/
        |       └── MyApp Helper NP
        └── MyApp Helper.app
            ├── Info.plist
            └── MacOS/
                └── MyApp Helper
Linux
You can rename the electron executable to any name you like.
Packaging Tools
Apart from packaging your app manually, you can also choose to use third party packaging tools to do the work for you:
Rebranding by Rebuilding Electron from Source
It is also possible to rebrand Electron by changing the product name and building it from source. To do this you need to modify the atom.gyp file and have a clean rebuild.
Creating a Custom Electron Fork
Creating a custom fork of Electron is almost certainly not something you will need to do in order to build your app, even for "Production Level" applications. Using a tool such as electron-packager or electron-forge will allow you to "Rebrand" Electron without having to do these steps.
You need to fork Electron when you have custom C++ code that you have patched directly into Electron, that either cannot be upstreamed, or has been rejected from the official version. As maintainers of Electron, we very much would like to make your scenario work, so please try as hard as you can to get your changes into the official version of Electron, it will be much much easier on you, and we appreciate your help.
Creating a Custom Release with surf-build
-
Install Surf, via npm:
npm install -g surf-build@latest -
Create a new S3 bucket and create the following empty directory structure:
- atom-shell/ - symbols/ - dist/ -
Set the following Environment Variables:
ELECTRON_GITHUB_TOKEN- a token that can create releases on GitHubELECTRON_S3_ACCESS_KEY,ELECTRON_S3_BUCKET,ELECTRON_S3_SECRET_KEY- the place where you'll upload node.js headers as well as symbolsELECTRON_RELEASE- Set totrueand the upload part will run, leave unset andsurf-buildwill do CI-type checks, appropriate to run for every pull request.CI- Set totrueor else it will failGITHUB_TOKEN- set it to the same asELECTRON_GITHUB_TOKENSURF_TEMP- set toC:\Tempon Windows to prevent path too long issuesTARGET_ARCH- set toia32orx64
-
In
script/upload.py, you must setELECTRON_REPOto your fork (MYORG/electron), especially if you are a contributor to Electron proper. -
surf-build -r https://github.com/MYORG/electron -s YOUR_COMMIT -n 'surf-PLATFORM-ARCH' -
Wait a very, very long time for the build to complete.
Application Packaging
To mitigate issues around long path names on Windows, slightly speed up require and conceal your source code from cursory inspection, you can choose to package your app into an asar archive with little changes to your source code.
Most users will get this feature for free, since it's supported out of the box by electron-packager, electron-forge, and electron-builder. If you are not using any of these tools, read on.
Generating asar Archives
An asar archive is a simple tar-like format that concatenates files into a single file. Electron can read arbitrary files from it without unpacking the whole file.
Steps to package your app into an asar archive:
1. Install the asar Utility
$ npm install -g asar2. Package with asar pack
$ asar pack your-app app.asarUsing asar Archives
In Electron there are two sets of APIs: Node APIs provided by Node.js and Web APIs provided by Chromium. Both APIs support reading files from asar archives.
Node API
With special patches in Electron, Node APIs like fs.readFile and require treat asar archives as virtual directories, and the files in it as normal files in the filesystem.
For example, suppose we have an example.asar archive under /path/to:
$ asar list /path/to/example.asar
    /app.js
    /file.txt
    /dir/module.js
    /static/index.html
    /static/main.css
    /static/jquery.min.js
Read a file in the asar archive:
const fs = require('fs')
    fs.readFileSync('/path/to/example.asar/file.txt')
List all files under the root of the archive:
const fs = require('fs')
    fs.readdirSync('/path/to/example.asar')
Use a module from the archive:
require('/path/to/example.asar/dir/module.js')You can also display a web page in an asar archive with BrowserWindow:
const { BrowserWindow } = require('electron')
    const win = new BrowserWindow()

    win.loadURL('file:///path/to/example.asar/static/index.html')
Web API
In a web page, files in an archive can be requested with the file: protocol. Like the Node API, asar archives are treated as directories.
For example, to get a file with $.get:
<script>
    let $ = require('./jquery.min.js')
    $.get('file:///path/to/example.asar/file.txt', (data) => {
      console.log(data)
    })
    </script>
Treating an asar Archive as a Normal File
For some cases like verifying the asar archive's checksum, we need to read the content of an asar archive as a file. For this purpose you can use the built-in original-fs module which provides original fs APIs without asar support:
const originalFs = require('original-fs')
    originalFs.readFileSync('/path/to/example.asar')
You can also set process.noAsar to true to disable the support for asar in the fs module:
const fs = require('fs')
    process.noAsar = true
    fs.readFileSync('/path/to/example.asar')
Limitations of the Node API
Even though we tried hard to make asar archives in the Node API work like directories as much as possible, there are still limitations due to the low-level nature of the Node API.
Archives Are Read-only
The archives can not be modified so all Node APIs that can modify files will not work with asar archives.
Working Directory Can Not Be Set to Directories in Archive
Though asar archives are treated as directories, there are no actual directories in the filesystem, so you can never set the working directory to directories in asar archives. Passing them as the cwd option of some APIs will also cause errors.
Extra Unpacking on Some APIs
Most fs APIs can read a file or get a file's information from asar archives without unpacking, but for some APIs that rely on passing the real file path to underlying system calls, Electron will extract the needed file into a temporary file and pass the path of the temporary file to the APIs to make them work. This adds a little overhead for those APIs.
APIs that requires extra unpacking are:
child_process.execFilechild_process.execFileSyncfs.openfs.openSyncprocess.dlopen- Used byrequireon native modules
Fake Stat Information of fs.stat
The Stats object returned by fs.stat and its friends on files in asar archives is generated by guessing, because those files do not exist on the filesystem. So you should not trust the Stats object except for getting file size and checking file type.
Executing Binaries Inside asar Archive
There are Node APIs that can execute binaries like child_process.exec, child_process.spawn and child_process.execFile, but only execFile is supported to execute binaries inside asar archive.
This is because exec and spawn accept command instead of file as input, and commands are executed under shell. There is no reliable way to determine whether a command uses a file in asar archive, and even if we do, we can not be sure whether we can replace the path in command without side effects.
Adding Unpacked Files to asar Archives
As stated above, some Node APIs will unpack the file to the filesystem when called. Apart from the performance issues, various anti-virus scanners might be triggered by this behavior.
As a workaround, you can leave various files unpacked using the --unpack option. In the following example, shared libraries of native Node.js modules will not be packed:
$ asar pack app app.asar --unpack *.nodeAfter running the command, you will notice that a folder named app.asar.unpacked was created together with the app.asar file. It contains the unpacked files and should be shipped together with the app.asar archive.
Technical Differences Between Electron and NW.js (formerly node-webkit)
Note: Electron was previously named Atom Shell.
Like NW.js, Electron provides a platform to write desktop applications with JavaScript and HTML and has Node integration to grant access to the low level system from web pages.
But there are also fundamental differences between the two projects that make Electron a completely separate product from NW.js:
1. Entry of Application
In NW.js the main entry point of an application is a web page or a JS script. You specify a html or js file in the package.json and it is opened in a browser window as the application's main window (in case of an html entrypoint) or the script is executed.
In Electron, the entry point is a JavaScript script. Instead of providing a URL directly, you manually create a browser window and load an HTML file using the API. You also need to listen to window events to decide when to quit the application.
Electron works more like the Node.js runtime. Electron's APIs are lower level so you can use it for browser testing in place of PhantomJS.
2. Build System
In order to avoid the complexity of building all of Chromium, Electron uses libchromiumcontent to access Chromium's Content API. libchromiumcontent is a single shared library that includes the Chromium Content module and all of its dependencies. Users don't need a powerful machine to build Electron.
3. Node Integration
In NW.js, the Node integration in web pages requires patching Chromium to work, while in Electron we chose a different way to integrate the libuv loop with each platform's message loop to avoid hacking Chromium. See the node_bindings code for how that was done.
4. Multi-context
If you are an experienced NW.js user, you should be familiar with the concept of Node context and web context. These concepts were invented because of how NW.js was implemented.
By using the multi-context feature of Node, Electron doesn't introduce a new JavaScript context in web pages.
Note: NW.js has optionally supported multi-context since 0.13.
autoUpdater
Enable apps to automatically update themselves.
Process: Main
You can find a detailed guide about how to implement updates into your application here.
Platform Notices
Currently, only macOS and Windows are supported. There is no built-in support for auto-updater on Linux, so it is recommended to use the distribution's package manager to update your app.
In addition, there are some subtle differences on each platform:
macOS
On macOS, the autoUpdater module is built upon Squirrel.Mac, meaning you don't need any special setup to make it work. For server-side requirements, you can read Server Support. Note that App Transport Security (ATS) applies to all requests made as part of the update process. Apps that need to disable ATS can add the NSAllowsArbitraryLoads key to their app's plist.
Note: Your application must be signed for automatic updates on macOS. This is a requirement of Squirrel.Mac.
Windows
On Windows, you have to install your app into a user's machine before you can use the autoUpdater, so it is recommended that you use the electron-winstaller, electron-forge or the grunt-electron-installer package to generate a Windows installer.
When using electron-winstaller or electron-forge make sure you do not try to update your app the first time it runs (Also see this issue for more info). It's also recommended to use electron-squirrel-startup to get desktop shortcuts for your app.
The installer generated with Squirrel will create a shortcut icon with an Application User Model ID in the format of com.squirrel.PACKAGE_ID.YOUR_EXE_WITHOUT_DOT_EXE, examples are com.squirrel.slack.Slack and com.squirrel.code.Code. You have to use the same ID for your app with app.setAppUserModelId API, otherwise Windows will not be able to pin your app properly in task bar.
Unlike Squirrel.Mac, Windows can host updates on S3 or any other static file host. You can read the documents of Squirrel.Windows to get more details about how Squirrel.Windows works.
Events
The autoUpdater object emits the following events:
Event: 'checking-for-update'
Emitted when checking if an update has started.
Event: 'update-available'
Emitted when there is an available update. The update is downloaded automatically.
Event: 'update-not-available'
Emitted when there is no available update.
Event: 'update-downloaded'
Returns:
eventEventreleaseNotesStringreleaseNameStringreleaseDateDateupdateURLString
Emitted when an update has been downloaded.
On Windows only releaseName is available.
Methods
The autoUpdater object has the following methods:
autoUpdater.setFeedURL(options)
-
optionsObjecturlStringheadersObject (optional) macOS - HTTP request headers.serverTypeString (optional) macOS - Eitherjsonordefault, see the Squirrel.Mac README for more information.
Sets the url and initialize the auto updater.
autoUpdater.getFeedURL()
Returns String - The current update feed URL.
autoUpdater.checkForUpdates()
Asks the server whether there is an update. You must call setFeedURL before using this API.
autoUpdater.quitAndInstall()
Restarts the app and installs the update after it has been downloaded. It should only be called after update-downloaded has been emitted.
Under the hood calling autoUpdater.quitAndInstall() will close all application windows first, and automatically call app.quit() after all windows have been closed.
Note: If the application is quit without calling this API after the update-downloaded event has been emitted, the application will still be replaced by the updated one on the next run.
Automated Testing with a Custom Driver
To write automated tests for your Electron app, you will need a way to "drive" your application. Spectron is a commonly-used solution which lets you emulate user actions via WebDriver. However, it's also possible to write your own custom driver using node's builtin IPC-over-STDIO. The benefit of a custom driver is that it tends to require less overhead than Spectron, and lets you expose custom methods to your test suite.
To create a custom driver, we'll use nodejs' child_process API. The test suite will spawn the Electron process, then establish a simple messaging protocol:
var childProcess = require('child_process')
    var electronPath = require('electron')

    // spawn the process
    var env = { /* ... */ }
    var stdio = ['inherit', 'inherit', 'inherit', 'ipc']
    var appProcess = childProcess.spawn(electronPath, ['./app'], {stdio, env})

    // listen for IPC messages from the app
    appProcess.on('message', (msg) => {
      // ...
    })

    // send an IPC message to the app
    appProcess.send({my: 'message'})
From within the Electron app, you can listen for messages and send replies using the nodejs process API:
// listen for IPC messages from the test suite
    process.on('message', (msg) => {
      // ...
    })

    // send an IPC message to the test suite
    process.send({my: 'message'})
We can now communicate from the test suite to the Electron app using the appProcess object.
For convenience, you may want to wrap appProcess in a driver object that provides more high-level functions. Here is an example of how you can do this:
class TestDriver {
      constructor ({path, args, env}) {
        this.rpcCalls = []

        // start child process
        env.APP_TEST_DRIVER = 1 // let the app know it should listen for messages
        this.process = childProcess.spawn(path, args, {stdio: ['inherit', 'inherit', 'inherit', 'ipc'], env})

        // handle rpc responses
        this.process.on('message', (message) => {
          // pop the handler
          var rpcCall = this.rpcCalls[message.msgId]
          if (!rpcCall) return
          this.rpcCalls[message.msgId] = null
          // reject/resolve
          if (message.reject) rpcCall.reject(message.reject)
          else rpcCall.resolve(message.resolve)
        })

        // wait for ready
        this.isReady = this.rpc('isReady').catch((err) => {
          console.error('Application failed to start', err)
          this.stop()
          process.exit(1)
        })
      }

      // simple RPC call
      // to use: driver.rpc('method', 1, 2, 3).then(...)
      async rpc (cmd, ...args) {
        // send rpc request
        var msgId = this.rpcCalls.length
        this.process.send({msgId, cmd, args})
        return new Promise((resolve, reject) => this.rpcCalls.push({resolve, reject}))
      }

      stop () {
        this.process.kill()
      }
    }
In the app, you'd need to write a simple handler for the RPC calls:
if (process.env.APP_TEST_DRIVER) {
      process.on('message', onMessage)
    }

    async function onMessage ({msgId, cmd, args}) {
      var method = METHODS[cmd]
      if (!method) method = () => new Error('Invalid method: ' + cmd)
      try {
        var resolve = await method(...args)
        process.send({msgId, resolve})
      } catch (err) {
        var reject = {
          message: err.message,
          stack: err.stack,
          name: err.name
        }
        process.send({msgId, reject})
      }
    }

    const METHODS = {
      isReady () {
        // do any setup needed
        return true
      }
      // define your RPC-able methods here
    }
Then, in your test suite, you can use your test-driver as follows:
var test = require('ava')
    var electronPath = require('electron')

    var app = new TestDriver({
      path: electronPath,
      args: ['./app'],
      env: {
        NODE_ENV: 'test'
      }
    })
    test.before(async t => {
      await app.isReady
    })
    test.after.always('cleanup', async t => {
      await app.stop()
    })
BluetoothDevice Object
deviceNameStringdeviceIdString
Boilerplates and CLIs
Electron development is un-opinionated - there is no "one true way" to develop, build, package, or release an Electron application. Additional features for Electron, both for build- and run-time, can usually be found on npm in individual packages, allowing developers to build both the app and build pipeline they need.
That level of modularity and extendability ensures that all developers working with Electron, both big and small in team-size, are never restricted in what they can or cannot do at any time during their development lifecycle. However, for many developers, one of the community-driven boilerplates or command line tools might make it dramatically easier to compile, package, and release an app.
Boilerplate vs CLI
A boilerplate is only a starting point - a canvas, so to speak - from which you build your application. They usually come in the form of a repository you can clone and customize to your heart's content.
A command line tool on the other hand continues to support you throughout the development and release. They are more helpful and supportive but enforce guidelines on how your code should be structured and built. Especially for beginners, using a command line tool is likely to be helpful.
electron-forge
A "complete tool for building modern Electron applications". Electron Forge unifies the existing (and well maintained) build tools for Electron development into a cohesive package so that anyone can jump right in to Electron development.
Forge comes with ready-to-use templates for popular frameworks like React, Vue, or Angular. It uses the same core modules used by the greater Electron community (like electron-packager) – changes made by Electron maintainers (like Slack) benefit Forge's users, too.
You can find more information and documentation on electronforge.io.
electron-builder
A "complete solution to package and build a ready-for-distribution Electron app" that focuses on an integrated experience. electron-builder adds one single dependency focused on simplicity and manages all further requirements internally.
electron-builder replaces features and modules used by the Electron maintainers (such as the auto-updater) with custom ones. They are generally tighter integrated but will have less in common with popular Electron apps like Atom, Visual Studio Code, or Slack.
You can find more information and documentation in the repository.
electron-react-boilerplate
If you don't want any tools but only a solid boilerplate to build from, CT Lin's electron-react-boilerplate might be worth a look. It's quite popular in the community and uses electron-builder internally.
Other Tools and Boilerplates
The "Awesome Electron" list contains more tools and boilerplates to choose from. If you find the length of the list intimidating, don't forget that adding tools as you go along is a valid approach, too.
Class: BrowserView
Create and control views.
Note: The BrowserView API is currently experimental and may change or be removed in future Electron releases.
Process: Main
A BrowserView can be used to embed additional web content into a BrowserWindow. It is like a child window, except that it is positioned relative to its owning window. It is meant to be an alternative to the webview tag.
Example
// In the main process.
    const {BrowserView, BrowserWindow} = require('electron')

    let win = new BrowserWindow({width: 800, height: 600})
    win.on('closed', () => {
      win = null
    })

    let view = new BrowserView({
      webPreferences: {
        nodeIntegration: false
      }
    })
    win.setBrowserView(view)
    view.setBounds({ x: 0, y: 0, width: 300, height: 300 })
    view.webContents.loadURL('https://electronjs.org')
new BrowserView([options]) Experimental
-
optionsObject (optional)webPreferencesObject (optional) - See BrowserWindow.
BrowserView.getAllViews()
Returns BrowserView[] - An array of all opened BrowserViews.
BrowserView.fromWebContents(webContents)
webContentsWebContents
Returns BrowserView | null - The BrowserView that owns the given webContents or null if the contents are not owned by a BrowserView.
Instance Properties
Objects created with new BrowserView have the following properties:
view.webContents Experimental
A WebContents object owned by this view.
view.id Experimental
A Integer representing the unique ID of the view.
Instance Methods
Objects created with new BrowserView have the following instance methods:
view.destroy()
Force closing the view, the unload and beforeunload events won't be emitted for the web page. After you're done with a view, call this function in order to free memory and other resources as soon as possible.
view.isDestroyed()
Returns Boolean - Whether the view is destroyed.
view.setAutoResize(options) Experimental
-
optionsObjectwidthBoolean - Iftrue, the view's width will grow and shrink together with the window.falseby default.heightBoolean - Iftrue, the view's height will grow and shrink together with the window.falseby default.
view.setBounds(bounds) Experimental
boundsRectangle
Resizes and moves the view to the supplied bounds relative to the window.
view.setBackgroundColor(color) Experimental
colorString - Color in#aarrggbbor#argbform. The alpha channel is optional.
BrowserWindow
Create and control browser windows.
Process: Main
// In the main process.
    const {BrowserWindow} = require('electron')

    // Or use `remote` from the renderer process.
    // const {BrowserWindow} = require('electron').remote

    let win = new BrowserWindow({width: 800, height: 600})
    win.on('closed', () => {
      win = null
    })

    // Load a remote URL
    win.loadURL('https://github.com')

    // Or load a local HTML file
    win.loadURL(`file://${__dirname}/app/index.html`)
Frameless window
To create a window without chrome, or a transparent window in arbitrary shape, you can use the Frameless Window API.
Showing window gracefully
When loading a page in the window directly, users may see the page load incrementally, which is not a good experience for a native app. To make the window display without visual flash, there are two solutions for different situations.
Using ready-to-show event
While loading the page, the ready-to-show event will be emitted when the renderer process has rendered the page for the first time if the window has not been shown yet. Showing the window after this event will have no visual flash:
const {BrowserWindow} = require('electron')
    let win = new BrowserWindow({show: false})
    win.once('ready-to-show', () => {
      win.show()
    })
This event is usually emitted after the did-finish-load event, but for pages with many remote resources, it may be emitted before the did-finish-load event.
Setting backgroundColor
For a complex app, the ready-to-show event could be emitted too late, making the app feel slow. In this case, it is recommended to show the window immediately, and use a backgroundColor close to your app's background:
const {BrowserWindow} = require('electron')

    let win = new BrowserWindow({backgroundColor: '#2e2c29'})
    win.loadURL('https://github.com')
Note that even for apps that use ready-to-show event, it is still recommended to set backgroundColor to make app feel more native.
Parent and child windows
By using parent option, you can create child windows:
const {BrowserWindow} = require('electron')

    let top = new BrowserWindow()
    let child = new BrowserWindow({parent: top})
    child.show()
    top.show()
The child window will always show on top of the top window.
Modal windows
A modal window is a child window that disables parent window, to create a modal window, you have to set both parent and modal options:
const {BrowserWindow} = require('electron')

    let child = new BrowserWindow({parent: top, modal: true, show: false})
    child.loadURL('https://github.com')
    child.once('ready-to-show', () => {
      child.show()
    })
Page visibility
The Page Visibility API works as follows:
- On all platforms, the visibility state tracks whether the window is hidden/minimized or not.
- Additionally, on macOS, the visibility state also tracks the window occlusion state. If the window is occluded (i.e. fully covered) by another window, the visibility state will be
hidden. On other platforms, the visibility state will behiddenonly when the window is minimized or explicitly hidden withwin.hide(). - If a
BrowserWindowis created withshow: false, the initial visibility state will bevisibledespite the window actually being hidden. - If
backgroundThrottlingis disabled, the visibility state will remainvisibleeven if the window is minimized, occluded, or hidden.
It is recommended that you pause expensive operations when the visibility state is hidden in order to minimize power consumption.
Platform notices
- On macOS modal windows will be displayed as sheets attached to the parent window.
- On macOS the child windows will keep the relative position to parent window when parent window moves, while on Windows and Linux child windows will not move.
- On Windows it is not supported to change parent window dynamically.
- On Linux the type of modal windows will be changed to
dialog. - On Linux many desktop environments do not support hiding a modal window.
Class: BrowserWindow
Create and control browser windows.
Process: Main
BrowserWindow is an EventEmitter.
It creates a new BrowserWindow with native properties as set by the options.
new BrowserWindow([options])
-
optionsObject (optional)widthInteger (optional) - Window's width in pixels. Default is800.heightInteger (optional) - Window's height in pixels. Default is600.xInteger (optional) (required if y is used) - Window's left offset from screen. Default is to center the window.yInteger (optional) (required if x is used) - Window's top offset from screen. Default is to center the window.useContentSizeBoolean (optional) - Thewidthandheightwould be used as web page's size, which means the actual window's size will include window frame's size and be slightly larger. Default isfalse.centerBoolean (optional) - Show window in the center of the screen.minWidthInteger (optional) - Window's minimum width. Default is.minHeightInteger (optional) - Window's minimum height. Default is.maxWidthInteger (optional) - Window's maximum width. Default is no limit.maxHeightInteger (optional) - Window's maximum height. Default is no limit.resizableBoolean (optional) - Whether window is resizable. Default istrue.movableBoolean (optional) - Whether window is movable. This is not implemented on Linux. Default istrue.minimizableBoolean (optional) - Whether window is minimizable. This is not implemented on Linux. Default istrue.maximizableBoolean (optional) - Whether window is maximizable. This is not implemented on Linux. Default istrue.closableBoolean (optional) - Whether window is closable. This is not implemented on Linux. Default istrue.focusableBoolean (optional) - Whether the window can be focused. Default istrue. On Windows settingfocusable: falsealso implies settingskipTaskbar: true. On Linux settingfocusable: falsemakes the window stop interacting with wm, so the window will always stay on top in all workspaces.alwaysOnTopBoolean (optional) - Whether the window should always stay on top of other windows. Default isfalse.fullscreenBoolean (optional) - Whether the window should show in fullscreen. When explicitly set tofalsethe fullscreen button will be hidden or disabled on macOS. Default isfalse.fullscreenableBoolean (optional) - Whether the window can be put into fullscreen mode. On macOS, also whether the maximize/zoom button should toggle full screen mode or maximize window. Default istrue.simpleFullscreenBoolean (optional) - Use pre-Lion fullscreen on macOS. Default isfalse.skipTaskbarBoolean (optional) - Whether to show the window in taskbar. Default isfalse.kioskBoolean (optional) - The kiosk mode. Default isfalse.titleString (optional) - Default window title. Default is"Electron".icon(NativeImage | String) (optional) - The window icon. On Windows it is recommended to useICOicons to get best visual effects, you can also leave it undefined so the executable's icon will be used.showBoolean (optional) - Whether window should be shown when created. Default istrue.frameBoolean (optional) - Specifyfalseto create a Frameless Window. Default istrue.parentBrowserWindow (optional) - Specify parent window. Default isnull.modalBoolean (optional) - Whether this is a modal window. This only works when the window is a child window. Default isfalse.acceptFirstMouseBoolean (optional) - Whether the web view accepts a single mouse-down event that simultaneously activates the window. Default isfalse.disableAutoHideCursorBoolean (optional) - Whether to hide cursor when typing. Default isfalse.autoHideMenuBarBoolean (optional) - Auto hide the menu bar unless theAltkey is pressed. Default isfalse.enableLargerThanScreenBoolean (optional) - Enable the window to be resized larger than screen. Default isfalse.backgroundColorString (optional) - Window's background color as a hexadecimal value, like#66CD00or#FFFor#80FFFFFF(alpha is supported). Default is#FFF(white).hasShadowBoolean (optional) - Whether window should have a shadow. This is only implemented on macOS. Default istrue.opacityNumber (optional) - Set the initial opacity of the window, between 0.0 (fully transparent) and 1.0 (fully opaque). This is only implemented on Windows and macOS.darkThemeBoolean (optional) - Forces using dark theme for the window, only works on some GTK+3 desktop environments. Default isfalse.transparentBoolean (optional) - Makes the window transparent. Default isfalse.typeString (optional) - The type of window, default is normal window. See more about this below.-
titleBarStyleString (optional) - The style of window title bar. Default isdefault. Possible values are:default- Results in the standard gray opaque Mac title bar.hidden- Results in a hidden title bar and a full size content window, yet the title bar still has the standard window controls ("traffic lights") in the top left.hiddenInset- Results in a hidden title bar with an alternative look where the traffic light buttons are slightly more inset from the window edge.customButtonsOnHoverBoolean (optional) - Draw custom close, minimize, and full screen buttons on macOS frameless windows. These buttons will not display unless hovered over in the top left of the window. These custom buttons prevent issues with mouse events that occur with the standard window toolbar buttons. Note: This option is currently experimental.
fullscreenWindowTitleBoolean (optional) - Shows the title in the title bar in full screen mode on macOS for alltitleBarStyleoptions. Default isfalse.thickFrameBoolean (optional) - UseWS_THICKFRAMEstyle for frameless windows on Windows, which adds standard window frame. Setting it tofalsewill remove window shadow and window animations. Default istrue.vibrancyString (optional) - Add a type of vibrancy effect to the window, only on macOS. Can beappearance-based,light,dark,titlebar,selection,menu,popover,sidebar,medium-lightorultra-dark. Please note that usingframe: falsein combination with a vibrancy value requires that you use a non-defaulttitleBarStyleas well.zoomToPageWidthBoolean (optional) - Controls the behavior on macOS when option-clicking the green stoplight button on the toolbar or by clicking the Window > Zoom menu item. Iftrue, the window will grow to the preferred width of the web page when zoomed,falsewill cause it to zoom to the width of the screen. This will also affect the behavior when callingmaximize()directly. Default isfalse.tabbingIdentifierString (optional) - Tab group name, allows opening the window as a native tab on macOS 10.12+. Windows with the same tabbing identifier will be grouped together. This also adds a native new tab button to your window's tab bar and allows yourappand window to receive thenew-window-for-tabevent.-
webPreferencesObject (optional) - Settings of web page's features.devToolsBoolean (optional) - Whether to enable DevTools. If it is set tofalse, can not useBrowserWindow.webContents.openDevTools()to open DevTools. Default istrue.nodeIntegrationBoolean (optional) - Whether node integration is enabled. Default istrue.nodeIntegrationInWorkerBoolean (optional) - Whether node integration is enabled in web workers. Default isfalse. More about this can be found in Multithreading.preloadString (optional) - Specifies a script that will be loaded before other scripts run in the page. This script will always have access to node APIs no matter whether node integration is turned on or off. The value should be the absolute file path to the script. When node integration is turned off, the preload script can reintroduce Node global symbols back to the global scope. See example here.sandboxBoolean (optional) - If set, this will sandbox the renderer associated with the window, making it compatible with the Chromium OS-level sandbox and disabling the Node.js engine. This is not the same as thenodeIntegrationoption and the APIs available to the preload script are more limited. Read more about the option here. Note: This option is currently experimental and may change or be removed in future Electron releases.sessionSession (optional) - Sets the session used by the page. Instead of passing the Session object directly, you can also choose to use thepartitionoption instead, which accepts a partition string. When bothsessionandpartitionare provided,sessionwill be preferred. Default is the default session.partitionString (optional) - Sets the session used by the page according to the session's partition string. Ifpartitionstarts withpersist:, the page will use a persistent session available to all pages in the app with the samepartition. If there is nopersist:prefix, the page will use an in-memory session. By assigning the samepartition, multiple pages can share the same session. Default is the default session.affinityString (optional) - When specified, web pages with the sameaffinitywill run in the same renderer process. Note that due to reusing the renderer process, certainwebPreferencesoptions will also be shared between the web pages even when you specified different values for them, including but not limited topreload,sandboxandnodeIntegration. So it is suggested to use exact samewebPreferencesfor web pages with the sameaffinity.zoomFactorNumber (optional) - The default zoom factor of the page,3.0represents300%. Default is1.0.javascriptBoolean (optional) - Enables JavaScript support. Default istrue.webSecurityBoolean (optional) - Whenfalse, it will disable the same-origin policy (usually using testing websites by people), and setallowRunningInsecureContenttotrueif this options has not been set by user. Default istrue.allowRunningInsecureContentBoolean (optional) - Allow an https page to run JavaScript, CSS or plugins from http URLs. Default isfalse.imagesBoolean (optional) - Enables image support. Default istrue.textAreasAreResizableBoolean (optional) - Make TextArea elements resizable. Default istrue.webglBoolean (optional) - Enables WebGL support. Default istrue.webaudioBoolean (optional) - Enables WebAudio support. Default istrue.pluginsBoolean (optional) - Whether plugins should be enabled. Default isfalse.experimentalFeaturesBoolean (optional) - Enables Chromium's experimental features. Default isfalse.experimentalCanvasFeaturesBoolean (optional) - Enables Chromium's experimental canvas features. Default isfalse.scrollBounceBoolean (optional) - Enables scroll bounce (rubber banding) effect on macOS. Default isfalse.blinkFeaturesString (optional) - A list of feature strings separated by,, likeCSSVariables,KeyboardEventKeyto enable. The full list of supported feature strings can be found in the RuntimeEnabledFeatures.json5 file.disableBlinkFeaturesString (optional) - A list of feature strings separated by,, likeCSSVariables,KeyboardEventKeyto disable. The full list of supported feature strings can be found in the RuntimeEnabledFeatures.json5 file.-
defaultFontFamilyObject (optional) - Sets the default font for the font-family.standardString (optional) - Defaults toTimes New Roman.serifString (optional) - Defaults toTimes New Roman.sansSerifString (optional) - Defaults toArial.monospaceString (optional) - Defaults toCourier New.cursiveString (optional) - Defaults toScript.fantasyString (optional) - Defaults toImpact.
defaultFontSizeInteger (optional) - Defaults to16.defaultMonospaceFontSizeInteger (optional) - Defaults to13.minimumFontSizeInteger (optional) - Defaults to.defaultEncodingString (optional) - Defaults toISO-8859-1.backgroundThrottlingBoolean (optional) - Whether to throttle animations and timers when the page becomes background. This also affects the Page Visibility API. Defaults totrue.offscreenBoolean (optional) - Whether to enable offscreen rendering for the browser window. Defaults tofalse. See the offscreen rendering tutorial for more details.contextIsolationBoolean (optional) - Whether to run Electron APIs and the specifiedpreloadscript in a separate JavaScript context. Defaults tofalse. The context that thepreloadscript runs in will still have full access to thedocumentandwindowglobals but it will use its own set of JavaScript builtins (Array,Object,JSON, etc.) and will be isolated from any changes made to the global environment by the loaded page. The Electron API will only be available in thepreloadscript and not the loaded page. This option should be used when loading potentially untrusted remote content to ensure the loaded content cannot tamper with thepreloadscript and any Electron APIs being used. This option uses the same technique used by Chrome Content Scripts. You can access this context in the dev tools by selecting the 'Electron Isolated Context' entry in the combo box at the top of the Console tab. Note: This option is currently experimental and may change or be removed in future Electron releases.nativeWindowOpenBoolean (optional) - Whether to use nativewindow.open(). Defaults tofalse. Note: This option is currently experimental.webviewTagBoolean (optional) - Whether to enable the<webview>tag. Defaults to the value of thenodeIntegrationoption. Note: Thepreloadscript configured for the<webview>will have node integration enabled when it is executed so you should ensure remote/untrusted content is not able to create a<webview>tag with a possibly maliciouspreloadscript. You can use thewill-attach-webviewevent on webContents to strip away thepreloadscript and to validate or alter the<webview>'s initial settings.additionArgumentsString - A list of strings that will be appended toprocess.argvin the renderer process of this app. Useful for passing small bits of data down to renderer process preload scripts.
When setting minimum or maximum window size with minWidth/maxWidth/ minHeight/maxHeight, it only constrains the users. It won't prevent you from passing a size that does not follow size constraints to setBounds/setSize or to the constructor of BrowserWindow.
The possible values and behaviors of the type option are platform dependent. Possible values are:
- On Linux, possible types are
desktop,dock,toolbar,splash,notification. -
On macOS, possible types are
desktop,textured.- The
texturedtype adds metal gradient appearance (NSTexturedBackgroundWindowMask). - The
desktoptype places the window at the desktop background window level (kCGDesktopWindowLevel - 1). Note that desktop window will not receive focus, keyboard or mouse events, but you can useglobalShortcutto receive input sparingly.
- The
- On Windows, possible type is
toolbar.
Instance Events
Objects created with new BrowserWindow emit the following events:
Note: Some events are only available on specific operating systems and are labeled as such.
Event: 'page-title-updated'
Returns:
eventEventtitleString
Emitted when the document changed its title, calling event.preventDefault() will prevent the native window's title from changing.
Event: 'close'
Returns:
eventEvent
Emitted when the window is going to be closed. It's emitted before the beforeunload and unload event of the DOM. Calling event.preventDefault() will cancel the close.
Usually you would want to use the beforeunload handler to decide whether the window should be closed, which will also be called when the window is reloaded. In Electron, returning any value other than undefined would cancel the close. For example:
window.onbeforeunload = (e) => {
      console.log('I do not want to be closed')

      // Unlike usual browsers that a message box will be prompted to users, returning
      // a non-void value will silently cancel the close.
      // It is recommended to use the dialog API to let the user confirm closing the
      // application.
      e.returnValue = false // equivalent to `return false` but not recommended
}*Note: There is a subtle difference between the behaviors of window.onbeforeunload = handler and window.addEventListener('beforeunload', handler). It is recommended to always set the event.returnValue explicitly, instead of just returning a value, as the former works more consistently within Electron.*
Event: 'closed'
Emitted when the window is closed. After you have received this event you should remove the reference to the window and avoid using it any more.
Event: 'session-end' Windows
Emitted when window session is going to end due to force shutdown or machine restart or session log off.
Event: 'unresponsive'
Emitted when the web page becomes unresponsive.
Event: 'responsive'
Emitted when the unresponsive web page becomes responsive again.
Event: 'blur'
Emitted when the window loses focus.
Event: 'focus'
Emitted when the window gains focus.
Event: 'show'
Emitted when the window is shown.
Event: 'hide'
Emitted when the window is hidden.
Event: 'ready-to-show'
Emitted when the web page has been rendered (while not being shown) and window can be displayed without a visual flash.
Event: 'maximize'
Emitted when window is maximized.
Event: 'unmaximize'
Emitted when the window exits from a maximized state.
Event: 'minimize'
Emitted when the window is minimized.
Event: 'restore'
Emitted when the window is restored from a minimized state.
Event: 'resize'
Emitted when the window is being resized.
Event: 'move'
Emitted when the window is being moved to a new position.
Note: On macOS this event is just an alias of moved.
Event: 'moved' macOS
Emitted once when the window is moved to a new position.
Event: 'enter-full-screen'
Emitted when the window enters a full-screen state.
Event: 'leave-full-screen'
Emitted when the window leaves a full-screen state.
Event: 'enter-html-full-screen'
Emitted when the window enters a full-screen state triggered by HTML API.
Event: 'leave-html-full-screen'
Emitted when the window leaves a full-screen state triggered by HTML API.
Event: 'app-command' Windows
Returns:
eventEventcommandString
Emitted when an App Command is invoked. These are typically related to keyboard media keys or browser commands, as well as the "Back" button built into some mice on Windows.
Commands are lowercased, underscores are replaced with hyphens, and the APPCOMMAND_ prefix is stripped off. e.g. APPCOMMAND_BROWSER_BACKWARD is emitted as browser-backward.
const {BrowserWindow} = require('electron')
    let win = new BrowserWindow()
    win.on('app-command', (e, cmd) => {
      // Navigate the window back when the user hits their mouse back button
      if (cmd === 'browser-backward' && win.webContents.canGoBack()) {
        win.webContents.goBack()
      }
    })
Event: 'scroll-touch-begin' macOS
Emitted when scroll wheel event phase has begun.
Event: 'scroll-touch-end' macOS
Emitted when scroll wheel event phase has ended.
Event: 'scroll-touch-edge' macOS
Emitted when scroll wheel event phase filed upon reaching the edge of element.
Event: 'swipe' macOS
Returns:
eventEventdirectionString
Emitted on 3-finger swipe. Possible directions are up, right, down, left.
Event: 'sheet-begin' macOS
Emitted when the window opens a sheet.
Event: 'sheet-end' macOS
Emitted when the window has closed a sheet.
Event: 'new-window-for-tab' macOS
Emitted when the native new tab button is clicked.
Static Methods
The BrowserWindow class has the following static methods:
BrowserWindow.getAllWindows()
Returns BrowserWindow[] - An array of all opened browser windows.
BrowserWindow.getFocusedWindow()
Returns BrowserWindow - The window that is focused in this application, otherwise returns null.
BrowserWindow.fromWebContents(webContents)
webContentsWebContents
Returns BrowserWindow - The window that owns the given webContents.
BrowserWindow.fromBrowserView(browserView)
browserViewBrowserView
Returns BrowserWindow | null - The window that owns the given browserView. If the given view is not attached to any window, returns null.
BrowserWindow.addExtension(path)
pathString
Adds Chrome extension located at path, and returns extension's name.
The method will also not return if the extension's manifest is missing or incomplete.
Note: This API cannot be called before the ready event of the app module is emitted.
BrowserWindow.removeExtension(name)
nameString
Remove a Chrome extension by name.
Note: This API cannot be called before the ready event of the app module is emitted.
BrowserWindow.getExtensions()
Returns Object - The keys are the extension names and each value is an Object containing name and version properties.
Note: This API cannot be called before the ready event of the app module is emitted.
BrowserWindow.addDevToolsExtension(path)
pathString
Adds DevTools extension located at path, and returns extension's name.
The extension will be remembered so you only need to call this API once, this API is not for programming use. If you try to add an extension that has already been loaded, this method will not return and instead log a warning to the console.
The method will also not return if the extension's manifest is missing or incomplete.
Note: This API cannot be called before the ready event of the app module is emitted.
BrowserWindow.removeDevToolsExtension(name)
nameString
Remove a DevTools extension by name.
Note: This API cannot be called before the ready event of the app module is emitted.
BrowserWindow.getDevToolsExtensions()
Returns Object - The keys are the extension names and each value is an Object containing name and version properties.
To check if a DevTools extension is installed you can run the following:
const {BrowserWindow} = require('electron')

    let installed = BrowserWindow.getDevToolsExtensions().hasOwnProperty('devtron')
    console.log(installed)
Note: This API cannot be called before the ready event of the app module is emitted.
Instance Properties
Objects created with new BrowserWindow have the following properties:
const {BrowserWindow} = require('electron')
    // In this example `win` is our instance
    let win = new BrowserWindow({width: 800, height: 600})
    win.loadURL('https://github.com')
win.webContents
A WebContents object this window owns. All web page related events and operations will be done via it.
See the webContents documentation for its methods and events.
win.id
A Integer representing the unique ID of the window.
Instance Methods
Objects created with new BrowserWindow have the following instance methods:
Note: Some methods are only available on specific operating systems and are labeled as such.
win.destroy()
Force closing the window, the unload and beforeunload event won't be emitted for the web page, and close event will also not be emitted for this window, but it guarantees the closed event will be emitted.
win.close()
Try to close the window. This has the same effect as a user manually clicking the close button of the window. The web page may cancel the close though. See the close event.
win.focus()
Focuses on the window.
win.blur()
Removes focus from the window.
win.isFocused()
Returns Boolean - Whether the window is focused.
win.isDestroyed()
Returns Boolean - Whether the window is destroyed.
win.show()
Shows and gives focus to the window.
win.showInactive()
Shows the window but doesn't focus on it.
win.hide()
Hides the window.
win.isVisible()
Returns Boolean - Whether the window is visible to the user.
win.isModal()
Returns Boolean - Whether current window is a modal window.
win.maximize()
Maximizes the window. This will also show (but not focus) the window if it isn't being displayed already.
win.unmaximize()
Unmaximizes the window.
win.isMaximized()
Returns Boolean - Whether the window is maximized.
win.minimize()
Minimizes the window. On some platforms the minimized window will be shown in the Dock.
win.restore()
Restores the window from minimized state to its previous state.
win.isMinimized()
Returns Boolean - Whether the window is minimized.
win.isFullScreen()
Returns Boolean - Whether the window is in fullscreen mode.
win.setSimpleFullScreen(flag) macOS
flagBoolean
Enters or leaves simple fullscreen mode.
Simple fullscreen mode emulates the native fullscreen behavior found in versions of Mac OS X prior to Lion (10.7).
win.isSimpleFullScreen() macOS
Returns Boolean - Whether the window is in simple (pre-Lion) fullscreen mode.
win.setAspectRatio(aspectRatio[, extraSize]) macOS
aspectRatioFloat - The aspect ratio to maintain for some portion of the content view.extraSizeSize - The extra size not to be included while maintaining the aspect ratio.
This will make a window maintain an aspect ratio. The extra size allows a developer to have space, specified in pixels, not included within the aspect ratio calculations. This API already takes into account the difference between a window's size and its content size.
Consider a normal window with an HD video player and associated controls. Perhaps there are 15 pixels of controls on the left edge, 25 pixels of controls on the right edge and 50 pixels of controls below the player. In order to maintain a 16:9 aspect ratio (standard aspect ratio for HD @1920x1080) within the player itself we would call this function with arguments of 16/9 and [ 40, 50 ]. The second argument doesn't care where the extra width and height are within the content view--only that they exist. Just sum any extra width and height areas you have within the overall content view.
win.previewFile(path[, displayName]) macOS
pathString - The absolute path to the file to preview with QuickLook. This is important as Quick Look uses the file name and file extension on the path to determine the content type of the file to open.displayNameString (optional) - The name of the file to display on the Quick Look modal view. This is purely visual and does not affect the content type of the file. Defaults topath.
Uses Quick Look to preview a file at a given path.
win.closeFilePreview() macOS
Closes the currently open Quick Look panel.
win.setBounds(bounds[, animate])
boundsRectangleanimateBoolean (optional) macOS
Resizes and moves the window to the supplied bounds
win.getBounds()
Returns Rectangle
win.setContentBounds(bounds[, animate])
boundsRectangleanimateBoolean (optional) macOS
Resizes and moves the window's client area (e.g. the web page) to the supplied bounds.
win.getContentBounds()
Returns Rectangle
win.setSize(width, height[, animate])
widthIntegerheightIntegeranimateBoolean (optional) macOS
Resizes the window to width and height.
win.getSize()
Returns Integer[] - Contains the window's width and height.
win.setContentSize(width, height[, animate])
widthIntegerheightIntegeranimateBoolean (optional) macOS
Resizes the window's client area (e.g. the web page) to width and height.
win.getContentSize()
Returns Integer[] - Contains the window's client area's width and height.
win.setMinimumSize(width, height)
widthIntegerheightInteger
Sets the minimum size of window to width and height.
win.getMinimumSize()
Returns Integer[] - Contains the window's minimum width and height.
win.setMaximumSize(width, height)
widthIntegerheightInteger
Sets the maximum size of window to width and height.
win.getMaximumSize()
Returns Integer[] - Contains the window's maximum width and height.
win.setResizable(resizable)
resizableBoolean
Sets whether the window can be manually resized by user.
win.isResizable()
Returns Boolean - Whether the window can be manually resized by user.
win.setMovable(movable) macOS Windows
movableBoolean
Sets whether the window can be moved by user. On Linux does nothing.
win.isMovable() macOS Windows
Returns Boolean - Whether the window can be moved by user.
On Linux always returns true.
win.setMinimizable(minimizable) macOS Windows
minimizableBoolean
Sets whether the window can be manually minimized by user. On Linux does nothing.
win.isMinimizable() macOS Windows
Returns Boolean - Whether the window can be manually minimized by user
On Linux always returns true.
win.setMaximizable(maximizable) macOS Windows
maximizableBoolean
Sets whether the window can be manually maximized by user. On Linux does nothing.
win.isMaximizable() macOS Windows
Returns Boolean - Whether the window can be manually maximized by user.
On Linux always returns true.
win.setFullScreenable(fullscreenable)
fullscreenableBoolean
Sets whether the maximize/zoom window button toggles fullscreen mode or maximizes the window.
win.isFullScreenable()
Returns Boolean - Whether the maximize/zoom window button toggles fullscreen mode or maximizes the window.
win.setClosable(closable) macOS Windows
closableBoolean
Sets whether the window can be manually closed by user. On Linux does nothing.
win.isClosable() macOS Windows
Returns Boolean - Whether the window can be manually closed by user.
On Linux always returns true.
win.setAlwaysOnTop(flag[, level][, relativeLevel])
flagBooleanlevelString (optional) macOS - Values includenormal,floating,torn-off-menu,modal-panel,main-menu,status,pop-up-menu,screen-saver, anddockfloating. See the macOS docs for more details.relativeLevelInteger (optional) macOS - The number of layers higher to set this window relative to the givenlevel. The default is. Note that Apple discourages setting levels higher than 1 abovescreen-saver.
Sets whether the window should show always on top of other windows. After setting this, the window is still a normal window, not a toolbox window which can not be focused on.
win.isAlwaysOnTop()
Returns Boolean - Whether the window is always on top of other windows.
win.center()
Moves window to the center of the screen.
win.setPosition(x, y[, animate])
xIntegeryIntegeranimateBoolean (optional) macOS
Moves window to x and y.
win.getPosition()
Returns Integer[] - Contains the window's current position.
win.getTitle()
Returns String - The title of the native window.
Note: The title of web page can be different from the title of the native window.
win.setSheetOffset(offsetY[, offsetX]) macOS
offsetYFloatoffsetXFloat (optional)
Changes the attachment point for sheets on macOS. By default, sheets are attached just below the window frame, but you may want to display them beneath a HTML-rendered toolbar. For example:
const {BrowserWindow} = require('electron')
    let win = new BrowserWindow()

    let toolbarRect = document.getElementById('toolbar').getBoundingClientRect()
win.setSheetOffset(toolbarRect.height)win.isKiosk()
Returns Boolean - Whether the window is in kiosk mode.
win.getNativeWindowHandle()
Returns Buffer - The platform-specific handle of the window.
The native type of the handle is HWND on Windows, NSView* on macOS, and Window (unsigned long) on Linux.
win.hookWindowMessage(message, callback) Windows
messageIntegercallbackFunction
Hooks a windows message. The callback is called when the message is received in the WndProc.
win.isWindowMessageHooked(message) Windows
messageInteger
Returns Boolean - true or false depending on whether the message is hooked.
win.unhookAllWindowMessages() Windows
Unhooks all of the window messages.
win.setRepresentedFilename(filename) macOS
filenameString
Sets the pathname of the file the window represents, and the icon of the file will show in window's title bar.
win.getRepresentedFilename() macOS
Returns String - The pathname of the file the window represents.
win.setDocumentEdited(edited) macOS
editedBoolean
Specifies whether the window’s document has been edited, and the icon in title bar will become gray when set to true.
win.isDocumentEdited() macOS
Returns Boolean - Whether the window's document has been edited.
win.capturePage([rect, ]callback)
rectRectangle (optional) - The bounds to capture-
callbackFunctionimageNativeImage
Same as webContents.capturePage([rect, ]callback).
win.loadURL(url[, options])
urlString-
optionsObject (optional)httpReferrerString (optional) - A HTTP Referrer url.userAgentString (optional) - A user agent originating the request.extraHeadersString (optional) - Extra headers separated by "\n"postData(UploadRawData[] | UploadFile[] | UploadFileSystem[] | UploadBlob[]) (optional)baseURLForDataURLString (optional) - Base url (with trailing path separator) for files to be loaded by the data url. This is needed only if the specifiedurlis a data url and needs to load other files.
Same as webContents.loadURL(url[, options]).
The url can be a remote address (e.g. http://) or a path to a local HTML file using the file:// protocol.
To ensure that file URLs are properly formatted, it is recommended to use Node's url.format method:
let url = require('url').format({
      protocol: 'file',
      slashes: true,
      pathname: require('path').join(__dirname, 'index.html')
    })

    win.loadURL(url)
You can load a URL using a POST request with URL-encoded data by doing the following:
win.loadURL('http://localhost:8000/post', {
      postData: [{
        type: 'rawData',
        bytes: Buffer.from('hello=world')
      }],
      extraHeaders: 'Content-Type: application/x-www-form-urlencoded'
    })
win.loadFile(filePath)
filePathString
Same as webContents.loadFile, filePath should be a path to an HTML file relative to the root of your application. See the webContents docs for more information.
win.reload()
Same as webContents.reload.
win.setMenu(menu) Linux Windows
menuMenu | null
Sets the menu as the window's menu bar, setting it to null will remove the menu bar.
win.setProgressBar(progress[, options])
progressDouble-
optionsObject (optional)modeString Windows - Mode for the progress bar. Can benone,normal,indeterminate,errororpaused.
Sets progress value in progress bar. Valid range is [0, 1.0].
Remove progress bar when progress < 0; Change to indeterminate mode when progress > 1.
On Linux platform, only supports Unity desktop environment, you need to specify the *.desktop file name to desktopName field in package.json. By default, it will assume app.getName().desktop.
On Windows, a mode can be passed. Accepted values are none, normal, indeterminate, error, and paused. If you call setProgressBar without a mode set (but with a value within the valid range), normal will be assumed.
win.setOverlayIcon(overlay, description) Windows
overlayNativeImage - the icon to display on the bottom right corner of the taskbar icon. If this parameter isnull, the overlay is cleareddescriptionString - a description that will be provided to Accessibility screen readers
Sets a 16 x 16 pixel overlay onto the current taskbar icon, usually used to convey some sort of application status or to passively notify the user.
win.setHasShadow(hasShadow) macOS
hasShadowBoolean
Sets whether the window should have a shadow. On Windows and Linux does nothing.
win.hasShadow() macOS
Returns Boolean - Whether the window has a shadow.
On Windows and Linux always returns true.
win.setOpacity(opacity) Windows macOS
opacityNumber - between 0.0 (fully transparent) and 1.0 (fully opaque)
Sets the opacity of the window. On Linux does nothing.
win.getOpacity() Windows macOS
Returns Number - between 0.0 (fully transparent) and 1.0 (fully opaque)
win.setThumbarButtons(buttons) Windows
buttonsThumbarButton[]
Returns Boolean - Whether the buttons were added successfully
Add a thumbnail toolbar with a specified set of buttons to the thumbnail image of a window in a taskbar button layout. Returns a Boolean object indicates whether the thumbnail has been added successfully.
The number of buttons in thumbnail toolbar should be no greater than 7 due to the limited room. Once you setup the thumbnail toolbar, the toolbar cannot be removed due to the platform's limitation. But you can call the API with an empty array to clean the buttons.
The buttons is an array of Button objects:
-
ButtonObjecticonNativeImage - The icon showing in thumbnail toolbar.clickFunctiontooltipString (optional) - The text of the button's tooltip.flagsString - Control specific states and behaviors of the button. By default, it is['enabled'].
The flags is an array that can include following Strings:
enabled- The button is active and available to the user.disabled- The button is disabled. It is present, but has a visual state indicating it will not respond to user action.dismissonclick- When the button is clicked, the thumbnail window closes immediately.nobackground- Do not draw a button border, use only the image.hidden- The button is not shown to the user.noninteractive- The button is enabled but not interactive; no pressed button state is drawn. This value is intended for instances where the button is used in a notification.
win.setThumbnailClip(region) Windows
regionRectangle - Region of the window
Sets the region of the window to show as the thumbnail image displayed when hovering over the window in the taskbar. You can reset the thumbnail to be the entire window by specifying an empty region: {x: 0, y: 0, width: 0, height: 0}.
win.setThumbnailToolTip(toolTip) Windows
toolTipString
Sets the toolTip that is displayed when hovering over the window thumbnail in the taskbar.
win.setAppDetails(options) Windows
-
optionsObjectappIdString (optional) - Window's App User Model ID. It has to be set, otherwise the other options will have no effect.appIconPathString (optional) - Window's Relaunch Icon.appIconIndexInteger (optional) - Index of the icon inappIconPath. Ignored whenappIconPathis not set. Default is.relaunchCommandString (optional) - Window's Relaunch Command.relaunchDisplayNameString (optional) - Window's Relaunch Display Name.
Sets the properties for the window's taskbar button.
Note: relaunchCommand and relaunchDisplayName must always be set together. If one of those properties is not set, then neither will be used.
win.showDefinitionForSelection() macOS
Same as webContents.showDefinitionForSelection().
win.setAutoHideMenuBar(hide)
hideBoolean
Sets whether the window menu bar should hide itself automatically. Once set the menu bar will only show when users press the single Alt key.
If the menu bar is already visible, calling setAutoHideMenuBar(true) won't hide it immediately.
win.isMenuBarAutoHide()
Returns Boolean - Whether menu bar automatically hides itself.
win.setMenuBarVisibility(visible) Windows Linux
visibleBoolean
Sets whether the menu bar should be visible. If the menu bar is auto-hide, users can still bring up the menu bar by pressing the single Alt key.
win.isMenuBarVisible()
Returns Boolean - Whether the menu bar is visible.
win.setVisibleOnAllWorkspaces(visible)
visibleBoolean
Sets whether the window should be visible on all workspaces.
Note: This API does nothing on Windows.
win.isVisibleOnAllWorkspaces()
Returns Boolean - Whether the window is visible on all workspaces.
Note: This API always returns false on Windows.
win.setIgnoreMouseEvents(ignore[, options])
ignoreBoolean-
optionsObject (optional)forwardBoolean (optional) Windows - If true, forwards mouse move messages to Chromium, enabling mouse related events such asmouseleave. Only used whenignoreis true. Ifignoreis false, forwarding is always disabled regardless of this value.
Makes the window ignore all mouse events.
All mouse events happened in this window will be passed to the window below this window, but if this window has focus, it will still receive keyboard events.
win.setContentProtection(enable) macOS Windows
enableBoolean
Prevents the window contents from being captured by other apps.
On macOS it sets the NSWindow's sharingType to NSWindowSharingNone. On Windows it calls SetWindowDisplayAffinity with WDA_MONITOR.
win.setParentWindow(parent) Linux macOS
parentBrowserWindow
Sets parent as current window's parent window, passing null will turn current window into a top-level window.
win.getParentWindow()
Returns BrowserWindow - The parent window.
win.getChildWindows()
Returns BrowserWindow[] - All child windows.
win.selectPreviousTab() macOS
Selects the previous tab when native tabs are enabled and there are other tabs in the window.
win.selectNextTab() macOS
Selects the next tab when native tabs are enabled and there are other tabs in the window.
win.mergeAllWindows() macOS
Merges all windows into one window with multiple tabs when native tabs are enabled and there is more than one open window.
win.moveTabToNewWindow() macOS
Moves the current tab into a new window if native tabs are enabled and there is more than one tab in the current window.
win.toggleTabBar() macOS
Toggles the visibility of the tab bar if native tabs are enabled and there is only one tab in the current window.
win.addTabbedWindow(browserWindow) macOS
browserWindowBrowserWindow
Adds a window as a tab on this window, after the tab for the window instance.
win.setVibrancy(type) macOS
typeString - Can beappearance-based,light,dark,titlebar,selection,menu,popover,sidebar,medium-lightorultra-dark. See the macOS documentation for more details.
Adds a vibrancy effect to the browser window. Passing null or an empty string will remove the vibrancy effect on the window.
win.setTouchBar(touchBar) macOS Experimental
touchBarTouchBar
Sets the touchBar layout for the current window. Specifying null or undefined clears the touch bar. This method only has an effect if the machine has a touch bar and is running on macOS 10.12.1+.
Note: The TouchBar API is currently experimental and may change or be removed in future Electron releases.
win.getBrowserView() Experimental
Returns BrowserView | null - an attached BrowserView. Returns null if none is attached.
Note: The BrowserView API is currently experimental and may change or be removed in future Electron releases.
Class: BrowserWindowProxy
Manipulate the child browser window
Process: Renderer
The BrowserWindowProxy object is returned from window.open and provides limited functionality with the child window.
Instance Methods
The BrowserWindowProxy object has the following instance methods:
win.blur()
Removes focus from the child window.
win.close()
Forcefully closes the child window without calling its unload event.
win.focus()
Focuses the child window (brings the window to front).
win.print()
Invokes the print dialog on the child window.
win.postMessage(message, targetOrigin)
messageStringtargetOriginString
Sends a message to the child window with the specified origin or * for no origin preference.
In addition to these methods, the child window implements window.opener object with no properties and a single method.
Instance Properties
The BrowserWindowProxy object has the following instance properties:
win.closed
A Boolean that is set to true after the child window gets closed.
Build Instructions (Linux)
Follow the guidelines below for building Electron on Linux.
Prerequisites
-
At least 25GB disk space and 8GB RAM.
-
Python 2.7.x. Some distributions like CentOS 6.x still use Python 2.6.x so you may need to check your Python version with
python -V.Please also ensure that your system and Python version support at least TLS 1.2. For a quick test, run the following script:
$ python ./script/check-tls.pyIf the script returns that your configuration is using an outdated security protocol, use your system's package manager to update Python to the latest version in the 2.7.x branch. Alternatively, visit https://www.python.org/downloads/ for detailed instructions.
-
Node.js. There are various ways to install Node. You can download source code from nodejs.org and compile it. Doing so permits installing Node on your own home directory as a standard user. Or try repositories such as NodeSource.
-
clang 3.4 or later.
-
Development headers of GTK+ and libnotify.
On Ubuntu, install the following libraries:
$ sudo apt-get install build-essential clang libdbus-1-dev libgtk-3-dev \
                           libnotify-dev libgnome-keyring-dev libgconf2-dev \
                           libasound2-dev libcap-dev libcups2-dev libxtst-dev \
                           libxss1 libnss3-dev gcc-multilib g++-multilib curl \
                           gperf bison
On RHEL / CentOS, install the following libraries:
$ sudo yum install clang dbus-devel gtk3-devel libnotify-devel \
                       libgnome-keyring-devel xorg-x11-server-utils libcap-devel \
                       cups-devel libXtst-devel alsa-lib-devel libXrandr-devel \
                       GConf2-devel nss-devel
On Fedora, install the following libraries:
$ sudo dnf install clang dbus-devel gtk3-devel libnotify-devel \
                       libgnome-keyring-devel xorg-x11-server-utils libcap-devel \
                       cups-devel libXtst-devel alsa-lib-devel libXrandr-devel \
                       GConf2-devel nss-devel
Other distributions may offer similar packages for installation via package managers such as pacman. Or one can compile from source code.
Getting the Code
$ git clone https://github.com/electron/electronBootstrapping
The bootstrap script will download all necessary build dependencies and create the build project files. You must have Python 2.7.x for the script to succeed. Downloading certain files can take a long time. Notice that we are using ninja to build Electron so there is no Makefile generated.
$ cd electron
    $ ./script/bootstrap.py --verbose
If you are using editor supports JSON compilation database based language server, you can generate it:
$ ./script/build.py --compdbCross compilation
If you want to build for an arm target you should also install the following dependencies:
$ sudo apt-get install libc6-dev-armhf-cross linux-libc-dev-armhf-cross \
                           g++-arm-linux-gnueabihf
Similarly for arm64, install the following:
$ sudo apt-get install libc6-dev-arm64-cross linux-libc-dev-arm64-cross \
                           g++-aarch64-linux-gnu
And to cross-compile for arm or ia32 targets, you should pass the --target_arch parameter to the bootstrap.py script:
$ ./script/bootstrap.py -v --target_arch=armBuilding
If you would like to build both Release and Debug targets:
$ ./script/build.pyThis script will cause a very large Electron executable to be placed in the directory out/R. The file size is in excess of 1.3 gigabytes. This happens because the Release target binary contains debugging symbols. To reduce the file size, run the create-dist.py script:
$ ./script/create-dist.pyThis will put a working distribution with much smaller file sizes in the dist directory. After running the create-dist.py script, you may want to remove the 1.3+ gigabyte binary which is still in out/R.
You can also build the Debug target only:
$ ./script/build.py -c DAfter building is done, you can find the electron debug binary under out/D.
Cleaning
To clean the build files:
$ npm run cleanTo clean only out and dist directories:
$ npm run clean-buildNote: Both clean commands require running bootstrap again before building.
Error While Loading Shared Libraries: libtinfo.so.5
Prebuilt clang will try to link to libtinfo.so.5. Depending on the host architecture, symlink to appropriate libncurses:
$ sudo ln -s /usr/lib/libncurses.so.5 /usr/lib/libtinfo.so.5Advanced topics
The default building configuration is targeted for major desktop Linux distributions. To build for a specific distribution or device, the following information may help you.
Building libchromiumcontent locally
To avoid using the prebuilt binaries of libchromiumcontent, you can build libchromiumcontent locally. To do so, follow these steps:
- Install depot_tools
- Install additional build dependencies
- Fetch the git submodules:
$ git submodule update --init --recursive- Pass the
--build_release_libccswitch tobootstrap.pyscript:
$ ./script/bootstrap.py -v --build_release_libccNote that by default the shared_library configuration is not built, so you can only build Release version of Electron if you use this mode:
$ ./script/build.py -c RUsing system clang instead of downloaded clang binaries
By default Electron is built with prebuilt clang binaries provided by the Chromium project. If for some reason you want to build with the clang installed in your system, you can call bootstrap.py with --clang_dir=<path> switch. By passing it the build script will assume the clang binaries reside in <path>/bin/.
For example if you installed clang under /user/local/bin/clang:
$ ./script/bootstrap.py -v --build_release_libcc --clang_dir /usr/local
    $ ./script/build.py -c R
Using compilers other than clang
To build Electron with compilers like g++, you first need to disable clang with --disable_clang switch first, and then set CC and CXX environment variables to the ones you want.
For example building with GCC toolchain:
$ env CC=gcc CXX=g++ ./script/bootstrap.py -v --build_release_libcc --disable_clang
    $ ./script/build.py -c R
Environment variables
Apart from CC and CXX, you can also set the following environment variables to customise the build configuration:
CPPFLAGSCPPFLAGS_hostCFLAGSCFLAGS_hostCXXFLAGSCXXFLAGS_hostARAR_hostCCCC_hostCXXCXX_hostLDFLAGS
The environment variables have to be set when executing the bootstrap.py script, it won't work in the build.py script.
Build Instructions (macOS)
Follow the guidelines below for building Electron on macOS.
Python
Please also ensure that your system and Python version support at least TLS 1.2. This depends on both your version of macOS and Python. For a quick test, run:
$ python ./script/check-tls.pyIf the script returns that your configuration is using an outdated security protocol, you can either update macOS to High Sierra or install a new version of Python 2.7.x. To upgrade Python, use Homebrew:
$ brew install python@2 && brew link python@2 --forceIf you are using Python as provided by Homebrew, you also need to install the following Python modules:
macOS SDK
If you're developing Electron and don't plan to redistribute your custom Electron build, you may skip this section.
For certain features (e.g. pinch-zoom) to work properly, you must target the macOS 10.10 SDK.
Official Electron builds are built with Xcode 8.2.1, which does not contain the 10.10 SDK by default. To obtain it, first download and mount the Xcode 6.4 DMG.
Then, assuming that the Xcode 6.4 DMG has been mounted at /Volumes/Xcode and that your Xcode 8.2.1 install is at /Applications/Xcode.app, run:
cp -r /Volumes/Xcode/Xcode.app/Contents/Developer/Platforms/MacOSX.platform/Developer/SDKs/MacOSX10.10.sdk /Applications/Xcode.app/Contents/Developer/Platforms/MacOSX.platform/Developer/SDKs/You will also need to enable Xcode to build against the 10.10 SDK:
- Open
/Applications/Xcode.app/Contents/Developer/Platforms/MacOSX.platform/Info.plist - Set the
MinimumSDKVersionto10.10 - Save the file
Getting the Code
$ git clone https://github.com/electron/electronBootstrapping
The bootstrap script will download all necessary build dependencies and create the build project files. Notice that we're using ninja to build Electron so there is no Xcode project generated.
$ cd electron
    $ ./script/bootstrap.py -v
If you are using editor supports JSON compilation database based language server, you can generate it:
$ ./script/build.py --compdbBuilding
Build both Release and Debug targets:
$ ./script/build.pyYou can also only build the Debug target:
$ ./script/build.py -c DAfter building is done, you can find Electron.app under out/D.
32bit Support
Electron can only be built for a 64bit target on macOS and there is no plan to support 32bit macOS in the future.
Cleaning
To clean the build files:
$ npm run cleanTo clean only out and dist directories:
$ npm run clean-buildNote: Both clean commands require running bootstrap again before building.
Build Instructions (Windows)
Follow the guidelines below for building Electron on Windows.
Prerequisites
- Windows 7 / Server 2008 R2 or higher
- Visual Studio 2017 - download VS 2017 Community Edition for free
- Python 2.7
- Node.js
- Git
- Debugging Tools for Windows if you plan on creating a full distribution since
symstore.exeis used for creating a symbol store from.pdbfiles.
If you don't currently have a Windows installation, dev.microsoftedge.com has timebombed versions of Windows that you can use to build Electron.
Building Electron is done entirely with command-line scripts and cannot be done with Visual Studio. You can develop Electron with any editor but support for building with Visual Studio will come in the future.
Note: Even though Visual Studio is not used for building, it's still required because we need the build toolchains it provides.
Getting the Code
$ git clone https://github.com/electron/electron.gitBootstrapping
The bootstrap script will download all necessary build dependencies and create the build project files. Notice that we're using ninja to build Electron so there is no Visual Studio project generated.
$ cd electron
    $ python script\bootstrap.py -v
Building
Build both Release and Debug targets:
$ python script\build.pyYou can also only build the Debug target:
$ python script\build.py -c DAfter building is done, you can find electron.exe under out\D (debug target) or under out\R (release target).
32bit Build
To build for the 32bit target, you need to pass --target_arch=ia32 when running the bootstrap script:
$ python script\bootstrap.py -v --target_arch=ia32The other building steps are exactly the same.
Visual Studio project
To generate a Visual Studio project, you can pass the --msvs parameter:
$ python script\bootstrap.py --msvsCleaning
To clean the build files:
$ npm run cleanTo clean only out and dist directories:
$ npm run clean-buildNote: Both clean commands require running bootstrap again before building.
Command xxxx not found
If you encountered an error like Command xxxx not found, you may try to use the VS2015 Command Prompt console to execute the build scripts.
Fatal internal compiler error: C1001
Make sure you have the latest Visual Studio update installed.
Assertion failed: ((handle))->activecnt >= 0
If building under Cygwin, you may see bootstrap.py failed with following error:
Assertion failed: ((handle))->activecnt >= 0, file src\win\pipe.c, line 1430

    Traceback (most recent call last):
      File "script/bootstrap.py", line 87, in <module>
        sys.exit(main())
      File "script/bootstrap.py", line 22, in main
        update_node_modules('.')
      File "script/bootstrap.py", line 56, in update_node_modules
        execute([NPM, 'install'])
      File "/home/zcbenz/codes/raven/script/lib/util.py", line 118, in execute
        raise e
    subprocess.CalledProcessError: Command '['npm.cmd', 'install']' returned non-zero exit status 3
This is caused by a bug when using Cygwin Python and Win32 Node together. The solution is to use the Win32 Python to execute the bootstrap script (assuming you have installed Python under C:\Python27):
$ /cygdrive/c/Python27/python.exe script/bootstrap.pyLNK1181: cannot open input file 'kernel32.lib'
Try reinstalling 32bit Node.js.
Error: ENOENT, stat 'C:\Users\USERNAME\AppData\Roaming\npm'
Creating that directory should fix the problem:
$ mkdir ~\AppData\Roaming\npmnode-gyp is not recognized as an internal or external command
You may get this error if you are using Git Bash for building, you should use PowerShell or VS2015 Command Prompt instead.
Build System Overview
Electron uses gyp for project generation and ninja for building. Project configurations can be found in the .gyp and .gypi files.
Gyp Files
Following gyp files contain the main rules for building Electron:
electron.gypdefines how Electron itself is built.common.gypiadjusts the build configurations of Node to make it build together with Chromium.brightray/brightray.gypdefines howbrightrayis built and includes the default configurations for linking with Chromium.brightray/brightray.gypiincludes general build configurations about building.
Component Build
Since Chromium is quite a large project, the final linking stage can take quite a few minutes, which makes it hard for development. In order to solve this, Chromium introduced the "component build", which builds each component as a separate shared library, making linking very quick but sacrificing file size and performance.
In Electron we took a very similar approach: for Debug builds, the binary will be linked to a shared library version of Chromium's components to achieve fast linking time; for Release builds, the binary will be linked to the static library versions, so we can have the best possible binary size and performance.
Minimal Bootstrapping
All of Chromium's prebuilt binaries (libchromiumcontent) are downloaded when running the bootstrap script. By default both static libraries and shared libraries will be downloaded and the final size should be between 800MB and 2GB depending on the platform.
By default, libchromiumcontent is downloaded from Amazon Web Services. If the LIBCHROMIUMCONTENT_MIRROR environment variable is set, the bootstrap script will download from it. libchromiumcontent-qiniu-mirror is a mirror for libchromiumcontent. If you have trouble in accessing AWS, you can switch the download address to it via export LIBCHROMIUMCONTENT_MIRROR=http://7xk3d2.dl1.z0.glb.clouddn.com/
If you only want to build Electron quickly for testing or development, you can download the shared library versions by passing the --dev parameter:
$ ./script/bootstrap.py --dev
    $ ./script/build.py -c D
Two-Phase Project Generation
Electron links with different sets of libraries in Release and Debug builds. gyp, however, doesn't support configuring different link settings for different configurations.
To work around this Electron uses a gyp variable libchromiumcontent_component to control which link settings to use and only generates one target when running gyp.
Target Names
Unlike most projects that use Release and Debug as target names, Electron uses R and D instead. This is because gyp randomly crashes if there is only one Release or Debug build configuration defined, and Electron only has to generate one target at a time as stated above.
This only affects developers, if you are building Electron for rebranding you are not affected.
Tests
Test your changes conform to the project coding style using:
$ npm run lintTest functionality using:
$ npm testWhenever you make changes to Electron source code, you'll need to re-run the build before the tests:
$ npm run build && npm testYou can make the test suite run faster by isolating the specific test or block you're currently working on using Mocha's exclusive tests feature. Append .only to any describe or it function call:
describe.only('some feature', function () {
      // ... only tests in this block will be run
    })
Alternatively, you can use mocha's grep option to only run tests matching the given regular expression pattern:
$ npm test -- --grep child_processTests that include native modules (e.g. runas) can't be executed with the debug build (see #2558 for details), but they will work with the release build.
To run the tests with the release build use:
$ npm test -- -RCertificate Object
dataString - PEM encoded dataissuerCertificatePrincipal - Issuer principalissuerNameString - Issuer's Common NameissuerCertCertificate - Issuer certificate (if not self-signed)subjectCertificatePrincipal - Subject principalsubjectNameString - Subject's Common NameserialNumberString - Hex value represented stringvalidStartNumber - Start date of the certificate being valid in secondsvalidExpiryNumber - End date of the certificate being valid in secondsfingerprintString - Fingerprint of the certificate
CertificatePrincipal Object
commonNameString - Common NameorganizationsString[] - Organization namesorganizationUnitsString[] - Organization Unit nameslocalityString - LocalitystateString - State or provincecountryString - Country or region
Supported Chrome Command Line Switches
Command line switches supported by Electron.
You can use app.commandLine.appendSwitch to append them in your app's main script before the ready event of the app module is emitted:
const {app} = require('electron')
    app.commandLine.appendSwitch('remote-debugging-port', '8315')
    app.commandLine.appendSwitch('host-rules', 'MAP * 127.0.0.1')

    app.on('ready', () => {
      // Your code here
})--ignore-connections-limit=domains
Ignore the connections limit for domains list separated by ,.
--disable-http-cache
Disables the disk cache for HTTP requests.
--disable-http2
Disable HTTP/2 and SPDY/3.1 protocols.
--lang
Set a custom locale.
--inspect=port and --inspect-brk=port
Debug-related flags, see the Debugging the Main Process guide for details.
--remote-debugging-port=port
Enables remote debugging over HTTP on the specified port.
--disk-cache-size=size
Forces the maximum disk space to be used by the disk cache, in bytes.
--js-flags=flags
Specifies the flags passed to the Node JS engine. It has to be passed when starting Electron if you want to enable the flags in the main process.
$ electron --js-flags="--harmony_proxies --harmony_collections" your-appSee the Node documentation or run node --help in your terminal for a list of available flags. Additionally, run node --v8-options to see a list of flags that specifically refer to Node's V8 JavaScript engine.
--proxy-server=address:port
Use a specified proxy server, which overrides the system setting. This switch only affects requests with HTTP protocol, including HTTPS and WebSocket requests. It is also noteworthy that not all proxy servers support HTTPS and WebSocket requests.
--proxy-bypass-list=hosts
Instructs Electron to bypass the proxy server for the given semi-colon-separated list of hosts. This flag has an effect only if used in tandem with --proxy-server.
For example:
const {app} = require('electron')
    app.commandLine.appendSwitch('proxy-bypass-list', '<local>;*.google.com;*foo.com;1.2.3.4:5678')
Will use the proxy server for all hosts except for local addresses (localhost, 127.0.0.1 etc.), google.com subdomains, hosts that contain the suffix foo.com and anything at 1.2.3.4:5678.
--proxy-pac-url=url
Uses the PAC script at the specified url.
--no-proxy-server
Don't use a proxy server and always make direct connections. Overrides any other proxy server flags that are passed.
--host-rules=rules
A comma-separated list of rules that control how hostnames are mapped.
For example:
MAP * 127.0.0.1Forces all hostnames to be mapped to 127.0.0.1MAP *.google.com proxyForces all google.com subdomains to be resolved to "proxy".MAP test.com [::1]:77Forces "test.com" to resolve to IPv6 loopback. Will also force the port of the resulting socket address to be 77.MAP * baz, EXCLUDE www.google.comRemaps everything to "baz", except for "www.google.com".
These mappings apply to the endpoint host in a net request (the TCP connect and host resolver in a direct connection, and the CONNECT in an HTTP proxy connection, and the endpoint host in a SOCKS proxy connection).
--host-resolver-rules=rules
Like --host-rules but these rules only apply to the host resolver.
--auth-server-whitelist=url
A comma-separated list of servers for which integrated authentication is enabled.
For example:
--auth-server-whitelist='*example.com, *foobar.com, *baz'then any url ending with example.com, foobar.com, baz will be considered for integrated authentication. Without * prefix the url has to match exactly.
--auth-negotiate-delegate-whitelist=url
A comma-separated list of servers for which delegation of user credentials is required. Without * prefix the url has to match exactly.
--ignore-certificate-errors
Ignores certificate related errors.
--ppapi-flash-path=path
Sets the path of the pepper flash plugin.
--ppapi-flash-version=version
Sets the version of the pepper flash plugin.
--log-net-log=path
Enables net log events to be saved and writes them to path.
--disable-renderer-backgrounding
Prevents Chromium from lowering the priority of invisible pages' renderer processes.
This flag is global to all renderer processes, if you only want to disable throttling in one window, you can take the hack of playing silent audio.
--enable-logging
Prints Chromium's logging into console.
This switch can not be used in app.commandLine.appendSwitch since it is parsed earlier than user's app is loaded, but you can set the ELECTRON_ENABLE_LOGGING environment variable to achieve the same effect.
--v=log_level
Gives the default maximal active V-logging level; 0 is the default. Normally positive values are used for V-logging levels.
This switch only works when --enable-logging is also passed.
--vmodule=pattern
Gives the per-module maximal V-logging levels to override the value given by --v. E.g. my_module=2,foo*=3 would change the logging level for all code in source files my_module.* and foo*.*.
Any pattern containing a forward or backward slash will be tested against the whole pathname and not just the module. E.g. */foo/bar/*=2 would change the logging level for all code in the source files under a foo/bar directory.
This switch only works when --enable-logging is also passed.
Chromium Development
A collection of resources for learning about Chromium and tracking its development
- chromiumdev on Slack
- @ChromiumDev on Twitter
- @googlechrome on Twitter
- Blog
- Code Search
- Source Code
- Development Calendar and Release Info
- Discussion Groups
See also V8 Development
Chromium development with Electron
It is possible to debug Chromium with Electron by passing --build_debug_libcc to the bootstrap script:
$ ./script/bootstrap.py -d --build_debug_libccThis will download and build libchromiumcontent locally, similarly to the --build_release_libcc, but it will create a shared library build of libchromiumcontent and won't strip any symbols, making it ideal for debugging.
When built like this, you can make changes to files in vendor/libchromiumcontent/src and rebuild quickly with:
$ ./script/build.py -c D --libccWhen developing on linux with gdb, it is recommended to add a gdb index to speed up loading symbols. This doesn't need to be executed on every build, but it is recommended to do it at least once to index most shared libraries:
$ ./vendor/libchromiumcontent/src/build/gdb-add-index ./out/D/electronBuilding libchromiumcontent requires a powerful machine and takes a long time (though incremental rebuilding the shared library component is fast). With an 8-core/16-thread Ryzen 1700 CPU clocked at 3ghz, fast SSD and 32GB of RAM, it should take about 40 minutes. It is not recommended to build with less than 16GB of RAM.
Chromium git cache
depot_tools has an undocumented option that allows the developer to set a global cache for all git objects of Chromium + dependencies. This option uses git clone --shared to save bandwidth/space on multiple clones of the same repositories.
On electron/libchromiumcontent, this option is exposed through the LIBCHROMIUMCONTENT_GIT_CACHE environment variable. If you intend to have several libchromiumcontent build trees on the same machine(to work on different branches for example), it is recommended to set the variable to speed up the download of Chromium source. For example:
$ mkdir ~/.chromium-git-cache
    $ LIBCHROMIUMCONTENT_GIT_CACHE=~/.chromium-git-cache ./script/bootstrap.py -d --build_debug_libcc
If the bootstrap script is interrupted while using the git cache, it will leave the cache locked. To remove the lock, delete the files ending in .lock:
$ find ~/.chromium-git-cache/ -type f -name '*.lock' -deleteIt is possible to share this directory with other machines by exporting it as SMB share on linux, but only one process/machine can be using the cache at a time. The locks created by git-cache script will try to prevent this, but it may not work perfectly in a network.
On Windows, SMBv2 has a directory cache that will cause problems with the git cache script, so it is necessary to disable it by setting the registry key
HKEY_LOCAL_MACHINE\System\CurrentControlSet\Services\Lanmanworkstation\Parameters\DirectoryCacheLifetimeto 0. More information: https://stackoverflow.com/a/9935126
Using clang-format on C++ Code
clang-format is a tool to automatically format C/C++/Objective-C code, so that developers don't need to worry about style issues during code reviews.
It is highly recommended to format your changed C++ code before opening pull requests, which will save you and the reviewers' time.
You can install clang-format and git-clang-format via npm install -g clang-format.
To automatically format a file according to Electron C++ code style, run clang-format -i path/to/electron/file.cc. It should work on macOS/Linux/Windows.
The workflow to format your changed code:
- Make codes changes in Electron repository.
- Run
git add your_changed_file.cc. - Run
git-clang-format, and you will probably see modifications inyour_changed_file.cc, these modifications are generated fromclang-format. - Run
git add your_changed_file.cc, and commit your change. - Now the branch is ready to be opened as a pull request.
If you want to format the changed code on your latest git commit (HEAD), you can run git-clang-format HEAD~1. See git-clang-format -h for more details.
Editor Integration
You can also integrate clang-format directly into your favorite editors. For further guidance on setting up editor integration, see these pages:
Class: ClientRequest
Make HTTP/HTTPS requests.
Process: Main
ClientRequest implements the Writable Stream interface and is therefore an EventEmitter.
new ClientRequest(options)
-
options(Object | String) - Ifoptionsis a String, it is interpreted as the request URL. If it is an object, it is expected to fully specify an HTTP request via the following properties:methodString (optional) - The HTTP request method. Defaults to the GET method.urlString (optional) - The request URL. Must be provided in the absolute form with the protocol scheme specified as http or https.sessionObject (optional) - TheSessioninstance with which the request is associated.partitionString (optional) - The name of thepartitionwith which the request is associated. Defaults to the empty string. Thesessionoption prevails onpartition. Thus if asessionis explicitly specified,partitionis ignored.protocolString (optional) - The protocol scheme in the form 'scheme:'. Currently supported values are 'http:' or 'https:'. Defaults to 'http:'.hostString (optional) - The server host provided as a concatenation of the hostname and the port number 'hostname:port'.hostnameString (optional) - The server host name.portInteger (optional) - The server's listening port number.pathString (optional) - The path part of the request URL.redirectString (optional) - The redirect mode for this request. Should be one offollow,errorormanual. Defaults tofollow. When mode iserror, any redirection will be aborted. When mode ismanualthe redirection will be deferred untilrequest.followRedirectis invoked. Listen for theredirectevent in this mode to get more details about the redirect request.
options properties such as protocol, host, hostname, port and path strictly follow the Node.js model as described in the URL module.
For instance, we could have created the same request to 'github.com' as follows:
const request = net.request({
      method: 'GET',
      protocol: 'https:',
      hostname: 'github.com',
      port: 443,
      path: '/'
})Event: 'response'
Returns:
responseIncomingMessage - An object representing the HTTP response message.
Event: 'login'
Returns:
-
authInfoObjectisProxyBooleanschemeStringhostStringportIntegerrealmString
-
callbackFunctionusernameStringpasswordString
Emitted when an authenticating proxy is asking for user credentials.
The callback function is expected to be called back with user credentials:
usernameStringpasswordString
request.on('login', (authInfo, callback) => {
      callback('username', 'password')
    })
Providing empty credentials will cancel the request and report an authentication error on the response object:
request.on('response', (response) => {
      console.log(`STATUS: ${response.statusCode}`);
      response.on('error', (error) => {
        console.log(`ERROR: ${JSON.stringify(error)}`)
      })
    })
    request.on('login', (authInfo, callback) => {
      callback()
    })
Event: 'finish'
Emitted just after the last chunk of the request's data has been written into the request object.
Event: 'abort'
Emitted when the request is aborted. The abort event will not be fired if the request is already closed.
Event: 'error'
Returns:
errorError - an error object providing some information about the failure.
Emitted when the net module fails to issue a network request. Typically when the request object emits an error event, a close event will subsequently follow and no response object will be provided.
Event: 'close'
Emitted as the last event in the HTTP request-response transaction. The close event indicates that no more events will be emitted on either the request or response objects.
Event: 'redirect'
Returns:
statusCodeIntegermethodStringredirectUrlStringresponseHeadersObject
Emitted when there is redirection and the mode is manual. Calling request.followRedirect will continue with the redirection.
request.chunkedEncoding
A Boolean specifying whether the request will use HTTP chunked transfer encoding or not. Defaults to false. The property is readable and writable, however it can be set only before the first write operation as the HTTP headers are not yet put on the wire. Trying to set the chunkedEncoding property after the first write will throw an error.
Using chunked encoding is strongly recommended if you need to send a large request body as data will be streamed in small chunks instead of being internally buffered inside Electron process memory.
request.setHeader(name, value)
nameString - An extra HTTP header name.valueObject - An extra HTTP header value.
Adds an extra HTTP header. The header name will issued as it is without lowercasing. It can be called only before first write. Calling this method after the first write will throw an error. If the passed value is not a String, its toString() method will be called to obtain the final value.
request.getHeader(name)
nameString - Specify an extra header name.
Returns Object - The value of a previously set extra header name.
request.removeHeader(name)
nameString - Specify an extra header name.
Removes a previously set extra header name. This method can be called only before first write. Trying to call it after the first write will throw an error.
request.write(chunk[, encoding][, callback])
chunk(String | Buffer) - A chunk of the request body's data. If it is a string, it is converted into a Buffer using the specified encoding.encodingString (optional) - Used to convert string chunks into Buffer objects. Defaults to 'utf-8'.callbackFunction (optional) - Called after the write operation ends.
callback is essentially a dummy function introduced in the purpose of keeping similarity with the Node.js API. It is called asynchronously in the next tick after chunk content have been delivered to the Chromium networking layer. Contrary to the Node.js implementation, it is not guaranteed that chunk content have been flushed on the wire before callback is called.
Adds a chunk of data to the request body. The first write operation may cause the request headers to be issued on the wire. After the first write operation, it is not allowed to add or remove a custom header.
request.end([chunk][, encoding][, callback])
chunk(String | Buffer) (optional)encodingString (optional)callbackFunction (optional)
Sends the last chunk of the request data. Subsequent write or end operations will not be allowed. The finish event is emitted just after the end operation.
request.abort()
Cancels an ongoing HTTP transaction. If the request has already emitted the close event, the abort operation will have no effect. Otherwise an ongoing event will emit abort and close events. Additionally, if there is an ongoing response object,it will emit the aborted event.
request.followRedirect()
Continues any deferred redirection request when the redirection mode is manual.
clipboard
Perform copy and paste operations on the system clipboard.
The following example shows how to write a string to the clipboard:
const {clipboard} = require('electron')
    clipboard.writeText('Example String')
On X Window systems, there is also a selection clipboard. To manipulate it you need to pass selection to each method:
const {clipboard} = require('electron')
    clipboard.writeText('Example String', 'selection')
    console.log(clipboard.readText('selection'))
Methods
The clipboard module has the following methods:
Note: Experimental APIs are marked as such and could be removed in future.
clipboard.readText([type])
typeString (optional)
Returns String - The content in the clipboard as plain text.
clipboard.writeText(text[, type])
textStringtypeString (optional)
Writes the text into the clipboard as plain text.
clipboard.readHTML([type])
typeString (optional)
Returns String - The content in the clipboard as markup.
clipboard.writeHTML(markup[, type])
markupStringtypeString (optional)
Writes markup to the clipboard.
clipboard.readImage([type])
typeString (optional)
Returns NativeImage - The image content in the clipboard.
clipboard.writeImage(image[, type])
imageNativeImagetypeString (optional)
Writes image to the clipboard.
clipboard.readRTF([type])
typeString (optional)
Returns String - The content in the clipboard as RTF.
clipboard.writeRTF(text[, type])
textStringtypeString (optional)
Writes the text into the clipboard in RTF.
clipboard.readBookmark() macOS Windows
Returns Object:
titleStringurlString
Returns an Object containing title and url keys representing the bookmark in the clipboard. The title and url values will be empty strings when the bookmark is unavailable.
clipboard.writeBookmark(title, url[, type]) macOS Windows
titleStringurlStringtypeString (optional)
Writes the title and url into the clipboard as a bookmark.
Note: Most apps on Windows don't support pasting bookmarks into them so you can use clipboard.write to write both a bookmark and fallback text to the clipboard.
clipboard.write({
      text: 'https://electronjs.org',
      bookmark: 'Electron Homepage'
    })
clipboard.readFindText() macOS
Returns String - The text on the find pasteboard. This method uses synchronous IPC when called from the renderer process. The cached value is reread from the find pasteboard whenever the application is activated.
clipboard.writeFindText(text) macOS
textString
Writes the text into the find pasteboard as plain text. This method uses synchronous IPC when called from the renderer process.
clipboard.availableFormats([type])
typeString (optional)
Returns String[] - An array of supported formats for the clipboard type.
clipboard.has(format[, type]) Experimental
formatStringtypeString (optional)
Returns Boolean - Whether the clipboard supports the specified format.
const {clipboard} = require('electron')
    console.log(clipboard.has('<p>selection</p>'))
clipboard.read(format) Experimental
formatString
Returns String - Reads format type from the clipboard.
clipboard.readBuffer(format) Experimental
formatString
Returns Buffer - Reads format type from the clipboard.
clipboard.writeBuffer(format, buffer[, type]) Experimental
formatStringbufferBuffertypeString (optional)
Writes the buffer into the clipboard as format.
clipboard.write(data[, type])
-
dataObjecttextString (optional)htmlString (optional)imageNativeImage (optional)rtfString (optional)bookmarkString (optional) - The title of the url attext.
typeString (optional)
const {clipboard} = require('electron')
    clipboard.write({text: 'test', html: '<b>test</b>'})
Writes data to the clipboard.
Code Signing
Code signing is a security technology that you use to certify that an app was created by you.
On macOS the system can detect any change to the app, whether the change is introduced accidentally or by malicious code.
On Windows the system assigns a trust level to your code signing certificate which if you don't have, or if your trust level is low will cause security dialogs to appear when users start using your application. Trust level builds over time so it's better to start code signing as early as possible.
While it is possible to distribute unsigned apps, it is not recommended. For example, here's what macOS users see when attempting to start an unsigned app:
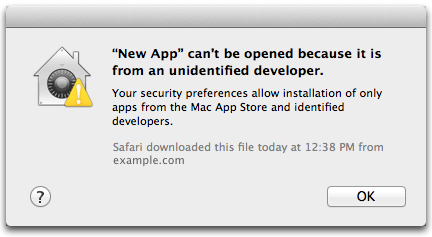
App can't be opened because it is from an unidentified developer
If you are building an Electron app that you intend to package and distribute, it should be code signed. The Mac and Windows app stores do not allow unsigned apps.
Signing macOS builds
Before signing macOS builds, you must do the following:
- Enroll in the
(requires an annual fee) - Download and install Xcode
- Generate, download, and install signing certificates
There are a number of tools for signing your packaged app:
- [
electron-osx-sign] is a standalone tool for signing macOS packages. -
[
electron-packager] bundleselectron-osx-sign. If you're usingelectron-packager, pass the--osx-sign=trueflag to sign your build.- [
electron-forge] useselectron-packagerinternally, you can set theosxSignoption in your forge config.
- [
- [
electron-builder] has built-in code-signing capabilities. See electron.build/code-signing
For more info, see the Mac App Store Submission Guide.
Signing Windows builds
Before signing Windows builds, you must do the following:
- Get a Windows Authenticode code signing certificate
- Install Visual Studio 2015/2017 (to get the signing utility)
You can get a code signing certificate from a lot of resellers, popular ones include:
- digicert
- Comodo
- GoDaddy
- Amongst others, please shop around to find one that suits your needs, Google is your friend :)
There are a number of tools for signing your packaged app:
- [
electron-winstaller] will generate an installer for windows and sign it for you - [
electron-forge] can sign installers it generates through the Squirrel.Windows or MSI targets. - [
electron-builder] can sign some of its windows targets
Windows Store
See the Windows Store Guide.
Coding Style
These are the style guidelines for coding in Electron.
You can run npm run lint to show any style issues detected by cpplint and eslint.
General Code
- End files with a newline.
-
Place requires in the following order:
- Built in Node Modules (such as
path) - Built in Electron Modules (such as
ipc,app) - Local Modules (using relative paths)
- Built in Node Modules (such as
-
Place class properties in the following order:
- Class methods and properties (methods starting with a
@) - Instance methods and properties
- Class methods and properties (methods starting with a
-
Avoid platform-dependent code:
- Use
path.join()to concatenate filenames. - Use
os.tmpdir()rather than/tmpwhen you need to reference the temporary directory.
- Use
-
Using a plain
returnwhen returning explicitly at the end of a function.- Not
return null,return undefined,nullorundefined
- Not
C++ and Python
For C++ and Python, we follow Chromium's Coding Style. You can use clang-format to format the C++ code automatically. There is also a script script/cpplint.py to check whether all files conform.
The Python version we are using now is Python 2.7.
The C++ code uses a lot of Chromium's abstractions and types, so it's recommended to get acquainted with them. A good place to start is Chromium's Important Abstractions and Data Structures document. The document mentions some special types, scoped types (that automatically release their memory when going out of scope), logging mechanisms etc.
Documentation
- Write remark markdown style
You can run npm run lint-docs to ensure that your documentation changes are formatted correctly.
JavaScript
- Write standard JavaScript style.
- File names should be concatenated with
-instead of_, e.g.file-name.jsrather thanfile_name.js, because in github/atom module names are usually in themodule-nameform. This rule only applies to.jsfiles. -
Use newer ES6/ES2015 syntax where appropriate
constfor requires and other constantsletfor defining variables- Arrow functions instead of
function () { } - Template literals instead of string concatenation using
+
Naming Things
Electron APIs uses the same capitalization scheme as Node.js:
- When the module itself is a class like
BrowserWindow, usePascalCase. - When the module is a set of APIs, like
globalShortcut, usecamelCase. - When the API is a property of object, and it is complex enough to be in a separate chapter like
win.webContents, usemixedCase. - For other non-module APIs, use natural titles, like
<webview> TagorProcess Object.
When creating a new API, it is preferred to use getters and setters instead of jQuery's one-function style. For example, .getText() and .setText(text) are preferred to .text([text]). There is a discussion on this.
contentTracing
Collect tracing data from Chromium's content module for finding performance bottlenecks and slow operations.
Process: Main
This module does not include a web interface so you need to open chrome://tracing/ in a Chrome browser and load the generated file to view the result.
Note: You should not use this module until the ready event of the app module is emitted.
const {app, contentTracing} = require('electron')

    app.on('ready', () => {
      const options = {
        categoryFilter: '*',
        traceOptions: 'record-until-full,enable-sampling'
      }

      contentTracing.startRecording(options, () => {
        console.log('Tracing started')

        setTimeout(() => {
          contentTracing.stopRecording('', (path) => {
            console.log('Tracing data recorded to ' + path)
          })
        }, 5000)
      })
    })
Methods
The contentTracing module has the following methods:
contentTracing.getCategories(callback)
-
callbackFunctioncategoriesString[]
Get a set of category groups. The category groups can change as new code paths are reached.
Once all child processes have acknowledged the getCategories request the callback is invoked with an array of category groups.
contentTracing.startRecording(options, callback)
-
optionsObjectcategoryFilterStringtraceOptionsString
callbackFunction
Start recording on all processes.
Recording begins immediately locally and asynchronously on child processes as soon as they receive the EnableRecording request. The callback will be called once all child processes have acknowledged the startRecording request.
categoryFilter is a filter to control what category groups should be traced. A filter can have an optional - prefix to exclude category groups that contain a matching category. Having both included and excluded category patterns in the same list is not supported.
Examples:
test_MyTest*,test_MyTest*,test_OtherStuff,"-excluded_category1,-excluded_category2
traceOptions controls what kind of tracing is enabled, it is a comma-delimited list. Possible options are:
record-until-fullrecord-continuouslytrace-to-consoleenable-samplingenable-systrace
The first 3 options are trace recording modes and hence mutually exclusive. If more than one trace recording modes appear in the traceOptions string, the last one takes precedence. If none of the trace recording modes are specified, recording mode is record-until-full.
The trace option will first be reset to the default option (record_mode set to record-until-full, enable_sampling and enable_systrace set to false) before options parsed from traceOptions are applied on it.
contentTracing.stopRecording(resultFilePath, callback)
resultFilePathString-
callbackFunctionresultFilePathString
Stop recording on all processes.
Child processes typically cache trace data and only rarely flush and send trace data back to the main process. This helps to minimize the runtime overhead of tracing since sending trace data over IPC can be an expensive operation. So, to end tracing, we must asynchronously ask all child processes to flush any pending trace data.
Once all child processes have acknowledged the stopRecording request, callback will be called with a file that contains the traced data.
Trace data will be written into resultFilePath if it is not empty or into a temporary file. The actual file path will be passed to callback if it's not null.
contentTracing.startMonitoring(options, callback)
-
optionsObjectcategoryFilterStringtraceOptionsString
callbackFunction
Start monitoring on all processes.
Monitoring begins immediately locally and asynchronously on child processes as soon as they receive the startMonitoring request.
Once all child processes have acknowledged the startMonitoring request the callback will be called.
contentTracing.stopMonitoring(callback)
callbackFunction
Stop monitoring on all processes.
Once all child processes have acknowledged the stopMonitoring request the callback is called.
contentTracing.captureMonitoringSnapshot(resultFilePath, callback)
resultFilePathString-
callbackFunctionresultFilePathString
Get the current monitoring traced data.
Child processes typically cache trace data and only rarely flush and send trace data back to the main process. This is because it may be an expensive operation to send the trace data over IPC and we would like to avoid unneeded runtime overhead from tracing. So, to end tracing, we must asynchronously ask all child processes to flush any pending trace data.
Once all child processes have acknowledged the captureMonitoringSnapshot request the callback will be called with a file that contains the traced data.
contentTracing.getTraceBufferUsage(callback)
-
callbackFunctionvalueNumberpercentageNumber
Get the maximum usage across processes of trace buffer as a percentage of the full state. When the TraceBufferUsage value is determined the callback is called.
Cookie Object
nameString - The name of the cookie.valueString - The value of the cookie.domainString (optional) - The domain of the cookie.hostOnlyBoolean (optional) - Whether the cookie is a host-only cookie.pathString (optional) - The path of the cookie.secureBoolean (optional) - Whether the cookie is marked as secure.httpOnlyBoolean (optional) - Whether the cookie is marked as HTTP only.sessionBoolean (optional) - Whether the cookie is a session cookie or a persistent cookie with an expiration date.expirationDateDouble (optional) - The expiration date of the cookie as the number of seconds since the UNIX epoch. Not provided for session cookies.
Class: Cookies
Query and modify a session's cookies.
Process: Main
Instances of the Cookies class are accessed by using cookies property of a Session.
For example:
const {session} = require('electron')

    // Query all cookies.
    session.defaultSession.cookies.get({}, (error, cookies) => {
      console.log(error, cookies)
    })

    // Query all cookies associated with a specific url.
    session.defaultSession.cookies.get({url: 'http://www.github.com'}, (error, cookies) => {
      console.log(error, cookies)
    })

    // Set a cookie with the given cookie data;
    // may overwrite equivalent cookies if they exist.
    const cookie = {url: 'http://www.github.com', name: 'dummy_name', value: 'dummy'}
    session.defaultSession.cookies.set(cookie, (error) => {
      if (error) console.error(error)
    })
Instance Events
The following events are available on instances of Cookies:
Event: 'changed'
eventEventcookieCookie - The cookie that was changed.-
causeString - The cause of the change with one of the following values:explicit- The cookie was changed directly by a consumer's action.overwrite- The cookie was automatically removed due to an insert operation that overwrote it.expired- The cookie was automatically removed as it expired.evicted- The cookie was automatically evicted during garbage collection.expired-overwrite- The cookie was overwritten with an already-expired expiration date.
removedBoolean -trueif the cookie was removed,falseotherwise.
Emitted when a cookie is changed because it was added, edited, removed, or expired.
Instance Methods
The following methods are available on instances of Cookies:
cookies.get(filter, callback)
-
filterObjecturlString (optional) - Retrieves cookies which are associated withurl. Empty implies retrieving cookies of all urls.nameString (optional) - Filters cookies by name.domainString (optional) - Retrieves cookies whose domains match or are subdomains ofdomains.pathString (optional) - Retrieves cookies whose path matchespath.secureBoolean (optional) - Filters cookies by their Secure property.sessionBoolean (optional) - Filters out session or persistent cookies.
-
callbackFunctionerrorErrorcookiesCookie[] - an array of cookie objects.
Sends a request to get all cookies matching filter, callback will be called with callback(error, cookies) on complete.
cookies.set(details, callback)
-
detailsObjecturlString - The url to associate the cookie with.nameString (optional) - The name of the cookie. Empty by default if omitted.valueString (optional) - The value of the cookie. Empty by default if omitted.domainString (optional) - The domain of the cookie. Empty by default if omitted.pathString (optional) - The path of the cookie. Empty by default if omitted.secureBoolean (optional) - Whether the cookie should be marked as Secure. Defaults to false.httpOnlyBoolean (optional) - Whether the cookie should be marked as HTTP only. Defaults to false.expirationDateDouble (optional) - The expiration date of the cookie as the number of seconds since the UNIX epoch. If omitted then the cookie becomes a session cookie and will not be retained between sessions.
-
callbackFunctionerrorError
Sets a cookie with details, callback will be called with callback(error) on complete.
cookies.remove(url, name, callback)
urlString - The URL associated with the cookie.nameString - The name of cookie to remove.callbackFunction
Removes the cookies matching url and name, callback will called with callback() on complete.
CPUUsage Object
percentCPUUsageNumber - Percentage of CPU used since the last call to getCPUUsage. First call returns 0.idleWakeupsPerSecondNumber - The number of average idle cpu wakeups per second since the last call to getCPUUsage. First call returns 0. Will always return 0 on Windows.
CrashReport Object
dateDateidString
crashReporter
Submit crash reports to a remote server.
The following is an example of automatically submitting a crash report to a remote server:
const {crashReporter} = require('electron')

    crashReporter.start({
      productName: 'YourName',
      companyName: 'YourCompany',
      submitURL: 'https://your-domain.com/url-to-submit',
      uploadToServer: true
    })
For setting up a server to accept and process crash reports, you can use following projects:
Crash reports are saved locally in an application-specific temp directory folder. For a productName of YourName, crash reports will be stored in a folder named YourName Crashes inside the temp directory. You can customize this temp directory location for your app by calling the app.setPath('temp', '/my/custom/temp') API before starting the crash reporter.
Methods
The crashReporter module has the following methods:
crashReporter.start(options)
-
optionsObjectcompanyNameString (optional)submitURLString - URL that crash reports will be sent to as POST.productNameString (optional) - Defaults toapp.getName().uploadToServerBoolean (optional) - Whether crash reports should be sent to the server Default istrue.ignoreSystemCrashHandlerBoolean (optional) - Default isfalse.extraObject (optional) - An object you can define that will be sent along with the report. Only string properties are sent correctly. Nested objects are not supported and the property names and values must be less than 64 characters long.crashesDirectoryString (optional) - Directory to store the crashreports temporarily (only used when the crash reporter is started viaprocess.crashReporter.start).
You are required to call this method before using any other crashReporter APIs and in each process (main/renderer) from which you want to collect crash reports. You can pass different options to crashReporter.start when calling from different processes.
Note Child processes created via the child_process module will not have access to the Electron modules. Therefore, to collect crash reports from them, use process.crashReporter.start instead. Pass the same options as above along with an additional one called crashesDirectory that should point to a directory to store the crash reports temporarily. You can test this out by calling process.crash() to crash the child process.
Note: To collect crash reports from child process in Windows, you need to add this extra code as well. This will start the process that will monitor and send the crash reports. Replace submitURL, productName and crashesDirectory with appropriate values.
Note: If you need send additional/updated extra parameters after your first call start you can call addExtraParameter on macOS or call start again with the new/updated extra parameters on Linux and Windows.
 const args = [
       `--reporter-url=${submitURL}`,
       `--application-name=${productName}`,
       `--crashes-directory=${crashesDirectory}`
     ]
     const env = {
       ELECTRON_INTERNAL_CRASH_SERVICE: 1
     }
     spawn(process.execPath, args, {
       env: env,
       detached: true
     })
Note: On macOS, Electron uses a new crashpad client for crash collection and reporting. If you want to enable crash reporting, initializing crashpad from the main process using crashReporter.start is required regardless of which process you want to collect crashes from. Once initialized this way, the crashpad handler collects crashes from all processes. You still have to call crashReporter.start from the renderer or child process, otherwise crashes from them will get reported without companyName, productName or any of the extra information.
crashReporter.getLastCrashReport()
Returns CrashReport:
Returns the date and ID of the last crash report. If no crash reports have been sent or the crash reporter has not been started, null is returned.
crashReporter.getUploadedReports()
Returns CrashReport[]:
Returns all uploaded crash reports. Each report contains the date and uploaded ID.
crashReporter.getUploadToServer() Linux macOS
Returns Boolean - Whether reports should be submitted to the server. Set through the start method or setUploadToServer.
Note: This API can only be called from the main process.
crashReporter.setUploadToServer(uploadToServer) Linux macOS
uploadToServerBoolean macOS - Whether reports should be submitted to the server.
This would normally be controlled by user preferences. This has no effect if called before start is called.
Note: This API can only be called from the main process.
crashReporter.addExtraParameter(key, value) macOS
keyString - Parameter key, must be less than 64 characters long.valueString - Parameter value, must be less than 64 characters long.
Set an extra parameter to be sent with the crash report. The values specified here will be sent in addition to any values set via the extra option when start was called. This API is only available on macOS, if you need to add/update extra parameters on Linux and Windows after your first call to start you can call start again with the updated extra options.
crashReporter.removeExtraParameter(key) macOS
keyString - Parameter key, must be less than 64 characters long.
Remove a extra parameter from the current set of parameters so that it will not be sent with the crash report.
crashReporter.getParameters()
See all of the current parameters being passed to the crash reporter.
Crash Report Payload
The crash reporter will send the following data to the submitURL as a multipart/form-data POST:
verString - The version of Electron.platformString - e.g. 'win32'.process_typeString - e.g. 'renderer'.guidString - e.g. '5e1286fc-da97-479e-918b-6bfb0c3d1c72'._versionString - The version inpackage.json._productNameString - The product name in thecrashReporteroptionsobject.prodString - Name of the underlying product. In this case Electron._companyNameString - The company name in thecrashReporteroptionsobject.upload_file_minidumpFile - The crash report in the format ofminidump.- All level one properties of the
extraobject in thecrashReporteroptionsobject.
Debugging on Windows
If you experience crashes or issues in Electron that you believe are not caused by your JavaScript application, but instead by Electron itself, debugging can be a little bit tricky, especially for developers not used to native/C++ debugging. However, using Visual Studio, GitHub's hosted Electron Symbol Server, and the Electron source code, you can enable step-through debugging with breakpoints inside Electron's source code.
Requirements
-
A debug build of Electron: The easiest way is usually building it yourself, using the tools and prerequisites listed in the build instructions for Windows. While you can attach to and debug Electron as you can download it directly, you will find that it is heavily optimized, making debugging substantially more difficult: The debugger will not be able to show you the content of all variables and the execution path can seem strange because of inlining, tail calls, and other compiler optimizations.
-
Visual Studio with C++ Tools: The free community editions of Visual Studio 2013 and Visual Studio 2015 both work. Once installed, configure Visual Studio to use GitHub's Electron Symbol server. It will enable Visual Studio to gain a better understanding of what happens inside Electron, making it easier to present variables in a human-readable format.
-
ProcMon: The free SysInternals tool allows you to inspect a processes parameters, file handles, and registry operations.
Attaching to and Debugging Electron
To start a debugging session, open up PowerShell/CMD and execute your debug build of Electron, using the application to open as a parameter.
$ ./out/D/electron.exe ~/my-electron-app/Setting Breakpoints
Then, open up Visual Studio. Electron is not built with Visual Studio and hence does not contain a project file - you can however open up the source code files "As File", meaning that Visual Studio will open them up by themselves. You can still set breakpoints - Visual Studio will automatically figure out that the source code matches the code running in the attached process and break accordingly.
Relevant code files can be found in ./atom/ as well as in Brightray, found in ./brightray/browser and ./brightray/common.
Attaching
You can attach the Visual Studio debugger to a running process on a local or remote computer. After the process is running, click Debug / Attach to Process (or press CTRL+ALT+P) to open the "Attach to Process" dialog box. You can use this capability to debug apps that are running on a local or remote computer, debug multiple processes simultaneously.
If Electron is running under a different user account, select the Show processes from all users check box. Notice that depending on how many BrowserWindows your app opened, you will see multiple processes. A typical one-window app will result in Visual Studio presenting you with two Electron.exe entries - one for the main process and one for the renderer process. Since the list only gives you names, there's currently no reliable way of figuring out which is which.
Which Process Should I Attach to?
Code executed within the main process (that is, code found in or eventually run by your main JavaScript file) as well as code called using the remote (require('electron').remote) will run inside the main process, while other code will execute inside its respective renderer process.
You can be attached to multiple programs when you are debugging, but only one program is active in the debugger at any time. You can set the active program in the Debug Location toolbar or the Processes window.
Using ProcMon to Observe a Process
While Visual Studio is fantastic for inspecting specific code paths, ProcMon's strength is really in observing everything your application is doing with the operating system - it captures File, Registry, Network, Process, and Profiling details of processes. It attempts to log all events occurring and can be quite overwhelming, but if you seek to understand what and how your application is doing to the operating system, it can be a valuable resource.
For an introduction to ProcMon's basic and advanced debugging features, go check out this video tutorial provided by Microsoft.
Class: Debugger
An alternate transport for Chrome's remote debugging protocol.
Process: Main
Chrome Developer Tools has a special binding available at JavaScript runtime that allows interacting with pages and instrumenting them.
const {BrowserWindow} = require('electron')
    let win = new BrowserWindow()

    try {
      win.webContents.debugger.attach('1.1')
    } catch (err) {
      console.log('Debugger attach failed : ', err)
    }

    win.webContents.debugger.on('detach', (event, reason) => {
      console.log('Debugger detached due to : ', reason)
    })

    win.webContents.debugger.on('message', (event, method, params) => {
      if (method === 'Network.requestWillBeSent') {
        if (params.request.url === 'https://www.github.com') {
          win.webContents.debugger.detach()
        }
      }
    })

win.webContents.debugger.sendCommand('Network.enable')debugger.attach([protocolVersion])
protocolVersionString (optional) - Requested debugging protocol version.
Attaches the debugger to the webContents.
debugger.isAttached()
Returns Boolean - Whether a debugger is attached to the webContents.
debugger.detach()
Detaches the debugger from the webContents.
debugger.sendCommand(method[, commandParams, callback])
methodString - Method name, should be one of the methods defined by the remote debugging protocol.commandParamsObject (optional) - JSON object with request parameters.-
callbackFunction (optional) - ResponseerrorObject - Error message indicating the failure of the command.resultAny - Response defined by the 'returns' attribute of the command description in the remote debugging protocol.
Send given command to the debugging target.
Event: 'detach'
eventEventreasonString - Reason for detaching debugger.
Emitted when debugging session is terminated. This happens either when webContents is closed or devtools is invoked for the attached webContents.
Event: 'message'
eventEventmethodString - Method name.paramsObject - Event parameters defined by the 'parameters' attribute in the remote debugging protocol.
Emitted whenever debugging target issues instrumentation event.
Debugging on macOS
If you experience crashes or issues in Electron that you believe are not caused by your JavaScript application, but instead by Electron itself, debugging can be a little bit tricky, especially for developers not used to native/C++ debugging. However, using lldb, and the Electron source code, you can enable step-through debugging with breakpoints inside Electron's source code. You can also use XCode for debugging if you prefer a graphical interface.
Requirements
-
A debug build of Electron: The easiest way is usually building it yourself, using the tools and prerequisites listed in the build instructions for macOS. While you can attach to and debug Electron as you can download it directly, you will find that it is heavily optimized, making debugging substantially more difficult: The debugger will not be able to show you the content of all variables and the execution path can seem strange because of inlining, tail calls, and other compiler optimizations.
-
Xcode: In addition to Xcode, also install the Xcode command line tools. They include LLDB, the default debugger in Xcode on Mac OS X. It supports debugging C, Objective-C and C++ on the desktop and iOS devices and simulator.
Attaching to and Debugging Electron
To start a debugging session, open up Terminal and start lldb, passing a debug build of Electron as a parameter.
$ lldb ./out/D/Electron.app
    (lldb) target create "./out/D/Electron.app"
    Current executable set to './out/D/Electron.app' (x86_64).
Setting Breakpoints
LLDB is a powerful tool and supports multiple strategies for code inspection. For this basic introduction, let's assume that you're calling a command from JavaScript that isn't behaving correctly - so you'd like to break on that command's C++ counterpart inside the Electron source.
Relevant code files can be found in ./atom/ as well as in Brightray, found in ./brightray/browser and ./brightray/common.
Let's assume that you want to debug app.setName(), which is defined in browser.cc as Browser::SetName(). Set the breakpoint using the breakpoint command, specifying file and line to break on:
(lldb) breakpoint set --file browser.cc --line 117
    Breakpoint 1: where = Electron Framework`atom::Browser::SetName(std::__1::basic_string<char, std::__1::char_traits<char>, std::__1::allocator<char> > const&) + 20 at browser.cc:118, address = 0x000000000015fdb4
Then, start Electron:
(lldb) runThe app will immediately be paused, since Electron sets the app's name on launch:
(lldb) run
    Process 25244 launched: '/Users/fr/Code/electron/out/D/Electron.app/Contents/MacOS/Electron' (x86_64)
    Process 25244 stopped
    * thread #1: tid = 0x839a4c, 0x0000000100162db4 Electron Framework`atom::Browser::SetName(this=0x0000000108b14f20, name="Electron") + 20 at browser.cc:118, queue = 'com.apple.main-thread', stop reason = breakpoint 1.1
        frame #0: 0x0000000100162db4 Electron Framework`atom::Browser::SetName(this=0x0000000108b14f20, name="Electron") + 20 at browser.cc:118
       115  }
       116
       117  void Browser::SetName(const std::string& name) {
    -> 118    name_override_ = name;
       119  }
       120
       121  int Browser::GetBadgeCount() {
    (lldb)
To show the arguments and local variables for the current frame, run frame variable (or fr v), which will show you that the app is currently setting the name to "Electron".
(lldb) frame variable
    (atom::Browser *) this = 0x0000000108b14f20
    (const string &) name = "Electron": {
        [...]
    }
To do a source level single step in the currently selected thread, execute step (or s). This would take you into name_override_.empty(). To proceed and do a step over, run next (or n).
(lldb) step
    Process 25244 stopped
    * thread #1: tid = 0x839a4c, 0x0000000100162dcc Electron Framework`atom::Browser::SetName(this=0x0000000108b14f20, name="Electron") + 44 at browser.cc:119, queue = 'com.apple.main-thread', stop reason = step in
        frame #0: 0x0000000100162dcc Electron Framework`atom::Browser::SetName(this=0x0000000108b14f20, name="Electron") + 44 at browser.cc:119
       116
       117  void Browser::SetName(const std::string& name) {
       118    name_override_ = name;
    -> 119  }
       120
       121  int Browser::GetBadgeCount() {
       122    return badge_count_;
To finish debugging at this point, run process continue. You can also continue until a certain line is hit in this thread (thread until 100). This command will run the thread in the current frame till it reaches line 100 in this frame or stops if it leaves the current frame.
Now, if you open up Electron's developer tools and call setName, you will once again hit the breakpoint.
Further Reading
LLDB is a powerful tool with a great documentation. To learn more about it, consider Apple's debugging documentation, for instance the LLDB Command Structure Reference or the introduction to Using LLDB as a Standalone Debugger.
You can also check out LLDB's fantastic manual and tutorial, which will explain more complex debugging scenarios.
Build Debug Electron with Release libchromiumcontent
You can create a debug build of electron by following build instructions for macOS. The bootstrap process will download Release version of libchromiumcontent by default, so you will not be able to step through the chromium source.
Build Debug Electron with Debug libchromiumcontent
If you want to debug and step through libchromiumcontent, you will have to run the bootsrap script with the --build_debug_libcc argument.
$ cd electron
    $ ./script/bootstrap.py -v --build_debug_libcc
This can take a significant amount of time depending on build machine as it has to build all of the libchromium source.
Once, the lib is built, create a symlink to the built directory under download
ln -s vendor/libchromiumcontent/dist/main/shared_library vendor/download/libchromiumcontent/shared_library
Electron debug builds will use this shared library to link against.
$ ./script/build.py -c D --libccThis will build debug electron with debug version of libchromiumcontent.
Generate xcode project for debugging sources (cannot build code from xcode)
Run the update script with the --xcode argument.
$ ./script/update.py --xcodeThis will generate the electron.ninjs.xcworkspace. You will have to open this workspace to set breakpoints and inspect.
Debugging and breakpoints
Launch electron app after build. You can now open the xcode workspace created above and attach to the electron process through the Debug > Attach To Process > Electron debug menu. [Note: If you want to debug the renderer process, you need to attach to the Electron Helper as well.]
You can now set breakpoints in any of the indexed files. However, you will not be able to set breakpoints directly in the chromium source. To set break points in the chromium source, you can choose Debug > Breakpoints > Create Symbolic Breakpoint and set any function name as the symbol. This will set the breakpoint for all functions with that name, from all the classes if there are more than one. You can also do this step of setting break points prior to attaching the debugger, however, actual breakpoints for symbolic breakpoint functions may not show up until the debugger is attached to the app.
Debugging the Main Process
The DevTools in an Electron browser window can only debug JavaScript that's executed in that window (i.e. the web pages). To debug JavaScript that's executed in the main process you will need to use an external debugger and launch Electron with the --inspect or --inspect-brk switch.
Command Line Switches
Use one of the following command line switches to enable debugging of the main process:
--inspect=[port]
Electron will listen for V8 inspector protocol messages on the specified port, an external debugger will need to connect on this port. The default port is 5858.
electron --inspect=5858 your/app--inspect-brk=[port]
Like --inspect but pauses execution on the first line of JavaScript.
External Debuggers
You will need to use a debugger that supports the V8 inspector protocol.
- Connect Chrome by visiting
chrome://inspectand selecting to inspect the launched Electron app present there. - Debugging the Main Process in VSCode
1. Open an Electron project in VSCode.
$ git clone git@github.com:electron/electron-quick-start.git
    $ code electron-quick-start
2. Add a file .vscode/launch.json with the following configuration:
{
      "version": "0.2.0",
      "configurations": [
        {
          "name": "Debug Main Process",
          "type": "node",
          "request": "launch",
          "cwd": "${workspaceRoot}",
          "runtimeExecutable": "${workspaceRoot}/node_modules/.bin/electron",
          "windows": {
            "runtimeExecutable": "${workspaceRoot}/node_modules/.bin/electron.cmd"
          },
          "args" : ["."]
        }
      ]
    }
3. Debugging
Set some breakpoints in main.js, and start debugging in the Debug View. You should be able to hit the breakpoints.
Here is a pre-configured project that you can download and directly debug in VSCode: https://github.com/octref/vscode-electron-debug/tree/master/electron-quick-start
desktopCapturer
Access information about media sources that can be used to capture audio and video from the desktop using the [
navigator.mediaDevices.getUserMedia] API.
Process: Renderer
The following example shows how to capture video from a desktop window whose title is Electron:
// In the renderer process.
    const {desktopCapturer} = require('electron')

    desktopCapturer.getSources({types: ['window', 'screen']}, (error, sources) => {
      if (error) throw error
      for (let i = 0; i < sources.length; ++i) {
        if (sources[i].name === 'Electron') {
          navigator.mediaDevices.getUserMedia({
            audio: false,
            video: {
              mandatory: {
                chromeMediaSource: 'desktop',
                chromeMediaSourceId: sources[i].id,
                minWidth: 1280,
                maxWidth: 1280,
                minHeight: 720,
                maxHeight: 720
              }
            }
          })
          .then((stream) => handleStream(stream))
          .catch((e) => handleError(e))
          return
        }
      }
    })

    function handleStream (stream) {
      const video = document.querySelector('video')
      video.srcObject = stream
      video.onloadedmetadata = (e) => video.play()
    }

    function handleError (e) {
      console.log(e)
    }
To capture video from a source provided by desktopCapturer the constraints passed to [navigator.mediaDevices.getUserMedia] must include chromeMediaSource: 'desktop', and audio: false.
To capture both audio and video from the entire desktop the constraints passed to [navigator.mediaDevices.getUserMedia] must include chromeMediaSource: 'desktop', for both audio and video, but should not include a chromeMediaSourceId constraint.
const constraints = {
      audio: {
        mandatory: {
          chromeMediaSource: 'desktop'
        }
      },
      video: {
        mandatory: {
          chromeMediaSource: 'desktop'
        }
      }
    }
Methods
The desktopCapturer module has the following methods:
desktopCapturer.getSources(options, callback)
-
optionsObjecttypesString[] - An array of Strings that lists the types of desktop sources to be captured, available types arescreenandwindow.thumbnailSizeSize (optional) - The size that the media source thumbnail should be scaled to. Default is150x150.
-
callbackFunctionerrorErrorsourcesDesktopCapturerSource[]
Starts gathering information about all available desktop media sources, and calls callback(error, sources) when finished.
sources is an array of DesktopCapturerSource objects, each DesktopCapturerSource represents a screen or an individual window that can be captured.
DesktopCapturerSource Object
idString - The identifier of a window or screen that can be used as achromeMediaSourceIdconstraint when calling [navigator.webkitGetUserMedia]. The format of the identifier will bewindow:XXorscreen:XX, whereXXis a random generated number.nameString - A screen source will be named eitherEntire ScreenorScreen <index>, while the name of a window source will match the window title.thumbnailNativeImage - A thumbnail image. Note: There is no guarantee that the size of the thumbnail is the same as thethumbnailSizespecified in theoptionspassed todesktopCapturer.getSources. The actual size depends on the scale of the screen or window.
Desktop Environment Integration
Different operating systems provide different features for integrating desktop applications into their desktop environments. For example, on Windows, applications can put shortcuts in the JumpList of task bar, and on Mac, applications can put a custom menu in the dock menu.
This guide explains how to integrate your application into those desktop environments with Electron APIs.
Notifications
See the Notifications documentation.
Progress Bar
See the Progress Bar documentation.
Developer Environment
Electron development is essentially Node.js development. To turn your operating system into an environment capable of building desktop apps with Electron, you will merely need Node.js, npm, a code editor of your choice, and a rudimentary understanding of your operating system's command line client.
Setting up macOS
Electron supports Mac OS X 10.9 (and all versions named macOS) and up. Apple does not allow running macOS in virtual machines unless the host computer is already an Apple computer, so if you find yourself in need of a Mac, consider using a cloud service that rents access to Macs (like MacInCloud or xcloud).
First, install a recent version of Node.js. We recommend that you install either the latest LTS or Current version available. Visit the Node.js download page and select the macOS Installer. While Homebrew is an offered option, but we recommend against it - many tools will be incompatible with the way Homebrew installs Node.js.
Once downloaded, execute the installer and let the installation wizard guide you through the installation.
Once installed, confirm that everything works as expected. Find the macOS Terminal application in your /Applications/Utilities folder (or by searching for the word Terminal in Spotlight). Open up Terminal or another command line client of your choice and confirm that both node and npm are available:
# This command should print the version of Node.js
    node -v

    # This command should print the version of npm
    npm -v
If both commands printed a version number, you are all set! Before you get started, you might want to install a code editor suited for JavaScript development.
Setting up Windows
Electron supports Windows 7 and later versions – attempting to develop Electron applications on earlier versions of Windows will not work. Microsoft provides free virtual machine images with Windows 10 for developers.
First, install a recent version of Node.js. We recommend that you install either the latest LTS or Current version available. Visit the Node.js download page and select the Windows Installer. Once downloaded, execute the installer and let the installation wizard guide you through the installation.
On the screen that allows you to configure the installation, make sure to select the Node.js runtime, npm package manager, and Add to PATH options.
Once installed, confirm that everything works as expected. Find the Windows PowerShell by opening the Start Menu and typing PowerShell. Open up PowerShell or another command line client of your choice and confirm that both node and npm are available:
# This command should print the version of Node.js
    node -v

    # This command should print the version of npm
    npm -v
If both commands printed a version number, you are all set! Before you get started, you might want to install a code editor suited for JavaScript development.
Setting up Linux
Generally speaking, Electron supports Ubuntu 12.04, Fedora 21, Debian 8 and later.
First, install a recent version of Node.js. Depending on your Linux distribution, the installation steps might differ. Assuming that you normally install software using a package manager like apt or pacman, use the official Node.js guidance on installing on Linux.
You're running Linux, so you likely already know how to operate a command line client. Open up your favorite client and confirm that both node and npm are available globally:
# This command should print the version of Node.js
    node -v

    # This command should print the version of npm
    npm -v
If both commands printed a version number, you are all set! Before you get started, you might want to install a code editor suited for JavaScript development.
A Good Editor
We might suggest two free popular editors built in Electron: GitHub's Atom and Microsoft's Visual Studio Code. Both of them have excellent JavaScript support.
If you are one of the many developers with a strong preference, know that virtually all code editors and IDEs these days support JavaScript.
DevTools Extension
Electron supports the Chrome DevTools Extension, which can be used to extend the ability of devtools for debugging popular web frameworks.
How to load a DevTools Extension
This document outlines the process for manually loading an extension. You may also try electron-devtools-installer, a third-party tool that downloads extensions directly from the Chrome WebStore.
To load an extension in Electron, you need to download it in Chrome browser, locate its filesystem path, and then load it by calling the BrowserWindow.addDevToolsExtension(extension) API.
Using the React Developer Tools as example:
- Install it in Chrome browser.
- Navigate to
chrome://extensions, and find its extension ID, which is a hash string likefmkadmapgofadopljbjfkapdkoienihi. -
Find out filesystem location used by Chrome for storing extensions:
- on Windows it is
%LOCALAPPDATA%\Google\Chrome\User Data\Default\Extensions; -
on Linux it could be:
~/.config/google-chrome/Default/Extensions/~/.config/google-chrome-beta/Default/Extensions/~/.config/google-chrome-canary/Default/Extensions/~/.config/chromium/Default/Extensions/
- on macOS it is
~/Library/Application Support/Google/Chrome/Default/Extensions.
- on Windows it is
- Pass the location of the extension to
BrowserWindow.addDevToolsExtensionAPI, for the React Developer Tools, it is something like:~/Library/Application Support/Google/Chrome/Default/Extensions/fmkadmapgofadopljbjfkapdkoienihi/0.15.0_0
Note: The BrowserWindow.addDevToolsExtension API cannot be called before the ready event of the app module is emitted.
The name of the extension is returned by BrowserWindow.addDevToolsExtension, and you can pass the name of the extension to the BrowserWindow.removeDevToolsExtension API to unload it.
Supported DevTools Extensions
Electron only supports a limited set of chrome.* APIs, so some extensions using unsupported chrome.* APIs for chrome extension features may not work. Following Devtools Extensions are tested and guaranteed to work in Electron:
What should I do if a DevTools Extension is not working?
First please make sure the extension is still being maintained, some extensions can not even work for recent versions of Chrome browser, and we are not able to do anything for them.
Then file a bug at Electron's issues list, and describe which part of the extension is not working as expected.
dialog
Display native system dialogs for opening and saving files, alerting, etc.
Process: Main
An example of showing a dialog to select multiple files and directories:
const {dialog} = require('electron')
    console.log(dialog.showOpenDialog({properties: ['openFile', 'openDirectory', 'multiSelections']}))
The Dialog is opened from Electron's main thread. If you want to use the dialog object from a renderer process, remember to access it using the remote:
const {dialog} = require('electron').remote
    console.log(dialog)
Methods
The dialog module has the following methods:
dialog.showOpenDialog([browserWindow, ]options[, callback])
browserWindowBrowserWindow (optional)-
optionsObjecttitleString (optional)defaultPathString (optional)buttonLabelString (optional) - Custom label for the confirmation button, when left empty the default label will be used.filtersFileFilter[] (optional)-
propertiesString - Contains which features the dialog should use. The following values are supported:openFile- Allow files to be selected.openDirectory- Allow directories to be selected.multiSelections- Allow multiple paths to be selected.showHiddenFiles- Show hidden files in dialog.createDirectorymacOS - Allow creating new directories from dialog.promptToCreateWindows - Prompt for creation if the file path entered in the dialog does not exist. This does not actually create the file at the path but allows non-existent paths to be returned that should be created by the application.noResolveAliasesmacOS - Disable the automatic alias (symlink) path resolution. Selected aliases will now return the alias path instead of their target path.treatPackageAsDirectorymacOS - Treat packages, such as.appfolders, as a directory instead of a file.
messageString (optional) macOS - Message to display above input boxes.securityScopedBookmarksBoolean (optional) masOS mas - Create security scoped bookmarks when packaged for the Mac App Store.
-
callbackFunction (optional)filePathsString[] - An array of file paths chosen by the userbookmarksString[] macOS mas - An array matching thefilePathsarray of base64 encoded strings which contains security scoped bookmark data.securityScopedBookmarksmust be enabled for this to be populated.
Returns String[], an array of file paths chosen by the user, if the callback is provided it returns undefined.
The browserWindow argument allows the dialog to attach itself to a parent window, making it modal.
The filters specifies an array of file types that can be displayed or selected when you want to limit the user to a specific type. For example:
{
      filters: [
        {name: 'Images', extensions: ['jpg', 'png', 'gif']},
        {name: 'Movies', extensions: ['mkv', 'avi', 'mp4']},
        {name: 'Custom File Type', extensions: ['as']},
        {name: 'All Files', extensions: ['*']}
      ]
    }
The extensions array should contain extensions without wildcards or dots (e.g. 'png' is good but '.png' and '*.png' are bad). To show all files, use the '*' wildcard (no other wildcard is supported).
If a callback is passed, the API call will be asynchronous and the result will be passed via callback(filenames).
Note: On Windows and Linux an open dialog can not be both a file selector and a directory selector, so if you set properties to ['openFile', 'openDirectory'] on these platforms, a directory selector will be shown.
dialog.showSaveDialog([browserWindow, ]options[, callback])
browserWindowBrowserWindow (optional)-
optionsObjecttitleString (optional)defaultPathString (optional) - Absolute directory path, absolute file path, or file name to use by default.buttonLabelString (optional) - Custom label for the confirmation button, when left empty the default label will be used.filtersFileFilter[] (optional)messageString (optional) macOS - Message to display above text fields.nameFieldLabelString (optional) macOS - Custom label for the text displayed in front of the filename text field.showsTagFieldBoolean (optional) macOS - Show the tags input box, defaults totrue.securityScopedBookmarksBoolean (optional) masOS mas - Create a security scoped bookmark when packaged for the Mac App Store. If this option is enabled and the file doesn't already exist a blank file will be created at the chosen path.
-
callbackFunction (optional)filenameStringbookmarkString macOS mas - Base64 encoded string which contains the security scoped bookmark data for the saved file.securityScopedBookmarksmust be enabled for this to be present.
Returns String, the path of the file chosen by the user, if a callback is provided it returns undefined.
The browserWindow argument allows the dialog to attach itself to a parent window, making it modal.
The filters specifies an array of file types that can be displayed, see dialog.showOpenDialog for an example.
If a callback is passed, the API call will be asynchronous and the result will be passed via callback(filename).
dialog.showMessageBox([browserWindow, ]options[, callback])
browserWindowBrowserWindow (optional)-
optionsObjecttypeString (optional) - Can be"none","info","error","question"or"warning". On Windows,"question"displays the same icon as"info", unless you set an icon using the"icon"option. On macOS, both"warning"and"error"display the same warning icon.buttonsString - Array of texts for buttons. On Windows, an empty array will result in one button labeled "OK".defaultIdInteger (optional) - Index of the button in the buttons array which will be selected by default when the message box opens.titleString (optional) - Title of the message box, some platforms will not show it.messageString - Content of the message box.detailString (optional) - Extra information of the message.checkboxLabelString (optional) - If provided, the message box will include a checkbox with the given label. The checkbox state can be inspected only when usingcallback.checkboxCheckedBoolean (optional) - Initial checked state of the checkbox.falseby default.iconNativeImage (optional)cancelIdInteger (optional) - The index of the button to be used to cancel the dialog, via theEsckey. By default this is assigned to the first button with "cancel" or "no" as the label. If no such labeled buttons exist and this option is not set,will be used as the return value or callback response. This option is ignored on Windows.noLinkBoolean (optional) - On Windows Electron will try to figure out which one of thebuttonsare common buttons (like "Cancel" or "Yes"), and show the others as command links in the dialog. This can make the dialog appear in the style of modern Windows apps. If you don't like this behavior, you can setnoLinktotrue.normalizeAccessKeysBoolean (optional) - Normalize the keyboard access keys across platforms. Default isfalse. Enabling this assumes&is used in the button labels for the placement of the keyboard shortcut access key and labels will be converted so they work correctly on each platform,&characters are removed on macOS, converted to_on Linux, and left untouched on Windows. For example, a button label ofVie&wwill be converted toVie_won Linux andViewon macOS and can be selected viaAlt-Won Windows and Linux.
-
callbackFunction (optional)responseNumber - The index of the button that was clicked.checkboxCheckedBoolean - The checked state of the checkbox ifcheckboxLabelwas set. Otherwisefalse.
Returns Integer, the index of the clicked button, if a callback is provided it returns undefined.
Shows a message box, it will block the process until the message box is closed. It returns the index of the clicked button.
The browserWindow argument allows the dialog to attach itself to a parent window, making it modal.
If a callback is passed, the dialog will not block the process. The API call will be asynchronous and the result will be passed via callback(response).
dialog.showErrorBox(title, content)
titleString - The title to display in the error box.contentString - The text content to display in the error box.
Displays a modal dialog that shows an error message.
This API can be called safely before the ready event the app module emits, it is usually used to report errors in early stage of startup. If called before the app readyevent on Linux, the message will be emitted to stderr, and no GUI dialog will appear.
dialog.showCertificateTrustDialog([browserWindow, ]options, callback) macOS Windows
browserWindowBrowserWindow (optional)-
optionsObjectcertificateCertificate - The certificate to trust/import.messageString - The message to display to the user.
callbackFunction
On macOS, this displays a modal dialog that shows a message and certificate information, and gives the user the option of trusting/importing the certificate. If you provide a browserWindow argument the dialog will be attached to the parent window, making it modal.
On Windows the options are more limited, due to the Win32 APIs used:
- The
messageargument is not used, as the OS provides its own confirmation dialog. - The
browserWindowargument is ignored since it is not possible to make this confirmation dialog modal.
Sheets
On macOS, dialogs are presented as sheets attached to a window if you provide a BrowserWindow reference in the browserWindow parameter, or modals if no window is provided.
You can call BrowserWindow.getCurrentWindow().setSheetOffset(offset) to change the offset from the window frame where sheets are attached.
Display Object
idNumber - Unique identifier associated with the display.rotationNumber - Can be 0, 90, 180, 270, represents screen rotation in clock-wise degrees.scaleFactorNumber - Output device's pixel scale factor.touchSupportString - Can beavailable,unavailable,unknown.boundsRectanglesizeSizeworkAreaRectangleworkAreaSizeSize
The Display object represents a physical display connected to the system. A fake Display may exist on a headless system, or a Display may correspond to a remote, virtual display.
Class: DownloadItem
Control file downloads from remote sources.
Process: Main
DownloadItem is an EventEmitter that represents a download item in Electron. It is used in will-download event of Session class, and allows users to control the download item.
// In the main process.
    const {BrowserWindow} = require('electron')
    let win = new BrowserWindow()
    win.webContents.session.on('will-download', (event, item, webContents) => {
      // Set the save path, making Electron not to prompt a save dialog.
      item.setSavePath('/tmp/save.pdf')

      item.on('updated', (event, state) => {
        if (state === 'interrupted') {
          console.log('Download is interrupted but can be resumed')
        } else if (state === 'progressing') {
          if (item.isPaused()) {
            console.log('Download is paused')
          } else {
            console.log(`Received bytes: ${item.getReceivedBytes()}`)
          }
        }
      })
      item.once('done', (event, state) => {
        if (state === 'completed') {
          console.log('Download successfully')
        } else {
          console.log(`Download failed: ${state}`)
        }
      })
})Event: 'updated'
Returns:
eventEventstateString - Can beprogressingorinterrupted.
Emitted when the download has been updated and is not done.
The state can be one of following:
progressing- The download is in-progress.interrupted- The download has interrupted and can be resumed.
Event: 'done'
Returns:
eventEventstateString - Can becompleted,cancelledorinterrupted.
Emitted when the download is in a terminal state. This includes a completed download, a cancelled download (via downloadItem.cancel()), and interrupted download that can't be resumed.
The state can be one of following:
completed- The download completed successfully.cancelled- The download has been cancelled.interrupted- The download has interrupted and can not resume.
Instance Methods
The downloadItem object has the following methods:
downloadItem.setSavePath(path)
pathString - Set the save file path of the download item.
The API is only available in session's will-download callback function. If user doesn't set the save path via the API, Electron will use the original routine to determine the save path(Usually prompts a save dialog).
downloadItem.getSavePath()
Returns String - The save path of the download item. This will be either the path set via downloadItem.setSavePath(path) or the path selected from the shown save dialog.
downloadItem.pause()
Pauses the download.
downloadItem.isPaused()
Returns Boolean - Whether the download is paused.
downloadItem.resume()
Resumes the download that has been paused.
Note: To enable resumable downloads the server you are downloading from must support range requests and provide both Last-Modified and ETag header values. Otherwise resume() will dismiss previously received bytes and restart the download from the beginning.
downloadItem.canResume()
Returns Boolean - Whether the download can resume.
downloadItem.cancel()
Cancels the download operation.
downloadItem.getURL()
Returns String - The origin url where the item is downloaded from.
downloadItem.getMimeType()
Returns String - The files mime type.
downloadItem.hasUserGesture()
Returns Boolean - Whether the download has user gesture.
downloadItem.getFilename()
Returns String - The file name of the download item.
Note: The file name is not always the same as the actual one saved in local disk. If user changes the file name in a prompted download saving dialog, the actual name of saved file will be different.
downloadItem.getTotalBytes()
Returns Integer - The total size in bytes of the download item.
If the size is unknown, it returns 0.
downloadItem.getReceivedBytes()
Returns Integer - The received bytes of the download item.
downloadItem.getContentDisposition()
Returns String - The Content-Disposition field from the response header.
downloadItem.getState()
Returns String - The current state. Can be progressing, completed, cancelled or interrupted.
Note: The following methods are useful specifically to resume a cancelled item when session is restarted.
downloadItem.getURLChain()
Returns String[] - The complete url chain of the item including any redirects.
downloadItem.getLastModifiedTime()
Returns String - Last-Modified header value.
downloadItem.getETag()
Returns String - ETag header value.
downloadItem.getStartTime()
Returns Double - Number of seconds since the UNIX epoch when the download was started.
Electron Versioning
A detailed look at our versioning policy and implementation.
As of version 2.0.0, Electron follows semver. The following command will install the most recent stable build of Electron:
npm install --save-dev electronTo update an existing project to use the latest stable version:
npm install --save-dev electron@latestVersion 1.x
Electron versions < 2.0 did not conform to the semver spec: major versions corresponded to end-user API changes, minor versions corresponded to Chromium major releases, and patch versions corresponded to new features and bug fixes. While convenient for developers merging features, it creates problems for developers of client-facing applications. The QA testing cycles of major apps like Slack, Stride, Teams, Skype, VS Code, Atom, and Desktop can be lengthy and stability is a highly desired outcome. There is a high risk in adopting new features while trying to absorb bug fixes.
Here is an example of the 1.x strategy:
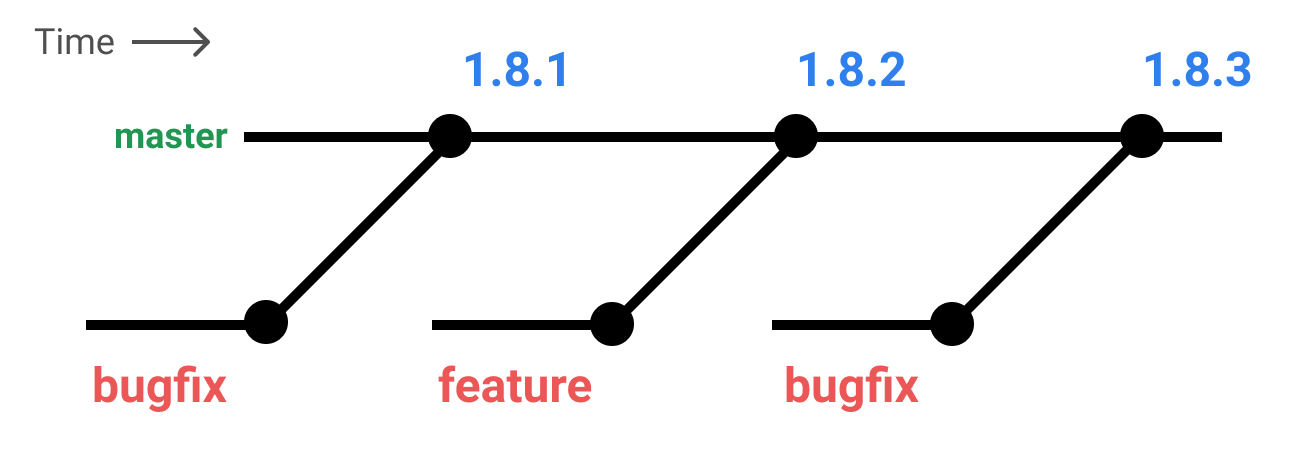
An app developed with 1.8.1 cannot take the 1.8.3 bug fix without either absorbing the 1.8.2 feature, or by backporting the fix and maintaining a new release line.
Version 2.0 and Beyond
There are several major changes from our 1.x strategy outlined below. Each change is intended to satisfy the needs and priorities of developers/maintainers and app developers.
- Strict use of semver
- Introduction of semver-compliant
-betatags - Introduction of conventional commit messages
- Well-defined stabilization branches
- The
masterbranch is versionless; only stabilization branches contain version information
We will cover in detail how git branching works, how npm tagging works, what developers should expect to see, and how one can backport changes.
semver
From 2.0 onward, Electron will follow semver.
Below is a table explicitly mapping types of changes to their corresponding category of semver (e.g. Major, Minor, Patch).
| Major Version Increments | Minor Version Increments | Patch Version Increments |
|---|---|---|
| Electron breaking API changes | Electron non-breaking API changes | Electron bug fixes |
| Node.js major version updates | Node.js minor version updates | Node.js patch version updates |
| Chromium version updates | fix-related chromium patches |
Note that most chromium updates will be considered breaking. Fixes that can be backported will likely be cherry-picked as patches.
Stabilization Branches
Stabilization branches are branches that run parallel to master, taking in only cherry-picked commits that are related to security or stability. These branches are never merged back to master.
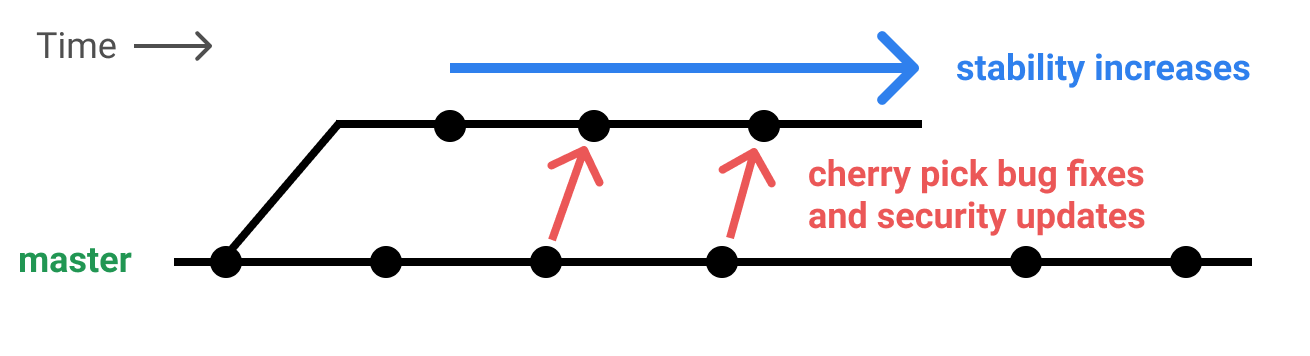
Stabilization branches are always either major or minor version lines, and named against the following template $MAJOR-$MINOR-x e.g. 2-0-x.
We allow for multiple stabilization branches to exist simultaneously, and intend to support at least two in parallel at all times, backporting security fixes as necessary. 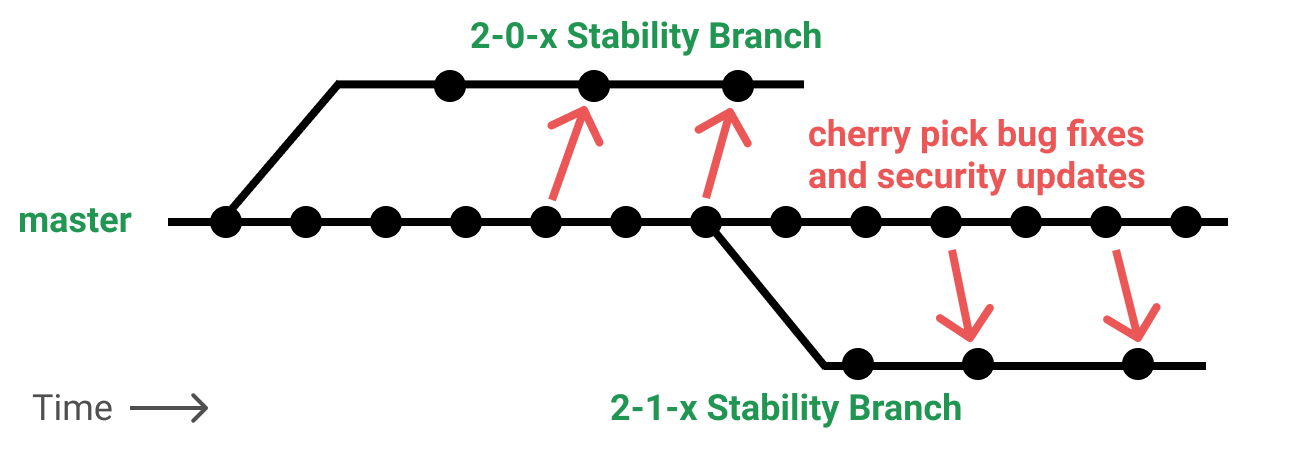
Older lines will not be supported by GitHub, but other groups can take ownership and backport stability and security fixes on their own. We discourage this, but recognize that it makes life easier for many app developers.
Beta Releases and Bug Fixes
Developers want to know which releases are safe to use. Even seemingly innocent features can introduce regressions in complex applications. At the same time, locking to a fixed version is dangerous because you’re ignoring security patches and bug fixes that may have come out since your version. Our goal is to allow the following standard semver ranges in package.json :
- Use
~2.0.0to admit only stability or security related fixes to your2.0.0release. - Use
^2.0.0to admit non-breaking reasonably stable feature work as well as security and bug fixes.
What’s important about the second point is that apps using ^ should still be able to expect a reasonable level of stability. To accomplish this, semver allows for a pre-release identifier to indicate a particular version is not yet safe or stable.
Whatever you choose, you will periodically have to bump the version in your package.json as breaking changes are a fact of Chromium life.
The process is as follows:
- All new major and minor releases lines begin with a
-beta.Ntag forN >= 1. At that point, the feature set is locked. That release line admits no further features, and focuses only on security and stability. e.g.2.0.0-beta.1. - Bug fixes, regression fixes, and security patches can be admitted. Upon doing so, a new beta is released incrementing
N. e.g.2.0.0-beta.2 - If a particular beta release is generally regarded as stable, it will be re-released as a stable build, changing only the version information. e.g.
2.0.0. - If future bug fixes or security patches need to be made once a release is stable, they are applied and the patch version is incremented accordingly e.g.
2.0.1.
For each major and minor bump, you should expect to see something like the following:
2.0.0-beta.1
    2.0.0-beta.2
    2.0.0-beta.3
    2.0.0
    2.0.1
    2.0.2
An example lifecycle in pictures:
- A new release branch is created that includes the latest set of features. It is published as
2.0.0-beta.1.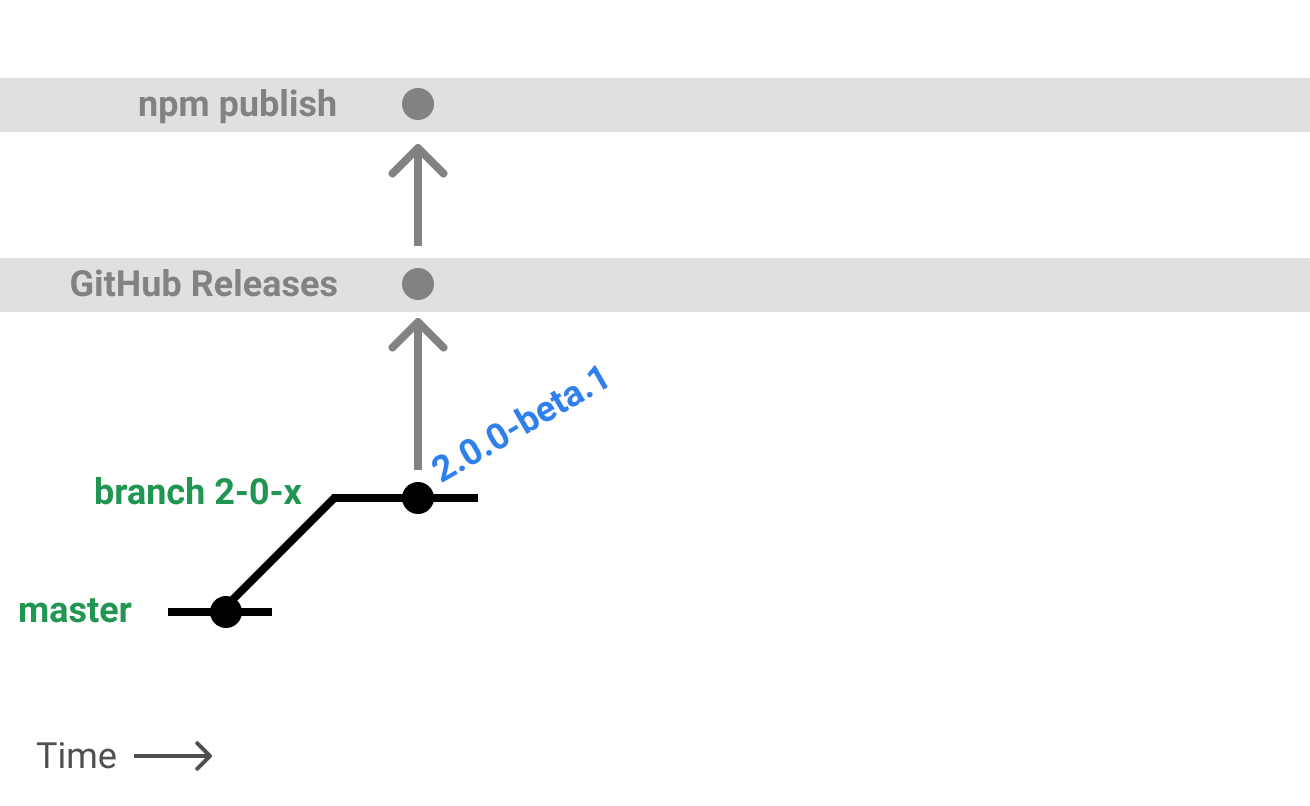
- A bug fix comes into master that can be backported to the release branch. The patch is applied, and a new beta is published as
2.0.0-beta.2.
- The beta is considered generally stable and it is published again as a non-beta under
2.0.0.
- Later, a zero-day exploit is revealed and a fix is applied to master. We backport the fix to the
2-0-xline and release2.0.1.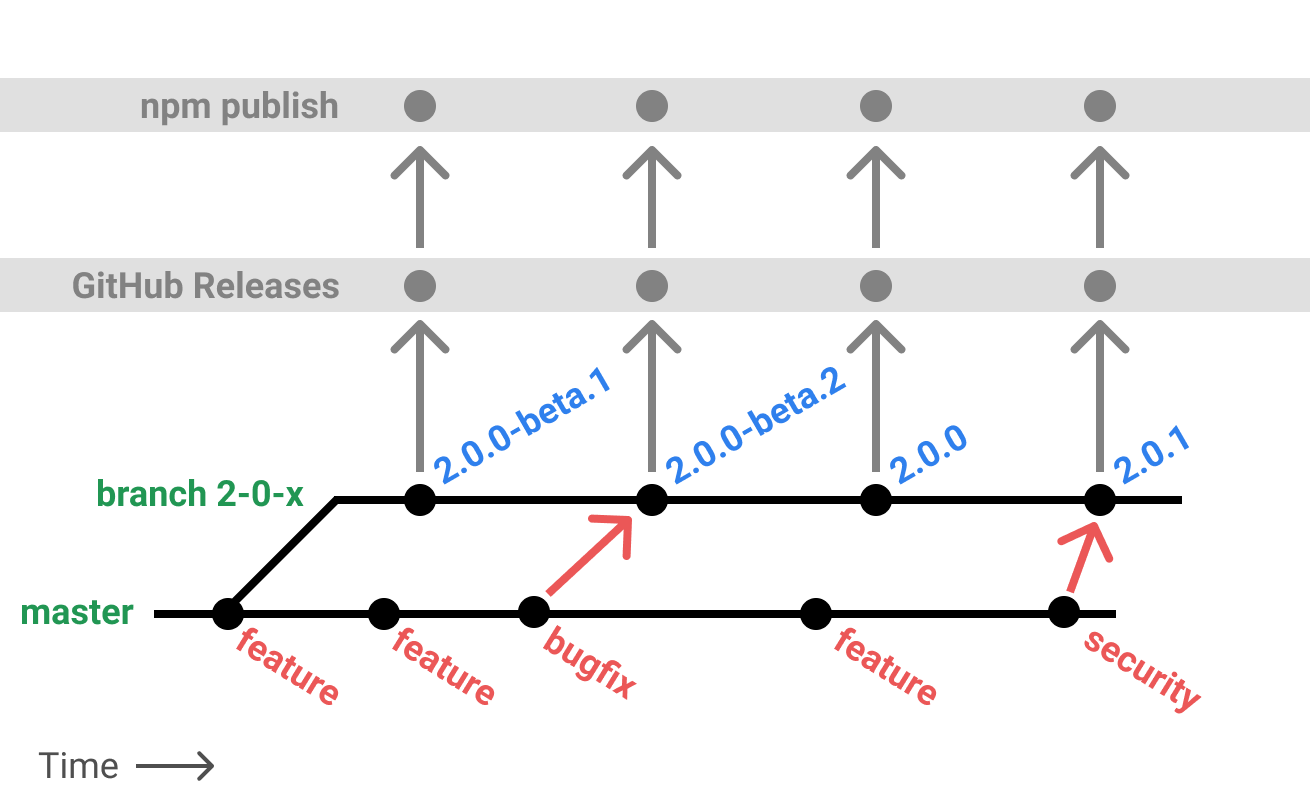
A few examples of how various semver ranges will pick up new releases:

Missing Features: Alphas, and Nightly
Our strategy has a few tradeoffs, which for now we feel are appropriate. Most importantly that new features in master may take a while before reaching a stable release line. If you want to try a new feature immediately, you will have to build Electron yourself.
As a future consideration, we may introduce one or both of the following:
- nightly builds off of master; these would allow folks to test new features quickly and give feedback
- alpha releases that have looser stability constraints to betas; for example it would be allowable to admit new features while a stability channel is in alpha
Feature Flags
Feature flags are a common practice in Chromium, and are well-established in the web-development ecosystem. In the context of Electron, a feature flag or soft branch must have the following properties:
- it is enabled/disabled either at runtime, or build-time; we do not support the concept of a request-scoped feature flag
- it completely segments new and old code paths; refactoring old code to support a new feature violates the feature-flag contract
- feature flags are eventually removed after the soft-branch is merged
We reconcile flagged code with our versioning strategy as follows:
- we do not consider iterating on feature-flagged code in a stability branch; even judicious use of feature flags is not without risk
- you may break API contracts in feature-flagged code without bumping the major version. Flagged code does not adhere to semver
Semantic Commits
We seek to increase clarity at all levels of the update and releases process. Starting with 2.0.0 we will require pull requests adhere to the Conventional Commits spec, which can be summarized as follows:
-
Commits that would result in a semver major bump must start with
BREAKING CHANGE:. -
Commits that would result in a semver minor bump must start with
feat:. -
Commits that would result in a semver patch bump must start with
fix:. -
We allow squashing of commits, provided that the squashed message adheres the the above message format.
-
It is acceptable for some commits in a pull request to not include a semantic prefix, as long as a later commit in the same pull request contains a meaningful encompassing semantic message.
Versionless master
- The
masterbranch will always contain0.0.0-devin itspackage.json - Release branches are never merged back to master
- Release branches do contain the correct version in their
package.json
Environment Variables
Control application configuration and behavior without changing code.
Certain Electron behaviors are controlled by environment variables because they are initialized earlier than the command line flags and the app's code.
POSIX shell example:
$ export ELECTRON_ENABLE_LOGGING=true
    $ electron
Windows console example:
> set ELECTRON_ENABLE_LOGGING=true
    > electron
Production Variables
The following environment variables are intended primarily for use at runtime in packaged Electron applications.
GOOGLE_API_KEY
Electron includes a hardcoded API key for making requests to Google's geocoding webservice. Because this API key is included in every version of Electron, it often exceeds its usage quota. To work around this, you can supply your own Google API key in the environment. Place the following code in your main process file, before opening any browser windows that will make geocoding requests:
process.env.GOOGLE_API_KEY = 'YOUR_KEY_HERE'For instructions on how to acquire a Google API key, visit this page.
By default, a newly generated Google API key may not be allowed to make geocoding requests. To enable geocoding requests, visit this page.
ELECTRON_NO_ASAR
Disables ASAR support. This variable is only supported in forked child processes and spawned child processes that set ELECTRON_RUN_AS_NODE.
ELECTRON_RUN_AS_NODE
Starts the process as a normal Node.js process.
ELECTRON_NO_ATTACH_CONSOLE Windows
Don't attach to the current console session.
ELECTRON_FORCE_WINDOW_MENU_BAR Linux
Don't use the global menu bar on Linux.
Development Variables
The following environment variables are intended primarily for development and debugging purposes.
ELECTRON_ENABLE_LOGGING
Prints Chrome's internal logging to the console.
ELECTRON_LOG_ASAR_READS
When Electron reads from an ASAR file, log the read offset and file path to the system tmpdir. The resulting file can be provided to the ASAR module to optimize file ordering.
ELECTRON_ENABLE_STACK_DUMPING
Prints the stack trace to the console when Electron crashes.
This environment variable will not work if the crashReporter is started.
ELECTRON_DEFAULT_ERROR_MODE Windows
Shows the Windows's crash dialog when Electron crashes.
This environment variable will not work if the crashReporter is started.
Why am I having trouble installing Electron?
When running npm install electron, some users occasionally encounter installation errors.
In almost all cases, these errors are the result of network problems and not actual issues with the electron npm package. Errors like ELIFECYCLE, EAI_AGAIN, ECONNRESET, and ETIMEDOUT are all indications of such network problems. The best resolution is to try switching networks, or wait a bit and try installing again.
You can also attempt to download Electron directly from electron/electron/releases if installing via npm is failing.
When will Electron upgrade to latest Chrome?
The Chrome version of Electron is usually bumped within one or two weeks after a new stable Chrome version gets released. This estimate is not guaranteed and depends on the amount of work involved with upgrading.
Only the stable channel of Chrome is used. If an important fix is in beta or dev channel, we will back-port it.
For more information, please see the security introduction.
When will Electron upgrade to latest Node.js?
When a new version of Node.js gets released, we usually wait for about a month before upgrading the one in Electron. So we can avoid getting affected by bugs introduced in new Node.js versions, which happens very often.
New features of Node.js are usually brought by V8 upgrades, since Electron is using the V8 shipped by Chrome browser, the shiny new JavaScript feature of a new Node.js version is usually already in Electron.
How to share data between web pages?
To share data between web pages (the renderer processes) the simplest way is to use HTML5 APIs which are already available in browsers. Good candidates are Storage API, localStorage, sessionStorage, and IndexedDB.
Or you can use the IPC system, which is specific to Electron, to store objects in the main process as a global variable, and then to access them from the renderers through the remote property of electron module:
// In the main process.
    global.sharedObject = {
      someProperty: 'default value'
    }
// In page 1.
require('electron').remote.getGlobal('sharedObject').someProperty = 'new value'// In page 2.
console.log(require('electron').remote.getGlobal('sharedObject').someProperty)My app's window/tray disappeared after a few minutes.
This happens when the variable which is used to store the window/tray gets garbage collected.
If you encounter this problem, the following articles may prove helpful:
If you want a quick fix, you can make the variables global by changing your code from this:
const {app, Tray} = require('electron')
    app.on('ready', () => {
      const tray = new Tray('/path/to/icon.png')
      tray.setTitle('hello world')
    })
to this:
const {app, Tray} = require('electron')
    let tray = null
    app.on('ready', () => {
      tray = new Tray('/path/to/icon.png')
      tray.setTitle('hello world')
    })
I can not use jQuery/RequireJS/Meteor/AngularJS in Electron.
Due to the Node.js integration of Electron, there are some extra symbols inserted into the DOM like module, exports, require. This causes problems for some libraries since they want to insert the symbols with the same names.
To solve this, you can turn off node integration in Electron:
// In the main process.
    const {BrowserWindow} = require('electron')
    let win = new BrowserWindow({
      webPreferences: {
        nodeIntegration: false
      }
    })
    win.show()
But if you want to keep the abilities of using Node.js and Electron APIs, you have to rename the symbols in the page before including other libraries:
<head>
    <script>
    window.nodeRequire = require;
    delete window.require;
    delete window.exports;
    delete window.module;
    </script>
    <script type="text/javascript" src="jquery.js"></script>
    </head>
require('electron').xxx is undefined.
When using Electron's built-in module you might encounter an error like this:
> require('electron').webFrame.setZoomFactor(1.0)
    Uncaught TypeError: Cannot read property 'setZoomLevel' of undefined
This is because you have the npm electron module installed either locally or globally, which overrides Electron's built-in module.
To verify whether you are using the correct built-in module, you can print the path of the electron module:
console.log(require.resolve('electron'))and then check if it is in the following form:
"/path/to/Electron.app/Contents/Resources/atom.asar/renderer/api/lib/exports/electron.js"If it is something like node_modules/electron/index.js, then you have to either remove the npm electron module, or rename it.
npm uninstall electron
    npm uninstall -g electron
However if you are using the built-in module but still getting this error, it is very likely you are using the module in the wrong process. For example electron.app can only be used in the main process, while electron.webFrame is only available in renderer processes.
FileFilter Object
nameStringextensionsString[]
File Object
Use the HTML5
FileAPI to work natively with files on the filesystem.
The DOM's File interface provides abstraction around native files in order to let users work on native files directly with the HTML5 file API. Electron has added a path attribute to the File interface which exposes the file's real path on filesystem.
Example of getting a real path from a dragged-onto-the-app file:
<div id="holder">
      Drag your file here
    </div>

    <script>
      document.addEventListener('drop', function (e) {
        e.preventDefault();
        e.stopPropagation();

        for (let f of e.dataTransfer.files) {
          console.log('File(s) you dragged here: ', f.path)
        }
      });
      document.addEventListener('dragover', function (e) {
        e.preventDefault();
        e.stopPropagation();
      });
    </script>
Writing Your First Electron App
Electron enables you to create desktop applications with pure JavaScript by providing a runtime with rich native (operating system) APIs. You could see it as a variant of the Node.js runtime that is focused on desktop applications instead of web servers.
This doesn't mean Electron is a JavaScript binding to graphical user interface (GUI) libraries. Instead, Electron uses web pages as its GUI, so you could also see it as a minimal Chromium browser, controlled by JavaScript.
Note: This example is also available as a repository you can download and run immediately.
As far as development is concerned, an Electron application is essentially a Node.js application. The starting point is a package.json that is identical to that of a Node.js module. A most basic Electron app would have the following folder structure:
your-app/
    ├── package.json
    ├── main.js
    └── index.html
Create a new empty folder for your new Electron application. Open up your command line client and run npm init from that very folder.
npm initnpm will guide you through creating a basic package.json file. The script specified by the main field is the startup script of your app, which will run the main process. An example of your package.json might look like this:
{
      "name": "your-app",
      "version": "0.1.0",
      "main": "main.js"
}Note: If the main field is not present in package.json, Electron will attempt to load an index.js (as Node.js does). If this was actually a simple Node application, you would add a start script that instructs node to execute the current package:
{
      "name": "your-app",
      "version": "0.1.0",
      "main": "main.js",
      "scripts": {
        "start": "node ."
      }
    }
Turning this Node application into an Electron application is quite simple - we merely replace the node runtime with the electron runtime.
{
      "name": "your-app",
      "version": "0.1.0",
      "main": "main.js",
      "scripts": {
        "start": "electron ."
      }
    }
Installing Electron
At this point, you'll need to install electron itself. The recommended way of doing so is to install it as a development dependency in your app, which allows you to work on multiple apps with different Electron versions. To do so, run the following command from your app's directory:
npm install --save-dev electronOther means for installing Electron exist. Please consult the installation guide to learn about use with proxies, mirrors, and custom caches.
Electron Development in a Nutshell
Electron apps are developed in JavaScript using the same principles and methods found in Node.js development. All APIs and features found in Electron are accessible through the electron module, which can be required like any other Node.js module:
const electron = require('electron')The electron module exposes features in namespaces. As examples, the lifecycle of the application is managed through electron.app, windows can be created using the electron.BrowserWindow class. A simple main.js file might wait for the application to be ready and open a window:
const {app, BrowserWindow} = require('electron')
    const path = require('path')
    const url = require('url')

    function createWindow () {
      // Create the browser window.
      win = new BrowserWindow({width: 800, height: 600})

      // and load the index.html of the app.
      win.loadURL(url.format({
        pathname: path.join(__dirname, 'index.html'),
        protocol: 'file:',
        slashes: true
      }))
    }

    app.on('ready', createWindow)
The main.js should create windows and handle all the system events your application might encounter. A more complete version of the above example might open developer tools, handle the window being closed, or re-create windows on macOS if the user clicks on the app's icon in the dock.
const {app, BrowserWindow} = require('electron')
    const path = require('path')
    const url = require('url')

    // Keep a global reference of the window object, if you don't, the window will
    // be closed automatically when the JavaScript object is garbage collected.
    let win

    function createWindow () {
      // Create the browser window.
      win = new BrowserWindow({width: 800, height: 600})

      // and load the index.html of the app.
      win.loadURL(url.format({
        pathname: path.join(__dirname, 'index.html'),
        protocol: 'file:',
        slashes: true
      }))

      // Open the DevTools.
      win.webContents.openDevTools()

      // Emitted when the window is closed.
      win.on('closed', () => {
        // Dereference the window object, usually you would store windows
        // in an array if your app supports multi windows, this is the time
        // when you should delete the corresponding element.
        win = null
      })
    }

    // This method will be called when Electron has finished
    // initialization and is ready to create browser windows.
    // Some APIs can only be used after this event occurs.
    app.on('ready', createWindow)

    // Quit when all windows are closed.
    app.on('window-all-closed', () => {
      // On macOS it is common for applications and their menu bar
      // to stay active until the user quits explicitly with Cmd + Q
      if (process.platform !== 'darwin') {
        app.quit()
      }
    })

    app.on('activate', () => {
      // On macOS it's common to re-create a window in the app when the
      // dock icon is clicked and there are no other windows open.
      if (win === null) {
        createWindow()
      }
    })

    // In this file you can include the rest of your app's specific main process
    // code. You can also put them in separate files and require them here.
Finally the index.html is the web page you want to show:
<!DOCTYPE html>
    <html>
      <head>
        <meta charset="UTF-8">
        <title>Hello World!</title>
      </head>
      <body>
        <h1>Hello World!</h1>
        We are using node <script>document.write(process.versions.node)</script>,
        Chrome <script>document.write(process.versions.chrome)</script>,
        and Electron <script>document.write(process.versions.electron)</script>.
      </body>
    </html>
Running Your App
Once you've created your initial main.js, index.html, and package.json files, you can try your app by running npm start from your application's directory.
Trying this Example
Clone and run the code in this tutorial by using the electron/electron-quick-start repository.
Note: Running this requires Git.
# Clone the repository
    $ git clone https://github.com/electron/electron-quick-start
    # Go into the repository
    $ cd electron-quick-start
    # Install dependencies
    $ npm install
    # Run the app
    $ npm start
For a list of boilerplates and tools to kick-start your development process, see the Boilerplates and CLIs documentation.
Frameless Window
Open a window without toolbars, borders, or other graphical "chrome".
A frameless window is a window that has no chrome, the parts of the window, like toolbars, that are not a part of the web page. These are options on the BrowserWindow class.
Create a frameless window
To create a frameless window, you need to set frame to false in BrowserWindow's options:
const {BrowserWindow} = require('electron')
    let win = new BrowserWindow({width: 800, height: 600, frame: false})
    win.show()
Alternatives on macOS
On macOS 10.9 Mavericks and newer, there's an alternative way to specify a chromeless window. Instead of setting frame to false which disables both the titlebar and window controls, you may want to have the title bar hidden and your content extend to the full window size, yet still preserve the window controls ("traffic lights") for standard window actions. You can do so by specifying the titleBarStyle option:
hidden
Results in a hidden title bar and a full size content window, yet the title bar still has the standard window controls (“traffic lights”) in the top left.
const {BrowserWindow} = require('electron')
    let win = new BrowserWindow({titleBarStyle: 'hidden'})
    win.show()
hiddenInset
Results in a hidden title bar with an alternative look where the traffic light buttons are slightly more inset from the window edge.
const {BrowserWindow} = require('electron')
    let win = new BrowserWindow({titleBarStyle: 'hiddenInset'})
    win.show()
customButtonsOnHover
Uses custom drawn close, miniaturize, and fullscreen buttons that display when hovering in the top left of the window. These custom buttons prevent issues with mouse events that occur with the standard window toolbar buttons. This option is only applicable for frameless windows.
const {BrowserWindow} = require('electron')
    let win = new BrowserWindow({titleBarStyle: 'customButtonsOnHover', frame: false})
    win.show()
Transparent window
By setting the transparent option to true, you can also make the frameless window transparent:
const {BrowserWindow} = require('electron')
    let win = new BrowserWindow({transparent: true, frame: false})
    win.show()
Limitations
- You can not click through the transparent area. We are going to introduce an API to set window shape to solve this, see our issue for details.
- Transparent windows are not resizable. Setting
resizabletotruemay make a transparent window stop working on some platforms. - The
blurfilter only applies to the web page, so there is no way to apply blur effect to the content below the window (i.e. other applications open on the user's system). - On Windows operating systems, transparent windows will not work when DWM is disabled.
- On Linux, users have to put
--enable-transparent-visuals --disable-gpuin the command line to disable GPU and allow ARGB to make transparent window, this is caused by an upstream bug that alpha channel doesn't work on some NVidia drivers on Linux. - On Mac, the native window shadow will not be shown on a transparent window.
Click-through window
To create a click-through window, i.e. making the window ignore all mouse events, you can call the win.setIgnoreMouseEvents(ignore) API:
const {BrowserWindow} = require('electron')
    let win = new BrowserWindow()
    win.setIgnoreMouseEvents(true)
Forwarding
Ignoring mouse messages makes the web page oblivious to mouse movement, meaning that mouse movement events will not be emitted. On Windows operating systems an optional parameter can be used to forward mouse move messages to the web page, allowing events such as mouseleave to be emitted:
let win = require('electron').remote.getCurrentWindow()
    let el = document.getElementById('clickThroughElement')
    el.addEventListener('mouseenter', () => {
      win.setIgnoreMouseEvents(true, {forward: true})
    })
    el.addEventListener('mouseleave', () => {
      win.setIgnoreMouseEvents(false)
    })
This makes the web page click-through when over el, and returns to normal outside it.
Draggable region
By default, the frameless window is non-draggable. Apps need to specify -webkit-app-region: drag in CSS to tell Electron which regions are draggable (like the OS's standard titlebar), and apps can also use -webkit-app-region: no-drag to exclude the non-draggable area from the draggable region. Note that only rectangular shapes are currently supported.
Note: -webkit-app-region: drag is known to have problems while the developer tools are open. See this GitHub issue for more information including a workaround.
To make the whole window draggable, you can add -webkit-app-region: drag as body's style:
<body style="-webkit-app-region: drag">
    </body>
And note that if you have made the whole window draggable, you must also mark buttons as non-draggable, otherwise it would be impossible for users to click on them:
button {
      -webkit-app-region: no-drag;
    }
If you're setting just a custom titlebar as draggable, you also need to make all buttons in titlebar non-draggable.
Text selection
In a frameless window the dragging behaviour may conflict with selecting text. For example, when you drag the titlebar you may accidentally select the text on the titlebar. To prevent this, you need to disable text selection within a draggable area like this:
.titlebar {
      -webkit-user-select: none;
      -webkit-app-region: drag;
    }
Context menu
On some platforms, the draggable area will be treated as a non-client frame, so when you right click on it a system menu will pop up. To make the context menu behave correctly on all platforms you should never use a custom context menu on draggable areas.
globalShortcut
Detect keyboard events when the application does not have keyboard focus.
Process: Main
The globalShortcut module can register/unregister a global keyboard shortcut with the operating system so that you can customize the operations for various shortcuts.
Note: The shortcut is global; it will work even if the app does not have the keyboard focus. You should not use this module until the ready event of the app module is emitted.
const {app, globalShortcut} = require('electron')

    app.on('ready', () => {
      // Register a 'CommandOrControl+X' shortcut listener.
      const ret = globalShortcut.register('CommandOrControl+X', () => {
        console.log('CommandOrControl+X is pressed')
      })

      if (!ret) {
        console.log('registration failed')
      }

      // Check whether a shortcut is registered.
      console.log(globalShortcut.isRegistered('CommandOrControl+X'))
    })

    app.on('will-quit', () => {
      // Unregister a shortcut.
      globalShortcut.unregister('CommandOrControl+X')

      // Unregister all shortcuts.
      globalShortcut.unregisterAll()
    })
Methods
The globalShortcut module has the following methods:
globalShortcut.register(accelerator, callback)
acceleratorAcceleratorcallbackFunction
Registers a global shortcut of accelerator. The callback is called when the registered shortcut is pressed by the user.
When the accelerator is already taken by other applications, this call will silently fail. This behavior is intended by operating systems, since they don't want applications to fight for global shortcuts.
globalShortcut.isRegistered(accelerator)
acceleratorAccelerator
Returns Boolean - Whether this application has registered accelerator.
When the accelerator is already taken by other applications, this call will still return false. This behavior is intended by operating systems, since they don't want applications to fight for global shortcuts.
globalShortcut.unregister(accelerator)
acceleratorAccelerator
Unregisters the global shortcut of accelerator.
globalShortcut.unregisterAll()
Unregisters all of the global shortcuts.
Glossary
This page defines some terminology that is commonly used in Electron development.
ASAR
ASAR stands for Atom Shell Archive Format. An asar archive is a simple tar-like format that concatenates files into a single file. Electron can read arbitrary files from it without unpacking the whole file.
The ASAR format was created primarily to improve performance on Windows... TODO
Brightray
Brightray was a static library that made libchromiumcontent easier to use in applications. It is now deprecated and has been merged into Electron's codebase.
CRT
The C Run-time Library (CRT) is the part of the C++ Standard Library that incorporates the ISO C99 standard library. The Visual C++ libraries that implement the CRT support native code development, and both mixed native and managed code, and pure managed code for .NET development.
DMG
An Apple Disk Image is a packaging format used by macOS. DMG files are commonly used for distributing application "installers". electron-builder supports dmg as a build target.
IME
Input Method Editor. A program that allows users to enter characters and symbols not found on their keyboard. For example, this allows users of Latin keyboards to input Chinese, Japanese, Korean and Indic characters.
IDL
Interface description language. Write function signatures and data types in a format that can be used to generate interfaces in Java, C++, JavaScript, etc.
IPC
IPC stands for Inter-Process Communication. Electron uses IPC to send serialized JSON messages between the main and renderer processes.
libchromiumcontent
A shared library that includes the Chromium Content module and all its dependencies (e.g., Blink, V8, etc.). Also referred to as "libcc".
main process
The main process, commonly a file named main.js, is the entry point to every Electron app. It controls the life of the app, from open to close. It also manages native elements such as the Menu, Menu Bar, Dock, Tray, etc. The main process is responsible for creating each new renderer process in the app. The full Node API is built in.
Every app's main process file is specified in the main property in package.json. This is how electron . knows what file to execute at startup.
In Chromium, this process is referred to as the "browser process". It is renamed in Electron to avoid confusion with renderer processes.
See also: process, renderer process
MAS
Acronym for Apple's Mac App Store. For details on submitting your app to the MAS, see the Mac App Store Submission Guide.
Mojo
An IPC system for communicating intra- or inter-process, and that's important because Chrome is keen on being able to split its work into separate processes or not, depending on memory pressures etc.
See https://chromium.googlesource.com/chromium/src/+/master/mojo/README.md
native modules
Native modules (also called addons in Node.js) are modules written in C or C++ that can be loaded into Node.js or Electron using the require() function, and used as if they were an ordinary Node.js module. They are used primarily to provide an interface between JavaScript running in Node.js and C/C++ libraries.
Native Node modules are supported by Electron, but since Electron is very likely to use a different V8 version from the Node binary installed in your system, you have to manually specify the location of Electron’s headers when building native modules.
See also Using Native Node Modules.
NSIS
Nullsoft Scriptable Install System is a script-driven Installer authoring tool for Microsoft Windows. It is released under a combination of free software licenses, and is a widely-used alternative to commercial proprietary products like InstallShield. electron-builder supports NSIS as a build target.
OSR
OSR (Off-screen rendering) can be used for loading heavy page in background and then displaying it after (it will be much faster). It allows you to render page without showing it on screen.
process
A process is an instance of a computer program that is being executed. Electron apps that make use of the main and one or many renderer process are actually running several programs simultaneously.
In Node.js and Electron, each running process has a process object. This object is a global that provides information about, and control over, the current process. As a global, it is always available to applications without using require().
See also: main process, renderer process
renderer process
The renderer process is a browser window in your app. Unlike the main process, there can be multiple of these and each is run in a separate process. They can also be hidden.
In normal browsers, web pages usually run in a sandboxed environment and are not allowed access to native resources. Electron users, however, have the power to use Node.js APIs in web pages allowing lower level operating system interactions.
See also: process, main process
Squirrel
Squirrel is an open-source framework that enables Electron apps to update automatically as new versions are released. See the autoUpdater API for info about getting started with Squirrel.
userland
This term originated in the Unix community, where "userland" or "userspace" referred to programs that run outside of the operating system kernel. More recently, the term has been popularized in the Node and npm community to distinguish between the features available in "Node core" versus packages published to the npm registry by the much larger "user" community.
Like Node, Electron is focused on having a small set of APIs that provide all the necessary primitives for developing multi-platform desktop applications. This design philosophy allows Electron to remain a flexible tool without being overly prescriptive about how it should be used. Userland enables users to create and share tools that provide additional functionality on top of what is available in "core".
V8
V8 is Google's open source JavaScript engine. It is written in C++ and is used in Google Chrome. V8 can run standalone, or can be embedded into any C++ application.
Electron builds V8 as part of Chromium and then points Node to that V8 when building it.
V8's version numbers always correspond to those of Google Chrome. Chrome 59 includes V8 5.9, Chrome 58 includes V8 5.8, etc.
webview
webview tags are used to embed 'guest' content (such as external web pages) in your Electron app. They are similar to iframes, but differ in that each webview runs in a separate process. It doesn't have the same permissions as your web page and all interactions between your app and embedded content will be asynchronous. This keeps your app safe from the embedded content.
GPUFeatureStatus Object
2d_canvasString - Canvasflash_3dString - Flashflash_stage3dString - Flash Stage3Dflash_stage3d_baselineString - Flash Stage3D Baseline profilegpu_compositingString - Compositingmultiple_raster_threadsString - Multiple Raster Threadsnative_gpu_memory_buffersString - Native GpuMemoryBuffersrasterizationString - Rasterizationvideo_decodeString - Video Decodevideo_encodeString - Video Encodevpx_decodeString - VPx Video DecodewebglString - WebGLwebgl2String - WebGL2
Possible values:
disabled_software- Software only. Hardware acceleration disabled (yellow)disabled_off- Disabled (red)disabled_off_ok- Disabled (yellow)unavailable_software- Software only, hardware acceleration unavailable (yellow)unavailable_off- Unavailable (red)unavailable_off_ok- Unavailable (yellow)enabled_readback- Hardware accelerated but at reduced performance (yellow)enabled_force- Hardware accelerated on all pages (green)enabled- Hardware accelerated (green)enabled_on- Enabled (green)enabled_force_on- Force enabled (green)
Events
The inAppPurchase module emits the following events:
Event: 'transactions-updated'
Emitted when one or more transactions have been updated.
Returns:
eventEventtransactions(Transaction[] - Array of transactions.
Methods
The inAppPurchase module has the following methods:
inAppPurchase.purchaseProduct(productID, quantity, callback)
productIDString - The id of the product to purchase. (the id ofcom.example.app.product1isproduct1).quantityInteger (optional) - The number of items the user wants to purchase.-
callbackFunction (optional) - The callback called when the payment is added to the PaymentQueue. (You should add a listener withinAppPurchase.addTransactionsListenerto get the transaction status).isProductValidBoolean - Determine if the product is valid and added to the payment queue.
inAppPurchase.canMakePayments()
Returns Boolean, whether a user can make a payment.
inAppPurchase.getReceiptURL()
Returns String, the path to the receipt.
Paid Applications Agreement
If you haven't already, you’ll need to sign the Paid Applications Agreement and set up your banking and tax information in iTunes Connect.
iTunes Connect Developer Help: Agreements, tax, and banking overview
Create Your In-App Purchases
Then, you'll need to configure your in-app purchases in iTunes Connect, and include details such as name, pricing, and description that highlights the features and functionality of your in-app purchase.
Change the CFBundleIdentifier
To test In-App Purchase in development with Electron you'll have to change the CFBundleIdentifier in node_modules/electron/dist/Electron.app/Contents/Info.plist. You have to replace com.github.electron by the bundle identifier of the application you created with iTunes Connect.
<key>CFBundleIdentifier</key>
    <string>com.example.app</string>
Code example
Here is an example that shows how to use In-App Purchases in Electron. You'll have to replace the product ids by the identifiers of the products created with iTunes Connect (the identifier of com.example.app.product1 is product1). Note that you have to listen to the transactions-updated event as soon as possible in your app.
const { inAppPurchase } = require('electron').remote
    const PRODUCT_IDS = ['id1', 'id2']

    // Listen for transactions as soon as possible.
    inAppPurchase.on('transactions-updated', (event, transactions) => {
      if (!Array.isArray(transactions)) {
        return
      }

      // Check each transaction.
      transactions.forEach(function (transaction) {
        var payment = transaction.payment

        switch (transaction.transactionState) {
          case 'purchasing':
            console.log(`Purchasing ${payment.productIdentifier}...`)
            break
          case 'purchased':

            console.log(`${payment.productIdentifier} purchased.`)

            // Get the receipt url.
            let receiptURL = inAppPurchase.getReceiptURL()

            console.log(`Receipt URL: ${receiptURL}`)

            // Submit the receipt file to the server and check if it is valid.
            // @see https://developer.apple.com/library/content/releasenotes/General/ValidateAppStoreReceipt/Chapters/ValidateRemotely.html
            // ...
            // If the receipt is valid, the product is purchased
            // ...

            // Finish the transaction.
            inAppPurchase.finishTransactionByDate(transaction.transactionDate)

            break
          case 'failed':

            console.log(`Failed to purchase ${payment.productIdentifier}.`)

            // Finish the transaction.
            inAppPurchase.finishTransactionByDate(transaction.transactionDate)

            break
          case 'restored':

            console.log(`The purchase of ${payment.productIdentifier} has been restored.`)

            break
          case 'deferred':

            console.log(`The purchase of ${payment.productIdentifier} has been deferred.`)

            break
          default:
            break
        }
      })
    })

    // Check if the user is allowed to make in-app purchase.
    if (!inAppPurchase.canMakePayments()) {
      console.log('The user is not allowed to make in-app purchase.')
    }

    // Retrieve and display the product descriptions.
    inAppPurchase.getProducts(PRODUCT_IDS, (products) => {
      // Check the parameters.
      if (!Array.isArray(products) || products.length <= 0) {
        console.log('Unable to retrieve the product informations.')
        return
      }

      // Display the name and price of each product.
      products.forEach((product) => {
        console.log(`The price of ${product.localizedTitle} is ${product.formattedPrice}.`)
      })

      // Ask the user which product he/she wants to purchase.
      // ...
      let selectedProduct = products[0]
      let selectedQuantity = 1

      // Purchase the selected product.
      inAppPurchase.purchaseProduct(selectedProduct.productIdentifier, selectedQuantity, (isProductValid) => {
        if (!isProductValid) {
          console.log('The product is not valid.')
          return
        }

        console.log('The payment has been added to the payment queue.')
      })
    })
Class: IncomingMessage
Handle responses to HTTP/HTTPS requests.
Process: Main
IncomingMessage implements the Readable Stream interface and is therefore an EventEmitter.
Event: 'data'
Returns:
chunkBuffer - A chunk of response body's data.
The data event is the usual method of transferring response data into applicative code.
Event: 'end'
Indicates that response body has ended.
Event: 'aborted'
Emitted when a request has been canceled during an ongoing HTTP transaction.
Event: 'error'
Returns:
error Error - Typically holds an error string identifying failure root cause.
Emitted when an error was encountered while streaming response data events. For instance, if the server closes the underlying while the response is still streaming, an error event will be emitted on the response object and a close event will subsequently follow on the request object.
Instance Properties
An IncomingMessage instance has the following readable properties:
response.statusCode
An Integer indicating the HTTP response status code.
response.statusMessage
A String representing the HTTP status message.
response.headers
An Object representing the response HTTP headers. The headers object is formatted as follows:
- All header names are lowercased.
- Each header name produces an array-valued property on the headers object.
- Each header value is pushed into the array associated with its header name.
response.httpVersion
A String indicating the HTTP protocol version number. Typical values are '1.0' or '1.1'. Additionally httpVersionMajor and httpVersionMinor are two Integer-valued readable properties that return respectively the HTTP major and minor version numbers.
response.httpVersionMajor
An Integer indicating the HTTP protocol major version number.
response.httpVersionMinor
An Integer indicating the HTTP protocol minor version number.
Installation
To install prebuilt Electron binaries, use npm. The preferred method is to install Electron as a development dependency in your app:
npm install electron --save-devSee the Electron versioning doc for info on how to manage Electron versions in your apps.
Global Installation
You can also install the electron command globally in your $PATH:
npm install electron -gCustomization
If you want to change the architecture that is downloaded (e.g., ia32 on an x64 machine), you can use the --arch flag with npm install or set the npm_config_arch environment variable:
npm install --arch=ia32 electronIn addition to changing the architecture, you can also specify the platform (e.g., win32, linux, etc.) using the --platform flag:
npm install --platform=win32 electronProxies
If you need to use an HTTP proxy you can set these environment variables.
Custom Mirrors and Caches
During installation, the electron module will call out to electron-download to download prebuilt binaries of Electron for your platform. It will do so by contacting GitHub's release download page (https://github.com/electron/electron/releases/tag/v$VERSION, where $VERSION is the exact version of Electron).
If you are unable to access GitHub or you need to provide a custom build, you can do so by either providing a mirror or an existing cache directory.
Mirror
You can use environment variables to override the base URL, the path at which to look for Electron binaries, and the binary filename. The url used by electron-download is composed as follows:
url = ELECTRON_MIRROR + ELECTRON_CUSTOM_DIR + '/' + ELECTRON_CUSTOM_FILENAMEFor instance, to use the China mirror:
ELECTRON_MIRROR="https://npm.taobao.org/mirrors/electron/"Cache
Alternatively, you can override the local cache. electron-download will cache downloaded binaries in a local directory to not stress your network. You can use that cache folder to provide custom builds of Electron or to avoid making contact with the network at all.
- Linux:
$XDG_CACHE_HOMEor~/.cache/electron/ - MacOS:
~/Library/Caches/electron/ - Windows:
$LOCALAPPDATA/electron/Cacheor~/AppData/Local/electron/Cache/
On environments that have been using older versions of Electron, you might find the cache also in ~/.electron.
You can also override the local cache location by providing a ELECTRON_CACHE environment variable.
The cache contains the version's official zip file as well as a checksum, stored as a text file. A typical cache might look like this:
├── electron-v1.7.9-darwin-x64.zip
    ├── electron-v1.8.1-darwin-x64.zip
    ├── electron-v1.8.2-beta.1-darwin-x64.zip
    ├── electron-v1.8.2-beta.2-darwin-x64.zip
    ├── electron-v1.8.2-beta.3-darwin-x64.zip
    ├── SHASUMS256.txt-1.7.9
    ├── SHASUMS256.txt-1.8.1
    ├── SHASUMS256.txt-1.8.2-beta.1
    ├── SHASUMS256.txt-1.8.2-beta.2
    ├── SHASUMS256.txt-1.8.2-beta.3
Troubleshooting
When running npm install electron, some users occasionally encounter installation errors.
In almost all cases, these errors are the result of network problems and not actual issues with the electron npm package. Errors like ELIFECYCLE, EAI_AGAIN, ECONNRESET, and ETIMEDOUT are all indications of such network problems. The best resolution is to try switching networks, or wait a bit and try installing again.
You can also attempt to download Electron directly from electron/electron/releases if installing via npm is failing.
If installation fails with an EACCESS error you may need to fix your npm permissions.
If the above error persists, the unsafe-perm flag may need to be set to true:
sudo npm install electron --unsafe-perm=trueOn slower networks, it may be advisable to use the --verbose flag in order to show download progress:
npm install --verbose electronIf you need to force a re-download of the asset and the SHASUM file set the force_no_cache environment variable to true.
IOCounters Object
readOperationCountNumber - The number of I/O read operations.writeOperationCountNumber - The number of I/O write operations.otherOperationCountNumber - Then number of I/O other operations.readTransferCountNumber - The number of I/O read transfers.writeTransferCountNumber - The number of I/O write transfers.otherTransferCountNumber - Then number of I/O other transfers.
ipcMain
Communicate asynchronously from the main process to renderer processes.
Process: Main
The ipcMain module is an instance of the EventEmitter class. When used in the main process, it handles asynchronous and synchronous messages sent from a renderer process (web page). Messages sent from a renderer will be emitted to this module.
Sending Messages
It is also possible to send messages from the main process to the renderer process, see webContents.send for more information.
- When sending a message, the event name is the
channel. - To reply to a synchronous message, you need to set
event.returnValue. - To send an asynchronous message back to the sender, you can use
event.sender.send(...).
An example of sending and handling messages between the render and main processes:
// In main process.
    const {ipcMain} = require('electron')
    ipcMain.on('asynchronous-message', (event, arg) => {
      console.log(arg) // prints "ping"
      event.sender.send('asynchronous-reply', 'pong')
    })

    ipcMain.on('synchronous-message', (event, arg) => {
      console.log(arg) // prints "ping"
      event.returnValue = 'pong'
    })
// In renderer process (web page).
const {ipcRenderer} = require('electron')
console.log(ipcRenderer.sendSync('synchronous-message', 'ping')) // prints "pong"
ipcRenderer.on('asynchronous-reply', (event, arg) => {
console.log(arg) // prints "pong"
})
ipcRenderer.send('asynchronous-message', 'ping')Methods
The ipcMain module has the following method to listen for events:
ipcMain.on(channel, listener)
channelStringlistenerFunction
Listens to channel, when a new message arrives listener would be called with listener(event, args...).
ipcMain.once(channel, listener)
channelStringlistenerFunction
Adds a one time listener function for the event. This listener is invoked only the next time a message is sent to channel, after which it is removed.
ipcMain.removeListener(channel, listener)
channelStringlistenerFunction
Removes the specified listener from the listener array for the specified channel.
Event object
The event object passed to the callback has the following methods:
event.returnValue
Set this to the value to be returned in a synchronous message.
event.sender
Returns the webContents that sent the message, you can call event.sender.send to reply to the asynchronous message, see webContents.send for more information.
ipcRenderer
Communicate asynchronously from a renderer process to the main process.
Process: Renderer
The ipcRenderer module is an instance of the EventEmitter class. It provides a few methods so you can send synchronous and asynchronous messages from the render process (web page) to the main process. You can also receive replies from the main process.
See ipcMain for code examples.
Methods
The ipcRenderer module has the following method to listen for events and send messages:
ipcRenderer.on(channel, listener)
channelStringlistenerFunction
Listens to channel, when a new message arrives listener would be called with listener(event, args...).
ipcRenderer.once(channel, listener)
channelStringlistenerFunction
Adds a one time listener function for the event. This listener is invoked only the next time a message is sent to channel, after which it is removed.
ipcRenderer.removeListener(channel, listener)
channelStringlistenerFunction
Removes the specified listener from the listener array for the specified channel.
ipcRenderer.removeAllListeners(channel)
channelString
Removes all listeners, or those of the specified channel.
ipcRenderer.send(channel[, arg1][, arg2][, ...])
channelString...argsany[]
Send a message to the main process asynchronously via channel, you can also send arbitrary arguments. Arguments will be serialized in JSON internally and hence no functions or prototype chain will be included.
The main process handles it by listening for channel with ipcMain module.
ipcRenderer.sendSync(channel[, arg1][, arg2][, ...])
channelString...argsany[]
Returns any - The value sent back by the ipcMain handler.
Send a message to the main process synchronously via channel, you can also send arbitrary arguments. Arguments will be serialized in JSON internally and hence no functions or prototype chain will be included.
The main process handles it by listening for channel with ipcMain module, and replies by setting event.returnValue.
Note: Sending a synchronous message will block the whole renderer process, unless you know what you are doing you should never use it.
ipcRenderer.sendTo(windowId, channel, [, arg1][, arg2][, ...])
windowIdNumberchannelString...argsany[]
Sends a message to a window with windowid via channel.
ipcRenderer.sendToHost(channel[, arg1][, arg2][, ...])
channelString...argsany[]
Like ipcRenderer.send but the event will be sent to the <webview> element in the host page instead of the main process.
How to Contribute in Issues
For any issue, there are fundamentally three ways an individual can contribute:
- By opening the issue for discussion: If you believe that you have found a new bug in Electron, you should report it by creating a new issue in the
electron/electronissue tracker. - By helping to triage the issue: You can do this either by providing assistive details (a reproducible test case that demonstrates a bug) or by providing suggestions to address the issue.
- By helping to resolve the issue: This can be done by demonstrating that the issue is not a bug or is fixed; but more often, by opening a pull request that changes the source in
electron/electronin a concrete and reviewable manner.
Asking for General Help
"Finding Support" has a list of resources for getting programming help, reporting security issues, contributing, and more. Please use the issue tracker for bugs only!
Submitting a Bug Report
When opening a new issue in the electron/electron issue tracker, users will be presented with a template that should be filled in.
<!--
    Thanks for opening an issue! A few things to keep in mind:

    - The issue tracker is only for bugs and feature requests.
    - Before reporting a bug, please try reproducing your issue against
      the latest version of Electron.
    - If you need general advice, join our Slack: http://atom-slack.herokuapp.com
    -->

    * Electron version:
    * Operating system:

    ### Expected behavior

    <!-- What do you think should happen? -->

    ### Actual behavior

    <!-- What actually happens? -->

    ### How to reproduce

    <!--

    Your best chance of getting this bug looked at quickly is to provide a REPOSITORY that can be cloned and run.

    You can fork https://github.com/electron/electron-quick-start and include a link to the branch with your changes.

    If you provide a URL, please list the commands required to clone/setup/run your repo e.g.

      $ git clone $YOUR_URL -b $BRANCH
      $ npm install
      $ npm start || electron .

    -->
If you believe that you have found a bug in Electron, please fill out this form to the best of your ability.
The two most important pieces of information needed to evaluate the report are a description of the bug and a simple test case to recreate it. It easier to fix a bug if it can be reproduced.
See How to create a Minimal, Complete, and Verifiable example.
Triaging a Bug Report
It's common for open issues to involve discussion. Some contributors may have differing opinions, including whether the behavior is a bug or feature. This discussion is part of the process and should be kept focused, helpful, and professional.
Terse responses that provide neither additional context nor supporting detail are not helpful or professional. To many, such responses are annoying and unfriendly.
Contributors are encouraged to solve issues collaboratively and help one another make progress. If encounter an issue that you feel is invalid, or which contains incorrect information, explain why you feel that way with additional supporting context, and be willing to be convinced that you may be wrong. By doing so, we can often reach the correct outcome faster.
Resolving a Bug Report
Most issues are resolved by opening a pull request. The process for opening and reviewing a pull request is similar to that of opening and triaging issues, but carries with it a necessary review and approval workflow that ensures that the proposed changes meet the minimal quality and functional guidelines of the Electron project.
JumpListCategory Object
-
typeString (optional) - One of the following:tasks- Items in this category will be placed into the standardTaskscategory. There can be only one such category, and it will always be displayed at the bottom of the Jump List.frequent- Displays a list of files frequently opened by the app, the name of the category and its items are set by Windows.recent- Displays a list of files recently opened by the app, the name of the category and its items are set by Windows. Items may be added to this category indirectly usingapp.addRecentDocument(path).custom- Displays tasks or file links,namemust be set by the app.
nameString (optional) - Must be set iftypeiscustom, otherwise it should be omitted.itemsJumpListItem - Array ofJumpListItemobjects iftypeistasksorcustom, otherwise it should be omitted.
Note: If a JumpListCategory object has neither the type nor the name property set then its type is assumed to be tasks. If the name property is set but the type property is omitted then the type is assumed to be custom.
JumpListItem Object
-
typeString (optional) - One of the following:task- A task will launch an app with specific arguments.separator- Can be used to separate items in the standardTaskscategory.file- A file link will open a file using the app that created the Jump List, for this to work the app must be registered as a handler for the file type (though it doesn't have to be the default handler).
pathString (optional) - Path of the file to open, should only be set iftypeisfile.programString (optional) - Path of the program to execute, usually you should specifyprocess.execPathwhich opens the current program. Should only be set iftypeistask.argsString (optional) - The command line arguments whenprogramis executed. Should only be set iftypeistask.titleString (optional) - The text to be displayed for the item in the Jump List. Should only be set iftypeistask.descriptionString (optional) - Description of the task (displayed in a tooltip). Should only be set iftypeistask.iconPathString (optional) - The absolute path to an icon to be displayed in a Jump List, which can be an arbitrary resource file that contains an icon (e.g..ico,.exe,.dll). You can usually specifyprocess.execPathto show the program icon.iconIndexNumber (optional) - The index of the icon in the resource file. If a resource file contains multiple icons this value can be used to specify the zero-based index of the icon that should be displayed for this task. If a resource file contains only one icon, this property should be set to zero.
Keyboard Shortcuts
Configure local and global keyboard shortcuts
Local Shortcuts
You can use the Menu module to configure keyboard shortcuts that will be triggered only when the app is focused. To do so, specify an [accelerator] property when creating a MenuItem.
const {Menu, MenuItem} = require('electron')
    const menu = new Menu()

    menu.append(new MenuItem({
      label: 'Print',
      accelerator: 'CmdOrCtrl+P',
      click: () => { console.log('time to print stuff') }
    }))
You can configure different key combinations based on the user's operating system.
{
      accelerator: process.platform === 'darwin' ? 'Alt+Cmd+I' : 'Ctrl+Shift+I'
    }
Global Shortcuts
You can use the globalShortcut module to detect keyboard events even when the application does not have keyboard focus.
const {app, globalShortcut} = require('electron')

    app.on('ready', () => {
      globalShortcut.register('CommandOrControl+X', () => {
        console.log('CommandOrControl+X is pressed')
      })
    })
Shortcuts within a BrowserWindow
If you want to handle keyboard shortcuts for a BrowserWindow, you can use the keyup and keydown event listeners on the window object inside the renderer process.
window.addEventListener('keyup', doSomething, true)Note the third parameter true which means the listener will always receive key presses before other listeners so they can't have stopPropagation() called on them.
The before-input-event event is emitted before dispatching keydown and keyup events in the page. It can be used to catch and handle custom shortcuts that are not visible in the menu.
If you don't want to do manual shortcut parsing there are libraries that do advanced key detection such as mousetrap.
Mousetrap.bind('4', () => { console.log('4') })
    Mousetrap.bind('?', () => { console.log('show shortcuts!') })
    Mousetrap.bind('esc', () => { console.log('escape') }, 'keyup')

    // combinations
    Mousetrap.bind('command+shift+k', () => { console.log('command shift k') })

    // map multiple combinations to the same callback
    Mousetrap.bind(['command+k', 'ctrl+k'], () => {
      console.log('command k or control k')

      // return false to prevent default behavior and stop event from bubbling
      return false
    })

    // gmail style sequences
    Mousetrap.bind('g i', () => { console.log('go to inbox') })
    Mousetrap.bind('* a', () => { console.log('select all') })

    // konami code!
    Mousetrap.bind('up up down down left right left right b a enter', () => {
      console.log('konami code')
    })
Custom Linux Desktop Launcher Actions
On many Linux environments, you can add custom entries to its launcher by modifying the .desktop file. For Canonical's Unity documentation, see Adding Shortcuts to a Launcher. For details on a more generic implementation, see the freedesktop.org Specification.
Launcher shortcuts of Audacious:
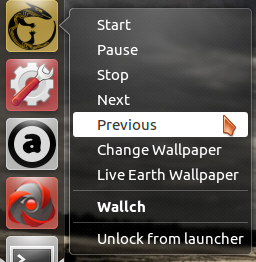
Generally speaking, shortcuts are added by providing a Name and Exec property for each entry in the shortcuts menu. Unity will execute the Exec field once clicked by the user. The format is as follows:
Actions=PlayPause;Next;Previous

    [Desktop Action PlayPause]
    Name=Play-Pause
    Exec=audacious -t
    OnlyShowIn=Unity;

    [Desktop Action Next]
    Name=Next
    Exec=audacious -f
    OnlyShowIn=Unity;

    [Desktop Action Previous]
    Name=Previous
    Exec=audacious -r
    OnlyShowIn=Unity;
Unity's preferred way of telling your application what to do is to use parameters. You can find these in your app in the global variable process.argv.
Locales
Locale values returned by
app.getLocale().
Electron uses Chromium's l10n_util library to fetch the locale. Possible values are listed below:
| Language Code | Language Name |
|---|---|
| af | Afrikaans |
| am | Amharic |
| ar | Arabic |
| az | Azerbaijani |
| be | Belarusian |
| bg | Bulgarian |
| bh | Bihari |
| bn | Bengali |
| br | Breton |
| bs | Bosnian |
| ca | Catalan |
| co | Corsican |
| cs | Czech |
| cy | Welsh |
| da | Danish |
| de | German |
| de-AT | German (Austria) |
| de-CH | German (Switzerland) |
| de-DE | German (Germany) |
| el | Greek |
| en | English |
| en-AU | English (Australia) |
| en-CA | English (Canada) |
| en-GB | English (UK) |
| en-NZ | English (New Zealand) |
| en-US | English (US) |
| en-ZA | English (South Africa) |
| eo | Esperanto |
| es | Spanish |
| es-419 | Spanish (Latin America) |
| et | Estonian |
| eu | Basque |
| fa | Persian |
| fi | Finnish |
| fil | Filipino |
| fo | Faroese |
| fr | French |
| fr-CA | French (Canada) |
| fr-CH | French (Switzerland) |
| fr-FR | French (France) |
| fy | Frisian |
| ga | Irish |
| gd | Scots Gaelic |
| gl | Galician |
| gn | Guarani |
| gu | Gujarati |
| ha | Hausa |
| haw | Hawaiian |
| he | Hebrew |
| hi | Hindi |
| hr | Croatian |
| hu | Hungarian |
| hy | Armenian |
| ia | Interlingua |
| id | Indonesian |
| is | Icelandic |
| it | Italian |
| it-CH | Italian (Switzerland) |
| it-IT | Italian (Italy) |
| ja | Japanese |
| jw | Javanese |
| ka | Georgian |
| kk | Kazakh |
| km | Cambodian |
| kn | Kannada |
| ko | Korean |
| ku | Kurdish |
| ky | Kyrgyz |
| la | Latin |
| ln | Lingala |
| lo | Laothian |
| lt | Lithuanian |
| lv | Latvian |
| mk | Macedonian |
| ml | Malayalam |
| mn | Mongolian |
| mo | Moldavian |
| mr | Marathi |
| ms | Malay |
| mt | Maltese |
| nb | Norwegian (Bokmal) |
| ne | Nepali |
| nl | Dutch |
| nn | Norwegian (Nynorsk) |
| no | Norwegian |
| oc | Occitan |
| om | Oromo |
| or | Oriya |
| pa | Punjabi |
| pl | Polish |
| ps | Pashto |
| pt | Portuguese |
| pt-BR | Portuguese (Brazil) |
| pt-PT | Portuguese (Portugal) |
| qu | Quechua |
| rm | Romansh |
| ro | Romanian |
| ru | Russian |
| sd | Sindhi |
| sh | Serbo-Croatian |
| si | Sinhalese |
| sk | Slovak |
| sl | Slovenian |
| sn | Shona |
| so | Somali |
| sq | Albanian |
| sr | Serbian |
| st | Sesotho |
| su | Sundanese |
| sv | Swedish |
| sw | Swahili |
| ta | Tamil |
| te | Telugu |
| tg | Tajik |
| th | Thai |
| ti | Tigrinya |
| tk | Turkmen |
| to | Tonga |
| tr | Turkish |
| tt | Tatar |
| tw | Twi |
| ug | Uighur |
| uk | Ukrainian |
| ur | Urdu |
| uz | Uzbek |
| vi | Vietnamese |
| xh | Xhosa |
| yi | Yiddish |
| yo | Yoruba |
| zh | Chinese |
| zh-CN | Chinese (Simplified) |
| zh-TW | Chinese (Traditional) |
| zu | Zulu |
Mac App Store Submission Guide
Since v0.34.0, Electron allows submitting packaged apps to the Mac App Store (MAS). This guide provides information on: how to submit your app and the limitations of the MAS build.
Note: Submitting an app to Mac App Store requires enrolling Apple Developer Program, which costs money.
How to Submit Your App
The following steps introduce a simple way to submit your app to Mac App Store. However, these steps do not ensure your app will be approved by Apple; you still need to read Apple's Submitting Your App guide on how to meet the Mac App Store requirements.
Get Certificate
To submit your app to the Mac App Store, you first must get a certificate from Apple. You can follow these existing guides on web.
Get Team ID
Before signing your app, you need to know the Team ID of your account. To locate your Team ID, Sign in to Apple Developer Center, and click Membership in the sidebar. Your Team ID appears in the Membership Information section under the team name.
Sign Your App
After finishing the preparation work, you can package your app by following Application Distribution, and then proceed to signing your app.
First, you have to add a ElectronTeamID key to your app's Info.plist, which has your Team ID as value:
<plist version="1.0">
    <dict>
      ...
      <key>ElectronTeamID</key>
      <string>TEAM_ID</string>
    </dict>
    </plist>
Then, you need to prepare three entitlements files.
child.plist:
<?xml version="1.0" encoding="UTF-8"?>
    <!DOCTYPE plist PUBLIC "-//Apple//DTD PLIST 1.0//EN" "http://www.apple.com/DTDs/PropertyList-1.0.dtd">
    <plist version="1.0">
      <dict>
        <key>com.apple.security.app-sandbox</key>
        <true/>
        <key>com.apple.security.inherit</key>
        <true/>
      </dict>
</plist>parent.plist:
<?xml version="1.0" encoding="UTF-8"?>
    <!DOCTYPE plist PUBLIC "-//Apple//DTD PLIST 1.0//EN" "http://www.apple.com/DTDs/PropertyList-1.0.dtd">
    <plist version="1.0">
      <dict>
        <key>com.apple.security.app-sandbox</key>
        <true/>
        <key>com.apple.security.application-groups</key>
        <string>TEAM_ID.your.bundle.id</string>
      </dict>
</plist>loginhelper.plist:
<?xml version="1.0" encoding="UTF-8"?>
    <!DOCTYPE plist PUBLIC "-//Apple//DTD PLIST 1.0//EN" "http://www.apple.com/DTDs/PropertyList-1.0.dtd">
    <plist version="1.0">
      <dict>
        <key>com.apple.security.app-sandbox</key>
        <true/>
      </dict>
    </plist>
You have to replace TEAM_ID with your Team ID, and replace your.bundle.id with the Bundle ID of your app.
And then sign your app with the following script:
#!/bin/bash

    # Name of your app.
    APP="YourApp"
    # The path of your app to sign.
    APP_PATH="/path/to/YourApp.app"
    # The path to the location you want to put the signed package.
    RESULT_PATH="~/Desktop/$APP.pkg"
    # The name of certificates you requested.
    APP_KEY="3rd Party Mac Developer Application: Company Name (APPIDENTITY)"
    INSTALLER_KEY="3rd Party Mac Developer Installer: Company Name (APPIDENTITY)"
    # The path of your plist files.
    CHILD_PLIST="/path/to/child.plist"
    PARENT_PLIST="/path/to/parent.plist"
    LOGINHELPER_PLIST="/path/to/loginhelper.plist"

    FRAMEWORKS_PATH="$APP_PATH/Contents/Frameworks"

    codesign -s "$APP_KEY" -f --entitlements "$CHILD_PLIST" "$FRAMEWORKS_PATH/Electron Framework.framework/Versions/A/Electron Framework"
    codesign -s "$APP_KEY" -f --entitlements "$CHILD_PLIST" "$FRAMEWORKS_PATH/Electron Framework.framework/Versions/A/Libraries/libffmpeg.dylib"
    codesign -s "$APP_KEY" -f --entitlements "$CHILD_PLIST" "$FRAMEWORKS_PATH/Electron Framework.framework/Versions/A/Libraries/libnode.dylib"
    codesign -s "$APP_KEY" -f --entitlements "$CHILD_PLIST" "$FRAMEWORKS_PATH/Electron Framework.framework"
    codesign -s "$APP_KEY" -f --entitlements "$CHILD_PLIST" "$FRAMEWORKS_PATH/$APP Helper.app/Contents/MacOS/$APP Helper"
    codesign -s "$APP_KEY" -f --entitlements "$CHILD_PLIST" "$FRAMEWORKS_PATH/$APP Helper.app/"
    codesign -s "$APP_KEY" -f --entitlements "$CHILD_PLIST" "$FRAMEWORKS_PATH/$APP Helper EH.app/Contents/MacOS/$APP Helper EH"
    codesign -s "$APP_KEY" -f --entitlements "$CHILD_PLIST" "$FRAMEWORKS_PATH/$APP Helper EH.app/"
    codesign -s "$APP_KEY" -f --entitlements "$CHILD_PLIST" "$FRAMEWORKS_PATH/$APP Helper NP.app/Contents/MacOS/$APP Helper NP"
    codesign -s "$APP_KEY" -f --entitlements "$CHILD_PLIST" "$FRAMEWORKS_PATH/$APP Helper NP.app/"
    codesign -s "$APP_KEY" -f --entitlements "$LOGINHELPER_PLIST" "$APP_PATH/Contents/Library/LoginItems/$APP Login Helper.app/Contents/MacOS/$APP Login Helper"
    codesign -s "$APP_KEY" -f --entitlements "$LOGINHELPER_PLIST" "$APP_PATH/Contents/Library/LoginItems/$APP Login Helper.app/"
    codesign -s "$APP_KEY" -f --entitlements "$CHILD_PLIST" "$APP_PATH/Contents/MacOS/$APP"
    codesign -s "$APP_KEY" -f --entitlements "$PARENT_PLIST" "$APP_PATH"

    productbuild --component "$APP_PATH" /Applications --sign "$INSTALLER_KEY" "$RESULT_PATH"
If you are new to app sandboxing under macOS, you should also read through Apple's Enabling App Sandbox to have a basic idea, then add keys for the permissions needed by your app to the entitlements files.
Apart from manually signing your app, you can also choose to use the electron-osx-sign module to do the job.
Sign Native Modules
Native modules used in your app also need to be signed. If using electron-osx-sign, be sure to include the path to the built binaries in the argument list:
electron-osx-sign YourApp.app YourApp.app/Contents/Resources/app/node_modules/nativemodule/build/release/nativemoduleAlso note that native modules may have intermediate files produced which should not be included (as they would also need to be signed). If you use electron-packager before version 8.1.0, add --ignore=.+\.o$ to your build step to ignore these files. Versions 8.1.0 and later ignores those files by default.
Upload Your App
After signing your app, you can use Application Loader to upload it to iTunes Connect for processing, making sure you have created a record before uploading.
Submit Your App for Review
After these steps, you can submit your app for review.
Limitations of MAS Build
In order to satisfy all requirements for app sandboxing, the following modules have been disabled in the MAS build:
crashReporterautoUpdater
and the following behaviors have been changed:
- Video capture may not work for some machines.
- Certain accessibility features may not work.
- Apps will not be aware of DNS changes.
Also, due to the usage of app sandboxing, the resources which can be accessed by the app are strictly limited; you can read App Sandboxing for more information.
Additional Entitlements
Depending on which Electron APIs your app uses, you may need to add additional entitlements to your parent.plist file to be able to use these APIs from your app's Mac App Store build.
Network Access
Enable outgoing network connections to allow your app to connect to a server:
<key>com.apple.security.network.client</key>
    <true/>
Enable incoming network connections to allow your app to open a network listening socket:
<key>com.apple.security.network.server</key>
    <true/>
See the Enabling Network Access documentation for more details.
dialog.showOpenDialog
<key>com.apple.security.files.user-selected.read-only</key>
    <true/>
See the Enabling User-Selected File Access documentation for more details.
dialog.showSaveDialog
<key>com.apple.security.files.user-selected.read-write</key>
    <true/>
See the Enabling User-Selected File Access documentation for more details.
shell.openItem(filePath)
This will fail when the app is signed for distribution in the Mac App Store. Subscribe to #9005 for updates.
Workaround
shell.openExternal('file://' + filePath) will open the file in the default application as long as the extension is associated with an installed app.
Cryptographic Algorithms Used by Electron
Depending on the country and region you are located, Mac App Store may require documenting the cryptographic algorithms used in your app, and even ask you to submit a copy of U.S. Encryption Registration (ERN) approval.
Electron uses following cryptographic algorithms:
- AES - NIST SP 800-38A, NIST SP 800-38D, RFC 3394
- HMAC - FIPS 198-1
- ECDSA - ANS X9.62–2005
- ECDH - ANS X9.63–2001
- HKDF - NIST SP 800-56C
- PBKDF2 - RFC 2898
- RSA - RFC 3447
- SHA - FIPS 180-4
- Blowfish - https://www.schneier.com/cryptography/blowfish/
- CAST - RFC 2144, RFC 2612
- DES - FIPS 46-3
- DH - RFC 2631
- DSA - ANSI X9.30
- EC - SEC 1
- IDEA - "On the Design and Security of Block Ciphers" book by X. Lai
- MD2 - RFC 1319
- MD4 - RFC 6150
- MD5 - RFC 1321
- MDC2 - ISO/IEC 10118-2
- RC2 - RFC 2268
- RC4 - RFC 4345
- RC5 - http://people.csail.mit.edu/rivest/Rivest-rc5rev.pdf
- RIPEMD - ISO/IEC 10118-3
On how to get the ERN approval, you can reference the article: How to legally submit an app to Apple’s App Store when it uses encryption (or how to obtain an ERN).
MacOS Dock
Electron has APIs to configure the app's icon in the macOS Dock. A macOS-only API exists to create a a custom dock menu, but Electron also uses the app's dock icon to implement cross-platform features like recent documents and application progress.
The custom dock is commonly used to add shortcuts to tasks the user wouldn't want to open the whole app window for.
Dock menu of Terminal.app:

To set your custom dock menu, you can use the app.dock.setMenu API, which is only available on macOS:
const { app, Menu } = require('electron')

    const dockMenu = Menu.buildFromTemplate([
      {
        label: 'New Window',
        click () { console.log('New Window') }
      }, {
        label: 'New Window with Settings',
        submenu: [
          { label: 'Basic' },
          { label: 'Pro' }
        ]
      },
      { label: 'New Command...' }
    ])

    app.dock.setMenu(dockMenu)
MemoryInfo Object
pidInteger - Process id of the process.workingSetSizeInteger - The amount of memory currently pinned to actual physical RAM.peakWorkingSetSizeInteger - The maximum amount of memory that has ever been pinned to actual physical RAM. On macOS its value will always be 0.privateBytesInteger - The amount of memory not shared by other processes, such as JS heap or HTML content.sharedBytesInteger - The amount of memory shared between processes, typically memory consumed by the Electron code itself
Note that all statistics are reported in Kilobytes.
MemoryUsageDetails Object
countNumbersizeNumberliveSizeNumber
new Menu()
Creates a new menu.
Static Methods
The menu class has the following static methods:
Menu.setApplicationMenu(menu)
menuMenu | null
Sets menu as the application menu on macOS. On Windows and Linux, the menu will be set as each window's top menu.
Passing null will remove the menu bar on Windows and Linux but has no effect on macOS.
Note: This API has to be called after the ready event of app module.
Menu.getApplicationMenu()
Returns Menu | null - The application menu, if set, or null, if not set.
Note: The returned Menu instance doesn't support dynamic addition or removal of menu items. Instance properties can still be dynamically modified.
Menu.sendActionToFirstResponder(action) macOS
actionString
Sends the action to the first responder of application. This is used for emulating default macOS menu behaviors. Usually you would just use the role property of a MenuItem.
See the macOS Cocoa Event Handling Guide for more information on macOS' native actions.
Menu.buildFromTemplate(template)
templateMenuItemConstructorOptions[]
Returns Menu
Generally, the template is just an array of options for constructing a MenuItem. The usage can be referenced above.
You can also attach other fields to the element of the template and they will become properties of the constructed menu items.
Instance Methods
The menu object has the following instance methods:
menu.popup(options)
-
optionsObjectwindowBrowserWindow (optional) - Default is the focused window.xNumber (optional) - Default is the current mouse cursor position. Must be declared ifyis declared.yNumber (optional) - Default is the current mouse cursor position. Must be declared ifxis declared.positioningItemNumber (optional) macOS - The index of the menu item to be positioned under the mouse cursor at the specified coordinates. Default is -1.callbackFunction (optional) - Called when menu is closed.
Pops up this menu as a context menu in the BrowserWindow.
menu.closePopup([browserWindow])
browserWindowBrowserWindow (optional) - Default is the focused window.
Closes the context menu in the browserWindow.
menu.insert(pos, menuItem)
posIntegermenuItemMenuItem
Inserts the menuItem to the pos position of the menu.
Instance Events
Objects created with new Menu emit the following events:
Note: Some events are only available on specific operating systems and are labeled as such.
Event: 'menu-will-close'
Returns:
eventEvent
Emitted when a popup is closed either manually or with menu.closePopup().
Instance Properties
menu objects also have the following properties:
menu.items
A MenuItem[] array containing the menu's items.
Each Menu consists of multiple MenuItems and each MenuItem can have a submenu.
Instance Events
Objects created with new Menu or returned by Menu.buildFromTemplate emit the following events:
Examples
The Menu class is only available in the main process, but you can also use it in the render process via the remote module.
Main process
An example of creating the application menu in the main process with the simple template API:
const {app, Menu} = require('electron')

    const template = [
      {
        label: 'Edit',
        submenu: [
          {role: 'undo'},
          {role: 'redo'},
          {type: 'separator'},
          {role: 'cut'},
          {role: 'copy'},
          {role: 'paste'},
          {role: 'pasteandmatchstyle'},
          {role: 'delete'},
          {role: 'selectall'}
        ]
      },
      {
        label: 'View',
        submenu: [
          {role: 'reload'},
          {role: 'forcereload'},
          {role: 'toggledevtools'},
          {type: 'separator'},
          {role: 'resetzoom'},
          {role: 'zoomin'},
          {role: 'zoomout'},
          {type: 'separator'},
          {role: 'togglefullscreen'}
        ]
      },
      {
        role: 'window',
        submenu: [
          {role: 'minimize'},
          {role: 'close'}
        ]
      },
      {
        role: 'help',
        submenu: [
          {
            label: 'Learn More',
            click () { require('electron').shell.openExternal('https://electronjs.org') }
          }
        ]
      }
    ]

    if (process.platform === 'darwin') {
      template.unshift({
        label: app.getName(),
        submenu: [
          {role: 'about'},
          {type: 'separator'},
          {role: 'services', submenu: []},
          {type: 'separator'},
          {role: 'hide'},
          {role: 'hideothers'},
          {role: 'unhide'},
          {type: 'separator'},
          {role: 'quit'}
        ]
      })

      // Edit menu
      template[1].submenu.push(
        {type: 'separator'},
        {
          label: 'Speech',
          submenu: [
            {role: 'startspeaking'},
            {role: 'stopspeaking'}
          ]
        }
      )

      // Window menu
      template[3].submenu = [
        {role: 'close'},
        {role: 'minimize'},
        {role: 'zoom'},
        {type: 'separator'},
        {role: 'front'}
      ]
    }

    const menu = Menu.buildFromTemplate(template)
    Menu.setApplicationMenu(menu)
Render process
Below is an example of creating a menu dynamically in a web page (render process) by using the remote module, and showing it when the user right clicks the page:
<!-- index.html -->
    <script>
    const {remote} = require('electron')
    const {Menu, MenuItem} = remote

    const menu = new Menu()
    menu.append(new MenuItem({label: 'MenuItem1', click() { console.log('item 1 clicked') }}))
    menu.append(new MenuItem({type: 'separator'}))
    menu.append(new MenuItem({label: 'MenuItem2', type: 'checkbox', checked: true}))

    window.addEventListener('contextmenu', (e) => {
      e.preventDefault()
      menu.popup({window: remote.getCurrentWindow()})
    }, false)
    </script>
Notes on macOS Application Menu
macOS has a completely different style of application menu from Windows and Linux. Here are some notes on making your app's menu more native-like.
Standard Menus
On macOS there are many system-defined standard menus, like the Services and Windows menus. To make your menu a standard menu, you should set your menu's role to one of the following and Electron will recognize them and make them become standard menus:
windowhelpservices
Standard Menu Item Actions
macOS has provided standard actions for some menu items, like About xxx, Hide xxx, and Hide Others. To set the action of a menu item to a standard action, you should set the role attribute of the menu item.
Main Menu's Name
On macOS the label of the application menu's first item is always your app's name, no matter what label you set. To change it, modify your app bundle's Info.plist file. See About Information Property List Files for more information.
Setting Menu for Specific Browser Window (Linux Windows)
The setMenu method of browser windows can set the menu of certain browser windows.
Menu Item Position
You can make use of position and id to control how the item will be placed when building a menu with Menu.buildFromTemplate.
The position attribute of MenuItem has the form [placement]=[id], where placement is one of before, after, or endof and id is the unique ID of an existing item in the menu:
before- Inserts this item before the id referenced item. If the referenced item doesn't exist the item will be inserted at the end of the menu.after- Inserts this item after id referenced item. If the referenced item doesn't exist the item will be inserted at the end of the menu.endof- Inserts this item at the end of the logical group containing the id referenced item (groups are created by separator items). If the referenced item doesn't exist, a new separator group is created with the given id and this item is inserted after that separator.
When an item is positioned, all un-positioned items are inserted after it until a new item is positioned. So if you want to position a group of menu items in the same location you only need to specify a position for the first item.
Examples
Template:
[
      {label: '4', id: '4'},
      {label: '5', id: '5'},
      {label: '1', id: '1', position: 'before=4'},
      {label: '2', id: '2'},
      {label: '3', id: '3'}
    ]
Menu:
<br />- 1
    - 2
    - 3
    - 4
    - 5
Template:
[
      {label: 'a', position: 'endof=letters'},
      {label: '1', position: 'endof=numbers'},
      {label: 'b', position: 'endof=letters'},
      {label: '2', position: 'endof=numbers'},
      {label: 'c', position: 'endof=letters'},
      {label: '3', position: 'endof=numbers'}
    ]
Menu:
<br />- ---
    - a
    - b
    - c
    - ---
    - 1
    - 2
    - 3
Class: MenuItem
Add items to native application menus and context menus.
Process: Main
See Menu for examples.
new MenuItem(options)
-
optionsObject-
clickFunction (optional) - Will be called withclick(menuItem, browserWindow, event)when the menu item is clicked.menuItemMenuItembrowserWindowBrowserWindoweventEvent
roleString (optional) - Define the action of the menu item, when specified theclickproperty will be ignored. See roles.typeString (optional) - Can benormal,separator,submenu,checkboxorradio.labelString (optional)sublabelString (optional)acceleratorAccelerator (optional)icon(NativeImage | String) (optional)enabledBoolean (optional) - If false, the menu item will be greyed out and unclickable.visibleBoolean (optional) - If false, the menu item will be entirely hidden.checkedBoolean (optional) - Should only be specified forcheckboxorradiotype menu items.submenu(MenuItemConstructorOptions[] | Menu) (optional) - Should be specified forsubmenutype menu items. Ifsubmenuis specified, thetype: 'submenu'can be omitted. If the value is not aMenuthen it will be automatically converted to one usingMenu.buildFromTemplate.idString (optional) - Unique within a single menu. If defined then it can be used as a reference to this item by the position attribute.positionString (optional) - This field allows fine-grained definition of the specific location within a given menu.
-
Roles
Roles allow menu items to have predefined behaviors.
It is best to specify role for any menu item that matches a standard role, rather than trying to manually implement the behavior in a click function. The built-in role behavior will give the best native experience.
The label and accelerator values are optional when using a role and will default to appropriate values for each platform.
The role property can have following values:
undoredocutcopypastepasteAndMatchStyleselectAlldeleteminimize- Minimize current window.close- Close current window.quit- Quit the application.reload- Reload the current window.forceReload- Reload the current window ignoring the cache.toggleDevTools- Toggle developer tools in the current window.toggleFullScreen- Toggle full screen mode on the current window.resetZoom- Reset the focused page's zoom level to the original size.zoomIn- Zoom in the focused page by 10%.zoomOut- Zoom out the focused page by 10%.editMenu- Whole default "Edit" menu (Undo, Copy, etc.).windowMenu- Whole default "Window" menu (Minimize, Close, etc.).
The following additional roles are available on macOS:
about- Map to theorderFrontStandardAboutPanelaction.hide- Map to thehideaction.hideOthers- Map to thehideOtherApplicationsaction.unhide- Map to theunhideAllApplicationsaction.startSpeaking- Map to thestartSpeakingaction.stopSpeaking- Map to thestopSpeakingaction.front- Map to thearrangeInFrontaction.zoom- Map to theperformZoomaction.toggleTabBar- Map to thetoggleTabBaraction.selectNextTab- Map to theselectNextTabaction.selectPreviousTab- Map to theselectPreviousTabaction.mergeAllWindows- Map to themergeAllWindowsaction.moveTabToNewWindow- Map to themoveTabToNewWindowaction.window- The submenu is a "Window" menu.help- The submenu is a "Help" menu.services- The submenu is a "Services" menu.recentDocuments- The submenu is an "Open Recent" menu.clearRecentDocuments- Map to theclearRecentDocumentsaction.
When specifying a role on macOS, label and accelerator are the only options that will affect the menu item. All other options will be ignored. Lowercase role, e.g. toggledevtools, is still supported.
Instance Properties
The following properties are available on instances of MenuItem:
menuItem.enabled
A Boolean indicating whether the item is enabled, this property can be dynamically changed.
menuItem.visible
A Boolean indicating whether the item is visible, this property can be dynamically changed.
menuItem.checked
A Boolean indicating whether the item is checked, this property can be dynamically changed.
A checkbox menu item will toggle the checked property on and off when selected.
A radio menu item will turn on its checked property when clicked, and will turn off that property for all adjacent items in the same menu.
You can add a click function for additional behavior.
menuItem.label
A String representing the menu items visible label.
menuItem.click
A Function that is fired when the MenuItem receives a click event.
MimeTypedBuffer Object
mimeTypeString - The mimeType of the Buffer that you are sendingdataBuffer - The actual Buffer content
Multithreading
With Web Workers, it is possible to run JavaScript in OS-level threads.
Multi-threaded Node.js
It is possible to use Node.js features in Electron's Web Workers, to do so the nodeIntegrationInWorker option should be set to true in webPreferences.
let win = new BrowserWindow({
      webPreferences: {
        nodeIntegrationInWorker: true
      }
    })
The nodeIntegrationInWorker can be used independent of nodeIntegration, but sandbox must not be set to true.
Available APIs
All built-in modules of Node.js are supported in Web Workers, and asar archives can still be read with Node.js APIs. However none of Electron's built-in modules can be used in a multi-threaded environment.
Native Node.js modules
Any native Node.js module can be loaded directly in Web Workers, but it is strongly recommended not to do so. Most existing native modules have been written assuming single-threaded environment, using them in Web Workers will lead to crashes and memory corruptions.
Note that even if a native Node.js module is thread-safe it's still not safe to load it in a Web Worker because the process.dlopen function is not thread safe.
The only way to load a native module safely for now, is to make sure the app loads no native modules after the Web Workers get started.
process.dlopen = () => {
      throw new Error('Load native module is not safe')
    }
    let worker = new Worker('script.js')
Native File Drag & Drop
Certain kinds of applications that manipulate files might want to support the operating system's native file drag & drop feature. Dragging files into web content is common and supported by many websites. Electron additionally supports dragging files and content out from web content into the operating system's world.
To implement this feature in your app, you need to call webContents.startDrag(item) API in response to the ondragstart event.
In your renderer process, handle the ondragstart event and forward the information to your main process.
<a href="#" id="drag">item</a>
    <script type="text/javascript" charset="utf-8">
      document.getElementById('drag').ondragstart = (event) => {
        event.preventDefault()
        ipcRenderer.send('ondragstart', '/path/to/item')
      }
    </script>
Then, in the main process, augment the event with a path to the file that is being dragged and an icon.
const { ipcMain } = require('electron')

    ipcMain.on('ondragstart', (event, filePath) => {
      event.sender.startDrag({
        file: filePath,
        icon: '/path/to/icon.png'
      })
    })
nativeImage
Create tray, dock, and application icons using PNG or JPG files.
In Electron, for the APIs that take images, you can pass either file paths or NativeImage instances. An empty image will be used when null is passed.
For example, when creating a tray or setting a window's icon, you can pass an image file path as a String:
const {BrowserWindow, Tray} = require('electron')

    const appIcon = new Tray('/Users/somebody/images/icon.png')
    let win = new BrowserWindow({icon: '/Users/somebody/images/window.png'})
    console.log(appIcon, win)
Or read the image from the clipboard which returns a NativeImage:
const {clipboard, Tray} = require('electron')
    const image = clipboard.readImage()
    const appIcon = new Tray(image)
    console.log(appIcon)
Supported Formats
Currently PNG and JPEG image formats are supported. PNG is recommended because of its support for transparency and lossless compression.
On Windows, you can also load ICO icons from file paths. For best visual quality it is recommended to include at least the following sizes in the:
- Small icon
- 16x16 (100% DPI scale)
- 20x20 (125% DPI scale)
- 24x24 (150% DPI scale)
- 32x32 (200% DPI scale)
- Large icon
- 32x32 (100% DPI scale)
- 40x40 (125% DPI scale)
- 48x48 (150% DPI scale)
- 64x64 (200% DPI scale)
- 256x256
Check the Size requirements section in this article.
High Resolution Image
On platforms that have high-DPI support such as Apple Retina displays, you can append @2x after image's base filename to mark it as a high resolution image.
For example if icon.png is a normal image that has standard resolution, then icon@2x.png will be treated as a high resolution image that has double DPI density.
If you want to support displays with different DPI densities at the same time, you can put images with different sizes in the same folder and use the filename without DPI suffixes. For example:
images/
    ├── icon.png
    ├── icon@2x.png
    └── icon@3x.png
const {Tray} = require('electron')
let appIcon = new Tray('/Users/somebody/images/icon.png')
console.log(appIcon)Following suffixes for DPI are also supported:
@1x@1.25x@1.33x@1.4x@1.5x@1.8x@2x@2.5x@3x@4x@5x
Template Image
Template images consist of black and clear colors (and an alpha channel). Template images are not intended to be used as standalone images and are usually mixed with other content to create the desired final appearance.
The most common case is to use template images for a menu bar icon so it can adapt to both light and dark menu bars.
Note: Template image is only supported on macOS.
To mark an image as a template image, its filename should end with the word Template. For example:
xxxTemplate.pngxxxTemplate@2x.png
Methods
The nativeImage module has the following methods, all of which return an instance of the NativeImage class:
nativeImage.createFromPath(path)
pathString
Returns NativeImage
Creates a new NativeImage instance from a file located at path. This method returns an empty image if the path does not exist, cannot be read, or is not a valid image.
const nativeImage = require('electron').nativeImage

    let image = nativeImage.createFromPath('/Users/somebody/images/icon.png')
    console.log(image)
nativeImage.createFromBuffer(buffer[, options])
bufferBufferoptionsObject (optional)widthInteger (optional) - Required for bitmap buffers.heightInteger (optional) - Required for bitmap buffers. *scaleFactorDouble (optional) - Defaults to 1.0.
Returns NativeImage
Creates a new NativeImage instance from buffer.
nativeImage.createFromDataURL(dataURL)
dataURLString
Returns NativeImage
Creates a new NativeImage instance from dataURL.
nativeImage.createFromNamedImage(imageName[, hslShift]) macOS
imageNameStringhslShiftNumber[]
Returns NativeImage
Creates a new NativeImage instance from the NSImage that maps to the given image name. See NSImageName for a list of possible values.
The hslShift is applied to the image with the following rules
hsl_shift[0](hue): The absolute hue value for the image - 0 and 1 map to 0 and 360 on the hue color wheel (red).hsl_shift[1](saturation): A saturation shift for the image, with the following key values: 0 = remove all color. 0.5 = leave unchanged. 1 = fully saturate the image.hsl_shift[2](lightness): A lightness shift for the image, with the following key values: 0 = remove all lightness (make all pixels black). 0.5 = leave unchanged. 1 = full lightness (make all pixels white).
This means that [-1, 0, 1] will make the image completely white and [-1, 1, 0] will make the image completely black.
Class: NativeImage
Natively wrap images such as tray, dock, and application icons.
Instance Methods
The following methods are available on instances of the NativeImage class:
image.toPNG([options])
optionsObject (optional) *scaleFactorDouble (optional) - Defaults to 1.0.
Returns Buffer - A Buffer that contains the image's PNG encoded data.
image.toJPEG(quality)
qualityInteger (required) - Between 0 - 100.
Returns Buffer - A Buffer that contains the image's JPEG encoded data.
image.toBitmap([options])
optionsObject (optional) *scaleFactorDouble (optional) - Defaults to 1.0.
Returns Buffer - A Buffer that contains a copy of the image's raw bitmap pixel data.
image.toDataURL([options])
optionsObject (optional) *scaleFactorDouble (optional) - Defaults to 1.0.
Returns String - The data URL of the image.
image.getBitmap([options])
optionsObject (optional) *scaleFactorDouble (optional) - Defaults to 1.0.
Returns Buffer - A Buffer that contains the image's raw bitmap pixel data.
The difference between getBitmap() and toBitmap() is, getBitmap() does not copy the bitmap data, so you have to use the returned Buffer immediately in current event loop tick, otherwise the data might be changed or destroyed.
image.getNativeHandle() macOS
Returns Buffer - A Buffer that stores C pointer to underlying native handle of the image. On macOS, a pointer to NSImage instance would be returned.
Notice that the returned pointer is a weak pointer to the underlying native image instead of a copy, so you must ensure that the associated nativeImage instance is kept around.
image.isEmpty()
Returns Boolean - Whether the image is empty.
image.getSize()
Returns Size
image.isTemplateImage()
Returns Boolean - Whether the image is a template image.
image.crop(rect)
rectRectangle - The area of the image to crop.
Returns NativeImage - The cropped image.
image.resize(options)
optionsObjectwidthInteger (optional) - Defaults to the image's width.heightInteger (optional) - Defaults to the image's height. *qualityString (optional) - The desired quality of the resize image. Possible values aregood,betterorbest. The default isbest. These values express a desired quality/speed tradeoff. They are translated into an algorithm-specific method that depends on the capabilities (CPU, GPU) of the underlying platform. It is possible for all three methods to be mapped to the same algorithm on a given platform.
Returns NativeImage - The resized image.
If only the height or the width are specified then the current aspect ratio will be preserved in the resized image.
image.getAspectRatio()
Returns Float - The image's aspect ratio.
image.addRepresentation(options)
optionsObjectscaleFactorDouble - The scale factor to add the image representation for.widthInteger (optional) - Defaults to 0. Required if a bitmap buffer is specified asbuffer.heightInteger (optional) - Defaults to 0. Required if a bitmap buffer is specified asbuffer.bufferBuffer (optional) - The buffer containing the raw image data. *dataURLString (optional) - The data URL containing either a base 64 encoded PNG or JPEG image.
Add an image representation for a specific scale factor. This can be used to explicitly add different scale factor representations to an image. This can be called on empty images.
net
Issue HTTP/HTTPS requests using Chromium's native networking library
Process: Main
The net module is a client-side API for issuing HTTP(S) requests. It is similar to the HTTP and HTTPS modules of Node.js but uses Chromium's native networking library instead of the Node.js implementation, offering better support for web proxies.
The following is a non-exhaustive list of why you may consider using the net module instead of the native Node.js modules:
- Automatic management of system proxy configuration, support of the wpad protocol and proxy pac configuration files.
- Automatic tunneling of HTTPS requests.
- Support for authenticating proxies using basic, digest, NTLM, Kerberos or negotiate authentication schemes.
- Support for traffic monitoring proxies: Fiddler-like proxies used for access control and monitoring.
The net module API has been specifically designed to mimic, as closely as possible, the familiar Node.js API. The API components including classes, methods, properties and event names are similar to those commonly used in Node.js.
For instance, the following example quickly shows how the net API might be used:
const {app} = require('electron')
    app.on('ready', () => {
      const {net} = require('electron')
      const request = net.request('https://github.com')
      request.on('response', (response) => {
        console.log(`STATUS: ${response.statusCode}`)
        console.log(`HEADERS: ${JSON.stringify(response.headers)}`)
        response.on('data', (chunk) => {
          console.log(`BODY: ${chunk}`)
        })
        response.on('end', () => {
          console.log('No more data in response.')
        })
      })
      request.end()
    })
By the way, it is almost identical to how you would normally use the HTTP/HTTPS modules of Node.js
The net API can be used only after the application emits the ready event. Trying to use the module before the ready event will throw an error.
Methods
The net module has the following methods:
net.request(options)
options(Object | String) - TheClientRequestconstructor options.
Returns ClientRequest
Creates a ClientRequest instance using the provided options which are directly forwarded to the ClientRequest constructor. The net.request method would be used to issue both secure and insecure HTTP requests according to the specified protocol scheme in the options object.
Using in the renderer process
If you want to show Notifications from a renderer process you should use the HTML5 Notification API
Class: Notification
Create OS desktop notifications
Process: Main
Notification is an EventEmitter.
It creates a new Notification with native properties as set by the options.
Static Methods
The Notification class has the following static methods:
Notification.isSupported()
Returns Boolean - Whether or not desktop notifications are supported on the current system
new Notification([options]) Experimental
-
optionsObjecttitleString - A title for the notification, which will be shown at the top of the notification window when it is shown.subtitleString (optional) macOS - A subtitle for the notification, which will be displayed below the title.bodyString - The body text of the notification, which will be displayed below the title or subtitle.silentBoolean (optional) - Whether or not to emit an OS notification noise when showing the notification.icon(String | NativeImage) (optional) - An icon to use in the notification.hasReplyBoolean (optional) macOS - Whether or not to add an inline reply option to the notification.replyPlaceholderString (optional) macOS - The placeholder to write in the inline reply input field.soundString (optional) macOS - The name of the sound file to play when the notification is shown.actionsNotificationAction[] (optional) macOS - Actions to add to the notification. Please read the available actions and limitations in theNotificationActiondocumentation.closeButtonTextString (optional) macOS - A custom title for the close button of an alert. An empty string will cause the default localized text to be used.
Instance Events
Objects created with new Notification emit the following events:
Note: Some events are only available on specific operating systems and are labeled as such.
Event: 'show'
Returns:
eventEvent
Emitted when the notification is shown to the user, note this could be fired multiple times as a notification can be shown multiple times through the show() method.
Event: 'close'
Returns:
eventEvent
Emitted when the notification is closed by manual intervention from the user.
This event is not guaranteed to be emitted in all cases where the notification is closed.
Event: 'reply' macOS
Returns:
eventEventreplyString - The string the user entered into the inline reply field.
Emitted when the user clicks the "Reply" button on a notification with hasReply: true.
Event: 'action' macOS
Returns:
eventEventindexNumber - The index of the action that was activated.
Instance Methods
Objects created with new Notification have the following instance methods:
notification.show()
Immediately shows the notification to the user, please note this means unlike the HTML5 Notification implementation, simply instantiating a new Notification does not immediately show it to the user, you need to call this method before the OS will display it.
If the notification has been shown before, this method will dismiss the previously shown notification and create a new one with identical properties.
notification.close()
Dismisses the notification.
Playing Sounds
On macOS, you can specify the name of the sound you'd like to play when the notification is shown. Any of the default sounds (under System Preferences > Sound) can be used, in addition to custom sound files. Be sure that the sound file is copied under the app bundle (e.g., YourApp.app/Contents/Resources), or one of the following locations:
~/Library/Sounds/Library/Sounds/Network/Library/Sounds/System/Library/Sounds
See the NSSound docs for more information.
NotificationAction Object
typeString - The type of action, can bebutton.textString (optional) - The label for the given action.
Platform / Action Support
| Action Type | Platform Support | Usage of
text |
Default
text |
Limitations |
|---|---|---|---|---|
button |
macOS | Used as the label for the button | "Show" (or a localized string by system default if first of such
button
, otherwise empty) |
Only the first one is used. If multiple are provided, those beyond the first will be listed as additional actions (displayed when mouse active over the action button). Any such action also is incompatible with
hasReply
and will be ignored if
hasReply
is
true
. |
Button support on macOS
In order for extra notification buttons to work on macOS your app must meet the following criteria.
- App is signed
- App has it's
NSUserNotificationAlertStyleset toalertin theInfo.plist.
If either of these requirements are not met the button simply won't appear.
Notifications (Windows, Linux, macOS)
All three operating systems provide means for applications to send notifications to the user. Electron conveniently allows developers to send notifications with the HTML5 Notification API, using the currently running operating system's native notification APIs to display it.
Note: Since this is an HTML5 API it is only available in the renderer process. If you want to show Notifications in the main process please check out the Notification module.
let myNotification = new Notification('Title', {
      body: 'Lorem Ipsum Dolor Sit Amet'
    })

    myNotification.onclick = () => {
      console.log('Notification clicked')
    }
While code and user experience across operating systems are similar, there are subtle differences.
Windows
- On Windows 10, notifications "just work".
- On Windows 8.1 and Windows 8, a shortcut to your app, with an Application User Model ID, must be installed to the Start screen. Note, however, that it does not need to be pinned to the Start screen.
- On Windows 7, notifications work via a custom implementation which visually resembles the native one on newer systems.
Furthermore, in Windows 8, the maximum length for the notification body is 250 characters, with the Windows team recommending that notifications should be kept to 200 characters. That said, that limitation has been removed in Windows 10, with the Windows team asking developers to be reasonable. Attempting to send gigantic amounts of text to the API (thousands of characters) might result in instability.
Advanced Notifications
Later versions of Windows allow for advanced notifications, with custom templates, images, and other flexible elements. To send those notifications (from either the main process or the renderer process), use the userland module electron-windows-notifications, which uses native Node addons to send ToastNotification and TileNotification objects.
While notifications including buttons work with electron-windows-notifications, handling replies requires the use of electron-windows-interactive-notifications, which helps with registering the required COM components and calling your Electron app with the entered user data.
Quiet Hours / Presentation Mode
To detect whether or not you're allowed to send a notification, use the userland module electron-notification-state.
This allows you to determine ahead of time whether or not Windows will silently throw the notification away.
macOS
Notifications are straight-forward on macOS, but you should be aware of Apple's Human Interface guidelines regarding notifications.
Note that notifications are limited to 256 bytes in size and will be truncated if you exceed that limit.
Advanced Notifications
Later versions of macOS allow for notifications with an input field, allowing the user to quickly reply to a notification. In order to send notifications with an input field, use the userland module node-mac-notifier.
Do not disturb / Session State
To detect whether or not you're allowed to send a notification, use the userland module electron-notification-state.
This will allow you to detect ahead of time whether or not the notification will be displayed.
Linux
Notifications are sent using libnotify which can show notifications on any desktop environment that follows Desktop Notifications Specification, including Cinnamon, Enlightenment, Unity, GNOME, KDE.
Offscreen Rendering
Offscreen rendering lets you obtain the content of a browser window in a bitmap, so it can be rendered anywhere, for example on a texture in a 3D scene. The offscreen rendering in Electron uses a similar approach than the Chromium Embedded Framework project.
Two modes of rendering can be used and only the dirty area is passed in the 'paint' event to be more efficient. The rendering can be stopped, continued and the frame rate can be set. The specified frame rate is a top limit value, when there is nothing happening on a webpage, no frames are generated. The maximum frame rate is 60, because above that there is no benefit, only performance loss.
Note: An offscreen window is always created as a Frameless Window.
GPU accelerated
GPU accelerated rendering means that the GPU is used for composition. Because of that the frame has to be copied from the GPU which requires more performance, thus this mode is quite a bit slower than the other one. The benefit of this mode that WebGL and 3D CSS animations are supported.
Software output device
This mode uses a software output device for rendering in the CPU, so the frame generation is much faster, thus this mode is preferred over the GPU accelerated one.
To enable this mode GPU acceleration has to be disabled by calling the app.disableHardwareAcceleration() API.
Usage
const { app, BrowserWindow } = require('electron')

    app.disableHardwareAcceleration()

    let win

    app.once('ready', () => {
      win = new BrowserWindow({
        webPreferences: {
          offscreen: true
        }
      })

      win.loadURL('http://github.com')
      win.webContents.on('paint', (event, dirty, image) => {
        // updateBitmap(dirty, image.getBitmap())
      })
      win.webContents.setFrameRate(30)
    })
Online/Offline Event Detection
Online and offline event detection can be implemented in the renderer process using the navigator.onLine attribute, part of standard HTML5 API. The navigator.onLine attribute returns false if any network requests are guaranteed to fail i.e. definitely offline (disconnected from the network). It returns true in all other cases. Since all other conditions return true, one has to be mindful of getting false positives, as we cannot assume true value necessarily means that Electron can access the internet. Such as in cases where the computer is running a virtualization software that has virtual ethernet adapters that are always “connected.” Therefore, if you really want to determine the internet access status of Electron, you should develop additional means for checking.
Example:
main.js
const {app, BrowserWindow} = require('electron')

    let onlineStatusWindow

    app.on('ready', () => {
      onlineStatusWindow = new BrowserWindow({ width: 0, height: 0, show: false })
      onlineStatusWindow.loadURL(`file://${__dirname}/online-status.html`)
    })
online-status.html
<!DOCTYPE html>
    <html>
    <body>
    <script>
      const alertOnlineStatus = () => {
        window.alert(navigator.onLine ? 'online' : 'offline')
      }

      window.addEventListener('online',  alertOnlineStatus)
      window.addEventListener('offline',  alertOnlineStatus)

      alertOnlineStatus()
    </script>
    </body>
    </html>
There may be instances where you want to respond to these events in the main process as well. The main process however does not have a navigator object and thus cannot detect these events directly. Using Electron's inter-process communication utilities, the events can be forwarded to the main process and handled as needed, as shown in the following example.
main.js
const {app, BrowserWindow, ipcMain} = require('electron')
    let onlineStatusWindow

    app.on('ready', () => {
      onlineStatusWindow = new BrowserWindow({ width: 0, height: 0, show: false })
      onlineStatusWindow.loadURL(`file://${__dirname}/online-status.html`)
    })

    ipcMain.on('online-status-changed', (event, status) => {
      console.log(status)
    })
online-status.html
<!DOCTYPE html>
    <html>
    <body>
    <script>
      const {ipcRenderer} = require('electron')
      const updateOnlineStatus = () => {
        ipcRenderer.send('online-status-changed', navigator.onLine ? 'online' : 'offline')
      }

      window.addEventListener('online',  updateOnlineStatus)
      window.addEventListener('offline',  updateOnlineStatus)

      updateOnlineStatus()
    </script>
    </body>
    </html>
Planned Breaking API Changes (3.0)
The following list includes the APIs that will be removed in Electron 3.0.
There is no timetable for when this release will occur but deprecation warnings will be added at least one major version beforehand.
app
// Deprecated
    app.getAppMemoryInfo()
    // Replace with
    app.getAppMetrics()
BrowserWindow
// Deprecated
    let optionsA = {webPreferences: {blinkFeatures: ''}}
    let windowA = new BrowserWindow(optionsA)
    // Replace with
    let optionsB = {webPreferences: {enableBlinkFeatures: ''}}
    let windowB = new BrowserWindow(optionsB)

    // Deprecated
    window.on('app-command', (e, cmd) => {
      if (cmd === 'media-play_pause') {
        // do something
      }
    })
    // Replace with
    window.on('app-command', (e, cmd) => {
      if (cmd === 'media-play-pause') {
        // do something
      }
    })
clipboard
// Deprecated
    clipboard.readRtf()
    // Replace with
    clipboard.readRTF()

    // Deprecated
    clipboard.writeRtf()
    // Replace with
    clipboard.writeRTF()

    // Deprecated
    clipboard.readHtml()
    // Replace with
    clipboard.readHTML()

    // Deprecated
    clipboard.writeHtml()
    // Replace with
    clipboard.writeHTML()
crashReporter
// Deprecated
    crashReporter.start({
      companyName: 'Crashly',
      submitURL: 'https://crash.server.com',
      autoSubmit: true
    })
    // Replace with
    crashReporter.start({
      companyName: 'Crashly',
      submitURL: 'https://crash.server.com',
      uploadToServer: true
    })
nativeImage
// Deprecated
    nativeImage.createFromBuffer(buffer, 1.0)
    // Replace with
    nativeImage.createFromBuffer(buffer, {
      scaleFactor: 1.0
    })
screen
// Deprecated
    screen.getMenuBarHeight()
    // Replace with
    screen.getPrimaryDisplay().workArea
session
// Deprecated
    ses.setCertificateVerifyProc(function (hostname, certificate, callback) {
      callback(true)
    })
    // Replace with
    ses.setCertificateVerifyProc(function (request, callback) {
      callback(0)
    })
Tray
// Deprecated
    tray.setHighlightMode(true)
    // Replace with
    tray.setHighlightMode('on')

    // Deprecated
    tray.setHighlightMode(false)
    // Replace with
    tray.setHighlightMode('off')
webContents
// Deprecated
    webContents.openDevTools({detach: true})
    // Replace with
    webContents.openDevTools({mode: 'detach'})
webFrame
// Deprecated
    webFrame.registerURLSchemeAsSecure('app')
    // Replace with
    protocol.registerStandardSchemes(['app'], {secure: true})

    // Deprecated
    webFrame.registerURLSchemeAsPrivileged('app', {secure: true})
    // Replace with
    protocol.registerStandardSchemes(['app'], {secure: true})
Node Headers URL
This is the URL specified as disturl in a .npmrc file or as the --dist-url command line flag when building native Node modules.
Deprecated: https://atom.io/download/atom-shell
Replace with: https://atom.io/download/electron
FIXME comments
The FIXME string is used in code comments to denote things that should be fixed for the 3.0 release. See https://github.com/electron/electron/search?q=fixme
Planned Breaking API Changes (4.0)
The following list includes the APIs that will be removed in Electron 4.0.
There is no timetable for when this release will occur but deprecation warnings will be added at least one major version beforehand.
app.makeSingleInstance
// Deprecated
    app.makeSingleInstance(function (argv, cwd) {

    })
    // Replace with
    app.requestSingleInstanceLock()
    app.on('second-instance', function (argv, cwd) {

    })
app.releaseSingleInstance
// Deprecated
    app.releaseSingleInstance()
    // Replace with
    app.releaseSingleInstanceLock()
Point Object
xNumberyNumber
powerMonitor
Monitor power state changes.
Process: Main
You cannot require or use this module until the ready event of the app module is emitted.
For example:
const electron = require('electron')
    const {app} = electron

    app.on('ready', () => {
      electron.powerMonitor.on('suspend', () => {
        console.log('The system is going to sleep')
      })
    })
Events
The powerMonitor module emits the following events:
Event: 'suspend'
Emitted when the system is suspending.
Event: 'resume'
Emitted when system is resuming.
Event: 'on-ac' Windows
Emitted when the system changes to AC power.
Event: 'on-battery' Windows
Emitted when system changes to battery power.
Event: 'shutdown' Linux macOS
Emitted when the system is about to reboot or shut down. If the event handler invokes e.preventDefault(), Electron will attempt to delay system shutdown in order for the app to exit cleanly. If e.preventDefault() is called, the app should exit as soon as possible by calling something like app.quit().
powerSaveBlocker
Block the system from entering low-power (sleep) mode.
Process: Main
For example:
const {powerSaveBlocker} = require('electron')

    const id = powerSaveBlocker.start('prevent-display-sleep')
    console.log(powerSaveBlocker.isStarted(id))

    powerSaveBlocker.stop(id)
Methods
The powerSaveBlocker module has the following methods:
powerSaveBlocker.start(type)
-
typeString - Power save blocker type.prevent-app-suspension- Prevent the application from being suspended. Keeps system active but allows screen to be turned off. Example use cases: downloading a file or playing audio.prevent-display-sleep- Prevent the display from going to sleep. Keeps system and screen active. Example use case: playing video.
Returns Integer - The blocker ID that is assigned to this power blocker.
Starts preventing the system from entering lower-power mode. Returns an integer identifying the power save blocker.
Note: prevent-display-sleep has higher precedence over prevent-app-suspension. Only the highest precedence type takes effect. In other words, prevent-display-sleep always takes precedence over prevent-app-suspension.
For example, an API calling A requests for prevent-app-suspension, and another calling B requests for prevent-display-sleep. prevent-display-sleep will be used until B stops its request. After that, prevent-app-suspension is used.
powerSaveBlocker.stop(id)
idInteger - The power save blocker id returned bypowerSaveBlocker.start.
Stops the specified power save blocker.
powerSaveBlocker.isStarted(id)
idInteger - The power save blocker id returned bypowerSaveBlocker.start.
Returns Boolean - Whether the corresponding powerSaveBlocker has started.
PrinterInfo Object
nameStringdescriptionStringstatusNumberisDefaultBoolean
Example
Below is an example of some of the additional options that may be set which may be different on each platform.
{
      name: 'Zebra_LP2844',
      description: 'Zebra LP2844',
      status: 3,
      isDefault: false,
      options: {
        copies: '1',
        'device-uri': 'usb://Zebra/LP2844?location=14200000',
        finishings: '3',
        'job-cancel-after': '10800',
        'job-hold-until': 'no-hold',
        'job-priority': '50',
        'job-sheets': 'none,none',
        'marker-change-time': '0',
        'number-up': '1',
        'printer-commands': 'none',
        'printer-info': 'Zebra LP2844',
        'printer-is-accepting-jobs': 'true',
        'printer-is-shared': 'true',
        'printer-location': '',
        'printer-make-and-model': 'Zebra EPL2 Label Printer',
        'printer-state': '3',
        'printer-state-change-time': '1484872644',
        'printer-state-reasons': 'offline-report',
        'printer-type': '36932',
        'printer-uri-supported': 'ipp://localhost/printers/Zebra_LP2844',
        system_driverinfo: 'Z'
      }
    }
process
Extensions to process object.
Electron's process object is extended from the Node.js process object. It adds the following events, properties, and methods:
Event: 'loaded'
Emitted when Electron has loaded its internal initialization script and is beginning to load the web page or the main script.
It can be used by the preload script to add removed Node global symbols back to the global scope when node integration is turned off:
// preload.js
    const _setImmediate = setImmediate
    const _clearImmediate = clearImmediate
    process.once('loaded', () => {
      global.setImmediate = _setImmediate
      global.clearImmediate = _clearImmediate
})process.defaultApp
A Boolean. When app is started by being passed as parameter to the default app, this property is true in the main process, otherwise it is undefined.
process.mas
A Boolean. For Mac App Store build, this property is true, for other builds it is undefined.
process.noAsar
A Boolean that controls ASAR support inside your application. Setting this to true will disable the support for asar archives in Node's built-in modules.
process.noDeprecation
A Boolean that controls whether or not deprecation warnings are printed to stderr. Setting this to true will silence deprecation warnings. This property is used instead of the --no-deprecation command line flag.
process.resourcesPath
A String representing the path to the resources directory.
process.throwDeprecation
A Boolean that controls whether or not deprecation warnings will be thrown as exceptions. Setting this to true will throw errors for deprecations. This property is used instead of the --throw-deprecation command line flag.
process.traceDeprecation
A Boolean that controls whether or not deprecations printed to stderr include their stack trace. Setting this to true will print stack traces for deprecations. This property is instead of the --trace-deprecation command line flag.
process.traceProcessWarnings
A Boolean that controls whether or not process warnings printed to stderr include their stack trace. Setting this to true will print stack traces for process warnings (including deprecations). This property is instead of the --trace-warnings command line flag.
process.type
A String representing the current process's type, can be "browser" (i.e. main process) or "renderer".
process.versions.chrome
A String representing Chrome's version string.
process.versions.electron
A String representing Electron's version string.
process.windowsStore
A Boolean. If the app is running as a Windows Store app (appx), this property is true, for otherwise it is undefined.
Methods
The process object has the following methods:
process.crash()
Causes the main thread of the current process crash.
process.getCPUUsage()
Returns CPUUsage
process.getProcessMemoryInfo()
Returns Object:
workingSetSizeInteger - The amount of memory currently pinned to actual physical RAM.peakWorkingSetSizeInteger - The maximum amount of memory that has ever been pinned to actual physical RAM.privateBytesInteger - The amount of memory not shared by other processes, such as JS heap or HTML content.sharedBytesInteger - The amount of memory shared between processes, typically memory consumed by the Electron code itself.
Returns an object giving memory usage statistics about the current process. Note that all statistics are reported in Kilobytes.
process.getSystemMemoryInfo()
Returns Object:
totalInteger - The total amount of physical memory in Kilobytes available to the system.freeInteger - The total amount of memory not being used by applications or disk cache.swapTotalInteger Windows Linux - The total amount of swap memory in Kilobytes available to the system.swapFreeInteger Windows Linux - The free amount of swap memory in Kilobytes available to the system.
Returns an object giving memory usage statistics about the entire system. Note that all statistics are reported in Kilobytes.
process.hang()
Causes the main thread of the current process hang.
process.setFdLimit(maxDescriptors) macOS Linux
maxDescriptorsInteger
Sets the file descriptor soft limit to maxDescriptors or the OS hard limit, whichever is lower for the current process.
ProcessMetric Object
pidInteger - Process id of the process.typeString - Process type (Browser or Tab or GPU etc).memoryMemoryInfo - Memory information for the process.cpuCPUUsage - CPU usage of the process.
Progress Bar in Taskbar (Windows, macOS, Unity)
On Windows a taskbar button can be used to display a progress bar. This enables a window to provide progress information to the user without the user having to switch to the window itself.
On macOS the progress bar will be displayed as a part of the dock icon.
The Unity DE also has a similar feature that allows you to specify the progress bar in the launcher.
Progress bar in taskbar button:

All three cases are covered by the same API - the setProgressBar() method available on instances of BrowserWindows. Call it with a number between and 1 to indicate your progress. If you have a long-running task that's currently at 63% towards completion, you'd call it with setProgressBar(0.63).
Generally speaking, setting the parameter to a value below zero (like -1) will remove the progress bar while setting it to a value higher than one (like 2) will switch the progress bar to intermediate mode.
See the API documentation for more options and modes.
const { BrowserWindow } = require('electron')
    const win = new BrowserWindow()

    win.setProgressBar(0.5)
protocol
Register a custom protocol and intercept existing protocol requests.
Process: Main
An example of implementing a protocol that has the same effect as the file:// protocol:
const {app, protocol} = require('electron')
    const path = require('path')

    app.on('ready', () => {
      protocol.registerFileProtocol('atom', (request, callback) => {
        const url = request.url.substr(7)
        callback({path: path.normalize(`${__dirname}/${url}`)})
      }, (error) => {
        if (error) console.error('Failed to register protocol')
      })
    })
Note: All methods unless specified can only be used after the ready event of the app module gets emitted.
Methods
The protocol module has the following methods:
protocol.registerStandardSchemes(schemes[, options])
schemesString[] - Custom schemes to be registered as standard schemes.-
optionsObject (optional)secureBoolean (optional) -trueto register the scheme as secure. Defaultfalse.
A standard scheme adheres to what RFC 3986 calls generic URI syntax. For example http and https are standard schemes, while file is not.
Registering a scheme as standard, will allow relative and absolute resources to be resolved correctly when served. Otherwise the scheme will behave like the file protocol, but without the ability to resolve relative URLs.
For example when you load following page with custom protocol without registering it as standard scheme, the image will not be loaded because non-standard schemes can not recognize relative URLs:
<body>
      <img src='test.png'>
    </body>
Registering a scheme as standard will allow access to files through the FileSystem API. Otherwise the renderer will throw a security error for the scheme.
By default web storage apis (localStorage, sessionStorage, webSQL, indexedDB, cookies) are disabled for non standard schemes. So in general if you want to register a custom protocol to replace the http protocol, you have to register it as a standard scheme:
const {app, protocol} = require('electron')

    protocol.registerStandardSchemes(['atom'])
    app.on('ready', () => {
      protocol.registerHttpProtocol('atom', '...')
    })
Note: This method can only be used before the ready event of the app module gets emitted.
protocol.registerServiceWorkerSchemes(schemes)
schemesString[] - Custom schemes to be registered to handle service workers.
protocol.registerFileProtocol(scheme, handler[, completion])
schemeString-
handlerFunction-
requestObjecturlStringreferrerStringmethodStringuploadDataUploadData[]
-
callbackFunctionfilePathString (optional)
-
-
completionFunction (optional)errorError
Registers a protocol of scheme that will send the file as a response. The handler will be called with handler(request, callback) when a request is going to be created with scheme. completion will be called with completion(null) when scheme is successfully registered or completion(error) when failed.
To handle the request, the callback should be called with either the file's path or an object that has a path property, e.g. callback(filePath) or callback({path: filePath}).
When callback is called with nothing, a number, or an object that has an error property, the request will fail with the error number you specified. For the available error numbers you can use, please see the net error list.
By default the scheme is treated like http:, which is parsed differently than protocols that follow the "generic URI syntax" like file:, so you probably want to call protocol.registerStandardSchemes to have your scheme treated as a standard scheme.
protocol.registerBufferProtocol(scheme, handler[, completion])
schemeString-
handlerFunction-
requestObjecturlStringreferrerStringmethodStringuploadDataUploadData[]
-
callbackFunctionbuffer(Buffer | MimeTypedBuffer) (optional)
-
-
completionFunction (optional)errorError
Registers a protocol of scheme that will send a Buffer as a response.
The usage is the same with registerFileProtocol, except that the callback should be called with either a Buffer object or an object that has the data, mimeType, and charset properties.
Example:
const {protocol} = require('electron')

    protocol.registerBufferProtocol('atom', (request, callback) => {
      callback({mimeType: 'text/html', data: Buffer.from('<h5>Response</h5>')})
    }, (error) => {
      if (error) console.error('Failed to register protocol')
    })
protocol.registerStringProtocol(scheme, handler[, completion])
schemeString-
handlerFunction-
requestObjecturlStringreferrerStringmethodStringuploadDataUploadData[]
-
callbackFunctiondataString (optional)
-
-
completionFunction (optional)errorError
Registers a protocol of scheme that will send a String as a response.
The usage is the same with registerFileProtocol, except that the callback should be called with either a String or an object that has the data, mimeType, and charset properties.
protocol.registerHttpProtocol(scheme, handler[, completion])
schemeString-
handlerFunction-
requestObjecturlStringreferrerStringmethodStringuploadDataUploadData[]
-
callbackFunction-
redirectRequestObjecturlStringmethodStringsessionObject (optional)-
uploadDataObject (optional)contentTypeString - MIME type of the content.dataString - Content to be sent.
-
-
-
completionFunction (optional)errorError
Registers a protocol of scheme that will send an HTTP request as a response.
The usage is the same with registerFileProtocol, except that the callback should be called with a redirectRequest object that has the url, method, referrer, uploadData and session properties.
By default the HTTP request will reuse the current session. If you want the request to have a different session you should set session to null.
For POST requests the uploadData object must be provided.
protocol.registerStreamProtocol(scheme, handler[, completion])
schemeString-
handlerFunction-
requestObjecturlStringheadersObjectreferrerStringmethodStringuploadDataUploadData[]
-
callbackFunctionstream(ReadableStream | StreamProtocolResponse) (optional)
-
-
completionFunction (optional)errorError
Registers a protocol of scheme that will send a Readable as a response.
The usage is similar to the other register{Any}Protocol, except that the callback should be called with either a Readable object or an object that has the data, statusCode, and headers properties.
Example:
const {protocol} = require('electron')
    const {PassThrough} = require('stream')

    function createStream (text) {
      const rv = new PassThrough() // PassThrough is also a Readable stream
      rv.push(text)
      rv.push(null)
      return rv
    }

    protocol.registerStreamProtocol('atom', (request, callback) => {
      callback({
        statusCode: 200,
        headers: {
          'content-type': 'text/html'
        },
        data: createStream('<h5>Response</h5>')
      })
    }, (error) => {
      if (error) console.error('Failed to register protocol')
    })
It is possible to pass any object that implements the readable stream API (emits data/end/error events). For example, here's how a file could be returned:
const {protocol} = require('electron')
    const fs = require('fs')

    protocol.registerStreamProtocol('atom', (request, callback) => {
      callback(fs.createReadStream('index.html'))
    }, (error) => {
      if (error) console.error('Failed to register protocol')
    })
protocol.unregisterProtocol(scheme[, completion])
schemeString-
completionFunction (optional)errorError
Unregisters the custom protocol of scheme.
protocol.isProtocolHandled(scheme, callback)
schemeString-
callbackFunctionerrorError
The callback will be called with a boolean that indicates whether there is already a handler for scheme.
protocol.interceptFileProtocol(scheme, handler[, completion])
schemeString-
handlerFunction-
requestObjecturlStringreferrerStringmethodStringuploadDataUploadData[]
-
callbackFunctionfilePathString
-
-
completionFunction (optional)errorError
Intercepts scheme protocol and uses handler as the protocol's new handler which sends a file as a response.
protocol.interceptStringProtocol(scheme, handler[, completion])
schemeString-
handlerFunction-
requestObjecturlStringreferrerStringmethodStringuploadDataUploadData[]
-
callbackFunctiondataString (optional)
-
-
completionFunction (optional)errorError
Intercepts scheme protocol and uses handler as the protocol's new handler which sends a String as a response.
protocol.interceptBufferProtocol(scheme, handler[, completion])
schemeString-
handlerFunction-
requestObjecturlStringreferrerStringmethodStringuploadDataUploadData[]
-
callbackFunctionbufferBuffer (optional)
-
-
completionFunction (optional)errorError
Intercepts scheme protocol and uses handler as the protocol's new handler which sends a Buffer as a response.
protocol.interceptHttpProtocol(scheme, handler[, completion])
schemeString-
handlerFunction-
requestObjecturlStringreferrerStringmethodStringuploadDataUploadData[]
-
callbackFunction-
redirectRequestObjecturlStringmethodStringsessionObject (optional)-
uploadDataObject (optional)contentTypeString - MIME type of the content.dataString - Content to be sent.
-
-
-
completionFunction (optional)errorError
Intercepts scheme protocol and uses handler as the protocol's new handler which sends a new HTTP request as a response.
protocol.interceptStreamProtocol(scheme, handler[, completion])
schemeString-
handlerFunction-
requestObjecturlStringheadersObjectreferrerStringmethodStringuploadDataUploadData[]
-
callbackFunctionstream(ReadableStream | StreamProtocolResponse) (optional)
-
-
completionFunction (optional)errorError
Same as protocol.registerStreamProtocol, except that it replaces an existing protocol handler.
protocol.uninterceptProtocol(scheme[, completion])
schemeString-
completionFunction (optional)errorError
Remove the interceptor installed for scheme and restore its original handler.
Step 1: Fork
Fork the project on GitHub and clone your fork locally.
$ git clone git@github.com:username/electron.git
    $ cd electron
    $ git remote add upstream https://github.com/electron/electron.git
    $ git fetch upstream
Step 2: Build
Build steps and dependencies differ slightly depending on your operating system. See these detailed guides on building Electron locally:
Once you've built the project locally, you're ready to start making changes!
Step 3: Branch
To keep your development environment organized, create local branches to hold your work. These should be branched directly off of the master branch.
$ git checkout -b my-branch -t upstream/masterStep 4: Code
Most pull requests opened against the electron/electron repository include changes to either the C/C++ code in the atom/ or brightray/ folders, the JavaScript code in the lib/ folder, the documentation in docs/api/ or tests in the spec/ folder.
Please be sure to run npm run lint from time to time on any code changes to ensure that they follow the project's code style.
See coding style for more information about best practice when modifying code in different parts of the project.
Step 5: Commit
It is recommended to keep your changes grouped logically within individual commits. Many contributors find it easier to review changes that are split across multiple commits. There is no limit to the number of commits in a pull request.
$ git add my/changed/files
    $ git commit
Note that multiple commits often get squashed when they are landed.
Commit message guidelines
A good commit message should describe what changed and why. The Electron project uses semantic commit messages to streamline the release process.
Before a pull request can be merged, it should include at least one semantic commit message, though it's not necessary for all commits in the pull request to be semantic. Alternatively, you can update your pull request title to start with a semantic prefix.
Examples of commit messages with semantic prefixes:
fix: don't overwrite prevent_default if default wasn't preventedfeat: add app.isPackaged() methoddocs: app.isDefaultProtocolClient is now available on Linux
Common prefixes:
- fix: A bug fix
    - feat: A new feature
    - docs: Documentation changes
    - test: Adding missing tests or correcting existing tests
    - build: Changes that affect the build system
    - ci: Changes to our CI configuration files and scripts
    - perf: A code change that improves performance
    - refactor: A code change that neither fixes a bug nor adds a feature
    - style: Changes that do not affect the meaning of the code (linting)
Other things to keep in mind when writing a commit message:
- The first line should:
- contain a short description of the change (preferably 50 characters or less, and no more than 72 characters)
- be entirely in lowercase with the exception of proper nouns, acronyms, and the words that refer to code, like function/variable names
- Keep the second line blank.
- Wrap all other lines at 72 columns.
Breaking Changes
A commit that has the text BREAKING CHANGE: at the beginning of its optional body or footer section introduces a breaking API change (correlating with Major in semantic versioning). A breaking change can be part of commits of any type. e.g., a fix:, feat: & chore: types would all be valid, in addition to any other type.
See conventionalcommits.org for more details.
Step 6: Rebase
Once you have committed your changes, it is a good idea to use git rebase (not git merge) to synchronize your work with the main repository.
$ git fetch upstream
    $ git rebase upstream/master
This ensures that your working branch has the latest changes from electron/electron master.
Step 7: Test
Bug fixes and features should always come with tests. A testing guide has been provided to make the process easier. Looking at other tests to see how they should be structured can also help.
Before submitting your changes in a pull request, always run the full test suite. To run the tests:
$ npm run testMake sure the linter does not report any issues and that all tests pass. Please do not submit patches that fail either check.
If you are updating tests and want to run a single spec to check it:
$ npm run test -match=menuThe above would only run spec modules matching menu, which is useful for anyone who's working on tests that would otherwise be at the very end of the testing cycle.
Step 8: Push
Once your commits are ready to go -- with passing tests and linting -- begin the process of opening a pull request by pushing your working branch to your fork on GitHub.
$ git push origin my-branchStep 9: Opening the Pull Request
From within GitHub, opening a new pull request will present you with a template that should be filled out:
<!--
    Thank you for your pull request. Please provide a description above and review
    the requirements below.

    Bug fixes and new features should include tests and possibly benchmarks.

    Contributors guide: https://github.com/electron/electron/blob/master/CONTRIBUTING.md
    -->
Step 10: Discuss and update
You will probably get feedback or requests for changes to your pull request. This is a big part of the submission process so don't be discouraged! Some contributors may sign off on the pull request right away. Others may have detailed comments or feedback. This is a necessary part of the process in order to evaluate whether the changes are correct and necessary.
To make changes to an existing pull request, make the changes to your local branch, add a new commit with those changes, and push those to your fork. GitHub will automatically update the pull request.
$ git add my/changed/files
    $ git commit
    $ git push origin my-branch
There are a number of more advanced mechanisms for managing commits using git rebase that can be used, but are beyond the scope of this guide.
Feel free to post a comment in the pull request to ping reviewers if you are awaiting an answer on something. If you encounter words or acronyms that seem unfamiliar, refer to this glossary.
Approval and Request Changes Workflow
All pull requests require approval from a Code Owner of the area you modified in order to land. Whenever a maintainer reviews a pull request they may request changes. These may be small, such as fixing a typo, or may involve substantive changes. Such requests are intended to be helpful, but at times may come across as abrupt or unhelpful, especially if they do not include concrete suggestions on how to change them.
Try not to be discouraged. If you feel that a review is unfair, say so or seek the input of another project contributor. Often such comments are the result of a reviewer having taken insufficient time to review and are not ill-intended. Such difficulties can often be resolved with a bit of patience. That said, reviewers should be expected to provide helpful feeback.
Step 11: Landing
In order to land, a pull request needs to be reviewed and approved by at least one Electron Code Owner and pass CI. After that, if there are no objections from other contributors, the pull request can be merged.
Congratulations and thanks for your contribution!
Continuous Integration Testing
Every pull request is tested on the Continuous Integration (CI) system to confirm that it works on Electron's supported platforms.
Ideally, the pull request will pass ("be green") on all of CI's platforms. This means that all tests pass and there are no linting errors. However, it is not uncommon for the CI infrastructure itself to fail on specific platforms or for so-called "flaky" tests to fail ("be red"). Each CI failure must be manually inspected to determine the cause.
CI starts automatically when you open a pull request, but only Releasers can restart a CI run. If you believe CI is giving a false negative, ask a Releaser to restart the tests.
Quick Start
Electron enables you to create desktop applications with pure JavaScript by providing a runtime with rich native (operating system) APIs. You could see it as a variant of the Node.js runtime that is focused on desktop applications instead of web servers.
The old "Quick Start" document that used to live here has been split up into two documents:
- To check out how a simple Electron app is built, see Writing Your First Electron App
- To check out the process architecture, see Main and Renderer Processes.
To learn more about Electron, check out the official guides.
Official Guides
Please make sure that you use the documents that match your Electron version. The version number should be a part of the page URL. If it's not, you are probably using the documentation of a development branch which may contain API changes that are not compatible with your Electron version. To view older versions of the documentation, you can browse by tag on GitHub by opening the "Switch branches/tags" dropdown and selecting the tag that matches your version.
FAQ
There are questions that are asked quite often. Check this out before creating an issue:
Guides and Tutorials
-
Adding Features to Your App
-
Packaging
Detailed Tutorials
These individual tutorials expand on topics discussed in the guide above.
Development
See <development/README.md>
Developing Electron
These guides are intended for people working on the Electron project itself. For guides on Electron app development, see /docs/README.md.
- Code of Conduct
- Contributing to Electron
- Issues
- Pull Requests
- Documentation Styleguide
- Source Code Directory Structure
- Coding Style
- Using clang-format on C++ Code
- Build System Overview
- Build Instructions (macOS)
- Build Instructions (Windows)
- Build Instructions (Linux)
- Chromium Development
- V8 Development
- Testing
- Debugging on Windows
- Debugging on macOS
- Setting Up Symbol Server in Debugger
- Upgrading Chromium
- Upgrading Crashpad
- Upgrading Node
- Releasing
Recent Documents (Windows & macOS)
Windows and macOS provide access to a list of recent documents opened by the application via JumpList or dock menu, respectively.
JumpList:

Application dock menu:

To add a file to recent documents, you can use the app.addRecentDocument API:
const { app } = require('electron')
    app.addRecentDocument('/Users/USERNAME/Desktop/work.type')
And you can use app.clearRecentDocuments API to empty the recent documents list:
const { app } = require('electron')
    app.clearRecentDocuments()
Windows Notes
In order to be able to use this feature on Windows, your application has to be registered as a handler of the file type of the document, otherwise the file won't appear in JumpList even after you have added it. You can find everything on registering your application in Application Registration.
When a user clicks a file from the JumpList, a new instance of your application will be started with the path of the file added as a command line argument.
macOS Notes
When a file is requested from the recent documents menu, the open-file event of app module will be emitted for it.
Rectangle Object
xNumber - The x coordinate of the origin of the rectangle (must be an integer)yNumber - The y coordinate of the origin of the rectangle (must be an integer)widthNumber - The width of the rectangle (must be an integer)heightNumber - The height of the rectangle (must be an integer)
Releasing
This document describes the process for releasing a new version of Electron.
Determine which branch to release from
- If releasing beta, run the scripts below from
master. - If releasing a stable version, run the scripts below from the branch you're stabilizing.
Find out what version change is needed
Run npm run prepare-release -- --notesOnly to view auto generated release notes. The notes generated should help you determine if this is a major, minor, patch, or beta version change. Read the Version Change Rules for more information.
NB: If releasing from a branch, e.g. 1-8-x, check out the branch with git checkout 1-8-x rather than git checkout -b remotes/origin/1-8-x. The scripts need git rev-parse --abbrev-ref HEAD to return a short name, e.g. no remotes/origin/
Set your tokens and environment variables
You'll need Electron S3 credentials in order to create and upload an Electron release. Contact a team member for more information.
There are a handful of *_TOKEN environment variables needed by the release scripts. Once you've generated these per-user tokens, you may want to keep them in a local file that you can source when starting a release. ELECTRON_GITHUB_TOKEN: Create as described at https://github.com/settings/tokens/new, giving the token repo access scope. APPVEYOR_TOKEN: Create a token from https://windows-ci.electronjs.org/api-token If you don't have an account, ask a team member to add you. * CIRCLE_TOKEN: Create a token from "Personal API Tokens" at https://circleci.com/account/api
Run the prepare-release script
The prepare release script will do the following: 1. Check if a release is already in process and if so it will halt. 2. Create a release branch. 3. Bump the version number in several files. See this bump commit for an example. 4. Create a draft release on GitHub with auto-generated release notes. 5. Push the release branch. 6. Call the APIs to run the release builds.
Once you have determined which type of version change is needed, run the prepare-release script with arguments according to your need: - [major|minor|patch|beta] to increment one of the version numbers, or - --stable to indicate this is a stable version
For example:
Major version change
npm run prepare-release -- majorMinor version change
npm run prepare-release -- minorPatch version change
npm run prepare-release -- patchBeta version change
npm run prepare-release -- betaPromote beta to stable
npm run prepare-release -- --stableTip: You can test the new version number before running prepare-release with a dry run of the bump-version script with the same major/minor/patch/beta arguments, e.g.:
$ ./script/bump-version.py --bump minor --dry-runWait for builds :hourglass_flowing_sand:
The prepare-release script will trigger the builds via API calls. To monitor the build progress, see the following pages:
- circleci.com/gh/electron/electron for OS X and Linux
- windows-ci.electronjs.org/project/AppVeyor/electron for Windows
Compile release notes
Writing release notes is a good way to keep yourself busy while the builds are running. For prior art, see existing releases on the releases page.
Tips: - Each listed item should reference a PR on electron/electron, not an issue, nor a PR from another repo like libcc. - No need to use link markup when referencing PRs. Strings like #123 will automatically be converted to links on github.com. - To see the version of Chromium, V8, and Node in every version of Electron, visit atom.io/download/electron/index.json.
Patch releases
For a patch release, use the following format:
## Bug Fixes
* Fixed a cross-platform thing. #123
### Linux
* Fixed a Linux thing. #123
### macOS
* Fixed a macOS thing. #123
### Windows
* Fixed a Windows thing. #1234Minor releases
For a minor release, e.g. 1.8.0, use this format:
## Upgrades
- Upgraded from Node `oldVersion` to `newVersion`. #123
## API Changes
* Changed a thing. #123
### Linux
* Changed a Linux thing. #123
### macOS
* Changed a macOS thing. #123
### Windows
* Changed a Windows thing. #123Major releases
## Upgrades
- Upgraded from Chromium `oldVersion` to `newVersion`. #123
- Upgraded from Node `oldVersion` to `newVersion`. #123
## Breaking API changes
* Changed a thing. #123
### Linux
* Changed a Linux thing. #123
### macOS
* Changed a macOS thing. #123
### Windows
* Changed a Windows thing. #123
## Other Changes
- Some other change. #123Beta releases
Use the same formats as the ones suggested above, but add the following note at the beginning of the changelog:
**Note:** This is a beta release and most likely will have have some
instability and/or regressions.
Please file new issues for any bugs you find in it.
This release is published to [npm](https://www.npmjs.com/package/electron)
under the `beta` tag and can be installed via `npm install electron@beta`.Edit the release draft
- Visit the releases page and you'll see a new draft release with placeholder release notes.
- Edit the release and add release notes.
- Uncheck the
prereleasecheckbox if you're publishing a stable release; leave it checked for beta releases. - Click 'Save draft'. Do not click 'Publish release'!
- Wait for all builds to pass before proceeding.
- In the
releasebranch, verify that the release's files have been created:
$ git rev-parse --abbrev-ref HEAD
release
$ npm run release -- --validateReleaseMerge temporary branch (pre-2-0-x branches only)
Once the release builds have finished, merge the release branch back into the source release branch using the merge-release script. If the branch cannot be successfully merged back this script will automatically rebase the release branch and push the changes which will trigger the release builds again, which means you will need to wait for the release builds to run again before proceeding.
Merging back into master
npm run merge-release -- masterMerging back into old release branch
npm run merge-release -- 1-7-xPublish the release
Once the merge has finished successfully, run the release script via npm run release to finish the release process. This script will do the following: 1. Build the project to validate that the correct version number is being released. 2. Download the binaries and generate the node headers and the .lib linker used on Windows by node-gyp to build native modules. 3. Create and upload the SHASUMS files stored on S3 for the node files. 4. Create and upload the SHASUMS256.txt file stored on the GitHub release. 5. Validate that all of the required files are present on GitHub and S3 and have the correct checksums as specified in the SHASUMS files. 6. Publish the release on GitHub 7. Delete the release branch.
Publish to npm
Before publishing to npm, you'll need to log into npm as Electron. Optionally, you may find npmrc to be a useful way to keep Electron's profile side-by-side with your own:
$ sudo npm install -g npmrc
$ npmrc -c electron
Removing old .npmrc (default)
Activating .npmrc "electron"The Electron account's credentials are kept by GitHub. "Electron - NPM" for the URL "https://www.npmjs.com/login".
$ npm login
Username: electron
Password:
Email: (this IS public) electron@github.comPublish the release to npm.
$ npm whoami
electron
$ npm run publish-to-npmNote: In general you should be using the latest Node during this process; however, older versions of the publish-to-npm script may have trouble with Node 7 or higher. If you have trouble with this in an older branch, try running with an older version of Node, e.g. a 6.x LTS.
Fix missing binaries of a release manually
In the case of a corrupted release with broken CI machines, we might have to re-upload the binaries for an already published release.
The first step is to go to the Releases page and delete the corrupted binaries with the SHASUMS256.txt checksum file.
Then manually create distributions for each platform and upload them:
# Checkout the version to re-upload.
git checkout vTHE.RELEASE.VERSION
# Do release build, specifying one target architecture.
./script/bootstrap.py --target_arch [arm|x64|ia32]
./script/build.py -c R
./script/create-dist.py
# Explicitly allow overwritting a published release.
./script/upload.py --overwriteAfter re-uploading all distributions, publish again to upload the checksum file:
npm run releaseremote
Use main process modules from the renderer process.
Process: Renderer
The remote module provides a simple way to do inter-process communication (IPC) between the renderer process (web page) and the main process.
In Electron, GUI-related modules (such as dialog, menu etc.) are only available in the main process, not in the renderer process. In order to use them from the renderer process, the ipc module is necessary to send inter-process messages to the main process. With the remote module, you can invoke methods of the main process object without explicitly sending inter-process messages, similar to Java's RMI. An example of creating a browser window from a renderer process:
const {BrowserWindow} = require('electron').remote
let win = new BrowserWindow({width: 800, height: 600})
win.loadURL('https://github.com')Note: For the reverse (access the renderer process from the main process), you can use webContents.executeJavascript.
Remote Objects
Each object (including functions) returned by the remote module represents an object in the main process (we call it a remote object or remote function). When you invoke methods of a remote object, call a remote function, or create a new object with the remote constructor (function), you are actually sending synchronous inter-process messages.
In the example above, both BrowserWindow and win were remote objects and new BrowserWindow didn't create a BrowserWindow object in the renderer process. Instead, it created a BrowserWindow object in the main process and returned the corresponding remote object in the renderer process, namely the win object.
Note: Only enumerable properties which are present when the remote object is first referenced are accessible via remote.
Note: Arrays and Buffers are copied over IPC when accessed via the remote module. Modifying them in the renderer process does not modify them in the main process and vice versa.
Lifetime of Remote Objects
Electron makes sure that as long as the remote object in the renderer process lives (in other words, has not been garbage collected), the corresponding object in the main process will not be released. When the remote object has been garbage collected, the corresponding object in the main process will be dereferenced.
If the remote object is leaked in the renderer process (e.g. stored in a map but never freed), the corresponding object in the main process will also be leaked, so you should be very careful not to leak remote objects.
Primary value types like strings and numbers, however, are sent by copy.
Passing callbacks to the main process
Code in the main process can accept callbacks from the renderer - for instance the remote module - but you should be extremely careful when using this feature.
First, in order to avoid deadlocks, the callbacks passed to the main process are called asynchronously. You should not expect the main process to get the return value of the passed callbacks.
For instance you can't use a function from the renderer process in an Array.map called in the main process:
// main process mapNumbers.js
exports.withRendererCallback = (mapper) => {
return [1, 2, 3].map(mapper)
}
exports.withLocalCallback = () => {
return [1, 2, 3].map(x => x + 1)
}// renderer process
const mapNumbers = require('electron').remote.require('./mapNumbers')
const withRendererCb = mapNumbers.withRendererCallback(x => x + 1)
const withLocalCb = mapNumbers.withLocalCallback()
console.log(withRendererCb, withLocalCb)
// [undefined, undefined, undefined], [2, 3, 4]As you can see, the renderer callback's synchronous return value was not as expected, and didn't match the return value of an identical callback that lives in the main process.
Second, the callbacks passed to the main process will persist until the main process garbage-collects them.
For example, the following code seems innocent at first glance. It installs a callback for the close event on a remote object:
require('electron').remote.getCurrentWindow().on('close', () => {
// window was closed...
})But remember the callback is referenced by the main process until you explicitly uninstall it. If you do not, each time you reload your window the callback will be installed again, leaking one callback for each restart.
To make things worse, since the context of previously installed callbacks has been released, exceptions will be raised in the main process when the close event is emitted.
To avoid this problem, ensure you clean up any references to renderer callbacks passed to the main process. This involves cleaning up event handlers, or ensuring the main process is explicitly told to dereference callbacks that came from a renderer process that is exiting.
Accessing built-in modules in the main process
The built-in modules in the main process are added as getters in the remote module, so you can use them directly like the electron module.
const app = require('electron').remote.app
console.log(app)Methods
The remote module has the following methods:
remote.require(module)
moduleString
Returns any - The object returned by require(module) in the main process. Modules specified by their relative path will resolve relative to the entrypoint of the main process.
e.g.
project/
├── main
│ ├── foo.js
│ └── index.js
├── package.json
└── renderer
└── index.js// main process: main/index.js
const {app} = require('electron')
app.on('ready', () => { /* ... */ })// some relative module: main/foo.js
module.exports = 'bar'// renderer process: renderer/index.js
const foo = require('electron').remote.require('./foo') // barremote.getCurrentWindow()
Returns BrowserWindow - The window to which this web page belongs.
remote.getCurrentWebContents()
Returns WebContents - The web contents of this web page.
remote.getGlobal(name)
nameString
Returns any - The global variable of name (e.g. global[name]) in the main process.
remote.process
The process object in the main process. This is the same as remote.getGlobal('process') but is cached.
RemoveClientCertificate Object
typeString -clientCertificate.originString - Origin of the server whose associated client certificate must be removed from the cache.
RemovePassword Object
typeString -password.originString (optional) - When provided, the authentication info related to the origin will only be removed otherwise the entire cache will be cleared.schemeString (optional) - Scheme of the authentication. Can bebasic,digest,ntlm,negotiate. Must be provided if removing byorigin.realmString (optional) - Realm of the authentication. Must be provided if removing byorigin.usernameString (optional) - Credentials of the authentication. Must be provided if removing byorigin.passwordString (optional) - Credentials of the authentication. Must be provided if removing byorigin.
REPL
Read-Eval-Print-Loop (REPL) is a simple, interactive computer programming environment that takes single user inputs (i.e. single expressions), evaluates them, and returns the result to the user.
The repl module provides a REPL implementation that can be accessed using:
-
Assuming you have
electronorelectron-prebuiltinstalled as a local project dependency:./node_modules/.bin/electron --interactive -
Assuming you have
electronorelectron-prebuiltinstalled globally:electron --interactive
This only creates a REPL for the main process. You can use the Console tab of the Dev Tools to get a REPL for the renderer processes.
Note: electron --interactive is not available on Windows.
More information can be found in the Node.js REPL docs.
Represented File for macOS BrowserWindows
On macOS a window can set its represented file, so the file's icon can show in the title bar and when users Command-Click or Control-Click on the title a path popup will show.
You can also set the edited state of a window so that the file icon can indicate whether the document in this window has been modified.
Represented file popup menu:

To set the represented file of window, you can use the BrowserWindow.setRepresentedFilename and BrowserWindow.setDocumentEdited APIs:
const { BrowserWindow } = require('electron')
const win = new BrowserWindow()
win.setRepresentedFilename('/etc/passwd')
win.setDocumentEdited(true)sandbox Option
Create a browser window with a renderer that can run inside Chromium OS sandbox. With this option enabled, the renderer must communicate via IPC to the main process in order to access node APIs. However, in order to enable the Chromium OS sandbox, electron must be run with the
--enable-sandboxcommand line argument.
One of the key security features of Chromium is that all blink rendering/JavaScript code is executed within a sandbox. This sandbox uses OS-specific features to ensure that exploits in the renderer process cannot harm the system.
In other words, when the sandbox is enabled, the renderers can only make changes to the system by delegating tasks to the main process via IPC. Here's more information about the sandbox.
Since a major feature in electron is the ability to run node.js in the renderer process (making it easier to develop desktop applications using web technologies), the sandbox is disabled by electron. This is because most node.js APIs require system access. require() for example, is not possible without file system permissions, which are not available in a sandboxed environment.
Usually this is not a problem for desktop applications since the code is always trusted, but it makes electron less secure than chromium for displaying untrusted web content. For applications that require more security, the sandbox flag will force electron to spawn a classic chromium renderer that is compatible with the sandbox.
A sandboxed renderer doesn't have a node.js environment running and doesn't expose node.js JavaScript APIs to client code. The only exception is the preload script, which has access to a subset of the electron renderer API.
Another difference is that sandboxed renderers don't modify any of the default JavaScript APIs. Consequently, some APIs such as window.open will work as they do in chromium (i.e. they do not return a BrowserWindowProxy).
Example
To create a sandboxed window, simply pass sandbox: true to webPreferences:
let win
app.on('ready', () => {
win = new BrowserWindow({
webPreferences: {
sandbox: true
}
})
win.loadURL('http://google.com')
})In the above code the BrowserWindow that was created has node.js disabled and can communicate only via IPC. The use of this option stops electron from creating a node.js runtime in the renderer. Also, within this new window window.open follows the native behaviour (by default electron creates a BrowserWindow and returns a proxy to this via window.open).
It is important to note that this option alone won't enable the OS-enforced sandbox. To enable this feature, the --enable-sandbox command-line argument must be passed to electron, which will force sandbox: true for all BrowserWindow instances.
To enable OS-enforced sandbox on BrowserWindow or webview process with sandbox:true without causing entire app to be in sandbox, --enable-mixed-sandbox command-line argument must be passed to electron. This option is currently only supported on macOS and Windows.
let win
app.on('ready', () => {
// no need to pass `sandbox: true` since `--enable-sandbox` was enabled.
win = new BrowserWindow()
win.loadURL('http://google.com')
})Note that it is not enough to call app.commandLine.appendSwitch('--enable-sandbox'), as electron/node startup code runs after it is possible to make changes to chromium sandbox settings. The switch must be passed to electron on the command-line:
electron --enable-sandbox app.jsIt is not possible to have the OS sandbox active only for some renderers, if --enable-sandbox is enabled, normal electron windows cannot be created.
If you need to mix sandboxed and non-sandboxed renderers in one application, simply omit the --enable-sandbox argument. Without this argument, windows created with sandbox: true will still have node.js disabled and communicate only via IPC, which by itself is already a gain from security POV.
Preload
An app can make customizations to sandboxed renderers using a preload script. Here's an example:
let win
app.on('ready', () => {
win = new BrowserWindow({
webPreferences: {
sandbox: true,
preload: 'preload.js'
}
})
win.loadURL('http://google.com')
})and preload.js:
// This file is loaded whenever a javascript context is created. It runs in a
// private scope that can access a subset of electron renderer APIs. We must be
// careful to not leak any objects into the global scope!
const fs = require('fs')
const {ipcRenderer} = require('electron')
// read a configuration file using the `fs` module
const buf = fs.readFileSync('allowed-popup-urls.json')
const allowedUrls = JSON.parse(buf.toString('utf8'))
const defaultWindowOpen = window.open
function customWindowOpen (url, ...args) {
if (allowedUrls.indexOf(url) === -1) {
ipcRenderer.sendSync('blocked-popup-notification', location.origin, url)
return null
}
return defaultWindowOpen(url, ...args)
}
window.open = customWindowOpenImportant things to notice in the preload script:
- Even though the sandboxed renderer doesn't have node.js running, it still has access to a limited node-like environment:
Buffer,process,setImmediateandrequireare available. - The preload script can indirectly access all APIs from the main process through the
remoteandipcRenderermodules. This is howfs(used above) and other modules are implemented: They are proxies to remote counterparts in the main process. - The preload script must be contained in a single script, but it is possible to have complex preload code composed with multiple modules by using a tool like browserify, as explained below. In fact, browserify is already used by electron to provide a node-like environment to the preload script.
To create a browserify bundle and use it as a preload script, something like the following should be used:
browserify preload/index.js \
-x electron \
-x fs \
--insert-global-vars=__filename,__dirname -o preload.jsThe -x flag should be used with any required module that is already exposed in the preload scope, and tells browserify to use the enclosing require function for it. --insert-global-vars will ensure that process, Buffer and setImmediate are also taken from the enclosing scope(normally browserify injects code for those).
Currently the require function provided in the preload scope exposes the following modules:
child_process-
electroncrashReporterremoteipcRendererwebFrame
fsostimersurl
More may be added as needed to expose more electron APIs in the sandbox, but any module in the main process can already be used through electron.remote.require.
Status
Please use the sandbox option with care, as it is still an experimental feature. We are still not aware of the security implications of exposing some electron renderer APIs to the preload script, but here are some things to consider before rendering untrusted content:
- A preload script can accidentally leak privileged APIs to untrusted code.
- Some bug in V8 engine may allow malicious code to access the renderer preload APIs, effectively granting full access to the system through the
remotemodule.
Since rendering untrusted content in electron is still uncharted territory, the APIs exposed to the sandbox preload script should be considered more unstable than the rest of electron APIs, and may have breaking changes to fix security issues.
One planned enhancement that should greatly increase security is to block IPC messages from sandboxed renderers by default, allowing the main process to explicitly define a set of messages the renderer is allowed to send.
screen
Retrieve information about screen size, displays, cursor position, etc.
You cannot require or use this module until the ready event of the app module is emitted.
screen is an EventEmitter.
Note: In the renderer / DevTools, window.screen is a reserved DOM property, so writing let {screen} = require('electron') will not work.
An example of creating a window that fills the whole screen:
const electron = require('electron')
const {app, BrowserWindow} = electron
let win
app.on('ready', () => {
const {width, height} = electron.screen.getPrimaryDisplay().workAreaSize
win = new BrowserWindow({width, height})
win.loadURL('https://github.com')
})Another example of creating a window in the external display:
const electron = require('electron')
const {app, BrowserWindow} = require('electron')
let win
app.on('ready', () => {
let displays = electron.screen.getAllDisplays()
let externalDisplay = displays.find((display) => {
return display.bounds.x !== 0 || display.bounds.y !== 0
})
if (externalDisplay) {
win = new BrowserWindow({
x: externalDisplay.bounds.x + 50,
y: externalDisplay.bounds.y + 50
})
win.loadURL('https://github.com')
}
})Events
The screen module emits the following events:
Event: 'display-added'
Returns:
eventEventnewDisplayDisplay
Emitted when newDisplay has been added.
Event: 'display-removed'
Returns:
eventEventoldDisplayDisplay
Emitted when oldDisplay has been removed.
Event: 'display-metrics-changed'
Returns:
eventEventdisplayDisplaychangedMetricsString[]
Emitted when one or more metrics change in a display. The changedMetrics is an array of strings that describe the changes. Possible changes are bounds, workArea, scaleFactor and rotation.
Methods
The screen module has the following methods:
screen.getMenuBarHeight() macOS
Returns Integer - The height of the menu bar in pixels.
screen.getPrimaryDisplay()
Returns Display - The primary display.
screen.getAllDisplays()
Returns Display[] - An array of displays that are currently available.
screen.getDisplayNearestPoint(point)
pointPoint
Returns Display - The display nearest the specified point.
screen.getDisplayMatching(rect)
rectRectangle
Returns Display - The display that most closely intersects the provided bounds.
ScrubberItem Object
labelString (optional) - The text to appear in this itemiconNativeImage (optional) - The image to appear in this item
Security, Native Capabilities, and Your Responsibility
As web developers, we usually enjoy the strong security net of the browser - the risks associated with the code we write are relatively small. Our websites are granted limited powers in a sandbox, and we trust that our users enjoy a browser built by a large team of engineers that is able to quickly respond to newly discovered security threats.
When working with Electron, it is important to understand that Electron is not a web browser. It allows you to build feature-rich desktop applications with familiar web technologies, but your code wields much greater power. JavaScript can access the filesystem, user shell, and more. This allows you to build high quality native applications, but the inherent security risks scale with the additional powers granted to your code.
With that in mind, be aware that displaying arbitrary content from untrusted sources poses a severe security risk that Electron is not intended to handle. In fact, the most popular Electron apps (Atom, Slack, Visual Studio Code, etc) display primarily local content (or trusted, secure remote content without Node integration) – if your application executes code from an online source, it is your responsibility to ensure that the code is not malicious.
Reporting Security Issues
For information on how to properly disclose an Electron vulnerability, see SECURITY.md
Chromium Security Issues and Upgrades
While Electron strives to support new versions of Chromium as soon as possible, developers should be aware that upgrading is a serious undertaking - involving hand-editing dozens or even hundreds of files. Given the resources and contributions available today, Electron will often not be on the very latest version of Chromium, lagging behind by either days or weeks.
We feel that our current system of updating the Chromium component strikes an appropriate balance between the resources we have available and the needs of the majority of applications built on top of the framework. We definitely are interested in hearing more about specific use cases from the people that build things on top of Electron. Pull requests and contributions supporting this effort are always very welcome.
Ignoring Above Advice
A security issue exists whenever you receive code from a remote destination and execute it locally. As an example, consider a remote website being displayed inside a BrowserWindow. If an attacker somehow manages to change said content (either by attacking the source directly, or by sitting between your app and the actual destination), they will be able to execute native code on the user's machine.
:warning: Under no circumstances should you load and execute remote code with Node.js integration enabled. Instead, use only local files (packaged together with your application) to execute Node.js code. To display remote content, use the
webviewtag and make sure to disable thenodeIntegration.
Electron Security Warnings
From Electron 2.0 on, developers will see warnings and recommendations printed to the developer console. They only show up when the binary's name is Electron, indicating that a developer is currently looking at the console.
You can force-enable or force-disable these warnings by setting ELECTRON_ENABLE_SECURITY_WARNINGS or ELECTRON_DISABLE_SECURITY_WARNINGS on either process.env or the window object.
Checklist: Security Recommendations
This is not bulletproof, but at the least, you should follow these steps to improve the security of your application.
- Only load secure content
- Disable the Node.js integration in all renderers that display remote content
- Enable context isolation in all renderers that display remote content
- Use
ses.setPermissionRequestHandler()in all sessions that load remote content - Do not disable
webSecurity - Define a
Content-Security-Policyand use restrictive rules (i.e.script-src 'self') - Override and disable
eval, which allows strings to be executed as code. - Do not set
allowRunningInsecureContenttotrue - Do not enable experimental features
- Do not use
blinkFeatures - WebViews: Do not use
allowpopups - WebViews: Verify the options and params of all
<webview>tags
1) Only Load Secure Content
Any resources not included with your application should be loaded using a secure protocol like HTTPS. In other words, do not use insecure protocols like HTTP. Similarly, we recommend the use of WSS over WS, FTPS over FTP, and so on.
Why?
HTTPS has three main benefits:
1) It authenticates the remote server, ensuring your app connects to the correct host instead of an impersonator. 2) It ensures data integrity, asserting that the data was not modified while in transit between your application and the host. 3) It encrypts the traffic between your user and the destination host, making it more difficult to eavesdrop on the information sent between your app and the host.
How?
// Bad
browserWindow.loadURL('http://my-website.com')
// Good
browserWindow.loadURL('https://my-website.com')<!-- Bad -->
<script crossorigin src="http://cdn.com/react.js"></script>
<link rel="stylesheet" href="http://cdn.com/style.css">
<!-- Good -->
<script crossorigin src="https://cdn.com/react.js"></script>
<link rel="stylesheet" href="https://cdn.com/style.css">2) Disable Node.js Integration for Remote Content
It is paramount that you disable Node.js integration in any renderer (BrowserWindow, BrowserView, or WebView) that loads remote content. The goal is to limit the powers you grant to remote content, thus making it dramatically more difficult for an attacker to harm your users should they gain the ability to execute JavaScript on your website.
After this, you can grant additional permissions for specific hosts. For example, if you are opening a BrowserWindow pointed at `https://my-website.com/", you can give that website exactly the abilities it needs, but no more.
Why?
A cross-site-scripting (XSS) attack is more dangerous if an attacker can jump out of the renderer process and execute code on the user's computer. Cross-site-scripting attacks are fairly common - and while an issue, their power is usually limited to messing with the website that they are executed on. Disabling Node.js integration helps prevent an XSS from being escalated into a so-called "Remote Code Execution" (RCE) attack.
How?
// Bad
const mainWindow = new BrowserWindow()
mainWindow.loadURL('https://my-website.com')// Good
const mainWindow = new BrowserWindow({
webPreferences: {
nodeIntegration: false,
preload: './preload.js'
}
})
mainWindow.loadURL('https://my-website.com')<!-- Bad -->
<webview nodeIntegration src="page.html"></webview>
<!-- Good -->
<webview src="page.html"></webview>When disabling Node.js integration, you can still expose APIs to your website that do consume Node.js modules or features. Preload scripts continue to have access to require and other Node.js features, allowing developers to expose a custom API to remotely loaded content.
In the following example preload script, the later loaded website will have access to a window.readConfig() method, but no Node.js features.
const { readFileSync } = require('fs')
window.readConfig = function () {
const data = readFileSync('./config.json')
return data
}3) Enable Context Isolation for Remote Content
Context isolation is an Electron feature that allows developers to run code in preload scripts and in Electron APIs in a dedicated JavaScript context. In practice, that means that global objects like Array.prototype.push or JSON.parse cannot be modified by scripts running in the renderer process.
Electron uses the same technology as Chromium's Content Scripts to enable this behavior.
Why?
Context isolation allows each the scripts on running in the renderer to make changes to its JavaScript environment without worrying about conflicting with the scripts in the Electron API or the preload script.
While still an experimental Electron feature, context isolation adds an additional layer of security. It creates a new JavaScript world for Electron APIs and preload scripts.
At the same time, preload scripts still have access to the document and window objects. In other words, you're getting a decent return on a likely very small investment.
How?
// Main process
const mainWindow = new BrowserWindow({
webPreferences: {
contextIsolation: true,
preload: 'preload.js'
}
})// Preload script
// Set a variable in the page before it loads
webFrame.executeJavaScript('window.foo = "foo";')
// The loaded page will not be able to access this, it is only available
// in this context
window.bar = 'bar'
document.addEventListener('DOMContentLoaded', () => {
// Will log out 'undefined' since window.foo is only available in the main
// context
console.log(window.foo)
// Will log out 'bar' since window.bar is available in this context
console.log(window.bar)
})4) Handle Session Permission Requests From Remote Content
You may have seen permission requests while using Chrome: They pop up whenever the website attempts to use a feature that the user has to manually approve ( like notifications).
The API is based on the Chromium permissions API and implements the same types of permissions.
Why?
By default, Electron will automatically approve all permission requests unless the developer has manually configured a custom handler. While a solid default, security-conscious developers might want to assume the very opposite.
How?
const { session } = require('electron')
session
.fromPartition('some-partition')
.setPermissionRequestHandler((webContents, permission, callback) => {
const url = webContents.getURL()
if (permission === 'notifications') {
// Approves the permissions request
callback(true)
}
if (!url.startsWith('https://my-website.com')) {
// Denies the permissions request
return callback(false)
}
})5) Do Not Disable WebSecurity
Recommendation is Electron's default
You may have already guessed that disabling the webSecurity property on a renderer process (BrowserWindow, BrowserView, or WebView) disables crucial security features.
Do not disable webSecurity in production applications.
Why?
Disabling webSecurity will disable the same-origin policy and set allowRunningInsecureContent property to true. In other words, it allows the execution of insecure code from different domains.
How?
// Bad
const mainWindow = new BrowserWindow({
webPreferences: {
webSecurity: false
}
})// Good
const mainWindow = new BrowserWindow()<!-- Bad -->
<webview disablewebsecurity src="page.html"></webview>
<!-- Good -->
<webview src="page.html"></webview>6) Define a Content Security Policy
A Content Security Policy (CSP) is an additional layer of protection against cross-site-scripting attacks and data injection attacks. We recommend that they be enabled by any website you load inside Electron.
Why?
CSP allows the server serving content to restrict and control the resources Electron can load for that given web page. https://your-page.com should be allowed to load scripts from the origins you defined while scripts from https://evil.attacker.com should not be allowed to run. Defining a CSP is an easy way to improve your applications security.
How?
Electron respects the Content-Security-Policy HTTP header and the respective <meta> tag.
The following CSP will allow Electron to execute scripts from the current website and from apis.mydomain.com.
// Bad
Content-Security-Policy: '*'
// Good
Content-Security-Policy: script-src 'self' https://apis.mydomain.com7) Override and Disable eval
eval() is a core JavaScript method that allows the execution of JavaScript from a string. Disabling it disables your app's ability to evaluate JavaScript that is not known in advance.
Why?
The eval() method has precisely one mission: To evaluate a series of characters as JavaScript and execute it. It is a required method whenever you need to evaluate code that is not known ahead of time. While legitimate use cases exist, like any other code generators, eval() is difficult to harden.
Generally speaking, it is easier to completely disable eval() than to make it bulletproof. Thus, if you do not need it, it is a good idea to disable it.
How?
// ESLint will warn about any use of eval(), even this one
// eslint-disable-next-line
window.eval = global.eval = function () {
throw new Error(`Sorry, this app does not support window.eval().`)
}8) Do Not Set allowRunningInsecureContent to true
Recommendation is Electron's default
By default, Electron will not allow websites loaded over HTTPS to load and execute scripts, CSS, or plugins from insecure sources (HTTP). Setting the property allowRunningInsecureContent to true disables that protection.
Loading the initial HTML of a website over HTTPS and attempting to load subsequent resources via HTTP is also known as "mixed content".
Why?
Loading content over HTTPS assures the authenticity and integrity of the loaded resources while encrypting the traffic itself. See the section on only displaying secure content for more details.
How?
// Bad
const mainWindow = new BrowserWindow({
webPreferences: {
allowRunningInsecureContent: true
}
})// Good
const mainWindow = new BrowserWindow({})9) Do Not Enable Experimental Features
Recommendation is Electron's default
Advanced users of Electron can enable experimental Chromium features using the experimentalFeatures and experimentalCanvasFeatures properties.
Why?
Experimental features are, as the name suggests, experimental and have not been enabled for all Chromium users. Furthermore, their impact on Electron as a whole has likely not been tested.
Legitimate use cases exist, but unless you know what you are doing, you should not enable this property.
How?
// Bad
const mainWindow = new BrowserWindow({
webPreferences: {
experimentalFeatures: true
}
})// Good
const mainWindow = new BrowserWindow({})10) Do Not Use blinkFeatures
Recommendation is Electron's default
Blink is the name of the rendering engine behind Chromium. As with experimentalFeatures, the blinkFeatures property allows developers to enable features that have been disabled by default.
Why?
Generally speaking, there are likely good reasons if a feature was not enabled by default. Legitimate use cases for enabling specific features exist. As a developer, you should know exactly why you need to enable a feature, what the ramifications are, and how it impacts the security of your application. Under no circumstances should you enable features speculatively.
How?
// Bad
const mainWindow = new BrowserWindow({
webPreferences: {
blinkFeatures: ['ExecCommandInJavaScript']
}
})// Good
const mainWindow = new BrowserWindow()11) Do Not Use allowpopups
Recommendation is Electron's default
If you are using WebViews, you might need the pages and scripts loaded in your <webview> tag to open new windows. The allowpopups attribute enables them to create new BrowserWindows using the window.open() method. WebViews are otherwise not allowed to create new windows.
Why?
If you do not need popups, you are better off not allowing the creation of new BrowserWindows by default. This follows the principle of minimally required access: Don't let a website create new popups unless you know it needs that feature.
How?
<!-- Bad -->
<webview allowpopups src="page.html"></webview>
<!-- Good -->
<webview src="page.html"></webview>12) Verify WebView Options Before Creation
A WebView created in a renderer process that does not have Node.js integration enabled will not be able to enable integration itself. However, a WebView will always create an independent renderer process with its own webPreferences.
It is a good idea to control the creation of new WebViews from the main process and to verify that their webPreferences do not disable security features.
Why?
Since WebViews live in the DOM, they can be created by a script running on your website even if Node.js integration is otherwise disabled.
Electron enables developers to disable various security features that control a renderer process. In most cases, developers do not need to disable any of those features - and you should therefore not allow different configurations for newly created <WebView> tags.
How?
Before a <WebView> tag is attached, Electron will fire the will-attach-webview event on the hosting webContents. Use the event to prevent the creation of WebViews with possibly insecure options.
app.on('web-contents-created', (event, contents) => {
contents.on('will-attach-webview', (event, webPreferences, params) => {
// Strip away preload scripts if unused or verify their location is legitimate
delete webPreferences.preload
delete webPreferences.preloadURL
// Disable Node.js integration
webPreferences.nodeIntegration = false
// Verify URL being loaded
if (!params.src.startsWith('https://yourapp.com/')) {
event.preventDefault()
}
})
})Again, this list merely minimizes the risk, it does not remove it. If your goal is to display a website, a browser will be a more secure option.
SegmentedControlSegment Object
labelString (optional) - The text to appear in this segmenticonNativeImage (optional) - The image to appear in this segmentenabledBoolean (optional) - Whether this segment is selectable. Default: true
session
Manage browser sessions, cookies, cache, proxy settings, etc.
Process: Main
The session module can be used to create new Session objects.
You can also access the session of existing pages by using the session property of WebContents, or from the session module.
const {BrowserWindow} = require('electron')
let win = new BrowserWindow({width: 800, height: 600})
win.loadURL('http://github.com')
const ses = win.webContents.session
console.log(ses.getUserAgent())Methods
The session module has the following methods:
session.fromPartition(partition[, options])
partitionString-
optionsObject (optional)cacheBoolean - Whether to enable cache.
Returns Session - A session instance from partition string. When there is an existing Session with the same partition, it will be returned; otherwise a new Session instance will be created with options.
If partition starts with persist:, the page will use a persistent session available to all pages in the app with the same partition. if there is no persist: prefix, the page will use an in-memory session. If the partition is empty then default session of the app will be returned.
To create a Session with options, you have to ensure the Session with the partition has never been used before. There is no way to change the options of an existing Session object.
Properties
The session module has the following properties:
session.defaultSession
A Session object, the default session object of the app.
Class: Session
Get and set properties of a session.
Process: Main
You can create a Session object in the session module:
const {session} = require('electron')
const ses = session.fromPartition('persist:name')
console.log(ses.getUserAgent())Instance Events
The following events are available on instances of Session:
Event: 'will-download'
eventEventitemDownloadItemwebContentsWebContents
Emitted when Electron is about to download item in webContents.
Calling event.preventDefault() will cancel the download and item will not be available from next tick of the process.
const {session} = require('electron')
session.defaultSession.on('will-download', (event, item, webContents) => {
event.preventDefault()
require('request')(item.getURL(), (data) => {
require('fs').writeFileSync('/somewhere', data)
})
})Instance Methods
The following methods are available on instances of Session:
ses.getCacheSize(callback)
-
callbackFunctionsizeInteger - Cache size used in bytes.
Callback is invoked with the session's current cache size.
ses.clearCache(callback)
callbackFunction - Called when operation is done.
Clears the session’s HTTP cache.
ses.clearStorageData([options, callback])
-
optionsObject (optional)originString (optional) - Should followwindow.location.origin’s representationscheme://host:port.storagesString - The types of storages to clear, can contain:appcache,cookies,filesystem,indexdb,localstorage,shadercache,websql,serviceworkers.quotasString - The types of quotas to clear, can contain:temporary,persistent,syncable.
callbackFunction (optional) - Called when operation is done.
Clears the data of web storages.
ses.flushStorageData()
Writes any unwritten DOMStorage data to disk.
ses.setProxy(config, callback)
-
configObjectpacScriptString - The URL associated with the PAC file.proxyRulesString - Rules indicating which proxies to use.proxyBypassRulesString - Rules indicating which URLs should bypass the proxy settings.
callbackFunction - Called when operation is done.
Sets the proxy settings.
When pacScript and proxyRules are provided together, the proxyRules option is ignored and pacScript configuration is applied.
The proxyRules has to follow the rules below:
proxyRules = schemeProxies[";"<schemeProxies>]
schemeProxies = [<urlScheme>"="]<proxyURIList>
urlScheme = "http" | "https" | "ftp" | "socks"
proxyURIList = <proxyURL>[","<proxyURIList>]
proxyURL = [<proxyScheme>"://"]<proxyHost>[":"<proxyPort>]For example:
http=foopy:80;ftp=foopy2- Use HTTP proxyfoopy:80forhttp://URLs, and HTTP proxyfoopy2:80forftp://URLs.foopy:80- Use HTTP proxyfoopy:80for all URLs.foopy:80,bar,direct://- Use HTTP proxyfoopy:80for all URLs, failing over tobariffoopy:80is unavailable, and after that using no proxy.socks4://foopy- Use SOCKS v4 proxyfoopy:1080for all URLs.http=foopy,socks5://bar.com- Use HTTP proxyfoopyfor http URLs, and fail over to the SOCKS5 proxybar.comiffoopyis unavailable.http=foopy,direct://- Use HTTP proxyfoopyfor http URLs, and use no proxy iffoopyis unavailable.http=foopy;socks=foopy2- Use HTTP proxyfoopyfor http URLs, and usesocks4://foopy2for all other URLs.
The proxyBypassRules is a comma separated list of rules described below:
-
[ URL_SCHEME "://" ] HOSTNAME_PATTERN [ ":" <port> ]Match all hostnames that match the pattern HOSTNAME_PATTERN.
Examples: "foobar.com", "foobar.com", ".foobar.com", "foobar.com:99", "https://x..y.com:99"
-
"." HOSTNAME_SUFFIX_PATTERN [ ":" PORT ]Match a particular domain suffix.
Examples: ".google.com", ".com", "http://.google.com"
-
-
[ SCHEME "://" ] IP_LITERAL [ ":" PORT ]Match URLs which are IP address literals.
Examples: "127.0.1", "[0:0::1]", "[::1]", "http://[::1]:99"
-
IP_LITERAL "/" PREFIX_LENGTH_IN_BITSMatch any URL that is to an IP literal that falls between the given range. IP range is specified using CIDR notation.
Examples: "192.168.1.1/16", "fefe:13::abc/33".
-
<local>Match local addresses. The meaning of
<local>is whether the host matches one of: "127.0.0.1", "::1", "localhost".
ses.resolveProxy(url, callback)
urlURL-
callbackFunctionproxyString
Resolves the proxy information for url. The callback will be called with callback(proxy) when the request is performed.
ses.setDownloadPath(path)
pathString - The download location.
Sets download saving directory. By default, the download directory will be the Downloads under the respective app folder.
ses.enableNetworkEmulation(options)
-
optionsObjectofflineBoolean (optional) - Whether to emulate network outage. Defaults to false.latencyDouble (optional) - RTT in ms. Defaults to 0 which will disable latency throttling.downloadThroughputDouble (optional) - Download rate in Bps. Defaults to 0 which will disable download throttling.uploadThroughputDouble (optional) - Upload rate in Bps. Defaults to 0 which will disable upload throttling.
Emulates network with the given configuration for the session.
// To emulate a GPRS connection with 50kbps throughput and 500 ms latency.
window.webContents.session.enableNetworkEmulation({
latency: 500,
downloadThroughput: 6400,
uploadThroughput: 6400
})
// To emulate a network outage.
window.webContents.session.enableNetworkEmulation({offline: true})ses.disableNetworkEmulation()
Disables any network emulation already active for the session. Resets to the original network configuration.
ses.setCertificateVerifyProc(proc)
-
procFunction-
requestObjecthostnameStringcertificateCertificateverificationResultString - Verification result from chromium.errorCodeInteger - Error code.
-
callbackFunction-
verificationResultInteger - Value can be one of certificate error codes from here. Apart from the certificate error codes, the following special codes can be used.- Indicates success and disables Certificate Transparency verification.-2- Indicates failure.-3- Uses the verification result from chromium.
-
-
Sets the certificate verify proc for session, the proc will be called with proc(request, callback) whenever a server certificate verification is requested. Calling callback(0) accepts the certificate, calling callback(-2) rejects it.
Calling setCertificateVerifyProc(null) will revert back to default certificate verify proc.
const {BrowserWindow} = require('electron')
let win = new BrowserWindow()
win.webContents.session.setCertificateVerifyProc((request, callback) => {
const {hostname} = request
if (hostname === 'github.com') {
callback(0)
} else {
callback(-2)
}
})ses.setPermissionRequestHandler(handler)
-
handlerFunction | nullwebContentsWebContents - WebContents requesting the permission.permissionString - Enum of 'media', 'geolocation', 'notifications', 'midiSysex', 'pointerLock', 'fullscreen', 'openExternal'.-
callbackFunctionpermissionGrantedBoolean - Allow or deny the permission.
-
detailsObject - Some properties are only available on certain permission types.externalURLString - The url of theopenExternalrequest.
Sets the handler which can be used to respond to permission requests for the session. Calling callback(true) will allow the permission and callback(false) will reject it. To clear the handler, call setPermissionRequestHandler(null).
const {session} = require('electron')
session.fromPartition('some-partition').setPermissionRequestHandler((webContents, permission, callback) => {
if (webContents.getURL() === 'some-host' && permission === 'notifications') {
return callback(false) // denied.
}
callback(true)
})ses.clearHostResolverCache([callback])
callbackFunction (optional) - Called when operation is done.
Clears the host resolver cache.
ses.allowNTLMCredentialsForDomains(domains)
domainsString - A comma-separated list of servers for which integrated authentication is enabled.
Dynamically sets whether to always send credentials for HTTP NTLM or Negotiate authentication.
const {session} = require('electron')
// consider any url ending with `example.com`, `foobar.com`, `baz`
// for integrated authentication.
session.defaultSession.allowNTLMCredentialsForDomains('*example.com, *foobar.com, *baz')
// consider all urls for integrated authentication.
session.defaultSession.allowNTLMCredentialsForDomains('*')ses.setUserAgent(userAgent[, acceptLanguages])
userAgentStringacceptLanguagesString (optional)
Overrides the userAgent and acceptLanguages for this session.
The acceptLanguages must a comma separated ordered list of language codes, for example "en-US,fr,de,ko,zh-CN,ja".
This doesn't affect existing WebContents, and each WebContents can use webContents.setUserAgent to override the session-wide user agent.
ses.getUserAgent()
Returns String - The user agent for this session.
ses.getBlobData(identifier, callback)
identifierString - Valid UUID.-
callbackFunctionresultBuffer - Blob data.
ses.createInterruptedDownload(options)
-
optionsObjectpathString - Absolute path of the download.urlChainString[] - Complete URL chain for the download.mimeTypeString (optional)offsetInteger - Start range for the download.lengthInteger - Total length of the download.lastModifiedString - Last-Modified header value.eTagString - ETag header value.startTimeDouble (optional) - Time when download was started in number of seconds since UNIX epoch.
Allows resuming cancelled or interrupted downloads from previous Session. The API will generate a DownloadItem that can be accessed with the will-download event. The DownloadItem will not have any WebContents associated with it and the initial state will be interrupted. The download will start only when the resume API is called on the DownloadItem.
ses.clearAuthCache(options[, callback])
options(RemovePassword | RemoveClientCertificate)callbackFunction (optional) - Called when operation is done.
Clears the session’s HTTP authentication cache.
ses.setPreloads(preloads)
preloadsString[] - An array of absolute path to preload scripts
Adds scripts that will be executed on ALL web contents that are associated with this session just before normal preload scripts run.
ses.getPreloads()
Returns String[] an array of paths to preload scripts that have been registered.
Instance Properties
The following properties are available on instances of Session:
ses.cookies
A Cookies object for this session.
ses.webRequest
A WebRequest object for this session.
ses.protocol
A Protocol object for this session.
const {app, session} = require('electron')
const path = require('path')
app.on('ready', function () {
const protocol = session.fromPartition('some-partition').protocol
protocol.registerFileProtocol('atom', function (request, callback) {
var url = request.url.substr(7)
callback({path: path.normalize(`${__dirname}/${url}`)})
}, function (error) {
if (error) console.error('Failed to register protocol')
})
})Setting Up Symbol Server in Debugger
Debug symbols allow you to have better debugging sessions. They have information about the functions contained in executables and dynamic libraries and provide you with information to get clean call stacks. A Symbol Server allows the debugger to load the correct symbols, binaries and sources automatically without forcing users to download large debugging files. The server functions like Microsoft's symbol server so the documentation there can be useful.
Note that because released Electron builds are heavily optimized, debugging is not always easy. The debugger will not be able to show you the content of all variables and the execution path can seem strange because of inlining, tail calls, and other compiler optimizations. The only workaround is to build an unoptimized local build.
The official symbol server URL for Electron is https://electron-symbols.githubapp.com. You cannot visit this URL directly, you must add it to the symbol path of your debugging tool. In the examples below, a local cache directory is used to avoid repeatedly fetching the PDB from the server. Replace c:\code\symbols with an appropriate cache directory on your machine.
Using the Symbol Server in Windbg
The Windbg symbol path is configured with a string value delimited with asterisk characters. To use only the Electron symbol server, add the following entry to your symbol path (Note: you can replace c:\code\symbols with any writable directory on your computer, if you'd prefer a different location for downloaded symbols):
SRV*c:\code\symbols\*https://electron-symbols.githubapp.comSet this string as _NT_SYMBOL_PATH in the environment, using the Windbg menus, or by typing the .sympath command. If you would like to get symbols from Microsoft's symbol server as well, you should list that first:
SRV*c:\code\symbols\*https://msdl.microsoft.com/download/symbols;SRV*c:\code\symbols\*https://electron-symbols.githubapp.com

Troubleshooting: Symbols will not load
Type the following commands in Windbg to print why symbols are not loading:
> !sym noisy
> .reload /f electron.exeshell
Manage files and URLs using their default applications.
The shell module provides functions related to desktop integration.
An example of opening a URL in the user's default browser:
const {shell} = require('electron')
shell.openExternal('https://github.com')Methods
The shell module has the following methods:
shell.showItemInFolder(fullPath)
fullPathString
Returns Boolean - Whether the item was successfully shown.
Show the given file in a file manager. If possible, select the file.
shell.openItem(fullPath)
fullPathString
Returns Boolean - Whether the item was successfully opened.
Open the given file in the desktop's default manner.
shell.openExternal(url[, options, callback])
urlString - max 2081 characters on windows, or the function returns false.-
optionsObject (optional) macOSactivateBoolean -trueto bring the opened application to the foreground. The default istrue.
-
callbackFunction (optional) macOS - If specified will perform the open asynchronously.errorError
Returns Boolean - Whether an application was available to open the URL. If callback is specified, always returns true.
Open the given external protocol URL in the desktop's default manner. (For example, mailto: URLs in the user's default mail agent).
shell.moveItemToTrash(fullPath)
fullPathString
Returns Boolean - Whether the item was successfully moved to the trash.
Move the given file to trash and returns a boolean status for the operation.
shell.beep()
Play the beep sound.
shell.writeShortcutLink(shortcutPath[, operation], options) Windows
shortcutPathString-
operationString (optional) - Default iscreate, can be one of following:create- Creates a new shortcut, overwriting if necessary.update- Updates specified properties only on an existing shortcut.replace- Overwrites an existing shortcut, fails if the shortcut doesn't exist.
optionsShortcutDetails
Returns Boolean - Whether the shortcut was created successfully.
Creates or updates a shortcut link at shortcutPath.
shell.readShortcutLink(shortcutPath) Windows
shortcutPathString
Returns ShortcutDetails
Resolves the shortcut link at shortcutPath.
An exception will be thrown when any error happens.
ShortcutDetails Object
targetString - The target to launch from this shortcut.cwdString (optional) - The working directory. Default is empty.argsString (optional) - The arguments to be applied totargetwhen launching from this shortcut. Default is empty.descriptionString (optional) - The description of the shortcut. Default is empty.iconString (optional) - The path to the icon, can be a DLL or EXE.iconandiconIndexhave to be set together. Default is empty, which uses the target's icon.iconIndexNumber (optional) - The resource ID of icon wheniconis a DLL or EXE. Default is 0.appUserModelIdString (optional) - The Application User Model ID. Default is empty.
Size Object
widthNumberheightNumber
Snapcraft Guide (Ubuntu Software Center & More)
This guide provides information on how to package your Electron application for any Snapcraft environment, including the Ubuntu Software Center.
Background and Requirements
Together with the broader Linux community, Canonical aims to fix many of the common software installation problems with the snapcraft project. Snaps are containerized software packages that include required dependencies, auto-update, and work on all major Linux distributions without system modification.
There are three ways to create a .snap file:
1) Using electron-forge or electron-builder, both tools that come with snap support out of the box. This is the easiest option. 2) Using electron-installer-snap, which takes electron-packager's output. 3) Using an already created .deb package.
In all cases, you will need to have the snapcraft tool installed. We recommend building on Ubuntu 16.04 (or the current LTS).
snap install snapcraft --classicWhile it is possible to install snapcraft on macOS using Homebrew, it is not able to build snap packages and is focused on managing packages in the store.
Using electron-installer-snap
The module works like electron-winstaller and similar modules in that its scope is limited to building snap packages. You can install it with:
npm install --save-dev electron-installer-snapStep 1: Package Your Electron Application
Package the application using electron-packager (or a similar tool). Make sure to remove node_modules that you don't need in your final application, since any module you don't actually need will increase your application's size.
The output should look roughly like this:
.
└── dist
└── app-linux-x64
├── LICENSE
├── LICENSES.chromium.html
├── content_shell.pak
├── app
├── icudtl.dat
├── libgcrypt.so.11
├── libnode.so
├── locales
├── natives_blob.bin
├── resources
├── snapshot_blob.bin
└── versionStep 2: Running electron-installer-snap
From a terminal that has snapcraft in its PATH, run electron-installer-snap with the only required parameter --src, which is the location of your packaged Electron application created in the first step.
npx electron-installer-snap --src=out/myappname-linux-x64If you have an existing build pipeline, you can use electron-installer-snap programmatically. For more information, see the Snapcraft API docs.
const snap = require('electron-installer-snap')
snap(options)
.then(snapPath => console.log(`Created snap at ${snapPath}!`))Using an Existing Debian Package
Snapcraft is capable of taking an existing .deb file and turning it into a .snap file. The creation of a snap is configured using a snapcraft.yaml file that describes the sources, dependencies, description, and other core building blocks.
Step 1: Create a Debian Package
If you do not already have a .deb package, using electron-installer-snap might be an easier path to create snap packages. However, multiple solutions for creating Debian packages exist, including electron-forge, electron-builder or electron-installer-debian.
Step 2: Create a snapcraft.yaml
For more information on the available configuration options, see the documentation on the snapcraft syntax. Let's look at an example:
name: myApp
version: '2.0.0'
summary: A little description for the app.
description: |
You know what? This app is amazing! It does all the things
for you. Some say it keeps you young, maybe even happy.
grade: stable
confinement: classic
parts:
slack:
plugin: dump
source: my-deb.deb
source-type: deb
after:
- desktop-gtk3
stage-packages:
- libasound2
- libgconf2-4
- libnotify4
- libnspr4
- libnss3
- libpcre3
- libpulse0
- libxss1
- libxtst6
electron-launch:
plugin: dump
source: files/
prepare: |
chmod +x bin/electron-launch
apps:
myApp:
command: bin/electron-launch $SNAP/usr/lib/myApp/myApp
desktop: usr/share/applications/myApp.desktop
# Correct the TMPDIR path for Chromium Framework/Electron to ensure
# libappindicator has readable resources.
environment:
TMPDIR: $XDG_RUNTIME_DIRAs you can see, the snapcraft.yaml instructs the system to launch a file called electron-launch. In this example, it passes information on to the app's binary:
#!/bin/sh
exec "$@" --executed-from="$(pwd)" --pid=$$ > /dev/null 2>&1 &Alternatively, if you're building your snap with strict confinement, you can use the desktop-launch command:
apps:
myApp:
# Correct the TMPDIR path for Chromium Framework/Electron to ensure
# libappindicator has readable resources.
command: env TMPDIR=$XDG_RUNTIME_DIR PATH=/usr/local/bin:${PATH} ${SNAP}/bin/desktop-launch $SNAP/myApp/desktop
desktop: usr/share/applications/desktop.desktopSource Code Directory Structure
The source code of Electron is separated into a few parts, mostly following Chromium on the separation conventions.
You may need to become familiar with Chromium's multi-process architecture to understand the source code better.
Structure of Source Code
Electron
├── atom/ - C++ source code.
| ├── app/ - System entry code.
| ├── browser/ - The frontend including the main window, UI, and all of the
| | main process things. This talks to the renderer to manage web pages.
| | ├── ui/ - Implementation of UI stuff for different platforms.
| | | ├── cocoa/ - Cocoa specific source code.
| | | ├── win/ - Windows GUI specific source code.
| | | └── x/ - X11 specific source code.
| | ├── api/ - The implementation of the main process APIs.
| | ├── net/ - Network related code.
| | ├── mac/ - Mac specific Objective-C source code.
| | └── resources/ - Icons, platform-dependent files, etc.
| ├── renderer/ - Code that runs in renderer process.
| | └── api/ - The implementation of renderer process APIs.
| └── common/ - Code that used by both the main and renderer processes,
| including some utility functions and code to integrate node's message
| loop into Chromium's message loop.
| └── api/ - The implementation of common APIs, and foundations of
| Electron's built-in modules.
├── brightray/ - Thin shim over libcc that makes it easier to use.
├── chromium_src/ - Source code copied from Chromium. See below.
├── default_app/ - The default page to show when Electron is started without
| providing an app.
├── docs/ - Documentations.
├── lib/ - JavaScript source code.
| ├── browser/ - Javascript main process initialization code.
| | └── api/ - Javascript API implementation.
| ├── common/ - JavaScript used by both the main and renderer processes
| | └── api/ - Javascript API implementation.
| └── renderer/ - Javascript renderer process initialization code.
| └── api/ - Javascript API implementation.
├── spec/ - Automatic tests.
├── electron.gyp - Building rules of Electron.
└── common.gypi - Compiler specific settings and building rules for other
components like `node` and `breakpad`./chromium_src
The files in /chromium_src tend to be pieces of Chromium that aren't part of the content layer. For example to implement Pepper API, we need some wiring similar to what official Chrome does. We could have built the relevant sources as a part of libcc but most often we don't require all the features (some tend to be proprietary, analytics stuff) so we took parts of the code. These could have easily been patches in libcc, but at the time when these were written the goal of libcc was to maintain very minimal patches and chromium_src changes tend to be big ones. Also, note that these patches can never be upstreamed unlike other libcc patches we maintain now.
Structure of Other Directories
- script - Scripts used for development purpose like building, packaging, testing, etc.
- tools - Helper scripts used by gyp files, unlike
script, scripts put here should never be invoked by users directly. - vendor - Source code of third party dependencies, we didn't use
third_partyas name because it would confuse it with the same directory in Chromium's source code tree. - node_modules - Third party node modules used for building.
- out - Temporary output directory of
ninja. - dist - Temporary directory created by
script/create-dist.pyscript when creating a distribution. - external_binaries - Downloaded binaries of third-party frameworks which do not support building with
gyp.
Keeping Git Submodules Up to Date
The Electron repository has a few vendored dependencies, found in the /vendor directory. Occasionally you might see a message like this when running git status:
$ git status
modified: vendor/libchromiumcontent (new commits)
modified: vendor/node (new commits)To update these vendored dependencies, run the following command:
git submodule update --init --recursiveIf you find yourself running this command often, you can create an alias for it in your ~/.gitconfig file:
[alias]
su = submodule update --init --recursiveStreamProtocolResponse Object
statusCodeNumber - The HTTP response codeheadersObject - An object containing the response headersdataReadableStream - A Node.js readable stream representing the response body
Electron Documentation Styleguide
These are the guidelines for writing Electron documentation.
Titles
- Each page must have a single
#-level title at the top. - Chapters in the same page must have
##-level titles. - Sub-chapters need to increase the number of
#in the title according to their nesting depth. - All words in the page's title must be capitalized, except for conjunctions like "of" and "and" .
- Only the first word of a chapter title must be capitalized.
Using Quick Start as example:
# Quick Start
...
## Main process
...
## Renderer process
...
## Run your app
...
### Run as a distribution
...
### Manually downloaded Electron binary
...For API references, there are exceptions to this rule.
Markdown rules
- Use
shinstead ofcmdin code blocks (due to the syntax highlighter). - Lines should be wrapped at 80 columns.
- No nesting lists more than 2 levels (due to the markdown renderer).
- All
jsandjavascriptcode blocks are linted with standard-markdown.
Picking words
- Use "will" over "would" when describing outcomes.
- Prefer "in the ___ process" over "on".
API references
The following rules only apply to the documentation of APIs.
Page title
Each page must use the actual object name returned by require('electron') as the title, such as BrowserWindow, autoUpdater, and session.
Under the page title must be a one-line description starting with >.
Using session as example:
# session
> Manage browser sessions, cookies, cache, proxy settings, etc.Module methods and events
For modules that are not classes, their methods and events must be listed under the ## Methods and ## Events chapters.
Using autoUpdater as an example:
# autoUpdater
## Events
### Event: 'error'
## Methods
### `autoUpdater.setFeedURL(url[, requestHeaders])`Classes
- API classes or classes that are part of modules must be listed under a
## Class: TheClassNamechapter. - One page can have multiple classes.
- Constructors must be listed with
###-level titles. - Static Methods must be listed under a
### Static Methodschapter. - Instance Methods must be listed under an
### Instance Methodschapter. -
All methods that have a return value must start their description with "Returns
[TYPE]- Return description"- If the method returns an
Object, its structure can be specified using a colon followed by a newline then an unordered list of properties in the same style as function parameters.
- If the method returns an
- Instance Events must be listed under an
### Instance Eventschapter. -
Instance Properties must be listed under an
### Instance Propertieschapter.- Instance properties must start with "A [Property Type] ..."
Using the Session and Cookies classes as an example:
# session
## Methods
### session.fromPartition(partition)
## Properties
### session.defaultSession
## Class: Session
### Instance Events
#### Event: 'will-download'
### Instance Methods
#### `ses.getCacheSize(callback)`
### Instance Properties
#### `ses.cookies`
## Class: Cookies
### Instance Methods
#### `cookies.get(filter, callback)`Methods
The methods chapter must be in the following form:
### `objectName.methodName(required[, optional]))`
* `required` String - A parameter description.
* `optional` Integer (optional) - Another parameter description.
...The title can be ### or ####-levels depending on whether it is a method of a module or a class.
For modules, the objectName is the module's name. For classes, it must be the name of the instance of the class, and must not be the same as the module's name.
For example, the methods of the Session class under the session module must use ses as the objectName.
The optional arguments are notated by square brackets [] surrounding the optional argument as well as the comma required if this optional argument follows another argument:
required[, optional]Below the method is more detailed information on each of the arguments. The type of argument is notated by either the common types:
If an argument or a method is unique to certain platforms, those platforms are denoted using a space-delimited italicized list following the datatype. Values can be macOS, Windows or Linux.
* `animate` Boolean (optional) _macOS_ _Windows_ - Animate the thing.Array type arguments must specify what elements the array may include in the description below.
The description for Function type arguments should make it clear how it may be called and list the types of the parameters that will be passed to it.
Events
The events chapter must be in following form:
### Event: 'wake-up'
Returns:
* `time` String
...The title can be ### or ####-levels depending on whether it is an event of a module or a class.
The arguments of an event follow the same rules as methods.
Properties
The properties chapter must be in following form:
### session.defaultSession
...The title can be ### or ####-levels depending on whether it is a property of a module or a class.
Finding Support
If you have a security concern, please see the security document.
If you're looking for programming help, for answers to questions, or to join in discussion with other developers who use Electron, you can interact with the community in these locations:
electroncategory on the Atom forums#atom-shellchannel on FreenodeElectronchannel on Atom's Slackelectron-ru(Russian)electron-br(Brazilian Portuguese)electron-kr(Korean)electron-jp(Japanese)electron-tr(Turkish)electron-id(Indonesia)electron-pl(Poland)
If you'd like to contribute to Electron, see the contributing document.
If you've found a bug in a supported version of Electron, please report it with the issue tracker.
awesome-electron is a community-maintained list of useful example apps, tools and resources.
Supported Versions
The latest three release branches are supported by the Electron team. For example, if the latest release is 2.0.x, then the 2-0-x series is supported, as are the two previous release series 1-7-x and 1-8-x.
When a release branch reaches the end of its support cycle, the series will be deprecated in NPM and a final end-of-support release will be made. This release will add a warning to inform that an unsupported version of Electron is in use.
These steps are to help app developers learn when a branch they're using becomes unsupported, but without being excessively intrusive to end users.
If an application has exceptional circumstances and needs to stay on an unsupported series of Electron, developers can silence the end-of-support warning by omitting the final release from the app's package.json devDependencies. For example, since the 1-6-x series ended with an end-of-support 1.6.18 release, developers could choose to stay in the 1-6-x series without warnings with devDependency of "electron": 1.6.0 - 1.6.17.
Supported Platforms
Following platforms are supported by Electron:
macOS
Only 64bit binaries are provided for macOS, and the minimum macOS version supported is macOS 10.9.
Windows
Windows 7 and later are supported, older operating systems are not supported (and do not work).
Both ia32 (x86) and x64 (amd64) binaries are provided for Windows. Running Electron apps on Windows for ARM devices is possible by using the ia32 binary.
Linux
The prebuilt ia32 (i686) and x64 (amd64) binaries of Electron are built on Ubuntu 12.04, the armv7l binary is built against ARM v7 with hard-float ABI and NEON for Debian Wheezy.
Until the release of Electron 2.0, Electron will also continue to release the armv7l binary with a simple arm suffix. Both binaries are identical.
Whether the prebuilt binary can run on a distribution depends on whether the distribution includes the libraries that Electron is linked to on the building platform, so only Ubuntu 12.04 is guaranteed to work, but following platforms are also verified to be able to run the prebuilt binaries of Electron:
- Ubuntu 12.04 and newer
- Fedora 21
- Debian 8
Moved to <support.md>
Synopsis
How to use Node.js and Electron APIs.
All of Node.js's built-in modules are available in Electron and third-party node modules also fully supported as well (including the native modules).
Electron also provides some extra built-in modules for developing native desktop applications. Some modules are only available in the main process, some are only available in the renderer process (web page), and some can be used in both processes.
The basic rule is: if a module is GUI or low-level system related, then it should be only available in the main process. You need to be familiar with the concept of main process vs. renderer process scripts to be able to use those modules.
The main process script is just like a normal Node.js script:
const {app, BrowserWindow} = require('electron')
let win = null
app.on('ready', () => {
win = new BrowserWindow({width: 800, height: 600})
win.loadURL('https://github.com')
})The renderer process is no different than a normal web page, except for the extra ability to use node modules:
<!DOCTYPE html>
<html>
<body>
<script>
const {app} = require('electron').remote
console.log(app.getVersion())
</script>
</body>
</html>To run your app, read Run your app.
Destructuring assignment
As of 0.37, you can use destructuring assignment to make it easier to use built-in modules.
const {app, BrowserWindow} = require('electron')
let win
app.on('ready', () => {
win = new BrowserWindow()
win.loadURL('https://github.com')
})If you need the entire electron module, you can require it and then using destructuring to access the individual modules from electron.
const electron = require('electron')
const {app, BrowserWindow} = electron
let win
app.on('ready', () => {
win = new BrowserWindow()
win.loadURL('https://github.com')
})This is equivalent to the following code:
const electron = require('electron')
const app = electron.app
const BrowserWindow = electron.BrowserWindow
let win
app.on('ready', () => {
win = new BrowserWindow()
win.loadURL('https://github.com')
})systemPreferences
Get system preferences.
Process: Main
const {systemPreferences} = require('electron')
console.log(systemPreferences.isDarkMode())Events
The systemPreferences object emits the following events:
Event: 'accent-color-changed' Windows
Returns:
eventEventnewColorString - The new RGBA color the user assigned to be their system accent color.
Event: 'inverted-color-scheme-changed' Windows
Returns:
eventEventinvertedColorSchemeBoolean -trueif an inverted color scheme, such as a high contrast theme, is being used,falseotherwise.
systemPreferences.isDarkMode() macOS
Returns Boolean - Whether the system is in Dark Mode.
systemPreferences.isSwipeTrackingFromScrollEventsEnabled() macOS
Returns Boolean - Whether the Swipe between pages setting is on.
systemPreferences.postNotification(event, userInfo) macOS
eventStringuserInfoObject
Posts event as native notifications of macOS. The userInfo is an Object that contains the user information dictionary sent along with the notification.
systemPreferences.postLocalNotification(event, userInfo) macOS
eventStringuserInfoObject
Posts event as native notifications of macOS. The userInfo is an Object that contains the user information dictionary sent along with the notification.
systemPreferences.subscribeNotification(event, callback) macOS
eventString-
callbackFunctioneventStringuserInfoObject
Subscribes to native notifications of macOS, callback will be called with callback(event, userInfo) when the corresponding event happens. The userInfo is an Object that contains the user information dictionary sent along with the notification.
The id of the subscriber is returned, which can be used to unsubscribe the event.
Under the hood this API subscribes to NSDistributedNotificationCenter, example values of event are:
AppleInterfaceThemeChangedNotificationAppleAquaColorVariantChangedAppleColorPreferencesChangedNotificationAppleShowScrollBarsSettingChanged
systemPreferences.subscribeLocalNotification(event, callback) macOS
eventString-
callbackFunctioneventStringuserInfoObject
Same as subscribeNotification, but uses NSNotificationCenter for local defaults. This is necessary for events such as NSUserDefaultsDidChangeNotification.
systemPreferences.unsubscribeLocalNotification(id) macOS
idInteger
Same as unsubscribeNotification, but removes the subscriber from NSNotificationCenter.
systemPreferences.registerDefaults(defaults) macOS
defaultsObject - a dictionary of (key: value) user defaults
Add the specified defaults to your application's NSUserDefaults.
systemPreferences.getUserDefault(key, type) macOS
keyStringtypeString - Can bestring,boolean,integer,float,double,url,arrayordictionary.
Returns any - The value of key in NSUserDefaults.
Some popular key and types are:
AppleInterfaceStyle:stringAppleAquaColorVariant:integerAppleHighlightColor:stringAppleShowScrollBars:stringNSNavRecentPlaces:arrayNSPreferredWebServices:dictionaryNSUserDictionaryReplacementItems:array
systemPreferences.setUserDefault(key, type, value) macOS
keyStringtypeString - SeegetUserDefault.valueString
Set the value of key in NSUserDefaults.
Note that type should match actual type of value. An exception is thrown if they don't.
Some popular key and types are:
ApplePressAndHoldEnabled:boolean
systemPreferences.removeUserDefault(key) macOS
keyString
Removes the key in NSUserDefaults. This can be used to restore the default or global value of a key previously set with setUserDefault.
systemPreferences.isAeroGlassEnabled() Windows
Returns Boolean - true if DWM composition (Aero Glass) is enabled, and false otherwise.
An example of using it to determine if you should create a transparent window or not (transparent windows won't work correctly when DWM composition is disabled):
const {BrowserWindow, systemPreferences} = require('electron')
let browserOptions = {width: 1000, height: 800}
// Make the window transparent only if the platform supports it.
if (process.platform !== 'win32' || systemPreferences.isAeroGlassEnabled()) {
browserOptions.transparent = true
browserOptions.frame = false
}
// Create the window.
let win = new BrowserWindow(browserOptions)
// Navigate.
if (browserOptions.transparent) {
win.loadURL(`file://${__dirname}/index.html`)
} else {
// No transparency, so we load a fallback that uses basic styles.
win.loadURL(`file://${__dirname}/fallback.html`)
}systemPreferences.getAccentColor() Windows
Returns String - The users current system wide accent color preference in RGBA hexadecimal form.
const color = systemPreferences.getAccentColor() // `"aabbccdd"`
const red = color.substr(0, 2) // "aa"
const green = color.substr(2, 2) // "bb"
const blue = color.substr(4, 2) // "cc"
const alpha = color.substr(6, 2) // "dd"systemPreferences.getColor(color) Windows
-
colorString - One of the following values:3d-dark-shadow- Dark shadow for three-dimensional display elements.3d-face- Face color for three-dimensional display elements and for dialog box backgrounds.3d-highlight- Highlight color for three-dimensional display elements.3d-light- Light color for three-dimensional display elements.3d-shadow- Shadow color for three-dimensional display elements.active-border- Active window border.active-caption- Active window title bar. Specifies the left side color in the color gradient of an active window's title bar if the gradient effect is enabled.active-caption-gradient- Right side color in the color gradient of an active window's title bar.app-workspace- Background color of multiple document interface (MDI) applications.button-text- Text on push buttons.caption-text- Text in caption, size box, and scroll bar arrow box.desktop- Desktop background color.disabled-text- Grayed (disabled) text.highlight- Item(s) selected in a control.highlight-text- Text of item(s) selected in a control.hotlight- Color for a hyperlink or hot-tracked item.inactive-border- Inactive window border.inactive-caption- Inactive window caption. Specifies the left side color in the color gradient of an inactive window's title bar if the gradient effect is enabled.inactive-caption-gradient- Right side color in the color gradient of an inactive window's title bar.inactive-caption-text- Color of text in an inactive caption.info-background- Background color for tooltip controls.info-text- Text color for tooltip controls.menu- Menu background.menu-highlight- The color used to highlight menu items when the menu appears as a flat menu.menubar- The background color for the menu bar when menus appear as flat menus.menu-text- Text in menus.scrollbar- Scroll bar gray area.window- Window background.window-frame- Window frame.window-text- Text in windows.
Returns String - The system color setting in RGB hexadecimal form (#ABCDEF). See the Windows docs for more details.
systemPreferences.isInvertedColorScheme() Windows
Returns Boolean - true if an inverted color scheme, such as a high contrast theme, is active, false otherwise.
Task Object
programString - Path of the program to execute, usually you should specifyprocess.execPathwhich opens the current program.argumentsString - The command line arguments whenprogramis executed.titleString - The string to be displayed in a JumpList.descriptionString - Description of this task.iconPathString - The absolute path to an icon to be displayed in a JumpList, which can be an arbitrary resource file that contains an icon. You can usually specifyprocess.execPathto show the icon of the program.iconIndexNumber - The icon index in the icon file. If an icon file consists of two or more icons, set this value to identify the icon. If an icon file consists of one icon, this value is 0.
Testing
We aim to keep the code coverage of Electron high. We ask that all pull request not only pass all existing tests, but ideally also add new tests to cover changed code and new scenarios. Ensuring that we capture as many code paths and use cases of Electron as possible ensures that we all ship apps with fewer bugs.
This repository comes with linting rules for both JavaScript and C++ – as well as unit and integration tests. To learn more about Electron's coding style, please see the coding-style document.
Linting
To ensure that your JavaScript is in compliance with the Electron coding style, run npm run lint-js, which will run standard against both Electron itself as well as the unit tests. If you are using an editor with a plugin/addon system, you might want to use one of the many StandardJS addons to be informed of coding style violations before you ever commit them.
To run standard with parameters, run npm run lint-js -- followed by arguments you want passed to standard.
To ensure that your C++ is in compliance with the Electron coding style, run npm run lint-cpp, which runs a cpplint script. We recommend that you use clang-format and prepared a short tutorial.
There is not a lot of Python in this repository, but it too is governed by coding style rules. npm run lint-py will check all Python, using pylint to do so.
Unit Tests
To run all unit tests, run npm run test. The unit tests are an Electron app (surprise!) that can be found in the spec folder. Note that it has its own package.json and that its dependencies are therefore not defined in the top-level package.json.
To run only specific tests matching a pattern, run npm run test -- -g=PATTERN, replacing the PATTERN with a regex that matches the tests you would like to run. As an example: If you want to run only IPC tests, you would run npm run test -- -g ipc.
Testing on Headless CI Systems (Travis CI, Jenkins)
Being based on Chromium, Electron requires a display driver to function. If Chromium can't find a display driver, Electron will fail to launch - and therefore not executing any of your tests, regardless of how you are running them. Testing Electron-based apps on Travis, Circle, Jenkins or similar Systems requires therefore a little bit of configuration. In essence, we need to use a virtual display driver.
Configuring the Virtual Display Server
First, install Xvfb. It's a virtual framebuffer, implementing the X11 display server protocol - it performs all graphical operations in memory without showing any screen output, which is exactly what we need.
Then, create a virtual xvfb screen and export an environment variable called DISPLAY that points to it. Chromium in Electron will automatically look for $DISPLAY, so no further configuration of your app is required. This step can be automated with Paul Betts's xvfb-maybe: Prepend your test commands with xvfb-maybe and the little tool will automatically configure xvfb, if required by the current system. On Windows or macOS, it will do nothing.
## On Windows or macOS, this invokes electron-mocha
## On Linux, if we are in a headless environment, this will be equivalent
## to xvfb-run electron-mocha ./test/*.js
xvfb-maybe electron-mocha ./test/*.jsTravis CI
On Travis, your .travis.yml should look roughly like this:
addons:
apt:
packages:
- xvfb
install:
- export DISPLAY=':99.0'
- Xvfb :99 -screen 0 1024x768x24 > /dev/null 2>&1 &Jenkins
For Jenkins, a Xvfb plugin is available.
Circle CI
Circle CI is awesome and has xvfb and $DISPLAY already setup, so no further configuration is required.
AppVeyor
AppVeyor runs on Windows, supporting Selenium, Chromium, Electron and similar tools out of the box - no configuration is required.
ThumbarButton Object
iconNativeImage - The icon showing in thumbnail toolbar.clickFunctiontooltipString (optional) - The text of the button's tooltip.flagsString - Control specific states and behaviors of the button. By default, it is['enabled'].
The flags is an array that can include following Strings:
enabled- The button is active and available to the user.disabled- The button is disabled. It is present, but has a visual state indicating it will not respond to user action.dismissonclick- When the button is clicked, the thumbnail window closes immediately.nobackground- Do not draw a button border, use only the image.hidden- The button is not shown to the user.noninteractive- The button is enabled but not interactive; no pressed button state is drawn. This value is intended for instances where the button is used in a notification.
new TouchBar(options) Experimental
-
optionsObjectitems(TouchBarButton | TouchBarColorPicker | TouchBarGroup | TouchBarLabel | TouchBarPopover | TouchBarScrubber | TouchBarSegmentedControl | TouchBarSlider | TouchBarSpacer)[]escapeItem(TouchBarButton | TouchBarColorPicker | TouchBarGroup | TouchBarLabel | TouchBarPopover | TouchBarScrubber | TouchBarSegmentedControl | TouchBarSlider | TouchBarSpacer | null) (optional)
Creates a new touch bar with the specified items. Use BrowserWindow.setTouchBar to add the TouchBar to a window.
Note: The TouchBar API is currently experimental and may change or be removed in future Electron releases.
Tip: If you don't have a MacBook with Touch Bar, you can use Touch Bar Simulator to test Touch Bar usage in your app.
Instance Properties
The following properties are available on instances of TouchBar:
touchBar.escapeItem
A TouchBarItem that will replace the "esc" button on the touch bar when set. Setting to null restores the default "esc" button. Changing this value immediately updates the escape item in the touch bar.
Examples
Below is an example of a simple slot machine touch bar game with a button and some labels.
const {app, BrowserWindow, TouchBar} = require('electron')
const {TouchBarLabel, TouchBarButton, TouchBarSpacer} = TouchBar
let spinning = false
// Reel labels
const reel1 = new TouchBarLabel()
const reel2 = new TouchBarLabel()
const reel3 = new TouchBarLabel()
// Spin result label
const result = new TouchBarLabel()
// Spin button
const spin = new TouchBarButton({
label: 'Running the above example
To run the example above, you'll need to (assuming you've got a terminal open in the directory you want to run the example):
- Save the above file to your computer as
touchbar.js - Install Electron via
npm install electron - Run the example inside Electron:
./node_modules/.bin/electron touchbar.js
You should then see a new Electron window and the app running in your touch bar (or touch bar emulator).
new TouchBarButton(options) Experimental
-
optionsObjectlabelString (optional) - Button text.backgroundColorString (optional) - Button background color in hex format, i.e#ABCDEF.iconNativeImage (optional) - Button icon.iconPositionString (optional) - Can beleft,rightoroverlay.clickFunction (optional) - Function to call when the button is clicked.
Instance Properties
The following properties are available on instances of TouchBarButton:
touchBarButton.label
A String representing the button's current text. Changing this value immediately updates the button in the touch bar.
touchBarButton.backgroundColor
A String hex code representing the button's current background color. Changing this value immediately updates the button in the touch bar.
touchBarButton.icon
A NativeImage representing the button's current icon. Changing this value immediately updates the button in the touch bar.
Class: TouchBarColorPicker
Create a color picker in the touch bar for native macOS applications
Process: Main
new TouchBarColorPicker(options) Experimental
-
optionsObjectavailableColorsString - Array of hex color strings to appear as possible colors to select.selectedColorString (optional) - The selected hex color in the picker, i.e#ABCDEF.-
changeFunction (optional) - Function to call when a color is selected.colorString - The color that the user selected from the picker.
Instance Properties
The following properties are available on instances of TouchBarColorPicker:
touchBarColorPicker.availableColors
A String[] array representing the color picker's available colors to select. Changing this value immediately updates the color picker in the touch bar.
touchBarColorPicker.selectedColor
A String hex code representing the color picker's currently selected color. Changing this value immediately updates the color picker in the touch bar.
new TouchBarGroup(options) Experimental
-
optionsObjectitemsTouchBar - Items to display as a group.
new TouchBarLabel(options) Experimental
-
optionsObjectlabelString (optional) - Text to display.textColorString (optional) - Hex color of text, i.e#ABCDEF.
Instance Properties
The following properties are available on instances of TouchBarLabel:
touchBarLabel.label
A String representing the label's current text. Changing this value immediately updates the label in the touch bar.
touchBarLabel.textColor
A String hex code representing the label's current text color. Changing this value immediately updates the label in the touch bar.
Class: TouchBarPopover
Create a popover in the touch bar for native macOS applications
Process: Main
new TouchBarPopover(options) Experimental
-
optionsObjectlabelString (optional) - Popover button text.iconNativeImage (optional) - Popover button icon.itemsTouchBar (optional) - Items to display in the popover.showCloseButtonBoolean (optional) -trueto display a close button on the left of the popover,falseto not show it. Default istrue.
Instance Properties
The following properties are available on instances of TouchBarPopover:
touchBarPopover.label
A String representing the popover's current button text. Changing this value immediately updates the popover in the touch bar.
touchBarPopover.icon
A NativeImage representing the popover's current button icon. Changing this value immediately updates the popover in the touch bar.
new TouchBarScrubber(options) Experimental
-
optionsObjectitemsScrubberItem[] - An array of items to place in this scrubber.-
selectFunction - Called when the user taps an item that was not the last tapped item.selectedIndexInteger - The index of the item the user selected.
-
highlightFunction - Called when the user taps any item.highlightedIndexInteger - The index of the item the user touched.
selectedStyleString - Selected item style. Defaults tonull.overlayStyleString - Selected overlay item style. Defaults tonull.showArrowButtonsBoolean - Defaults tofalse.modeString - Defaults tofree.continuousBoolean - Defaults totrue.
Instance Properties
The following properties are available on instances of TouchBarScrubber:
touchBarScrubber.items
A ScrubberItem[] array representing the items in this scrubber. Updating this value immediately updates the control in the touch bar. Updating deep properties inside this array does not update the touch bar.
touchBarScrubber.selectedStyle
A String representing the style that selected items in the scrubber should have. Updating this value immediately updates the control in the touch bar. Possible values:
background- Maps to[NSScrubberSelectionStyle roundedBackgroundStyle].outline- Maps to[NSScrubberSelectionStyle outlineOverlayStyle].null- Actually null, not a string, removes all styles.
touchBarScrubber.overlayStyle
A String representing the style that selected items in the scrubber should have. This style is overlayed on top of the scrubber item instead of being placed behind it. Updating this value immediately updates the control in the touch bar. Possible values:
background- Maps to[NSScrubberSelectionStyle roundedBackgroundStyle].outline- Maps to[NSScrubberSelectionStyle outlineOverlayStyle].null- Actually null, not a string, removes all styles.
touchBarScrubber.showArrowButtons
A Boolean representing whether to show the left / right selection arrows in this scrubber. Updating this value immediately updates the control in the touch bar.
touchBarScrubber.mode
A String representing the mode of this scrubber. Updating this value immediately updates the control in the touch bar. Possible values:
fixed- Maps toNSScrubberModeFixed.free- Maps toNSScrubberModeFree.
touchBarScrubber.continuous
A Boolean representing whether this scrubber is continuous or not. Updating this value immediately updates the control in the touch bar.
Class: TouchBarSegmentedControl
Create a segmented control (a button group) where one button has a selected state
Process: Main
new TouchBarSegmentedControl(options) Experimental
-
optionsObject-
segmentStyleString (optional) - Style of the segments:automatic- Default. The appearance of the segmented control is automatically determined based on the type of window in which the control is displayed and the position within the window.rounded- The control is displayed using the rounded style.textured-rounded- The control is displayed using the textured rounded style.round-rect- The control is displayed using the round rect style.textured-square- The control is displayed using the textured square style.capsule- The control is displayed using the capsule style.small-square- The control is displayed using the small square style.separated- The segments in the control are displayed very close to each other but not touching.
-
modeString (optional) - The selection mode of the control:single- Default. One item selected at a time, selecting one deselects the previously selected item.multiple- Multiple items can be selected at a time.buttons- Make the segments act as buttons, each segment can be pressed and released but never marked as active.
segmentsSegmentedControlSegment[] - An array of segments to place in this control.selectedIndexInteger (optional) - The index of the currently selected segment, will update automatically with user interaction. When the mode is multiple it will be the last selected item.-
changeFunction - Called when the user selects a new segment.selectedIndexInteger - The index of the segment the user selected.isSelectedBoolean - Whether as a result of user selection the segment is selected or not.
-
Instance Properties
The following properties are available on instances of TouchBarSegmentedControl:
touchBarSegmentedControl.segmentStyle
A String representing the controls current segment style. Updating this value immediately updates the control in the touch bar.
touchBarSegmentedControl.segments
A SegmentedControlSegment[] array representing the segments in this control. Updating this value immediately updates the control in the touch bar. Updating deep properties inside this array does not update the touch bar.
touchBarSegmentedControl.selectedIndex
An Integer representing the currently selected segment. Changing this value immediately updates the control in the touch bar. User interaction with the touch bar will update this value automatically.
new TouchBarSlider(options) Experimental
-
optionsObjectlabelString (optional) - Label text.valueInteger (optional) - Selected value.minValueInteger (optional) - Minimum value.maxValueInteger (optional) - Maximum value.-
changeFunction (optional) - Function to call when the slider is changed.newValueNumber - The value that the user selected on the Slider.
Instance Properties
The following properties are available on instances of TouchBarSlider:
touchBarSlider.label
A String representing the slider's current text. Changing this value immediately updates the slider in the touch bar.
touchBarSlider.value
A Number representing the slider's current value. Changing this value immediately updates the slider in the touch bar.
touchBarSlider.minValue
A Number representing the slider's current minimum value. Changing this value immediately updates the slider in the touch bar.
touchBarSlider.maxValue
A Number representing the slider's current maximum value. Changing this value immediately updates the slider in the touch bar.
Class: TouchBarSpacer
Create a spacer between two items in the touch bar for native macOS applications
Process: Main
new TouchBarSpacer(options) Experimental
-
optionsObject-
sizeString (optional) - Size of spacer, possible values are:small- Small space between items.large- Large space between items.flexible- Take up all available space.
-
Transaction Object
transactionIdentifierStringtransactionDateStringoriginalTransactionIdentifierStringtransactionStateString - The transaction sate ("purchasing","purchased","failed","restored", or"deferred")errorCodeIntegererrorMessageString-
paymentObjectproductIdentifierStringquantityInteger
Class: Tray
Add icons and context menus to the system's notification area.
Process: Main
Tray is an EventEmitter.
const {app, Menu, Tray} = require('electron')
let tray = null
app.on('ready', () => {
tray = new Tray('/path/to/my/icon')
const contextMenu = Menu.buildFromTemplate([
{label: 'Item1', type: 'radio'},
{label: 'Item2', type: 'radio'},
{label: 'Item3', type: 'radio', checked: true},
{label: 'Item4', type: 'radio'}
])
tray.setToolTip('This is my application.')
tray.setContextMenu(contextMenu)
})Platform limitations:
- On Linux the app indicator will be used if it is supported, otherwise
GtkStatusIconwill be used instead. - On Linux distributions that only have app indicator support, you have to install
libappindicator1to make the tray icon work. - App indicator will only be shown when it has a context menu.
- When app indicator is used on Linux, the
clickevent is ignored. - On Linux in order for changes made to individual
MenuItems to take effect, you have to callsetContextMenuagain. For example:
const {app, Menu, Tray} = require('electron')
let appIcon = null
app.on('ready', () => {
appIcon = new Tray('/path/to/my/icon')
const contextMenu = Menu.buildFromTemplate([
{label: 'Item1', type: 'radio'},
{label: 'Item2', type: 'radio'}
])
// Make a change to the context menu
contextMenu.items[1].checked = false
// Call this again for Linux because we modified the context menu
appIcon.setContextMenu(contextMenu)
})- On Windows it is recommended to use
ICOicons to get best visual effects.
If you want to keep exact same behaviors on all platforms, you should not rely on the click event and always attach a context menu to the tray icon.
Instance Events
The Tray module emits the following events:
Event: 'click'
-
eventEventaltKeyBooleanshiftKeyBooleanctrlKeyBooleanmetaKeyBoolean
boundsRectangle - The bounds of tray icon.positionPoint - The position of the event.
Emitted when the tray icon is clicked.
Event: 'right-click' macOS Windows
-
eventEventaltKeyBooleanshiftKeyBooleanctrlKeyBooleanmetaKeyBoolean
boundsRectangle - The bounds of tray icon.
Emitted when the tray icon is right clicked.
Event: 'double-click' macOS Windows
-
eventEventaltKeyBooleanshiftKeyBooleanctrlKeyBooleanmetaKeyBoolean
boundsRectangle - The bounds of tray icon.
Emitted when the tray icon is double clicked.
Event: 'balloon-show' Windows
Emitted when the tray balloon shows.
Event: 'balloon-click' Windows
Emitted when the tray balloon is clicked.
Event: 'balloon-closed' Windows
Emitted when the tray balloon is closed because of timeout or user manually closes it.
Event: 'drop' macOS
Emitted when any dragged items are dropped on the tray icon.
Event: 'drop-files' macOS
eventEventfilesString[] - The paths of the dropped files.
Emitted when dragged files are dropped in the tray icon.
Event: 'drop-text' macOS
eventEventtextString - the dropped text string.
Emitted when dragged text is dropped in the tray icon.
Event: 'drag-enter' macOS
Emitted when a drag operation enters the tray icon.
Event: 'drag-leave' macOS
Emitted when a drag operation exits the tray icon.
Event: 'drag-end' macOS
Emitted when a drag operation ends on the tray or ends at another location.
Event: 'mouse-enter' macOS
-
eventEventaltKeyBooleanshiftKeyBooleanctrlKeyBooleanmetaKeyBoolean
positionPoint - The position of the event.
Emitted when the mouse enters the tray icon.
Event: 'mouse-leave' macOS
-
eventEventaltKeyBooleanshiftKeyBooleanctrlKeyBooleanmetaKeyBoolean
positionPoint - The position of the event.
Emitted when the mouse exits the tray icon.
Event: 'mouse-move' macOS
-
eventEventaltKeyBooleanshiftKeyBooleanctrlKeyBooleanmetaKeyBoolean
positionPoint - The position of the event.
Emitted when the mouse moves in the tray icon.
Instance Methods
The Tray class has the following methods:
tray.destroy()
Destroys the tray icon immediately.
tray.setPressedImage(image) macOS
imageNativeImage
Sets the image associated with this tray icon when pressed on macOS.
tray.setTitle(title) macOS
titleString
Sets the title displayed aside of the tray icon in the status bar (Support ANSI colors).
tray.setHighlightMode(mode) macOS
-
modeString - Highlight mode with one of the following values:selection- Highlight the tray icon when it is clicked and also when its context menu is open. This is the default.always- Always highlight the tray icon.never- Never highlight the tray icon.
Sets when the tray's icon background becomes highlighted (in blue).
Note: You can use highlightMode with a BrowserWindow by toggling between 'never' and 'always' modes when the window visibility changes.
const {BrowserWindow, Tray} = require('electron')
const win = new BrowserWindow({width: 800, height: 600})
const tray = new Tray('/path/to/my/icon')
tray.on('click', () => {
win.isVisible() ? win.hide() : win.show()
})
win.on('show', () => {
tray.setHighlightMode('always')
})
win.on('hide', () => {
tray.setHighlightMode('never')
})tray.displayBalloon(options) Windows
-
optionsObjecticon(NativeImage | String) (optional) -titleStringcontentString
Displays a tray balloon.
tray.popUpContextMenu([menu, position]) macOS Windows
menuMenu (optional)positionPoint (optional) - The pop up position.
Pops up the context menu of the tray icon. When menu is passed, the menu will be shown instead of the tray icon's context menu.
The position is only available on Windows, and it is (0, 0) by default.
tray.isDestroyed()
Returns Boolean - Whether the tray icon is destroyed.
Updating Applications
There are several ways to update an Electron application. The easiest and officially supported one is taking advantage of the built-in Squirrel framework and Electron's autoUpdater module.
Using update.electronjs.org
GitHub's Electron team maintains update.electronjs.org, a free and open-source webservice that Electron apps can use to self-update. The service is designed for Electron apps that meet the following criteria:
- App runs on macOS or Windows
- App has a public GitHub repository
- Builds are published to GitHub Releases
- Builds are code-signed
The easiest way to use this service is by installing update-electron-app, a Node.js module preconfigured for use with update.electronjs.org.
Install the module:
npm install update-electron-appInvoke the updater from your app's main process file:
require('update-electron-app')()By default, this module will check for updates at app startup, then every ten minutes. When an update is found, it will automatically be downloaded in the background. When the download completes, a dialog is displayed allowing the user to restart the app.
If you need to customize your configuration, you can pass options to update-electron-app or use the update service directly.
Using electron-builder
If your app is packaged with electron-builder you can use the electron-updater module, which does not require a server and allows for updates from S3, GitHub or any other static file host. This sidesteps Electron's built-in update mechanism, meaning that the rest of this documentation will not apply to electron-builder's updater.
Deploying an Update Server
If you're developing a private Electron application, or if you're not publishing releases to GitHub Releases, it may be necessary to run your own update server.
Depending on your needs, you can choose from one of these:
- Hazel – Update server for private or open-source apps which can be deployed for free on Now. It pulls from GitHub Releases and leverages the power of GitHub's CDN.
- Nuts – Also uses GitHub Releases, but caches app updates on disk and supports private repositories.
- electron-release-server – Provides a dashboard for handling releases and does not require releases to originate on GitHub.
- Nucleus – A complete update server for Electron apps maintained by Atlassian. Supports multiple applications and channels; uses a static file store to minify server cost.
Implementing Updates in Your App
Once you've deployed your update server, continue with importing the required modules in your code. The following code might vary for different server software, but it works like described when using Hazel.
Important: Please ensure that the code below will only be executed in your packaged app, and not in development. You can use electron-is-dev to check for the environment.
const { app, autoUpdater, dialog } = require('electron')Next, construct the URL of the update server and tell autoUpdater about it:
const server = 'https://your-deployment-url.com'
const feed = `${server}/update/${process.platform}/${app.getVersion()}`
autoUpdater.setFeedURL(feed)As the final step, check for updates. The example below will check every minute:
setInterval(() => {
autoUpdater.checkForUpdates()
}, 60000)Once your application is packaged, it will receive an update for each new GitHub Release that you publish.
Applying Updates
Now that you've configured the basic update mechanism for your application, you need to ensure that the user will get notified when there's an update. This can be achieved using the autoUpdater API events:
autoUpdater.on('update-downloaded', (event, releaseNotes, releaseName) => {
const dialogOpts = {
type: 'info',
buttons: ['Restart', 'Later'],
title: 'Application Update',
message: process.platform === 'win32' ? releaseNotes : releaseName,
detail: 'A new version has been downloaded. Restart the application to apply the updates.'
}
dialog.showMessageBox(dialogOpts, (response) => {
if (response === 0) autoUpdater.quitAndInstall()
})
})Also make sure that errors are being handled. Here's an example for logging them to stderr:
autoUpdater.on('error', message => {
console.error('There was a problem updating the application')
console.error(message)
})Upgrading Chromium
This is an overview of the steps needed to upgrade Chromium in Electron.
- Upgrade libcc to a new Chromium version
- Make Electron code compatible with the new libcc
- Update Electron dependencies (crashpad, NodeJS, etc.) if needed
- Make internal builds of libcc and electron
- Update Electron docs if necessary
Upgrade libcc to a new Chromium version
-
Get the code and initialize the project: sh $ git clone git@github.com:electron/libchromiumcontent.git $ cd libchromiumcontent $ ./script/bootstrap -v
-
Update the Chromium snapshot
-
Choose a version number from OmahaProxy and update the
VERSIONfile with it- This can be done manually by visiting OmahaProxy in a browser, or automatically:
- One-liner for the latest stable mac version:
curl -so- https://omahaproxy.appspot.com/mac > VERSION - One-liner for the latest win64 beta version:
curl -so- https://omahaproxy.appspot.com/all | grep "win64,beta" | awk -F, 'NR==1{print $3}' > VERSION
-
run
$ ./script/update- Brew some tea -- this may run for 30m or more.
- It will probably fail applying patches.
- Fix
*.patchfiles in thepatches/andpatches-mas/folders. - (Optional)
script/updateapplies patches, but if multiple tries are needed you can manually run the same script thatupdatecalls:$ ./script/apply-patches
- There is a second script,
script/patch.pythat may be useful. Read./script/patch.py -hfor more information.
- Run the build when all patches can be applied without errors
$ ./script/build- If some patches are no longer compatible with the Chromium code, fix compilation errors.
- When the build succeeds, create a
distfor Electron
-
$ ./script/create-dist --no_zip- It will create a
dist/mainfolder in the libcc repo's root. You will need this to build Electron.
- It will create a
- (Optional) Update script contents if there are errors resulting from files that were removed or renamed. (
--no_zipprevents script from createdistarchives. You don't need them.)
Update Electron's code
-
Get the code: sh $ git clone git@github.com:electron/electron.git $ cd electron
-
If you have libcc built on your machine in its own repo, tell Electron to use it: sh $ ./script/bootstrap.py -v \ --libcc_source_path <libcc_folder>/src \ --libcc_shared_library_path <libcc_folder>/shared_library \ --libcc_static_library_path <libcc_folder>/static_library
-
If you haven't yet built libcc but it's already supposed to be upgraded to a new Chromium, bootstrap Electron as usual
$ ./script/bootstrap.py -v
- Ensure that libcc submodule (
vendor/libchromiumcontent) points to the right revision
- Set
CLANG_REVISIONinscript/update-clang.shto match the version Chromium is using.
- Located in
electron/libchromiumcontent/src/tools/clang/scripts/update.py
- Checkout Chromium if you haven't already:
-
https://chromium.googlesource.com/chromium/src.git/+/{VERSION}/tools/clang/scripts/update.py
- (Replace the
{VERSION}placeholder in the url above to the Chromium version libcc uses.)
- (Replace the
- Build Electron.
- Try to build Debug version first:
$ ./script/build.py -c D - You will need it to run tests
- Fix compilation and linking errors
- Ensure that Release build can be built too
$ ./script/build.py -c R- Often the Release build will have different linking errors that you'll need to fix.
- Some compilation and linking errors are caused by missing source/object files in the libcc
dist
- Update
./script/create-distin the libcc repo, recreate adist, and run Electron bootstrap script once again.
Tips for fixing compilation errors
- Fix build config errors first
- Fix fatal errors first, like missing files and errors related to compiler flags or defines
-
Try to identify complex errors as soon as possible.
- Ask for help if you're not sure how to fix them
- Disable all Electron features, fix the build, then enable them one by one
- Add more build flags to disable features in build-time.
When a Debug build of Electron succeeds, run the tests: $ ./script/test.py Fix the failing tests.
Follow all the steps above to fix Electron code on all supported platforms.
Updating Crashpad
If there are any compilation errors related to the Crashpad, it probably means you need to update the fork to a newer revision. See Upgrading Crashpad for instructions on how to do that.
Updating NodeJS
Upgrade vendor/node to the Node release that corresponds to the v8 version used in the new Chromium release. See the v8 versions in Node on
See Upgrading Node for instructions on this.
Verify ffmpeg support
Electron ships with a version of ffmpeg that includes proprietary codecs by default. A version without these codecs is built and distributed with each release as well. Each Chrome upgrade should verify that switching this version is still supported.
You can verify Electron's support for multiple ffmpeg builds by loading the following page. It should work with the default ffmpeg library distributed with Electron and not work with the ffmpeg library built without proprietary codecs.
<!DOCTYPE html>
<html>
<head>
<meta charset="utf-8">
<title>Proprietary Codec Check</title>
</head>
<body>
<p>Checking if Electron is using proprietary codecs by loading video from http://www.quirksmode.org/html5/videos/big_buck_bunny.mp4</p>
<p id="outcome"></p>
<video style="display:none" src="http://www.quirksmode.org/html5/videos/big_buck_bunny.mp4" autoplay></video>
<script>
const video = document.querySelector('video')
video.addEventListener('error', ({target}) => {
if (target.error.code === target.error.MEDIA_ERR_SRC_NOT_SUPPORTED) {
document.querySelector('#outcome').textContent = 'Not using proprietary codecs, video emitted source not supported error event.'
} else {
document.querySelector('#outcome').textContent = `Unexpected error: ${target.error.code}`
}
})
video.addEventListener('playing', () => {
document.querySelector('#outcome').textContent = 'Using proprietary codecs, video started playing.'
})
</script>
</body>
</html>Upgrading Crashpad
-
Get the version of crashpad that we're going to use.
libcc/src/third_party/crashpad/README.chromiumwill have a lineRevision:with a checksum- We need to check out the corresponding branch.
- Clone Google's crashpad (https://chromium.googlesource.com/crashpad/crashpad)
git clone https://chromium.googlesource.com/crashpad/crashpad-
Check out the branch with the revision checksum:
git checkout <revision checksum>
- Add electron's crashpad fork as a remote
git remote add electron https://github.com/electron/crashpad- Check out a new branch for the update
git checkout -b electron-crashpad-vA.B.C.DA.B.C.Dis the Chromium version found inlibcc/VERSIONand will be something like62.0.3202.94
-
Make a checklist of the Electron patches that need to be applied with
git log --oneline -
For each patch:
- In
electron-crashpad-vA.B.C.D, cherry-pick the patch's checksum git cherry-pick <checksum>- Resolve any conflicts
- Make sure it builds then add, commit, and push work to electron's crashpad fork
git push electron electron-crashpad-vA.B.C.D
- In
-
Update Electron to build the new crashpad:
cd vendor/crashpadgit fetchgit checkout electron-crashpad-v62.0.3202.94
-
Regenerate Ninja files against both targets
- From Electron root's root, run
script/update.py script/build.py -c D --target=crashpad_clientscript/build.py -c D --target=crashpad_handler- Both should build with no errors
- From Electron root's root, run
-
Push changes to submodule reference
- (From electron root)
git add vendor/crashpad git push origin upgrade-to-chromium-62
- (From electron root)
Discussion
One upgrade issue is building all of Electron with a single copy of V8 to ensure compatibility. This is important because upstream Node and libchromiumcontent both use their own versions of V8.
Upgrading Node is much easier than upgrading libchromiumcontent, so fewer conflicts arise if one upgrades libchromiumcontent first, then chooses the upstream Node release whose V8 is closest to it.
Electron has its own Node fork with modifications for the V8 build details mentioned above and for exposing API needed by Electron. Once an upstream Node release is chosen, it's placed in a branch in Electron's Node fork and any Electron Node patches are applied there.
Another factor is that the Node project patches its version of V8. As mentioned above, Electron builds everything with a single copy of V8, so Node's V8 patches must be ported to that copy.
Once all of Electron's dependencies are building and using the same copy of V8, the next step is to fix any Electron code issues caused by the Node upgrade.
[FIXME] something about a Node debugger in Atom that we (e.g. deepak) use and need to confirm doesn't break with the Node upgrade?
So in short, the primary steps are:
- Update Electron's Node fork to the desired version
- Backport Node's V8 patches to our copy of V8
- Update Electron to use new version of Node
- Update submodules
- Update Node.js build configuration
Updating Electron's Node fork
- Ensure that
masteronelectron/nodehas updated release tags fromnodejs/node - Create a branch in https://github.com/electron/node:
electron-node-vX.X.Xwhere the base that you're branching from is the tag for the desired update
vX.X.XMust use a version of node compatible with our current version of chromium
- Re-apply our commits from the previous version of node we were using (
vY.Y.Y) tov.X.X.X
- Check release tag and select the range of commits we need to re-apply
-
Cherry-pick commit range:
- Checkout both
vY.Y.Y&v.X.X.X git cherry-pick FIRST_COMMIT_HASH..LAST_COMMIT_HASH
- Checkout both
-
Resolve merge conflicts in each file encountered, then:
git add <conflict-file>git cherry-pick --continue- Repeat until finished
Updating V8 Patches
We need to generate a patch file from each patch applied to V8.
- Get a copy of Electron's libcc fork
$ git clone https://github.com/electron/libchromiumcontent
- Run
script/updateto get the latest libcc
- This will be time-consuming
- Remove our copies of the old Node v8 patches
- (In libchromiumcontent repo) Read
patches/v8/README.mdto see which patchfiles were created during the last update -
Remove those files from
patches/v8/:git rmthe patchfiles- edit
patches/v8/README.md - commit these removals
- Inspect Node repo to see what patches upstream Node used with their v8 after bumping its version
git log --oneline deps/V8
- Create a checklist of the patches. This is useful for tracking your work and for having a quick reference of commit hashes to use in the
git diff-treestep below. - Read
patches/v8/README.mdto see which patchfiles came from the previous version of V8 and therefore need to be removed.
- Delete each patchfile referenced in
patches/v8/README.md
- For each patch, do:
-
(In node repo)
git diff-tree --patch HASH > ~/path_to_libchromiumcontent/patches/v8/xxx-patch_name.patchxxxis an incremented three-digit number (to force patch order)patch_nameshould loosely match the node commit messages, e.g.030-cherry_pick_cc55747,patchif the Node commit message was "cherry-pick cc55747"
-
(remainder of steps in libchromium repo) Manually edit the
.patchfile to match upstream V8's directory:-
If a diff section has no instances of
deps/V8, remove it altogether.- We don’t want those patches because we’re only patching V8.
-
Replace instances of
a/deps/v8/filename.extwitha/filename.ext- This is needed because upstream Node keeps its V8 files in a subdirectory
-
- Ensure that local status is clean:
git statusto make sure there are no unstaged changes. - Confirm that the patch applies cleanly with
script/patch.py -r src/V8 -p patches/v8/xxx-patch_name.patch.patch -
Create a new copy of the patch:
cd src/v8 && git diff > ../../test.patch && cd ../..- This is needed because the first patch has Node commit checksums that we don't want
-
Confirm that checksums are the only difference between the two patches:
diff -u test.patch patches/v8/xxx-patch_name.patch
-
Replace the old patch with the new:
mv test.patch patches/v8/xxx-patch_name.patch
-
Add the patched code to the index without committing:
cd src/v8 && git add . && cd ../..- We don't want to commit the changes (they're kept in the patchfiles) but need them locally so that they don't show up in subsequent diffs while we iterate through more patches
-
Add the patch file to the index:
git add a patches/v8/
-
(Optionally) commit each patch file to ensure you can back up if you mess up a step:
git commit patches/v8/
- Update
patches/v8/README.mdwith references to all new patches that have been added so that the next person will know which need to be removed. - Update Electron's submodule references: sh $ cd electron/vendor/node electron/vendor/node$ git fetch electron/vendor/node$ git checkout electron-node-vA.B.C electron/vendor/node$ cd ../libchromiumcontent electron/vendor/libchromiumcontent$ git fetch electron/vendor/libchromiumcontent$ git checkout upgrade-to-chromium-X electron/vendor/libchromiumcontent$ cd ../.. electron$ git add vendor electron$ git commit -m "update submodule referefences for node and libc" electron$ git pso upgrade-to-chromium-62 electron$ script/bootstrap.py -d electron$ script/build.py -c -D
Notes
- libcc and V8 are treated as a single unit
-
Node maintains its own fork of V8
- They backport a small amount of things as needed
- Documentation in node about how they work with V8
-
We update code such that we only use one copy of V8 across all of electron
- E.g electron, libcc, and node
-
We don’t track upstream closely due to logistics:
- Upstream uses multiple repos and so merging into a single repo would result in lost history. So we only update when we’re planning a node version bump in electron.
-
libcc is large and time-consuming to update, so we typically choose the node version based on which of its releases has a version of V8 that’s closest to the version in libcc that we’re using.
- We sometimes have to wait for the next periodic Node release because it will sync more closely with the version of V8 in the new libcc
-
Electron keeps all its patches in libcc because it’s simpler than maintaining different repos for patches for each upstream project.
- Crashpad, node, libcc, etc. patches are all kept in the same place
-
Building node:
- There’s a chance we need to change our build configuration to match the build flags that node wants in
node/common.gypi
- There’s a chance we need to change our build configuration to match the build flags that node wants in
UploadBlob Object
typeString -blob.blobUUIDString - UUID of blob data to upload.
UploadData Object
bytesBuffer - Content being sent.fileString - Path of file being uploaded.blobUUIDString - UUID of blob data. Use ses.getBlobData method to retrieve the data.
UploadFile Object
typeString -file.filePathString - Path of file to be uploaded.offsetInteger - Defaults to.lengthInteger - Number of bytes to read fromoffset. Defaults to.modificationTimeDouble - Last Modification time in number of seconds since the UNIX epoch.
UploadFileSystem Object
typeString -fileSystem.filsSystemURLString - FileSystem url to read data for upload.offsetInteger - Defaults to.lengthInteger - Number of bytes to read fromoffset. Defaults to.modificationTimeDouble - Last Modification time in number of seconds since the UNIX epoch.
UploadRawData Object
typeString -rawData.bytesBuffer - Data to be uploaded.
Using Native Node Modules
The native Node modules are supported by Electron, but since Electron is very likely to use a different V8 version from the Node binary installed in your system, you have to manually specify the location of Electron's headers when building native modules.
How to install native modules
Three ways to install native modules:
Using npm
By setting a few environment variables, you can use npm to install modules directly.
An example of installing all dependencies for Electron:
# Electron's version.
export npm_config_target=1.2.3
# The architecture of Electron, can be ia32 or x64.
export npm_config_arch=x64
export npm_config_target_arch=x64
# Download headers for Electron.
export npm_config_disturl=https://atom.io/download/electron
# Tell node-pre-gyp that we are building for Electron.
export npm_config_runtime=electron
# Tell node-pre-gyp to build module from source code.
export npm_config_build_from_source=true
# Install all dependencies, and store cache to ~/.electron-gyp.
HOME=~/.electron-gyp npm installInstalling modules and rebuilding for Electron
You can also choose to install modules like other Node projects, and then rebuild the modules for Electron with the electron-rebuild package. This module can get the version of Electron and handle the manual steps of downloading headers and building native modules for your app.
An example of installing electron-rebuild and then rebuild modules with it:
npm install --save-dev electron-rebuild
# Every time you run "npm install", run this:
./node_modules/.bin/electron-rebuild
# On Windows if you have trouble, try:
.\node_modules\.bin\electron-rebuild.cmdManually building for Electron
If you are a developer developing a native module and want to test it against Electron, you might want to rebuild the module for Electron manually. You can use node-gyp directly to build for Electron:
cd /path-to-module/
HOME=~/.electron-gyp node-gyp rebuild --target=1.2.3 --arch=x64 --dist-url=https://atom.io/download/electronThe HOME=~/.electron-gyp changes where to find development headers. The --target=1.2.3 is version of Electron. The --dist-url=... specifies where to download the headers. The --arch=x64 says the module is built for 64bit system.
Troubleshooting
If you installed a native module and found it was not working, you need to check following things:
- The architecture of the module has to match Electron's architecture (ia32 or x64).
- After you upgrade Electron, you usually need to rebuild the modules.
- When in doubt, run
electron-rebuildfirst.
Modules that rely on prebuild
prebuild provides a way to publish native Node modules with prebuilt binaries for multiple versions of Node and Electron.
If modules provide binaries for the usage in Electron, make sure to omit --build-from-source and the npm_config_build_from_source environment variable in order to take full advantage of the prebuilt binaries.
Modules that rely on node-pre-gyp
The node-pre-gyp tool provides a way to deploy native Node modules with prebuilt binaries, and many popular modules are using it.
Usually those modules work fine under Electron, but sometimes when Electron uses a newer version of V8 than Node, and there are ABI changes, bad things may happen. So in general it is recommended to always build native modules from source code.
If you are following the npm way of installing modules, then this is done by default, if not, you have to pass --build-from-source to npm, or set the npm_config_build_from_source environment variable.
Using Pepper Flash Plugin
Electron supports the Pepper Flash plugin. To use the Pepper Flash plugin in Electron, you should manually specify the location of the Pepper Flash plugin and then enable it in your application.
Prepare a Copy of Flash Plugin
On macOS and Linux, the details of the Pepper Flash plugin can be found by navigating to chrome://plugins in the Chrome browser. Its location and version are useful for Electron's Pepper Flash support. You can also copy it to another location.
Add Electron Switch
You can directly add --ppapi-flash-path and --ppapi-flash-version to the Electron command line or by using the app.commandLine.appendSwitch method before the app ready event. Also, turn on plugins option of BrowserWindow.
For example:
const {app, BrowserWindow} = require('electron')
const path = require('path')
// Specify flash path, supposing it is placed in the same directory with main.js.
let pluginName
switch (process.platform) {
case 'win32':
pluginName = 'pepflashplayer.dll'
break
case 'darwin':
pluginName = 'PepperFlashPlayer.plugin'
break
case 'linux':
pluginName = 'libpepflashplayer.so'
break
}
app.commandLine.appendSwitch('ppapi-flash-path', path.join(__dirname, pluginName))
// Optional: Specify flash version, for example, v17.0.0.169
app.commandLine.appendSwitch('ppapi-flash-version', '17.0.0.169')
app.on('ready', () => {
let win = new BrowserWindow({
width: 800,
height: 600,
webPreferences: {
plugins: true
}
})
win.loadURL(`file://${__dirname}/index.html`)
// Something else
})You can also try loading the system wide Pepper Flash plugin instead of shipping the plugins yourself, its path can be received by calling app.getPath('pepperFlashSystemPlugin').
Enable Flash Plugin in a <webview> Tag
Add plugins attribute to <webview> tag.
<webview src="https://www.adobe.com/software/flash/about/" plugins></webview>Troubleshooting
You can check if Pepper Flash plugin was loaded by inspecting navigator.plugins in the console of devtools (although you can't know if the plugin's path is correct).
The architecture of Pepper Flash plugin has to match Electron's one. On Windows, a common error is to use 32bit version of Flash plugin against 64bit version of Electron.
On Windows the path passed to --ppapi-flash-path has to use as path delimiter, using POSIX-style paths will not work.
For some operations, such as streaming media using RTMP, it is necessary to grant wider permissions to players’ .swf files. One way of accomplishing this, is to use nw-flash-trust.
Using Selenium and WebDriver
From ChromeDriver - WebDriver for Chrome:
WebDriver is an open source tool for automated testing of web apps across many browsers. It provides capabilities for navigating to web pages, user input, JavaScript execution, and more. ChromeDriver is a standalone server which implements WebDriver's wire protocol for Chromium. It is being developed by members of the Chromium and WebDriver teams.
Setting up Spectron
Spectron is the officially supported ChromeDriver testing framework for Electron. It is built on top of WebdriverIO and has helpers to access Electron APIs in your tests and bundles ChromeDriver.
$ npm install --save-dev spectron// A simple test to verify a visible window is opened with a title
var Application = require('spectron').Application
var assert = require('assert')
var app = new Application({
path: '/Applications/MyApp.app/Contents/MacOS/MyApp'
})
app.start().then(function () {
// Check if the window is visible
return app.browserWindow.isVisible()
}).then(function (isVisible) {
// Verify the window is visible
assert.equal(isVisible, true)
}).then(function () {
// Get the window's title
return app.client.getTitle()
}).then(function (title) {
// Verify the window's title
assert.equal(title, 'My App')
}).catch(function (error) {
// Log any failures
console.error('Test failed', error.message)
}).then(function () {
// Stop the application
return app.stop()
})Setting up with WebDriverJs
WebDriverJs provides a Node package for testing with web driver, we will use it as an example.
1. Start ChromeDriver
First you need to download the chromedriver binary, and run it:
$ npm install electron-chromedriver
$ ./node_modules/.bin/chromedriver
Starting ChromeDriver (v2.10.291558) on port 9515
Only local connections are allowed.Remember the port number 9515, which will be used later
2. Install WebDriverJS
$ npm install selenium-webdriver3. Connect to ChromeDriver
The usage of selenium-webdriver with Electron is the same with upstream, except that you have to manually specify how to connect chrome driver and where to find Electron's binary:
const webdriver = require('selenium-webdriver')
const driver = new webdriver.Builder()
// The "9515" is the port opened by chrome driver.
.usingServer('http://localhost:9515')
.withCapabilities({
chromeOptions: {
// Here is the path to your Electron binary.
binary: '/Path-to-Your-App.app/Contents/MacOS/Electron'
}
})
.forBrowser('electron')
.build()
driver.get('http://www.google.com')
driver.findElement(webdriver.By.name('q')).sendKeys('webdriver')
driver.findElement(webdriver.By.name('btnG')).click()
driver.wait(() => {
return driver.getTitle().then((title) => {
return title === 'webdriver - Google Search'
})
}, 1000)
driver.quit()Setting up with WebdriverIO
WebdriverIO provides a Node package for testing with web driver.
1. Start ChromeDriver
First you need to download the chromedriver binary, and run it:
$ npm install electron-chromedriver
$ ./node_modules/.bin/chromedriver --url-base=wd/hub --port=9515
Starting ChromeDriver (v2.10.291558) on port 9515
Only local connections are allowed.Remember the port number 9515, which will be used later
2. Install WebdriverIO
$ npm install webdriverio3. Connect to chrome driver
const webdriverio = require('webdriverio')
const options = {
host: 'localhost', // Use localhost as chrome driver server
port: 9515, // "9515" is the port opened by chrome driver.
desiredCapabilities: {
browserName: 'chrome',
chromeOptions: {
binary: '/Path-to-Your-App/electron', // Path to your Electron binary.
args: [/* cli arguments */] // Optional, perhaps 'app=' + /path/to/your/app/
}
}
}
let client = webdriverio.remote(options)
client
.init()
.url('http://google.com')
.setValue('#q', 'webdriverio')
.click('#btnG')
.getTitle().then((title) => {
console.log('Title was: ' + title)
})
.end()Workflow
To test your application without rebuilding Electron, place your app source into Electron's resource directory.
Alternatively, pass an argument to run with your electron binary that points to your app's folder. This eliminates the need to copy-paste your app into Electron's resource directory.
Using Widevine CDM Plugin
In Electron you can use the Widevine CDM plugin shipped with Chrome browser.
Getting the plugin
Electron doesn't ship with the Widevine CDM plugin for license reasons, to get it, you need to install the official Chrome browser first, which should match the architecture and Chrome version of the Electron build you use.
Note: The major version of Chrome browser has to be the same with the Chrome version used by Electron, otherwise the plugin will not work even though navigator.plugins would show it has been loaded.
Windows & macOS
Open chrome://components/ in Chrome browser, find WidevineCdm and make sure it is up to date, then you can find all the plugin binaries from the APP_DATA/Google/Chrome/WidevineCDM/VERSION/_platform_specific/PLATFORM_ARCH/ directory.
APP_DATA is system's location for storing app data, on Windows it is %LOCALAPPDATA%, on macOS it is ~/Library/Application Support. VERSION is Widevine CDM plugin's version string, like 1.4.8.866. PLATFORM is mac or win. ARCH is x86 or x64.
On Windows the required binaries are widevinecdm.dll and widevinecdmadapter.dll, on macOS they are libwidevinecdm.dylib and widevinecdmadapter.plugin. You can copy them to anywhere you like, but they have to be put together.
Linux
On Linux the plugin binaries are shipped together with Chrome browser, you can find them under /opt/google/chrome, the filenames are libwidevinecdm.so and libwidevinecdmadapter.so.
Using the plugin
After getting the plugin files, you should pass the widevinecdmadapter's path to Electron with --widevine-cdm-path command line switch, and the plugin's version with --widevine-cdm-version switch.
Note: Though only the widevinecdmadapter binary is passed to Electron, the widevinecdm binary has to be put aside it.
The command line switches have to be passed before the ready event of app module gets emitted, and the page that uses this plugin must have plugin enabled.
Example code:
const {app, BrowserWindow} = require('electron')
// You have to pass the filename of `widevinecdmadapter` here, it is
// * `widevinecdmadapter.plugin` on macOS,
// * `libwidevinecdmadapter.so` on Linux,
// * `widevinecdmadapter.dll` on Windows.
app.commandLine.appendSwitch('widevine-cdm-path', '/path/to/widevinecdmadapter.plugin')
// The version of plugin can be got from `chrome://plugins` page in Chrome.
app.commandLine.appendSwitch('widevine-cdm-version', '1.4.8.866')
let win = null
app.on('ready', () => {
win = new BrowserWindow({
webPreferences: {
// The `plugins` have to be enabled.
plugins: true
}
})
win.show()
})Verifying the plugin
To verify whether the plugin works, you can use following ways:
- Open devtools and check whether
navigator.pluginsincludes the Widevine CDM plugin. - Open https://shaka-player-demo.appspot.com/ and load a manifest that uses
Widevine. - Open http://www.dash-player.com/demo/drm-test-area/, check whether the page says
bitdash uses Widevine in your browser, then play the video.
V8 Development
A collection of resources for learning and using V8
- V8 Tracing
- V8 Profiler - Profiler combinations which are useful for profiling:
--prof,--trace-ic,--trace-opt,--trace-deopt,--print-bytecode,--print-opt-code - V8 Interpreter Design
- Optimizing compiler
- V8 GDB Debugging
See also Chromium Development
webContents
Render and control web pages.
Process: Main
webContents is an EventEmitter. It is responsible for rendering and controlling a web page and is a property of the BrowserWindow object. An example of accessing the webContents object:
const {BrowserWindow} = require('electron')
let win = new BrowserWindow({width: 800, height: 1500})
win.loadURL('http://github.com')
let contents = win.webContents
console.log(contents)Methods
These methods can be accessed from the webContents module:
const {webContents} = require('electron')
console.log(webContents)webContents.getAllWebContents()
Returns WebContents[] - An array of all WebContents instances. This will contain web contents for all windows, webviews, opened devtools, and devtools extension background pages.
webContents.getFocusedWebContents()
Returns WebContents - The web contents that is focused in this application, otherwise returns null.
Event: 'did-finish-load'
Emitted when the navigation is done, i.e. the spinner of the tab has stopped spinning, and the onload event was dispatched.
Event: 'did-fail-load'
Returns:
eventEventerrorCodeIntegererrorDescriptionStringvalidatedURLStringisMainFrameBoolean
This event is like did-finish-load but emitted when the load failed or was cancelled, e.g. window.stop() is invoked. The full list of error codes and their meaning is available here.
Event: 'did-frame-finish-load'
Returns:
eventEventisMainFrameBoolean
Emitted when a frame has done navigation.
Event: 'did-start-loading'
Corresponds to the points in time when the spinner of the tab started spinning.
Event: 'did-stop-loading'
Corresponds to the points in time when the spinner of the tab stopped spinning.
Event: 'did-get-response-details'
Returns:
eventEventstatusBooleannewURLStringoriginalURLStringhttpResponseCodeIntegerrequestMethodStringreferrerStringheadersObjectresourceTypeString
Emitted when details regarding a requested resource are available. status indicates the socket connection to download the resource.
Event: 'did-get-redirect-request'
Returns:
eventEventoldURLStringnewURLStringisMainFrameBooleanhttpResponseCodeIntegerrequestMethodStringreferrerStringheadersObject
Emitted when a redirect is received while requesting a resource.
Event: 'page-favicon-updated'
Returns:
eventEventfaviconsString[] - Array of URLs.
Emitted when page receives favicon urls.
Event: 'new-window'
Returns:
eventEventurlStringframeNameStringdispositionString - Can bedefault,foreground-tab,background-tab,new-window,save-to-diskandother.optionsObject - The options which will be used for creating the newBrowserWindow.additionalFeaturesString[] - The non-standard features (features not handled by Chromium or Electron) given towindow.open().
Emitted when the page requests to open a new window for a url. It could be requested by window.open or an external link like <a target='_blank'>.
By default a new BrowserWindow will be created for the url.
Calling event.preventDefault() will prevent Electron from automatically creating a new BrowserWindow. If you call event.preventDefault() and manually create a new BrowserWindow then you must set event.newGuest to reference the new BrowserWindow instance, failing to do so may result in unexpected behavior. For example:
myBrowserWindow.webContents.on('new-window', (event, url) => {
event.preventDefault()
const win = new BrowserWindow({show: false})
win.once('ready-to-show', () => win.show())
win.loadURL(url)
event.newGuest = win
})Event: 'will-navigate'
Returns:
eventEventurlString
Emitted when a user or the page wants to start navigation. It can happen when the window.location object is changed or a user clicks a link in the page.
This event will not emit when the navigation is started programmatically with APIs like webContents.loadURL and webContents.back.
It is also not emitted for in-page navigations, such as clicking anchor links or updating the window.location.hash. Use did-navigate-in-page event for this purpose.
Calling event.preventDefault() will prevent the navigation.
Event: 'did-navigate'
Returns:
eventEventurlString
Emitted when a navigation is done.
This event is not emitted for in-page navigations, such as clicking anchor links or updating the window.location.hash. Use did-navigate-in-page event for this purpose.
Event: 'did-navigate-in-page'
Returns:
eventEventurlStringisMainFrameBoolean
Emitted when an in-page navigation happened.
When in-page navigation happens, the page URL changes but does not cause navigation outside of the page. Examples of this occurring are when anchor links are clicked or when the DOM hashchange event is triggered.
Event: 'will-prevent-unload'
Returns:
eventEvent
Emitted when a beforeunload event handler is attempting to cancel a page unload.
Calling event.preventDefault() will ignore the beforeunload event handler and allow the page to be unloaded.
const {BrowserWindow, dialog} = require('electron')
const win = new BrowserWindow({width: 800, height: 600})
win.webContents.on('will-prevent-unload', (event) => {
const choice = dialog.showMessageBox(win, {
type: 'question',
buttons: ['Leave', 'Stay'],
title: 'Do you want to leave this site?',
message: 'Changes you made may not be saved.',
defaultId: 0,
cancelId: 1
})
const leave = (choice === 0)
if (leave) {
event.preventDefault()
}
})Event: 'crashed'
Returns:
eventEventkilledBoolean
Emitted when the renderer process crashes or is killed.
Event: 'plugin-crashed'
Returns:
eventEventnameStringversionString
Emitted when a plugin process has crashed.
Event: 'destroyed'
Emitted when webContents is destroyed.
Event: 'before-input-event'
Returns:
eventEvent-
inputObject - Input properties.typeString - EitherkeyUporkeyDown.keyString - Equivalent to KeyboardEvent.key.codeString - Equivalent to KeyboardEvent.code.isAutoRepeatBoolean - Equivalent to KeyboardEvent.repeat.shiftBoolean - Equivalent to KeyboardEvent.shiftKey.controlBoolean - Equivalent to KeyboardEvent.controlKey.altBoolean - Equivalent to KeyboardEvent.altKey.metaBoolean - Equivalent to KeyboardEvent.metaKey.
Emitted before dispatching the keydown and keyup events in the page. Calling event.preventDefault will prevent the page keydown/keyup events and the menu shortcuts.
To only prevent the menu shortcuts, use setIgnoreMenuShortcuts:
const {BrowserWindow} = require('electron')
let win = new BrowserWindow({width: 800, height: 600})
win.webContents.on('before-input-event', (event, input) => {
// For example, only enable application menu keyboard shortcuts when
// Ctrl/Cmd are down.
win.webContents.setIgnoreMenuShortcuts(!input.control && !input.meta)
})Event: 'devtools-opened'
Emitted when DevTools is opened.
Event: 'devtools-closed'
Emitted when DevTools is closed.
Event: 'devtools-focused'
Emitted when DevTools is focused / opened.
Event: 'certificate-error'
Returns:
eventEventurlStringerrorString - The error code.certificateCertificate-
callbackFunctionisTrustedBoolean - Indicates whether the certificate can be considered trusted.
Emitted when failed to verify the certificate for url.
The usage is the same with the certificate-error event of app.
Event: 'select-client-certificate'
Returns:
eventEventurlURLcertificateListCertificate[]-
callbackFunctioncertificateCertificate - Must be a certificate from the given list.
Emitted when a client certificate is requested.
The usage is the same with the select-client-certificate event of app.
Event: 'login'
Returns:
eventEvent-
requestObjectmethodStringurlURLreferrerURL
-
authInfoObjectisProxyBooleanschemeStringhostStringportIntegerrealmString
-
callbackFunctionusernameStringpasswordString
Emitted when webContents wants to do basic auth.
The usage is the same with the login event of app.
Event: 'found-in-page'
Returns:
eventEvent-
resultObjectrequestIdIntegeractiveMatchOrdinalInteger - Position of the active match.matchesInteger - Number of Matches.selectionAreaObject - Coordinates of first match region.finalUpdateBoolean
Emitted when a result is available for [webContents.findInPage] request.
Event: 'media-started-playing'
Emitted when media starts playing.
Event: 'media-paused'
Emitted when media is paused or done playing.
Event: 'did-change-theme-color'
Emitted when a page's theme color changes. This is usually due to encountering a meta tag:
<meta name='theme-color' content='#ff0000'>Returns:
eventEventcolor(String | null) - Theme color is in format of '#rrggbb'. It isnullwhen no theme color is set.
Event: 'update-target-url'
Returns:
eventEventurlString
Emitted when mouse moves over a link or the keyboard moves the focus to a link.
Event: 'cursor-changed'
Returns:
eventEventtypeStringimageNativeImage (optional)scaleFloat (optional) - scaling factor for the custom cursor.sizeSize (optional) - the size of theimage.hotspotPoint (optional) - coordinates of the custom cursor's hotspot.
Emitted when the cursor's type changes. The type parameter can be default, crosshair, pointer, text, wait, help, e-resize, n-resize, ne-resize, nw-resize, s-resize, se-resize, sw-resize, w-resize, ns-resize, ew-resize, nesw-resize, nwse-resize, col-resize, row-resize, m-panning, e-panning, n-panning, ne-panning, nw-panning, s-panning, se-panning, sw-panning, w-panning, move, vertical-text, cell, context-menu, alias, progress, nodrop, copy, none, not-allowed, zoom-in, zoom-out, grab, grabbing or custom.
If the type parameter is custom, the image parameter will hold the custom cursor image in a NativeImage, and scale, size and hotspot will hold additional information about the custom cursor.
Event: 'context-menu'
Returns:
eventEvent-
paramsObjectxInteger - x coordinate.yInteger - y coordinate.linkURLString - URL of the link that encloses the node the context menu was invoked on.linkTextString - Text associated with the link. May be an empty string if the contents of the link are an image.pageURLString - URL of the top level page that the context menu was invoked on.frameURLString - URL of the subframe that the context menu was invoked on.srcURLString - Source URL for the element that the context menu was invoked on. Elements with source URLs are images, audio and video.mediaTypeString - Type of the node the context menu was invoked on. Can benone,image,audio,video,canvas,fileorplugin.hasImageContentsBoolean - Whether the context menu was invoked on an image which has non-empty contents.isEditableBoolean - Whether the context is editable.selectionTextString - Text of the selection that the context menu was invoked on.titleTextString - Title or alt text of the selection that the context was invoked on.misspelledWordString - The misspelled word under the cursor, if any.frameCharsetString - The character encoding of the frame on which the menu was invoked.inputFieldTypeString - If the context menu was invoked on an input field, the type of that field. Possible values arenone,plainText,password,other.menuSourceTypeString - Input source that invoked the context menu. Can benone,mouse,keyboard,touchortouchMenu.-
mediaFlagsObject - The flags for the media element the context menu was invoked on.inErrorBoolean - Whether the media element has crashed.isPausedBoolean - Whether the media element is paused.isMutedBoolean - Whether the media element is muted.hasAudioBoolean - Whether the media element has audio.isLoopingBoolean - Whether the media element is looping.isControlsVisibleBoolean - Whether the media element's controls are visible.canToggleControlsBoolean - Whether the media element's controls are toggleable.canRotateBoolean - Whether the media element can be rotated.
-
editFlagsObject - These flags indicate whether the renderer believes it is able to perform the corresponding action.canUndoBoolean - Whether the renderer believes it can undo.canRedoBoolean - Whether the renderer believes it can redo.canCutBoolean - Whether the renderer believes it can cut.canCopyBoolean - Whether the renderer believes it can copycanPasteBoolean - Whether the renderer believes it can paste.canDeleteBoolean - Whether the renderer believes it can delete.canSelectAllBoolean - Whether the renderer believes it can select all.
Emitted when there is a new context menu that needs to be handled.
Event: 'select-bluetooth-device'
Returns:
eventEventdevicesBluetoothDevice[]-
callbackFunctiondeviceIdString
Emitted when bluetooth device needs to be selected on call to navigator.bluetooth.requestDevice. To use navigator.bluetooth api webBluetooth should be enabled. If event.preventDefault is not called, first available device will be selected. callback should be called with deviceId to be selected, passing empty string to callback will cancel the request.
const {app, webContents} = require('electron')
app.commandLine.appendSwitch('enable-web-bluetooth')
app.on('ready', () => {
webContents.on('select-bluetooth-device', (event, deviceList, callback) => {
event.preventDefault()
let result = deviceList.find((device) => {
return device.deviceName === 'test'
})
if (!result) {
callback('')
} else {
callback(result.deviceId)
}
})
})Event: 'paint'
Returns:
eventEventdirtyRectRectangleimageNativeImage - The image data of the whole frame.
Emitted when a new frame is generated. Only the dirty area is passed in the buffer.
const {BrowserWindow} = require('electron')
let win = new BrowserWindow({webPreferences: {offscreen: true}})
win.webContents.on('paint', (event, dirty, image) => {
// updateBitmap(dirty, image.getBitmap())
})
win.loadURL('http://github.com')Event: 'devtools-reload-page'
Emitted when the devtools window instructs the webContents to reload
Event: 'will-attach-webview'
Returns:
eventEventwebPreferencesObject - The web preferences that will be used by the guest page. This object can be modified to adjust the preferences for the guest page.paramsObject - The other<webview>parameters such as thesrcURL. This object can be modified to adjust the parameters of the guest page.
Emitted when a <webview>'s web contents is being attached to this web contents. Calling event.preventDefault() will destroy the guest page.
This event can be used to configure webPreferences for the webContents of a <webview> before it's loaded, and provides the ability to set settings that can't be set via <webview> attributes.
Note: The specified preload script option will be appear as preloadURL (not preload) in the webPreferences object emitted with this event.
Event: 'did-attach-webview'
Returns:
eventEventwebContentsWebContents - The guest web contents that is used by the<webview>.
Emitted when a <webview> has been attached to this web contents.
Event: 'console-message'
Returns:
levelIntegermessageStringlineIntegersourceIdString
Emitted when the associated window logs a console message. Will not be emitted for windows with offscreen rendering enabled.
contents.loadURL(url[, options])
urlString-
optionsObject (optional)httpReferrerString (optional) - A HTTP Referrer url.userAgentString (optional) - A user agent originating the request.extraHeadersString (optional) - Extra headers separated by "\n".postData(UploadRawData[] | UploadFile[] | UploadFileSystem[] | UploadBlob[]) (optional)baseURLForDataURLString (optional) - Base url (with trailing path separator) for files to be loaded by the data url. This is needed only if the specifiedurlis a data url and needs to load other files.
Loads the url in the window. The url must contain the protocol prefix, e.g. the http:// or file://. If the load should bypass http cache then use the pragma header to achieve it.
const {webContents} = require('electron')
const options = {extraHeaders: 'pragma: no-cache\n'}
webContents.loadURL('https://github.com', options)contents.loadFile(filePath)
filePathString
Loads the given file in the window, filePath should be a path to an HTML file relative to the root of your application. For instance an app structure like this:
| root
| - package.json
| - src
| - main.js
| - index.htmlWould require code like this
win.loadFile('src/index.html')contents.downloadURL(url)
urlString
Initiates a download of the resource at url without navigating. The will-download event of session will be triggered.
contents.getURL()
Returns String - The URL of the current web page.
const {BrowserWindow} = require('electron')
let win = new BrowserWindow({width: 800, height: 600})
win.loadURL('http://github.com')
let currentURL = win.webContents.getURL()
console.log(currentURL)contents.getTitle()
Returns String - The title of the current web page.
contents.isDestroyed()
Returns Boolean - Whether the web page is destroyed.
contents.focus()
Focuses the web page.
contents.isFocused()
Returns Boolean - Whether the web page is focused.
contents.isLoading()
Returns Boolean - Whether web page is still loading resources.
contents.isLoadingMainFrame()
Returns Boolean - Whether the main frame (and not just iframes or frames within it) is still loading.
contents.isWaitingForResponse()
Returns Boolean - Whether the web page is waiting for a first-response from the main resource of the page.
contents.stop()
Stops any pending navigation.
contents.reload()
Reloads the current web page.
contents.reloadIgnoringCache()
Reloads current page and ignores cache.
contents.canGoBack()
Returns Boolean - Whether the browser can go back to previous web page.
contents.canGoForward()
Returns Boolean - Whether the browser can go forward to next web page.
contents.canGoToOffset(offset)
offsetInteger
Returns Boolean - Whether the web page can go to offset.
contents.clearHistory()
Clears the navigation history.
contents.goBack()
Makes the browser go back a web page.
contents.goForward()
Makes the browser go forward a web page.
contents.goToOffset(offset)
offsetInteger
Navigates to the specified offset from the "current entry".
contents.isCrashed()
Returns Boolean - Whether the renderer process has crashed.
contents.getUserAgent()
Returns String - The user agent for this web page.
contents.executeJavaScript(code[, userGesture, callback])
codeStringuserGestureBoolean (optional) - Default isfalse.-
callbackFunction (optional) - Called after script has been executed.resultAny
Returns Promise - A promise that resolves with the result of the executed code or is rejected if the result of the code is a rejected promise.
Evaluates code in page.
In the browser window some HTML APIs like requestFullScreen can only be invoked by a gesture from the user. Setting userGesture to true will remove this limitation.
If the result of the executed code is a promise the callback result will be the resolved value of the promise. We recommend that you use the returned Promise to handle code that results in a Promise.
contents.executeJavaScript('fetch("https://jsonplaceholder.typicode.com/users/1").then(resp => resp.json())', true)
.then((result) => {
console.log(result) // Will be the JSON object from the fetch call
})contents.setIgnoreMenuShortcuts(ignore) Experimental
ignoreBoolean
Ignore application menu shortcuts while this web contents is focused.
contents.isAudioMuted()
Returns Boolean - Whether this page has been muted.
contents.setZoomFactor(factor)
factorNumber - Zoom factor.
Changes the zoom factor to the specified factor. Zoom factor is zoom percent divided by 100, so 300% = 3.0.
contents.getZoomFactor(callback)
-
callbackFunctionzoomFactorNumber
Sends a request to get current zoom factor, the callback will be called with callback(zoomFactor).
contents.setZoomLevel(level)
levelNumber - Zoom level.
Changes the zoom level to the specified level. The original size is 0 and each increment above or below represents zooming 20% larger or smaller to default limits of 300% and 50% of original size, respectively. The formula for this is scale := 1.2 ^ level.
contents.getZoomLevel(callback)
-
callbackFunctionzoomLevelNumber
Sends a request to get current zoom level, the callback will be called with callback(zoomLevel).
contents.setVisualZoomLevelLimits(minimumLevel, maximumLevel)
minimumLevelNumbermaximumLevelNumber
Sets the maximum and minimum pinch-to-zoom level.
contents.setLayoutZoomLevelLimits(minimumLevel, maximumLevel)
minimumLevelNumbermaximumLevelNumber
Sets the maximum and minimum layout-based (i.e. non-visual) zoom level.
contents.undo()
Executes the editing command undo in web page.
contents.redo()
Executes the editing command redo in web page.
contents.cut()
Executes the editing command cut in web page.
contents.copy()
Executes the editing command copy in web page.
contents.copyImageAt(x, y)
xIntegeryInteger
Copy the image at the given position to the clipboard.
contents.paste()
Executes the editing command paste in web page.
contents.pasteAndMatchStyle()
Executes the editing command pasteAndMatchStyle in web page.
contents.delete()
Executes the editing command delete in web page.
contents.selectAll()
Executes the editing command selectAll in web page.
contents.unselect()
Executes the editing command unselect in web page.
contents.replaceMisspelling(text)
textString
Executes the editing command replaceMisspelling in web page.
contents.findInPage(text[, options])
textString - Content to be searched, must not be empty.-
optionsObject (optional)forwardBoolean (optional) - Whether to search forward or backward, defaults totrue.findNextBoolean (optional) - Whether the operation is first request or a follow up, defaults tofalse.matchCaseBoolean (optional) - Whether search should be case-sensitive, defaults tofalse.wordStartBoolean (optional) - Whether to look only at the start of words. defaults tofalse.medialCapitalAsWordStartBoolean (optional) - When combined withwordStart, accepts a match in the middle of a word if the match begins with an uppercase letter followed by a lowercase or non-letter. Accepts several other intra-word matches, defaults tofalse.
Returns Integer - The request id used for the request.
Starts a request to find all matches for the text in the web page. The result of the request can be obtained by subscribing to found-in-page event.
contents.stopFindInPage(action)
-
actionString - Specifies the action to take place when ending [webContents.findInPage] request.clearSelection- Clear the selection.keepSelection- Translate the selection into a normal selection.activateSelection- Focus and click the selection node.
Stops any findInPage request for the webContents with the provided action.
const {webContents} = require('electron')
webContents.on('found-in-page', (event, result) => {
if (result.finalUpdate) webContents.stopFindInPage('clearSelection')
})
const requestId = webContents.findInPage('api')
console.log(requestId)contents.capturePage([rect, ]callback)
rectRectangle (optional) - The area of the page to be captured.-
callbackFunctionimageNativeImage
Captures a snapshot of the page within rect. Upon completion callback will be called with callback(image). The image is an instance of NativeImage that stores data of the snapshot. Omitting rect will capture the whole visible page.
contents.hasServiceWorker(callback)
-
callbackFunctionhasWorkerBoolean
Checks if any ServiceWorker is registered and returns a boolean as response to callback.
contents.unregisterServiceWorker(callback)
-
callbackFunctionsuccessBoolean
Unregisters any ServiceWorker if present and returns a boolean as response to callback when the JS promise is fulfilled or false when the JS promise is rejected.
contents.print([options], [callback])
-
optionsObject (optional)silentBoolean (optional) - Don't ask user for print settings. Default isfalse.printBackgroundBoolean (optional) - Also prints the background color and image of the web page. Default isfalse.deviceNameString (optional) - Set the printer device name to use. Default is''.
-
callbackFunction (optional)successBoolean - Indicates success of the print call.
Prints window's web page. When silent is set to true, Electron will pick the system's default printer if deviceName is empty and the default settings for printing.
Calling window.print() in web page is equivalent to calling webContents.print({silent: false, printBackground: false, deviceName: ''}).
Use page-break-before: always; CSS style to force to print to a new page.
contents.printToPDF(options, callback)
-
optionsObjectmarginsTypeInteger (optional) - Specifies the type of margins to use. Uses 0 for default margin, 1 for no margin, and 2 for minimum margin.pageSizeString (optional) - Specify page size of the generated PDF. Can beA3,A4,A5,Legal,Letter,Tabloidor an Object containingheightandwidthin microns.printBackgroundBoolean (optional) - Whether to print CSS backgrounds.printSelectionOnlyBoolean (optional) - Whether to print selection only.landscapeBoolean (optional) -truefor landscape,falsefor portrait.
-
callbackFunctionerrorErrordataBuffer
Prints window's web page as PDF with Chromium's preview printing custom settings.
The callback will be called with callback(error, data) on completion. The data is a Buffer that contains the generated PDF data.
The landscape will be ignored if @page CSS at-rule is used in the web page.
By default, an empty options will be regarded as:
{
marginsType: 0,
printBackground: false,
printSelectionOnly: false,
landscape: false
}Use page-break-before: always; CSS style to force to print to a new page.
An example of webContents.printToPDF:
const {BrowserWindow} = require('electron')
const fs = require('fs')
let win = new BrowserWindow({width: 800, height: 600})
win.loadURL('http://github.com')
win.webContents.on('did-finish-load', () => {
// Use default printing options
win.webContents.printToPDF({}, (error, data) => {
if (error) throw error
fs.writeFile('/tmp/print.pdf', data, (error) => {
if (error) throw error
console.log('Write PDF successfully.')
})
})
})contents.addWorkSpace(path)
pathString
Adds the specified path to DevTools workspace. Must be used after DevTools creation:
const {BrowserWindow} = require('electron')
let win = new BrowserWindow()
win.webContents.on('devtools-opened', () => {
win.webContents.addWorkSpace(__dirname)
})contents.setDevToolsWebContents(devToolsWebContents)
devToolsWebContentsWebContents
Uses the devToolsWebContents as the target WebContents to show devtools.
The devToolsWebContents must not have done any navigation, and it should not be used for other purposes after the call.
By default Electron manages the devtools by creating an internal WebContents with native view, which developers have very limited control of. With the setDevToolsWebContents method, developers can use any WebContents to show the devtools in it, including BrowserWindow, BrowserView and <webview> tag.
Note that closing the devtools does not destroy the devToolsWebContents, it is caller's responsibility to destroy devToolsWebContents.
An example of showing devtools in a <webview> tag:
<html>
<head>
<style type="text/css">
* { margin: 0; }
#browser { height: 70%; }
#devtools { height: 30%; }
</style>
</head>
<body>
<webview id="browser" src="https://github.com"></webview>
<webview id="devtools"></webview>
<script>
const browserView = document.getElementById('browser')
const devtoolsView = document.getElementById('devtools')
browserView.addEventListener('dom-ready', () => {
const browser = browserView.getWebContents()
browser.setDevToolsWebContents(devtoolsView.getWebContents())
browser.openDevTools()
})
</script>
</body>
</html>An example of showing devtools in a BrowserWindow:
const {app, BrowserWindow} = require('electron')
let win = null
let devtools = null
app.once('ready', () => {
win = new BrowserWindow()
devtools = new BrowserWindow()
win.loadURL('https://github.com')
win.webContents.setDevToolsWebContents(devtools.webContents)
win.webContents.openDevTools({mode: 'detach'})
})contents.openDevTools([options])
-
optionsObject (optional)modeString - Opens the devtools with specified dock state, can beright,bottom,undocked,detach. Defaults to last used dock state. Inundockedmode it's possible to dock back. Indetachmode it's not.
Opens the devtools.
When contents is a <webview> tag, the mode would be detach by default, explicitly passing an empty mode can force using last used dock state.
contents.closeDevTools()
Closes the devtools.
contents.isDevToolsOpened()
Returns Boolean - Whether the devtools is opened.
contents.isDevToolsFocused()
Returns Boolean - Whether the devtools view is focused .
contents.toggleDevTools()
Toggles the developer tools.
contents.inspectServiceWorker()
Opens the developer tools for the service worker context.
contents.send(channel[, arg1][, arg2][, ...])
channelString...argsany[]
Send an asynchronous message to renderer process via channel, you can also send arbitrary arguments. Arguments will be serialized in JSON internally and hence no functions or prototype chain will be included.
The renderer process can handle the message by listening to channel with the ipcRenderer module.
An example of sending messages from the main process to the renderer process:
// In the main process.
const {app, BrowserWindow} = require('electron')
let win = null
app.on('ready', () => {
win = new BrowserWindow({width: 800, height: 600})
win.loadURL(`file://${__dirname}/index.html`)
win.webContents.on('did-finish-load', () => {
win.webContents.send('ping', 'whoooooooh!')
})
})<!-- index.html -->
<html>
<body>
<script>
require('electron').ipcRenderer.on('ping', (event, message) => {
console.log(message) // Prints 'whoooooooh!'
})
</script>
</body>
</html>contents.enableDeviceEmulation(parameters)
-
parametersObject-
screenPositionString - Specify the screen type to emulate (default:desktop):desktop- Desktop screen type.mobile- Mobile screen type.
screenSizeSize - Set the emulated screen size (screenPosition == mobile).viewPositionPoint - Position the view on the screen (screenPosition == mobile) (default:{x: 0, y: 0}).deviceScaleFactorInteger - Set the device scale factor (if zero defaults to original device scale factor) (default:).viewSizeSize - Set the emulated view size (empty means no override)scaleFloat - Scale of emulated view inside available space (not in fit to view mode) (default:1).
-
Enable device emulation with the given parameters.
contents.disableDeviceEmulation()
Disable device emulation enabled by webContents.enableDeviceEmulation.
contents.sendInputEvent(event)
-
eventObjecttypeString (required) - The type of the event, can bemouseDown,mouseUp,mouseEnter,mouseLeave,contextMenu,mouseWheel,mouseMove,keyDown,keyUporchar.modifiersString[] - An array of modifiers of the event, can includeshift,control,alt,meta,isKeypad,isAutoRepeat,leftButtonDown,middleButtonDown,rightButtonDown,capsLock,numLock,left,right.
Sends an input event to the page. Note: The BrowserWindow containing the contents needs to be focused for sendInputEvent() to work.
For keyboard events, the event object also have following properties:
keyCodeString (required) - The character that will be sent as the keyboard event. Should only use the valid key codes in Accelerator.
For mouse events, the event object also have following properties:
xInteger (required)yInteger (required)buttonString - The button pressed, can beleft,middle,right.globalXIntegerglobalYIntegermovementXIntegermovementYIntegerclickCountInteger
For the mouseWheel event, the event object also have following properties:
deltaXIntegerdeltaYIntegerwheelTicksXIntegerwheelTicksYIntegeraccelerationRatioXIntegeraccelerationRatioYIntegerhasPreciseScrollingDeltasBooleancanScrollBoolean
contents.beginFrameSubscription([onlyDirty ,]callback)
onlyDirtyBoolean (optional) - Defaults tofalse.-
callbackFunctionframeBufferBufferdirtyRectRectangle
Begin subscribing for presentation events and captured frames, the callback will be called with callback(frameBuffer, dirtyRect) when there is a presentation event.
The frameBuffer is a Buffer that contains raw pixel data. On most machines, the pixel data is effectively stored in 32bit BGRA format, but the actual representation depends on the endianness of the processor (most modern processors are little-endian, on machines with big-endian processors the data is in 32bit ARGB format).
The dirtyRect is an object with x, y, width, height properties that describes which part of the page was repainted. If onlyDirty is set to true, frameBuffer will only contain the repainted area. onlyDirty defaults to false.
contents.endFrameSubscription()
End subscribing for frame presentation events.
contents.startDrag(item)
-
itemObjectfileString orfilesArray - The path(s) to the file(s) being dragged.iconNativeImage - The image must be non-empty on macOS.
Sets the item as dragging item for current drag-drop operation, file is the absolute path of the file to be dragged, and icon is the image showing under the cursor when dragging.
contents.savePage(fullPath, saveType, callback)
fullPathString - The full file path.-
saveTypeString - Specify the save type.HTMLOnly- Save only the HTML of the page.HTMLComplete- Save complete-html page.MHTML- Save complete-html page as MHTML.
-
callbackFunction -(error) => {}.errorError
Returns Boolean - true if the process of saving page has been initiated successfully.
const {BrowserWindow} = require('electron')
let win = new BrowserWindow()
win.loadURL('https://github.com')
win.webContents.on('did-finish-load', () => {
win.webContents.savePage('/tmp/test.html', 'HTMLComplete', (error) => {
if (!error) console.log('Save page successfully')
})
})contents.showDefinitionForSelection() macOS
Shows pop-up dictionary that searches the selected word on the page.
contents.setSize(options)
Set the size of the page. This is only supported for <webview> guest contents.
-
optionsObjectenableAutoSizeBoolean (optional) - true to make the webview container automatically resize within the bounds specified by the attributes normal, min and max.normalSize (optional) - Normal size of the page. This can be used in combination with thedisableguestresizeattribute to manually resize the webview guest contents.minSize (optional) - Minimum size of the page. This can be used in combination with thedisableguestresizeattribute to manually resize the webview guest contents.maxSize (optional) - Maximium size of the page. This can be used in combination with thedisableguestresizeattribute to manually resize the webview guest contents.
contents.isOffscreen()
Returns Boolean - Indicates whether offscreen rendering is enabled.
contents.startPainting()
If offscreen rendering is enabled and not painting, start painting.
contents.stopPainting()
If offscreen rendering is enabled and painting, stop painting.
contents.isPainting()
Returns Boolean - If offscreen rendering is enabled returns whether it is currently painting.
contents.setFrameRate(fps)
fpsInteger
If offscreen rendering is enabled sets the frame rate to the specified number. Only values between 1 and 60 are accepted.
contents.getFrameRate()
Returns Integer - If offscreen rendering is enabled returns the current frame rate.
contents.invalidate()
Schedules a full repaint of the window this web contents is in.
If offscreen rendering is enabled invalidates the frame and generates a new one through the 'paint' event.
contents.getWebRTCIPHandlingPolicy()
Returns String - Returns the WebRTC IP Handling Policy.
contents.setWebRTCIPHandlingPolicy(policy)
-
policyString - Specify the WebRTC IP Handling Policy.default- Exposes user's public and local IPs. This is the default behavior. When this policy is used, WebRTC has the right to enumerate all interfaces and bind them to discover public interfaces.default_public_interface_only- Exposes user's public IP, but does not expose user's local IP. When this policy is used, WebRTC should only use the default route used by http. This doesn't expose any local addresses.default_public_and_private_interfaces- Exposes user's public and local IPs. When this policy is used, WebRTC should only use the default route used by http. This also exposes the associated default private address. Default route is the route chosen by the OS on a multi-homed endpoint.disable_non_proxied_udp- Does not expose public or local IPs. When this policy is used, WebRTC should only use TCP to contact peers or servers unless the proxy server supports UDP.
Setting the WebRTC IP handling policy allows you to control which IPs are exposed via WebRTC. See BrowserLeaks for more details.
contents.getOSProcessId()
Returns Integer - The pid of the associated renderer process.
contents.id
A Integer representing the unique ID of this WebContents.
contents.session
A Session used by this webContents.
contents.hostWebContents
A WebContents instance that might own this WebContents.
contents.devToolsWebContents
A WebContents of DevTools for this WebContents.
Note: Users should never store this object because it may become null when the DevTools has been closed.
contents.debugger
A Debugger instance for this webContents.
webFrame
Customize the rendering of the current web page.
Process: Renderer
An example of zooming current page to 200%.
const {webFrame} = require('electron')
webFrame.setZoomFactor(2)Methods
The webFrame module has the following methods:
webFrame.setZoomFactor(factor)
factorNumber - Zoom factor.
Changes the zoom factor to the specified factor. Zoom factor is zoom percent divided by 100, so 300% = 3.0.
webFrame.getZoomFactor()
Returns Number - The current zoom factor.
webFrame.setZoomLevel(level)
levelNumber - Zoom level.
Changes the zoom level to the specified level. The original size is 0 and each increment above or below represents zooming 20% larger or smaller to default limits of 300% and 50% of original size, respectively.
webFrame.getZoomLevel()
Returns Number - The current zoom level.
webFrame.setVisualZoomLevelLimits(minimumLevel, maximumLevel)
minimumLevelNumbermaximumLevelNumber
Sets the maximum and minimum pinch-to-zoom level.
webFrame.setLayoutZoomLevelLimits(minimumLevel, maximumLevel)
minimumLevelNumbermaximumLevelNumber
Sets the maximum and minimum layout-based (i.e. non-visual) zoom level.
webFrame.setSpellCheckProvider(language, autoCorrectWord, provider)
languageStringautoCorrectWordBoolean-
providerObject-
spellCheckFunction - ReturnsBoolean.textString
-
Sets a provider for spell checking in input fields and text areas.
The provider must be an object that has a spellCheck method that returns whether the word passed is correctly spelled.
An example of using node-spellchecker as provider:
const {webFrame} = require('electron')
webFrame.setSpellCheckProvider('en-US', true, {
spellCheck (text) {
return !(require('spellchecker').isMisspelled(text))
}
})webFrame.registerURLSchemeAsSecure(scheme)
schemeString
Registers the scheme as secure scheme.
Secure schemes do not trigger mixed content warnings. For example, https and data are secure schemes because they cannot be corrupted by active network attackers.
webFrame.registerURLSchemeAsBypassingCSP(scheme)
schemeString
Resources will be loaded from this scheme regardless of the current page's Content Security Policy.
webFrame.registerURLSchemeAsPrivileged(scheme[, options])
schemeString-
optionsObject (optional)secureBoolean (optional) - Default true.bypassCSPBoolean (optional) - Default true.allowServiceWorkersBoolean (optional) - Default true.supportFetchAPIBoolean (optional) - Default true.corsEnabledBoolean (optional) - Default true.
Registers the scheme as secure, bypasses content security policy for resources, allows registering ServiceWorker and supports fetch API.
Specify an option with the value of false to omit it from the registration. An example of registering a privileged scheme, without bypassing Content Security Policy:
const {webFrame} = require('electron')
webFrame.registerURLSchemeAsPrivileged('foo', { bypassCSP: false })webFrame.executeJavaScript(code[, userGesture, callback])
codeStringuserGestureBoolean (optional) - Default isfalse.-
callbackFunction (optional) - Called after script has been executed.resultAny
Returns Promise - A promise that resolves with the result of the executed code or is rejected if the result of the code is a rejected promise.
Evaluates code in page.
In the browser window some HTML APIs like requestFullScreen can only be invoked by a gesture from the user. Setting userGesture to true will remove this limitation.
webFrame.executeJavaScriptInIsolatedWorld(worldId, scripts[, userGesture, callback])
worldIdIntegerscriptsWebSource[]userGestureBoolean (optional) - Default isfalse.-
callbackFunction (optional) - Called after script has been executed.resultAny
Work like executeJavaScript but evaluates scripts in isolated context.
webFrame.setIsolatedWorldContentSecurityPolicy(worldId, csp)
worldIdIntegercspString
Set the content security policy of the isolated world.
webFrame.setIsolatedWorldHumanReadableName(worldId, name)
worldIdIntegernameString
Set the name of the isolated world. Useful in devtools.
webFrame.setIsolatedWorldSecurityOrigin(worldId, securityOrigin)
worldIdIntegersecurityOriginString
Set the security origin of the isolated world.
webFrame.getResourceUsage()
Returns Object:
imagesMemoryUsageDetailscssStyleSheetsMemoryUsageDetailsxslStyleSheetsMemoryUsageDetailsfontsMemoryUsageDetailsotherMemoryUsageDetails
Returns an object describing usage information of Blink's internal memory caches.
const {webFrame} = require('electron')
console.log(webFrame.getResourceUsage())This will generate:
{
images: {
count: 22,
size: 2549,
liveSize: 2542
},
cssStyleSheets: { /* same with "images" */ },
xslStyleSheets: { /* same with "images" */ },
fonts: { /* same with "images" */ },
other: { /* same with "images" */ }
}webFrame.clearCache()
Attempts to free memory that is no longer being used (like images from a previous navigation).
Note that blindly calling this method probably makes Electron slower since it will have to refill these emptied caches, you should only call it if an event in your app has occurred that makes you think your page is actually using less memory (i.e. you have navigated from a super heavy page to a mostly empty one, and intend to stay there).
Class: WebRequest
Intercept and modify the contents of a request at various stages of its lifetime.
Process: Main
Instances of the WebRequest class are accessed by using the webRequest property of a Session.
The methods of WebRequest accept an optional filter and a listener. The listener will be called with listener(details) when the API's event has happened. The details object describes the request. Passing null as listener will unsubscribe from the event.
The filter object has a urls property which is an Array of URL patterns that will be used to filter out the requests that do not match the URL patterns. If the filter is omitted then all requests will be matched.
For certain events the listener is passed with a callback, which should be called with a response object when listener has done its work.
An example of adding User-Agent header for requests:
const {session} = require('electron')
// Modify the user agent for all requests to the following urls.
const filter = {
urls: ['https://*.github.com/*', '*://electron.github.io']
}
session.defaultSession.webRequest.onBeforeSendHeaders(filter, (details, callback) => {
details.requestHeaders['User-Agent'] = 'MyAgent'
callback({cancel: false, requestHeaders: details.requestHeaders})
})Instance Methods
The following methods are available on instances of WebRequest:
webRequest.onBeforeRequest([filter, ]listener)
-
filterObject (optional)urlsString[] - Array of URL patterns that will be used to filter out the requests that do not match the URL patterns.
-
listenerFunction-
detailsObjectidIntegerurlStringmethodStringwebContentsIdInteger (optional)resourceTypeStringtimestampDoubleuploadDataUploadData[]
-
callbackFunction-
responseObjectcancelBoolean (optional)redirectURLString (optional) - The original request is prevented from being sent or completed and is instead redirected to the given URL.
-
-
The listener will be called with listener(details, callback) when a request is about to occur.
The uploadData is an array of UploadData objects.
The callback has to be called with an response object.
webRequest.onBeforeSendHeaders([filter, ]listener)
-
filterObject (optional)urlsString[] - Array of URL patterns that will be used to filter out the requests that do not match the URL patterns.
listenerFunction
The listener will be called with listener(details, callback) before sending an HTTP request, once the request headers are available. This may occur after a TCP connection is made to the server, but before any http data is sent.
-
detailsObjectidIntegerurlStringmethodStringwebContentsIdInteger (optional)resourceTypeStringtimestampDoublerequestHeadersObject
-
callbackFunction-
responseObjectcancelBoolean (optional)requestHeadersObject (optional) - When provided, request will be made with these headers.
-
The callback has to be called with an response object.
webRequest.onSendHeaders([filter, ]listener)
-
filterObject (optional)urlsString[] - Array of URL patterns that will be used to filter out the requests that do not match the URL patterns.
-
listenerFunction-
detailsObjectidIntegerurlStringmethodStringwebContentsIdInteger (optional)resourceTypeStringtimestampDoublerequestHeadersObject
-
The listener will be called with listener(details) just before a request is going to be sent to the server, modifications of previous onBeforeSendHeaders response are visible by the time this listener is fired.
webRequest.onHeadersReceived([filter, ]listener)
-
filterObject (optional)urlsString[] - Array of URL patterns that will be used to filter out the requests that do not match the URL patterns.
listenerFunction
The listener will be called with listener(details, callback) when HTTP response headers of a request have been received.
-
detailsObjectidIntegerurlStringmethodStringwebContentsIdInteger (optional)resourceTypeStringtimestampDoublestatusLineStringstatusCodeIntegerresponseHeadersObject
-
callbackFunction-
responseObjectcancelBooleanresponseHeadersObject (optional) - When provided, the server is assumed to have responded with these headers.statusLineString (optional) - Should be provided when overridingresponseHeadersto change header status otherwise original response header's status will be used.
-
The callback has to be called with an response object.
webRequest.onResponseStarted([filter, ]listener)
-
filterObject (optional)urlsString[] - Array of URL patterns that will be used to filter out the requests that do not match the URL patterns.
-
listenerFunction-
detailsObjectidIntegerurlStringmethodStringwebContentsIdInteger (optional)resourceTypeStringtimestampDoubleresponseHeadersObjectfromCacheBoolean - Indicates whether the response was fetched from disk cache.statusCodeIntegerstatusLineString
-
The listener will be called with listener(details) when first byte of the response body is received. For HTTP requests, this means that the status line and response headers are available.
webRequest.onBeforeRedirect([filter, ]listener)
-
filterObject (optional)urlsString[] - Array of URL patterns that will be used to filter out the requests that do not match the URL patterns.
-
listenerFunction-
detailsObjectidIntegerurlStringmethodStringwebContentsIdInteger (optional)resourceTypeStringtimestampDoubleredirectURLStringstatusCodeIntegeripString (optional) - The server IP address that the request was actually sent to.fromCacheBooleanresponseHeadersObject
-
The listener will be called with listener(details) when a server initiated redirect is about to occur.
webRequest.onCompleted([filter, ]listener)
-
filterObject (optional)urlsString[] - Array of URL patterns that will be used to filter out the requests that do not match the URL patterns.
-
listenerFunction-
detailsObjectidIntegerurlStringmethodStringwebContentsIdInteger (optional)resourceTypeStringtimestampDoubleresponseHeadersObjectfromCacheBooleanstatusCodeIntegerstatusLineString
-
The listener will be called with listener(details) when a request is completed.
webRequest.onErrorOccurred([filter, ]listener)
-
filterObject (optional)urlsString[] - Array of URL patterns that will be used to filter out the requests that do not match the URL patterns.
-
listenerFunction-
detailsObjectidIntegerurlStringmethodStringwebContentsIdInteger (optional)resourceTypeStringtimestampDoublefromCacheBooleanerrorString - The error description.
-
The listener will be called with listener(details) when an error occurs.
WebSource Object
codeStringurlString (optional)startLineInteger (optional) - Default is 1.
<webview> Tag
Display external web content in an isolated frame and process.
Process: Renderer
Use the webview tag to embed 'guest' content (such as web pages) in your Electron app. The guest content is contained within the webview container. An embedded page within your app controls how the guest content is laid out and rendered.
Unlike an iframe, the webview runs in a separate process than your app. It doesn't have the same permissions as your web page and all interactions between your app and embedded content will be asynchronous. This keeps your app safe from the embedded content. Note: Most methods called on the webview from the host page require a synchronous call to the main process.
Example
To embed a web page in your app, add the webview tag to your app's embedder page (this is the app page that will display the guest content). In its simplest form, the webview tag includes the src of the web page and css styles that control the appearance of the webview container:
<webview id="foo" src="https://www.github.com/" style="display:inline-flex; width:640px; height:480px"></webview>If you want to control the guest content in any way, you can write JavaScript that listens for webview events and responds to those events using the webview methods. Here's sample code with two event listeners: one that listens for the web page to start loading, the other for the web page to stop loading, and displays a "loading..." message during the load time:
<script>
onload = () => {
const webview = document.querySelector('webview')
const indicator = document.querySelector('.indicator')
const loadstart = () => {
indicator.innerText = 'loading...'
}
const loadstop = () => {
indicator.innerText = ''
}
webview.addEventListener('did-start-loading', loadstart)
webview.addEventListener('did-stop-loading', loadstop)
}
</script>CSS Styling Notes
Please note that the webview tag's style uses display:flex; internally to ensure the child object element fills the full height and width of its webview container when used with traditional and flexbox layouts (since v0.36.11). Please do not overwrite the default display:flex; CSS property, unless specifying display:inline-flex; for inline layout.
webview has issues being hidden using the hidden attribute or using display: none;. It can cause unusual rendering behaviour within its child browserplugin object and the web page is reloaded when the webview is un-hidden. The recommended approach is to hide the webview using visibility: hidden.
<style>
webview {
display:inline-flex;
width:640px;
height:480px;
}
webview.hide {
visibility: hidden;
}
</style>Tag Attributes
The webview tag has the following attributes:
src
<webview src="https://www.github.com/"></webview>Returns the visible URL. Writing to this attribute initiates top-level navigation.
Assigning src its own value will reload the current page.
The src attribute can also accept data URLs, such as data:text/plain,Hello, world!.
autosize
<webview src="https://www.github.com/" autosize minwidth="576" minheight="432"></webview>When this attribute is present the webview container will automatically resize within the bounds specified by the attributes minwidth, minheight, maxwidth, and maxheight. These constraints do not impact the webview unless autosize is enabled. When autosize is enabled, the webview container size cannot be less than the minimum values or greater than the maximum.
nodeintegration
<webview src="http://www.google.com/" nodeintegration></webview>When this attribute is present the guest page in webview will have node integration and can use node APIs like require and process to access low level system resources. Node integration is disabled by default in the guest page.
plugins
<webview src="https://www.github.com/" plugins></webview>When this attribute is present the guest page in webview will be able to use browser plugins. Plugins are disabled by default.
preload
<webview src="https://www.github.com/" preload="./test.js"></webview>Specifies a script that will be loaded before other scripts run in the guest page. The protocol of script's URL must be either file: or asar:, because it will be loaded by require in guest page under the hood.
When the guest page doesn't have node integration this script will still have access to all Node APIs, but global objects injected by Node will be deleted after this script has finished executing.
Note: This option will be appear as preloadURL (not preload) in the webPreferences specified to the will-attach-webview event.
httpreferrer
<webview src="https://www.github.com/" httpreferrer="http://cheng.guru"></webview>Sets the referrer URL for the guest page.
useragent
<webview src="https://www.github.com/" useragent="Mozilla/5.0 (Windows NT 6.1; WOW64; Trident/7.0; AS; rv:11.0) like Gecko"></webview>Sets the user agent for the guest page before the page is navigated to. Once the page is loaded, use the setUserAgent method to change the user agent.
disablewebsecurity
<webview src="https://www.github.com/" disablewebsecurity></webview>When this attribute is present the guest page will have web security disabled. Web security is enabled by default.
partition
<webview src="https://github.com" partition="persist:github"></webview>
<webview src="https://electronjs.org" partition="electron"></webview>Sets the session used by the page. If partition starts with persist:, the page will use a persistent session available to all pages in the app with the same partition. if there is no persist: prefix, the page will use an in-memory session. By assigning the same partition, multiple pages can share the same session. If the partition is unset then default session of the app will be used.
This value can only be modified before the first navigation, since the session of an active renderer process cannot change. Subsequent attempts to modify the value will fail with a DOM exception.
allowpopups
<webview src="https://www.github.com/" allowpopups></webview>When this attribute is present the guest page will be allowed to open new windows. Popups are disabled by default.
webpreferences
<webview src="https://github.com" webpreferences="allowRunningInsecureContent, javascript=no"></webview>A list of strings which specifies the web preferences to be set on the webview, separated by ,. The full list of supported preference strings can be found in BrowserWindow.
The string follows the same format as the features string in window.open. A name by itself is given a true boolean value. A preference can be set to another value by including an =, followed by the value. Special values yes and 1 are interpreted as true, while no and are interpreted as false.
blinkfeatures
<webview src="https://www.github.com/" blinkfeatures="PreciseMemoryInfo, CSSVariables"></webview>A list of strings which specifies the blink features to be enabled separated by ,. The full list of supported feature strings can be found in the RuntimeEnabledFeatures.json5 file.
disableblinkfeatures
<webview src="https://www.github.com/" disableblinkfeatures="PreciseMemoryInfo, CSSVariables"></webview>A list of strings which specifies the blink features to be disabled separated by ,. The full list of supported feature strings can be found in the RuntimeEnabledFeatures.json5 file.
guestinstance
<webview src="https://www.github.com/" guestinstance="3"></webview>A value that links the webview to a specific webContents. When a webview first loads a new webContents is created and this attribute is set to its instance identifier. Setting this attribute on a new or existing webview connects it to the existing webContents that currently renders in a different webview.
The existing webview will see the destroy event and will then create a new webContents when a new url is loaded.
disableguestresize
<webview src="https://www.github.com/" disableguestresize></webview>When this attribute is present the webview contents will be prevented from resizing when the webview element itself is resized.
This can be used in combination with webContents.setSize to manually resize the webview contents in reaction to a window size change. This can make resizing faster compared to relying on the webview element bounds to automatically resize the contents.
const {webContents} = require('electron')
// We assume that `win` points to a `BrowserWindow` instance containing a
// `<webview>` with `disableguestresize`.
win.on('resize', () => {
const [width, height] = win.getContentSize()
for (let wc of webContents.getAllWebContents()) {
// Check if `wc` belongs to a webview in the `win` window.
if (wc.hostWebContents &&
wc.hostWebContents.id === win.webContents.id) {
wc.setSize({
normal: {
width: width,
height: height
}
})
}
}
})Methods
The webview tag has the following methods:
Note: The webview element must be loaded before using the methods.
Example
const webview = document.querySelector('webview')
webview.addEventListener('dom-ready', () => {
webview.openDevTools()
})<webview>.loadURL(url[, options])
urlURL-
optionsObject (optional)httpReferrerString (optional) - A HTTP Referrer url.userAgentString (optional) - A user agent originating the request.extraHeadersString (optional) - Extra headers separated by "\n"postData(UploadRawData[] | UploadFile[] | UploadFileSystem[] | UploadBlob[]) (optional) -baseURLForDataURLString (optional) - Base url (with trailing path separator) for files to be loaded by the data url. This is needed only if the specifiedurlis a data url and needs to load other files.
Loads the url in the webview, the url must contain the protocol prefix, e.g. the http:// or file://.
<webview>.getURL()
Returns String - The URL of guest page.
<webview>.getTitle()
Returns String - The title of guest page.
<webview>.isLoading()
Returns Boolean - Whether guest page is still loading resources.
<webview>.isWaitingForResponse()
Returns Boolean - Whether the guest page is waiting for a first-response for the main resource of the page.
<webview>.stop()
Stops any pending navigation.
<webview>.reload()
Reloads the guest page.
<webview>.reloadIgnoringCache()
Reloads the guest page and ignores cache.
<webview>.canGoBack()
Returns Boolean - Whether the guest page can go back.
<webview>.canGoForward()
Returns Boolean - Whether the guest page can go forward.
<webview>.canGoToOffset(offset)
offsetInteger
Returns Boolean - Whether the guest page can go to offset.
<webview>.clearHistory()
Clears the navigation history.
<webview>.goBack()
Makes the guest page go back.
<webview>.goForward()
Makes the guest page go forward.
<webview>.goToOffset(offset)
offsetInteger
Navigates to the specified offset from the "current entry".
<webview>.isCrashed()
Returns Boolean - Whether the renderer process has crashed.
<webview>.getUserAgent()
Returns String - The user agent for guest page.
<webview>.executeJavaScript(code[, userGesture, callback])
codeStringuserGestureBoolean (optional) - Defaultfalse.-
callbackFunction (optional) - Called after script has been executed.resultAny
Evaluates code in page. If userGesture is set, it will create the user gesture context in the page. HTML APIs like requestFullScreen, which require user action, can take advantage of this option for automation.
<webview>.openDevTools()
Opens a DevTools window for guest page.
<webview>.closeDevTools()
Closes the DevTools window of guest page.
<webview>.isDevToolsOpened()
Returns Boolean - Whether guest page has a DevTools window attached.
<webview>.isDevToolsFocused()
Returns Boolean - Whether DevTools window of guest page is focused.
<webview>.inspectElement(x, y)
xIntegeryInteger
Starts inspecting element at position (x, y) of guest page.
<webview>.inspectServiceWorker()
Opens the DevTools for the service worker context present in the guest page.
<webview>.isAudioMuted()
Returns Boolean - Whether guest page has been muted.
<webview>.undo()
Executes editing command undo in page.
<webview>.redo()
Executes editing command redo in page.
<webview>.cut()
Executes editing command cut in page.
<webview>.copy()
Executes editing command copy in page.
<webview>.paste()
Executes editing command paste in page.
<webview>.pasteAndMatchStyle()
Executes editing command pasteAndMatchStyle in page.
<webview>.delete()
Executes editing command delete in page.
<webview>.selectAll()
Executes editing command selectAll in page.
<webview>.unselect()
Executes editing command unselect in page.
<webview>.findInPage(text[, options])
textString - Content to be searched, must not be empty.-
optionsObject (optional)forwardBoolean (optional) - Whether to search forward or backward, defaults totrue.findNextBoolean (optional) - Whether the operation is first request or a follow up, defaults tofalse.matchCaseBoolean (optional) - Whether search should be case-sensitive, defaults tofalse.wordStartBoolean (optional) - Whether to look only at the start of words. defaults tofalse.medialCapitalAsWordStartBoolean (optional) - When combined withwordStart, accepts a match in the middle of a word if the match begins with an uppercase letter followed by a lowercase or non-letter. Accepts several other intra-word matches, defaults tofalse.
Returns Integer - The request id used for the request.
Starts a request to find all matches for the text in the web page. The result of the request can be obtained by subscribing to found-in-page event.
<webview>.stopFindInPage(action)
-
actionString - Specifies the action to take place when ending<webview>.findInPagerequest.clearSelection- Clear the selection.keepSelection- Translate the selection into a normal selection.activateSelection- Focus and click the selection node.
Stops any findInPage request for the webview with the provided action.
<webview>.print([options])
-
optionsObject (optional)silentBoolean (optional) - Don't ask user for print settings. Default isfalse.printBackgroundBoolean (optional) - Also prints the background color and image of the web page. Default isfalse.deviceNameString (optional) - Set the printer device name to use. Default is''.
Prints webview's web page. Same as webContents.print([options]).
<webview>.printToPDF(options, callback)
-
optionsObjectmarginsTypeInteger (optional) - Specifies the type of margins to use. Uses 0 for default margin, 1 for no margin, and 2 for minimum margin.pageSizeString (optional) - Specify page size of the generated PDF. Can beA3,A4,A5,Legal,Letter,Tabloidor an Object containingheightandwidthin microns.printBackgroundBoolean (optional) - Whether to print CSS backgrounds.printSelectionOnlyBoolean (optional) - Whether to print selection only.landscapeBoolean (optional) -truefor landscape,falsefor portrait.
-
callbackFunctionerrorErrordataBuffer
Prints webview's web page as PDF, Same as webContents.printToPDF(options, callback).
<webview>.capturePage([rect, ]callback)
rectRectangle (optional) - The area of the page to be captured.-
callbackFunctionimageNativeImage
Captures a snapshot of the webview's page. Same as webContents.capturePage([rect, ]callback).
<webview>.send(channel[, arg1][, arg2][, ...])
channelString...argsany[]
Send an asynchronous message to renderer process via channel, you can also send arbitrary arguments. The renderer process can handle the message by listening to the channel event with the ipcRenderer module.
See webContents.send for examples.
<webview>.sendInputEvent(event)
eventObject
Sends an input event to the page.
See webContents.sendInputEvent for detailed description of event object.
<webview>.setZoomFactor(factor)
factorNumber - Zoom factor.
Changes the zoom factor to the specified factor. Zoom factor is zoom percent divided by 100, so 300% = 3.0.
<webview>.setZoomLevel(level)
levelNumber - Zoom level.
Changes the zoom level to the specified level. The original size is 0 and each increment above or below represents zooming 20% larger or smaller to default limits of 300% and 50% of original size, respectively.
<webview>.showDefinitionForSelection() macOS
Shows pop-up dictionary that searches the selected word on the page.
<webview>.getWebContents()
Returns WebContents - The web contents associated with this webview.
DOM events
The following DOM events are available to the webview tag:
Event: 'load-commit'
Returns:
urlStringisMainFrameBoolean
Fired when a load has committed. This includes navigation within the current document as well as subframe document-level loads, but does not include asynchronous resource loads.
Event: 'did-finish-load'
Fired when the navigation is done, i.e. the spinner of the tab will stop spinning, and the onload event is dispatched.
Event: 'did-fail-load'
Returns:
errorCodeIntegererrorDescriptionStringvalidatedURLStringisMainFrameBoolean
This event is like did-finish-load, but fired when the load failed or was cancelled, e.g. window.stop() is invoked.
Event: 'did-start-loading'
Corresponds to the points in time when the spinner of the tab starts spinning.
Event: 'did-stop-loading'
Corresponds to the points in time when the spinner of the tab stops spinning.
Event: 'did-get-response-details'
Returns:
statusBooleannewURLStringoriginalURLStringhttpResponseCodeIntegerrequestMethodStringreferrerStringheadersObjectresourceTypeString
Fired when details regarding a requested resource is available. status indicates socket connection to download the resource.
Event: 'did-get-redirect-request'
Returns:
oldURLStringnewURLStringisMainFrameBoolean
Fired when a redirect was received while requesting a resource.
Event: 'dom-ready'
Fired when document in the given frame is loaded.
Event: 'page-title-updated'
Returns:
titleStringexplicitSetBoolean
Fired when page title is set during navigation. explicitSet is false when title is synthesized from file url.
Event: 'page-favicon-updated'
Returns:
faviconsString[] - Array of URLs.
Fired when page receives favicon urls.
Event: 'enter-html-full-screen'
Fired when page enters fullscreen triggered by HTML API.
Event: 'leave-html-full-screen'
Fired when page leaves fullscreen triggered by HTML API.
Event: 'console-message'
Returns:
levelIntegermessageStringlineIntegersourceIdString
Fired when the guest window logs a console message.
The following example code forwards all log messages to the embedder's console without regard for log level or other properties.
const webview = document.querySelector('webview')
webview.addEventListener('console-message', (e) => {
console.log('Guest page logged a message:', e.message)
})Event: 'found-in-page'
Returns:
-
resultObjectrequestIdIntegeractiveMatchOrdinalInteger - Position of the active match.matchesInteger - Number of Matches.selectionAreaObject - Coordinates of first match region.finalUpdateBoolean
Fired when a result is available for webview.findInPage request.
const webview = document.querySelector('webview')
webview.addEventListener('found-in-page', (e) => {
webview.stopFindInPage('keepSelection')
})
const requestId = webview.findInPage('test')
console.log(requestId)Event: 'new-window'
Returns:
urlStringframeNameStringdispositionString - Can bedefault,foreground-tab,background-tab,new-window,save-to-diskandother.optionsObject - The options which should be used for creating the newBrowserWindow.
Fired when the guest page attempts to open a new browser window.
The following example code opens the new url in system's default browser.
const {shell} = require('electron')
const webview = document.querySelector('webview')
webview.addEventListener('new-window', (e) => {
const protocol = require('url').parse(e.url).protocol
if (protocol === 'http:' || protocol === 'https:') {
shell.openExternal(e.url)
}
})Event: 'will-navigate'
Returns:
urlString
Emitted when a user or the page wants to start navigation. It can happen when the window.location object is changed or a user clicks a link in the page.
This event will not emit when the navigation is started programmatically with APIs like <webview>.loadURL and <webview>.back.
It is also not emitted during in-page navigation, such as clicking anchor links or updating the window.location.hash. Use did-navigate-in-page event for this purpose.
Calling event.preventDefault() does NOT have any effect.
Event: 'did-navigate'
Returns:
urlString
Emitted when a navigation is done.
This event is not emitted for in-page navigations, such as clicking anchor links or updating the window.location.hash. Use did-navigate-in-page event for this purpose.
Event: 'did-navigate-in-page'
Returns:
isMainFrameBooleanurlString
Emitted when an in-page navigation happened.
When in-page navigation happens, the page URL changes but does not cause navigation outside of the page. Examples of this occurring are when anchor links are clicked or when the DOM hashchange event is triggered.
Event: 'close'
Fired when the guest page attempts to close itself.
The following example code navigates the webview to about:blank when the guest attempts to close itself.
const webview = document.querySelector('webview')
webview.addEventListener('close', () => {
webview.src = 'about:blank'
})Event: 'ipc-message'
Returns:
channelStringargsArray
Fired when the guest page has sent an asynchronous message to embedder page.
With sendToHost method and ipc-message event you can easily communicate between guest page and embedder page:
// In embedder page.
const webview = document.querySelector('webview')
webview.addEventListener('ipc-message', (event) => {
console.log(event.channel)
// Prints "pong"
})
webview.send('ping')// In guest page.
const {ipcRenderer} = require('electron')
ipcRenderer.on('ping', () => {
ipcRenderer.sendToHost('pong')
})Event: 'crashed'
Fired when the renderer process is crashed.
Event: 'gpu-crashed'
Fired when the gpu process is crashed.
Event: 'destroyed'
Fired when the WebContents is destroyed.
Event: 'media-started-playing'
Emitted when media starts playing.
Event: 'media-paused'
Emitted when media is paused or done playing.
Event: 'did-change-theme-color'
Returns:
themeColorString
Emitted when a page's theme color changes. This is usually due to encountering a meta tag:
<meta name='theme-color' content='#ff0000'>Event: 'update-target-url'
Returns:
urlString
Emitted when mouse moves over a link or the keyboard moves the focus to a link.
Event: 'devtools-opened'
Emitted when DevTools is opened.
Event: 'devtools-closed'
Emitted when DevTools is closed.
Event: 'devtools-focused'
Emitted when DevTools is focused / opened.
window.open Function
Open a new window and load a URL.
When window.open is called to create a new window in a web page, a new instance of BrowserWindow will be created for the url and a proxy will be returned to window.open to let the page have limited control over it.
The proxy has limited standard functionality implemented to be compatible with traditional web pages. For full control of the new window you should create a BrowserWindow directly.
The newly created BrowserWindow will inherit the parent window's options by default. To override inherited options you can set them in the features string.
window.open(url[, frameName][, features])
urlStringframeNameString (optional)featuresString (optional)
Returns BrowserWindowProxy - Creates a new window and returns an instance of BrowserWindowProxy class.
The features string follows the format of standard browser, but each feature has to be a field of BrowserWindow's options.
Notes:
- Node integration will always be disabled in the opened
windowif it is disabled on the parent window. - Context isolation will always be enabled in the opened
windowif it is enabled on the parent window. - JavaScript will always be disabled in the opened
windowif it is disabled on the parent window. - Non-standard features (that are not handled by Chromium or Electron) given in
featureswill be passed to any registeredwebContent'snew-windowevent handler in theadditionalFeaturesargument.
window.opener.postMessage(message, targetOrigin)
messageStringtargetOriginString
Sends a message to the parent window with the specified origin or * for no origin preference.
Using Chrome's window.open() implementation
If you want to use Chrome's built-in window.open() implementation, set nativeWindowOpen to true in the webPreferences options object.
Native window.open() allows synchronous access to opened windows so it is convenient choice if you need to open a dialog or a preferences window.
This option can also be set on <webview> tags as well:
<webview webpreferences="nativeWindowOpen=yes"></webview>The creation of the BrowserWindow is customizable via WebContents's new-window event.
// main process
const mainWindow = new BrowserWindow({
width: 800,
height: 600,
webPreferences: {
nativeWindowOpen: true
}
})
mainWindow.webContents.on('new-window', (event, url, frameName, disposition, options, additionalFeatures) => {
if (frameName === 'modal') {
// open window as modal
event.preventDefault()
Object.assign(options, {
modal: true,
parent: mainWindow,
width: 100,
height: 100
})
event.newGuest = new BrowserWindow(options)
}
})// renderer process (mainWindow)
let modal = window.open('', 'modal')
modal.document.write('<h1>Hello</h1>')Windows Store Guide
With Windows 10, the good old win32 executable got a new sibling: The Universal Windows Platform. The new .appx format does not only enable a number of new powerful APIs like Cortana or Push Notifications, but through the Windows Store, also simplifies installation and updating.
Microsoft developed a tool that compiles Electron apps as .appx packages, enabling developers to use some of the goodies found in the new application model. This guide explains how to use it - and what the capabilities and limitations of an Electron AppX package are.
Background and Requirements
Windows 10 "Anniversary Update" is able to run win32 .exe binaries by launching them together with a virtualized filesystem and registry. Both are created during compilation by running app and installer inside a Windows Container, allowing Windows to identify exactly which modifications to the operating system are done during installation. Pairing the executable with a virtual filesystem and a virtual registry allows Windows to enable one-click installation and uninstallation.
In addition, the exe is launched inside the appx model - meaning that it can use many of the APIs available to the Universal Windows Platform. To gain even more capabilities, an Electron app can pair up with an invisible UWP background task launched together with the exe - sort of launched as a sidekick to run tasks in the background, receive push notifications, or to communicate with other UWP applications.
To compile any existing Electron app, ensure that you have the following requirements:
- Windows 10 with Anniversary Update (released August 2nd, 2016)
- The Windows 10 SDK, downloadable here
- At least Node 4 (to check, run
node -v)
Then, go and install the electron-windows-store CLI:
npm install -g electron-windows-storeStep 1: Package Your Electron Application
Package the application using electron-packager (or a similar tool). Make sure to remove node_modules that you don't need in your final application, since any module you don't actually need will increase your application's size.
The output should look roughly like this:
├── Ghost.exe
├── LICENSE
├── content_resources_200_percent.pak
├── content_shell.pak
├── d3dcompiler_47.dll
├── ffmpeg.dll
├── icudtl.dat
├── libEGL.dll
├── libGLESv2.dll
├── locales
│ ├── am.pak
│ ├── ar.pak
│ ├── [...]
├── natives_blob.bin
├── node.dll
├── resources
│ ├── app
│ └── atom.asar
├── snapshot_blob.bin
├── squirrel.exe
└── ui_resources_200_percent.pakStep 2: Running electron-windows-store
From an elevated PowerShell (run it "as Administrator"), run electron-windows-store with the required parameters, passing both the input and output directories, the app's name and version, and confirmation that node_modules should be flattened.
electron-windows-store `
--input-directory C:\myelectronapp `
--output-directory C:\output\myelectronapp `
--flatten true `
--package-version 1.0.0.0 `
--package-name myelectronappOnce executed, the tool goes to work: It accepts your Electron app as an input, flattening the node_modules. Then, it archives your application as app.zip. Using an installer and a Windows Container, the tool creates an "expanded" AppX package - including the Windows Application Manifest (AppXManifest.xml) as well as the virtual file system and the virtual registry inside your output folder.
Once the expanded AppX files are created, the tool uses the Windows App Packager (MakeAppx.exe) to create a single-file AppX package from those files on disk. Finally, the tool can be used to create a trusted certificate on your computer to sign the new AppX package. With the signed AppX package, the CLI can also automatically install the package on your machine.
Step 3: Using the AppX Package
In order to run your package, your users will need Windows 10 with the so-called "Anniversary Update" - details on how to update Windows can be found here.
In opposition to traditional UWP apps, packaged apps currently need to undergo a manual verification process, for which you can apply here. In the meantime, all users will be able to install your package by double-clicking it, so a submission to the store might not be necessary if you're looking for an easier installation method. In managed environments (usually enterprises), the Add-AppxPackage PowerShell Cmdlet can be used to install it in an automated fashion.
Another important limitation is that the compiled AppX package still contains a win32 executable - and will therefore not run on Xbox, HoloLens, or Phones.
Optional: Add UWP Features using a BackgroundTask
You can pair your Electron app up with an invisible UWP background task that gets to make full use of Windows 10 features - like push notifications, Cortana integration, or live tiles.
To check out how an Electron app that uses a background task to send toast notifications and live tiles, check out the Microsoft-provided sample.
Optional: Convert using Container Virtualization
To generate the AppX package, the electron-windows-store CLI uses a template that should work for most Electron apps. However, if you are using a custom installer, or should you experience any trouble with the generated package, you can attempt to create a package using compilation with a Windows Container - in that mode, the CLI will install and run your application in blank Windows Container to determine what modifications your application is exactly doing to the operating system.
Before running the CLI for the first time, you will have to setup the "Windows Desktop App Converter". This will take a few minutes, but don't worry - you only have to do this once. Download and Desktop App Converter from here. You will receive two files: DesktopAppConverter.zip and BaseImage-14316.wim.
- Unzip
DesktopAppConverter.zip. From an elevated PowerShell (opened with "run as Administrator", ensure that your systems execution policy allows us to run everything we intend to run by callingSet-ExecutionPolicy bypass. - Then, run the installation of the Desktop App Converter, passing in the location of the Windows base Image (downloaded as
BaseImage-14316.wim), by calling.\DesktopAppConverter.ps1 -Setup -BaseImage .\BaseImage-14316.wim. - If running the above command prompts you for a reboot, please restart your machine and run the above command again after a successful restart.
Once installation succeeded, you can move on to compiling your Electron app.
Windows Taskbar
Electron has APIs to configure the app's icon in the Windows taskbar. Supported are the creation of a JumpList, custom thumbnails and toolbars, icon overlays, and the so-called "Flash Frame" effect, but Electron also uses the app's dock icon to implement cross-platform features like recent documents and application progress.
JumpList
Windows allows apps to define a custom context menu that shows up when users right-click the app's icon in the task bar. That context menu is called JumpList. You specify custom actions in the Tasks category of JumpList, as quoted from MSDN:
Applications define tasks based on both the program's features and the key things a user is expected to do with them. Tasks should be context-free, in that the application does not need to be running for them to work. They should also be the statistically most common actions that a normal user would perform in an application, such as compose an email message or open the calendar in a mail program, create a new document in a word processor, launch an application in a certain mode, or launch one of its subcommands. An application should not clutter the menu with advanced features that standard users won't need or one-time actions such as registration. Do not use tasks for promotional items such as upgrades or special offers.
It is strongly recommended that the task list be static. It should remain the same regardless of the state or status of the application. While it is possible to vary the list dynamically, you should consider that this could confuse the user who does not expect that portion of the destination list to change.
Tasks of Internet Explorer:

Unlike the dock menu in macOS which is a real menu, user tasks in Windows work like application shortcuts such that when user clicks a task, a program will be executed with specified arguments.
To set user tasks for your application, you can use app.setUserTasks API:
const { app } = require('electron')
app.setUserTasks([
{
program: process.execPath,
arguments: '--new-window',
iconPath: process.execPath,
iconIndex: 0,
title: 'New Window',
description: 'Create a new window'
}
])To clean your tasks list, call app.setUserTasks with an empty array:
const { app } = require('electron')
app.setUserTasks([])The user tasks will still show even after your application closes, so the icon and program path specified for a task should exist until your application is uninstalled.
Thumbnail Toolbars
On Windows you can add a thumbnail toolbar with specified buttons in a taskbar layout of an application window. It provides users a way to access to a particular window's command without restoring or activating the window.
From MSDN, it's illustrated:
This toolbar is the familiar standard toolbar common control. It has a maximum of seven buttons. Each button's ID, image, tooltip, and state are defined in a structure, which is then passed to the taskbar. The application can show, enable, disable, or hide buttons from the thumbnail toolbar as required by its current state.
For example, Windows Media Player might offer standard media transport controls such as play, pause, mute, and stop.
Thumbnail toolbar of Windows Media Player:

You can use BrowserWindow.setThumbarButtons to set thumbnail toolbar in your application:
const { BrowserWindow } = require('electron')
const path = require('path')
const win = new BrowserWindow()
win.setThumbarButtons([
{
tooltip: 'button1',
icon: path.join(__dirname, 'button1.png'),
click () { console.log('button1 clicked') }
}, {
tooltip: 'button2',
icon: path.join(__dirname, 'button2.png'),
flags: ['enabled', 'dismissonclick'],
click () { console.log('button2 clicked.') }
}
])To clean thumbnail toolbar buttons, just call BrowserWindow.setThumbarButtons with an empty array:
const { BrowserWindow } = require('electron')
const win = new BrowserWindow()
win.setThumbarButtons([])Icon Overlays in Taskbar
On Windows a taskbar button can use a small overlay to display application status, as quoted from MSDN:
Icon overlays serve as a contextual notification of status, and are intended to negate the need for a separate notification area status icon to communicate that information to the user. For instance, the new mail status in Microsoft Outlook, currently shown in the notification area, can now be indicated through an overlay on the taskbar button. Again, you must decide during your development cycle which method is best for your application. Overlay icons are intended to supply important, long-standing status or notifications such as network status, messenger status, or new mail. The user should not be presented with constantly changing overlays or animations.
Overlay on taskbar button:

To set the overlay icon for a window, you can use the BrowserWindow.setOverlayIcon API:
const {BrowserWindow} = require('electron')
let win = new BrowserWindow()
win.setOverlayIcon('path/to/overlay.png', 'Description for overlay')Flash Frame
On Windows you can highlight the taskbar button to get the user's attention. This is similar to bouncing the dock icon on macOS. From the MSDN reference documentation:
Typically, a window is flashed to inform the user that the window requires attention but that it does not currently have the keyboard focus.
To flash the BrowserWindow taskbar button, you can use the BrowserWindow.flashFrame API:
const {BrowserWindow} = require('electron')
let win = new BrowserWindow()
win.once('focus', () => win.flashFrame(false))
win.flashFrame(true)Don't forget to call the flashFrame method with false to turn off the flash. In the above example, it is called when the window comes into focus, but you might use a timeout or some other event to disable it.