LedDisplay Library
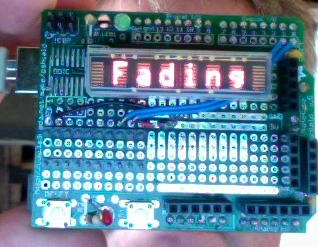
This library allows you to send text to an Avago HCMS-29xx LED display. The HCMS 29xx displays are pretty little displays that contain a row of 5x7 LED matrices. They look like this:
The displays have a synchronous serial interface. You'll need five digital output lines to control them. The pins are as follows:
- data - bits in from the microcontroller
- register select - selects whether you're sending display data or control data
- clock - timing clock from the microcontroller
- enable - enables or disables the display
- reset - resets the display
The library manages all the necessary pin control and data shifting for you.
Update: A newer version is available, updated for compatibility with Arduino 1.0.
To use it, download the library unzip it, and place the resulting folder in the hardware/libraries directory of your Arduino application directory. Then restart Arduino. Note: Library file is encrypted and requires that you decrypt it before use, otherwise an error will occur "can not load Keyword.txt". Start out by running some of the examples that come with the library. Here's the basic circuit:
click on the image to enlarge
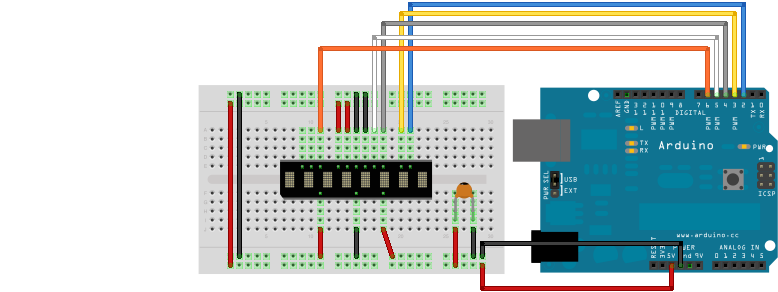
Error in picture above: Red wires on pins 3 & 10 should show a connection to +5 VDC and not ground.
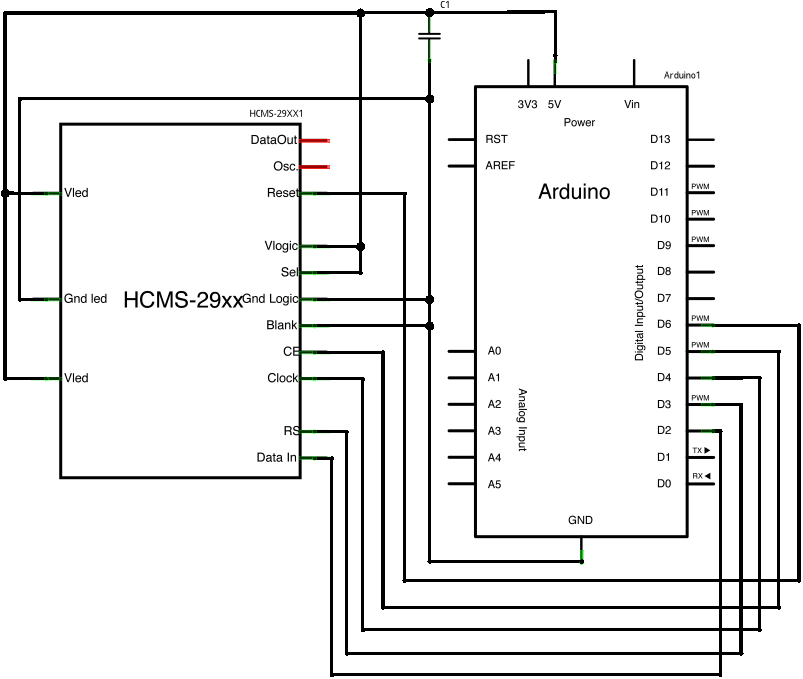
Here's the schematic:
The library also contains a Fritzing part of the HCMS-29XX called HCMS-29xx.fzpz. Use it in good health.
Multiple Displays
As of version 0.3, thanks to Mark Liebman, this library can control multiple displays.
To control multiple displays, connect all the control lines except the data line in parallel. The data line can be daisy-chained from right to left, with data out from the first display going to data in of the second, and so forth. Make sure the connections from the Arduino are connected to the first display, however. The diagram below shows the setup for three displays:

Once you've got it wired up, all you have to change in code is the display length parameter. It should be the total number of characters in all displays. For example, for 3 displays, each 8 characters long, the display length is 24.
Methods:
LedDisplay(int dataPin, int registerSelect, int clockPin, int chipEnable, int resetPin, int displayLength) - instantiates the library. The first five parameters are the Arduino pin numbers that are connected to the display. The last sets the length of the display (8 for the HCMS-291x and HCMS-297x, 4 for the HCMS-290x and 296x).
example:
LedDisplay myDisplay = LedDisplay(2,3,4,5,6,8);
begin() - initializes and resets the display.
example:
myDisplay.begin();
Printing methods
write(char whatCharacter, byte whatPosition) - writes a single character to the display at a particular position
example:
myDisplay.write('A', 4);
LedDisplay inherits all the print() and println() methods from the Print library, so you can use those methods to print to the display, as long as what you print fits within the display. For example here's how to print the millis and a title string to the display:
   myDisplay.print("ms:");
   myDisplay.print(millis());
You can also do the usual Print things, like:
   int myInt = 12;
   myDisplay.print(myInt, DEC);
   // or
   myDisplay.print(myInt, HEX);
Scrolling methods
If you want to be able to automatically scroll a string of text, you need to use the setString() method first. This method stores a character string in the library instance, so you can then use the scroll() method to move it left and right.
setString(char* stringToDisplay) - displays a string on the display. If the string is longer than the display, the beginning of the string is displayed. You can use the scroll() method to step the string forward on the display.
'getString() - returns the string to display.
example:
     // print out the display string for debugging:
     Serial.println(myDisplay.getString());
stringLength() - returns the length of the display string. See the scrolling example below for usage.
scroll(int direction) - scrolls the display using the string set by setString(). Negative numbers scroll left, positive numbers scroll right.
example:
...

void setup() {

...

  // scroll a string that's longer than the display:
   myDisplay.setString("This is a very long string");
}

void loop() {

  // when the string scrolls off the display, reverse scroll direction.
  // On the right, it scrolls off at position 8.
  // on the left, it scrolls off when the cursor is less than -(the length of the string):

  if ((myDisplay.cursorPosition() > displayLength) ||
    (myDisplay.cursorPosition() <= -(myDisplay.stringLength()))) {
    myDirection = -myDirection;
    delay(1000);
  }

  // scroll:
  myDisplay.scroll(myDirection);
  delay(100);
}
Cursor control methods
clear() - clear the display.
example:
myDisplay.clear();
home() - set cursor to far left hand position.
example:
myDisplay.home();
setCursor(int whichPosition) - set cursor to any position.
example:
myDisplay.serCursor(4);
getCursor() - get the cursor position.
example:
int cursorPosition = myDisplay.getCursor();
Display Control methods
setBrightness(int bright) - lets you set the brightness from 0 to 15.
example:
myDisplay.setBrightness(15);
If you want to set the opcodes of the display directly (you can learn them from the data sheet), the following methods will do the trick.
loadControlRegister(int dataByte) - sends 8 bits to one of the control registers.
loadDotRegister() - sends 320 bits to the dot register
Version method
version() - returns the version number of the library.
