QuickStart to Local Environment Setup and Development
Welcome to Angular! Angular helps you build modern applications for the web, mobile, or desktop.
We recently introduced a new Getting Started that leverages the StackBlitz online development environment. We recommend the new Getting Started for anyone who wants to quickly learn the essentials of Angular, in the context of building a basic online store app.
This guide shows you how to build and run a simple Angular app in your local development environment using the Angular CLI tool. At the end of this guide—as part of final code review—there is a link to download a copy of the final application code, so that you can compare your work, validate your local setup, or just explore a simple Angular app. This guide takes less than 30 minutes to complete.
Prerequisites
Before you begin, make sure your development environment includes Node.js® and an npm package manager.
Node.js
Angular requires Node.js version 8.x or 10.x.
-
To check your version, run
node -vin a terminal/console window. -
To get
Node.js, go to nodejs.org.
npm package manager
Angular, the Angular CLI, and Angular apps depend on features and functionality provided by libraries that are available as npm packages. To download and install npm packages, you must have an npm package manager.
This Quick Start uses the npm client command line interface, which is installed with Node.js by default.
To check that you have the npm client installed, run npm -v in a terminal/console window.
Step 1: Install the Angular CLI
You use the Angular CLI to create projects, generate application and library code, and perform a variety of ongoing development tasks such as testing, bundling, and deployment.
Install the Angular CLI globally.
To install the CLI using npm, open a terminal/console window and enter the following command:
npm install -g @angular/cli
Step 2: Create a workspace and initial application
You develop apps in the context of an Angular workspace. A workspace contains the files for one or more projects. A project is the set of files that comprise an app, a library, or end-to-end (e2e) tests.
To create a new workspace and initial app project:
-
Run the CLI command
ng newand provide the namemy-app, as shown here:ng new my-app -
The
ng newcommand prompts you for information about features to include in the initial app project. Accept the defaults by pressing the Enter or Return key.
The Angular CLI installs the necessary Angular npm packages and other dependencies. This can take a few minutes.
It also creates the following workspace and starter project files:
- A new workspace, with a root folder named
my-app - An initial skeleton app project, also called
my-app(in thesrcsubfolder) - An end-to-end test project (in the
e2esubfolder) - Related configuration files
The initial app project contains a simple Welcome app, ready to run.
Step 3: Serve the application
Angular includes a server, so that you can easily build and serve your app locally.
-
Go to the workspace folder (
my-app). -
Launch the server by using the CLI command
ng serve, with the--openoption.
cd my-app
ng serve --open
The ng serve command launches the server, watches your files,
and rebuilds the app as you make changes to those files.
The --open (or just -o) option automatically opens your browser
to http://localhost:4200/.
Your app greets you with a message:
Step 4: Edit your first Angular component
Components are the fundamental building blocks of Angular applications. They display data on the screen, listen for user input, and take action based on that input.
As part of the initial app, the CLI created the first Angular component for you. It is the root component, and it is named app-root.
-
Open
./src/app/app.component.ts. -
Change the
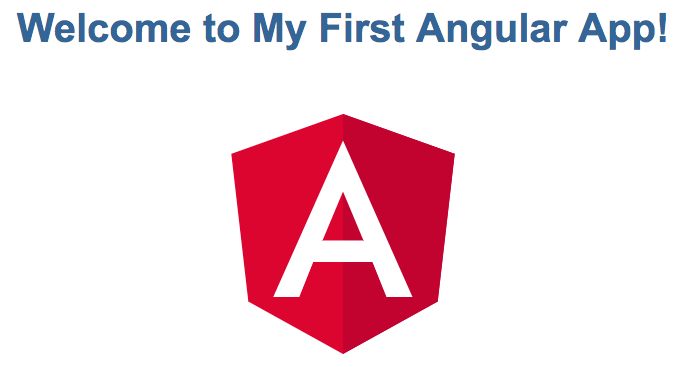
titleproperty from'my-app'to'My First Angular App'.src/app/app.component.ts @Component({ selector: 'app-root', templateUrl: './app.component.html', styleUrls: ['./app.component.css'] }) export class AppComponent { title = 'My First Angular App!'; }The browser reloads automatically with the revised title. That's nice, but it could look better.
-
Open
./src/app/app.component.cssand give the component some style.src/app/app.component.css h1 { color: #369; font-family: Arial, Helvetica, sans-serif; font-size: 250%; }
Looking good!
Final code review
You can download an example of the app that you created in this Getting Started guide.
Tip: Most Angular guides include links to download example files and run live examples in Stackblitz, so that you can see Angular concepts and code in action.
For more information about Angular project files and the file structure, see Workspace and project file structure.
Next steps
Now that you've seen the essentials of an Angular app and the Angular CLI, continue with these other introductory materials:
-
The Tour of Heroes tutorial provides additional hands-on learning. It walks you through the steps to build an app that helps a staffing agency manage a group of superhero employees. It has many of the features you'd expect to find in a data-driven application:
- Acquiring and displaying a list of items
- Editing a selected item's detail
- Navigating among different views of the data
- The Architecture guide describes key concepts such as modules, components, services, and dependency injection (DI). It provides a foundation for more in-depth guides about specific Angular concepts and features.
After the Tutorial and Architecture guide, you'll be ready to continue exploring Angular on your own through the other guides and references in this documentation set, focusing on the features most important for your apps.