Connect With WPA
This example shows you how to connect to a WPA2 Personal encrypted 802.11b/g network with the Arduino WiFi shield. Your Arduino Software (IDE) serial monitor will provide information about the connection once it has connected.
Hardware Required
- Arduino WiFi Shield
- Shield-compatible Arduino or Genuino board
Circuit
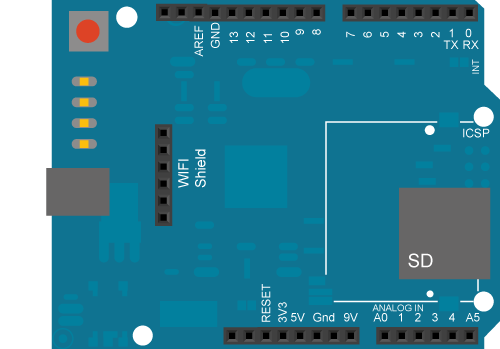
The WiFi shield uses pins 10, 11, 12, and 13 for the SPI connection to the HDG104 module. Digital pin 4 is used to control the slave select pin on the SD card.
You should have access to a 802.11b/g wireless network that connects to the internet for this example. You will need to change the network settings in the sketch to correspond to your particular networks SSID.
For networks using WPA/WPA2 Personal encryption, you need the SSID and password. The shield will not connect to networks using WPA2 Enterprise encryption.
image developed using Fritzing. For more circuit examples, see the Fritzing project page
In the above image, the board would be stacked below the WiFi shield.
Code
This example connects to an unencrypted Wifi network.
Then it prints the MAC address of the Wifi shield,
the IP address obtained, and other network details.
Circuit:
* WiFi shield attached
created 13 July 2010
by dlf (Metodo2 srl)
modified 31 May 2012
by Tom Igoe
*/
#include <SPI.h>
#include <WiFi.h>
char ssid[] = "yourNetwork"; // your network SSID (name)
char pass[] = "secretPassword"; // your network password
int status = WL_IDLE_STATUS; // the Wifi radio's status
void setup() {
//Initialize serial and wait for port to open:
Serial.begin(9600);
while (!Serial) {
; // wait for serial port to connect. Needed for native USB port only
}
// check for the presence of the shield:
if (WiFi.status() == WL_NO_SHIELD) {
Serial.println("WiFi shield not present");
// don't continue:
while (true);
}
String fv = WiFi.firmwareVersion();
if (fv != "1.1.0") {
Serial.println("Please upgrade the firmware");
}
// attempt to connect to Wifi network:
while (status != WL_CONNECTED) {
Serial.print("Attempting to connect to WPA SSID: ");
Serial.println(ssid);
// Connect to WPA/WPA2 network:
status = WiFi.begin(ssid, pass);
// wait 10 seconds for connection:
delay(10000);
}
// you're connected now, so print out the data:
Serial.print("You're connected to the network");
printCurrentNet();
printWifiData();
}
void loop() {
// check the network connection once every 10 seconds:
delay(10000);
printCurrentNet();
}
void printWifiData() {
// print your WiFi shield's IP address:
IPAddress ip = WiFi.localIP();
Serial.print("IP Address: ");
Serial.println(ip);
Serial.println(ip);
// print your MAC address:
byte mac[6];
WiFi.macAddress(mac);
Serial.print("MAC address: ");
Serial.print(mac[5], HEX);
Serial.print(":");
Serial.print(mac[4], HEX);
Serial.print(":");
Serial.print(mac[3], HEX);
Serial.print(":");
Serial.print(mac[2], HEX);
Serial.print(":");
Serial.print(mac[1], HEX);
Serial.print(":");
Serial.println(mac[0], HEX);
}
void printCurrentNet() {
// print the SSID of the network you're attached to:
Serial.print("SSID: ");
Serial.println(WiFi.SSID());
// print the MAC address of the router you're attached to:
byte bssid[6];
WiFi.BSSID(bssid);
Serial.print("BSSID: ");
Serial.print(bssid[5], HEX);
Serial.print(":");
Serial.print(bssid[4], HEX);
Serial.print(":");
Serial.print(bssid[3], HEX);
Serial.print(":");
Serial.print(bssid[2], HEX);
Serial.print(":");
Serial.print(bssid[1], HEX);
Serial.print(":");
Serial.println(bssid[0], HEX);
// print the received signal strength:
long rssi = WiFi.RSSI();
Serial.print("signal strength (RSSI):");
Serial.println(rssi);
// print the encryption type:
byte encryption = WiFi.encryptionType();
Serial.print("Encryption Type:");
Serial.println(encryption, HEX);
Serial.println();
}
See Also:
- WiFi library – Your reference for the WiFi Library.
- WiFi Shield – Product details for the retired WiFi Shield.
- Getting started – Getting started with the retired WiFi Shield.
- Connect No Encryption - Demonstrates how to connect to an open network.
- Connect With WEP - Demonstrates how to connect to a network that is encrypted with WEP.
- Scan Networks - Displays all WiFi networks in range.
- Simple Web Server WiFi – Turn on and off an LED accessing this simple Web Server.
- UDP NTP Client - Query a Network Time Protocol (NTP) server using UDP.
- WiFi Chat Server - Set up a simple chat server.
- WiFi Web Client - Connect to a remote webserver.
- WiFi Web Client Repeating - Repeatedly make HTTP calls to a server.
- WiFi Web Server - Serve a webpage from the WiFi shield with Analog Input values.
- WiFi Send Receive UDP String - Send and receive a UDP string.
Last revision 2018/08/23 by SM

