Debounce
Pushbuttons often generate spurious open/close transitions when pressed, due to mechanical and physical issues: these transitions may be read as multiple presses in a very short time fooling the program. This example demonstrates how to debounce an input, which means checking twice in a short period of time to make sure the pushbutton is definitely pressed. Without debouncing, pressing the button once may cause unpredictable results. This sketch uses the millis() function to keep track of the time passed since the button was pressed.
Hardware Required
- Arduino or Genuino Board
- momentary button or switch
- 10k ohm resistor
- hook-up wires
- breadboard
Circuit
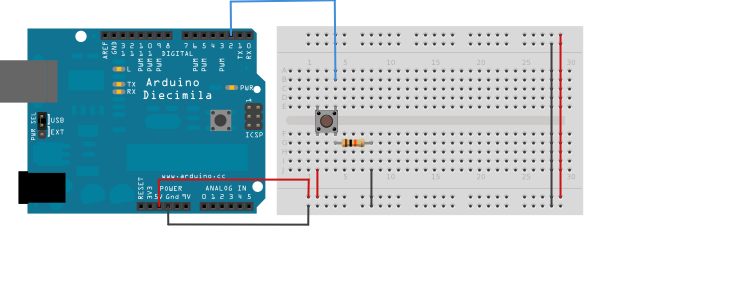
image developed using Fritzing. For more circuit examples, see the Fritzing project page
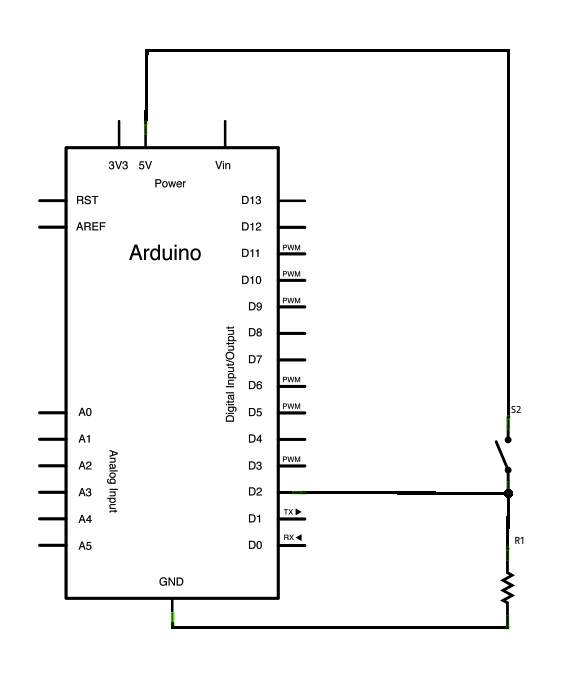
Schematic
click the image to enlarge
Code
The sketch below is based on Limor Fried's version of debounce, but the logic is inverted from her example. In her example, the switch returns LOW when closed, and HIGH when open. Here, the switch returns HIGH when pressed and LOW when not pressed.
Debounce
Each time the input pin goes from LOW to HIGH (e.g. because of a push-button
press), the output pin is toggled from LOW to HIGH or HIGH to LOW. There's a
minimum delay between toggles to debounce the circuit (i.e. to ignore noise).
The circuit:
- LED attached from pin 13 to ground
- pushbutton attached from pin 2 to +5V
- 10 kilohm resistor attached from pin 2 to ground
- Note: On most Arduino boards, there is already an LED on the board connected
to pin 13, so you don't need any extra components for this example.
created 21 Nov 2006
by David A. Mellis
modified 30 Aug 2011
by Limor Fried
modified 28 Dec 2012
by Mike Walters
modified 30 Aug 2016
by Arturo Guadalupi
This example code is in the public domain.
http://www.arduino.cc/en/Tutorial/Debounce
*/
// constants won't change. They're used here to set pin numbers:
const int buttonPin = 2; // the number of the pushbutton pin
const int ledPin = 13; // the number of the LED pin
// Variables will change:
int ledState = HIGH; // the current state of the output pin
int buttonState; // the current reading from the input pin
int lastButtonState = LOW; // the previous reading from the input pin
// the following variables are unsigned longs because the time, measured in
// milliseconds, will quickly become a bigger number than can be stored in an int.
unsigned long lastDebounceTime = 0; // the last time the output pin was toggled
unsigned long debounceDelay = 50; // the debounce time; increase if the output flickers
void setup() {
pinMode(buttonPin, INPUT);
pinMode(ledPin, OUTPUT);
// set initial LED state
digitalWrite(ledPin, ledState);
}
void loop() {
// read the state of the switch into a local variable:
int reading = digitalRead(buttonPin);
// check to see if you just pressed the button
// (i.e. the input went from LOW to HIGH), and you've waited long enough
// since the last press to ignore any noise:
// If the switch changed, due to noise or pressing:
if (reading != lastButtonState) {
// reset the debouncing timer
lastDebounceTime = millis();
}
if ((millis() - lastDebounceTime) > debounceDelay) {
// whatever the reading is at, it's been there for longer than the debounce
// delay, so take it as the actual current state:
// if the button state has changed:
if (reading != buttonState) {
buttonState = reading;
// only toggle the LED if the new button state is HIGH
if (buttonState == HIGH) {
ledState = !ledState;
}
}
}
// set the LED:
digitalWrite(ledPin, ledState);
// save the reading. Next time through the loop, it'll be the lastButtonState:
lastButtonState = reading;
}
See Also
- pinMode()
- digitalWrite()
- digitalRead()
- if()
- millis()
- DigitalReadSerial - read a switch, print the state out to the Serial Monitor
- Blink - turn an LED on and off
- Button State Change - counting the number of button pushes
Last revision 2015/07/29 by SM