Knob
Control the position of a RC (hobby) servo motor with your Arduino and a potentiometer.
This example makes use of the Arduino servo library.
Hardware Required
- Arduino or Genuino Board
- Servo Motor
- 10k ohm potentiometer
- hook-up wires
Circuit
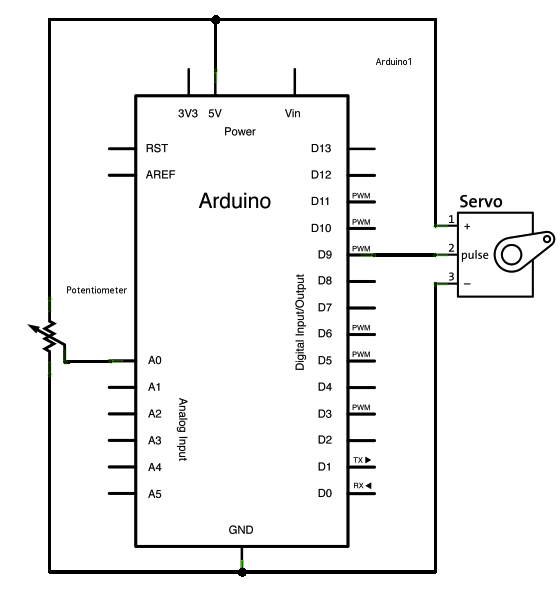
Servo motors have three wires: power, ground, and signal. The power wire is typically red, and should be connected to the 5V pin on the Arduino or Genuino board. The ground wire is typically black or brown and should be connected to a ground pin on the board. The signal pin is typically yellow or orange and should be connected to pin 9 on the board.
The potentiometer should be wired so that its two outer pins are connected to power (+5V) and ground, and its middle pin is connected to analog input 0 on the board.
click the images to enlarge
images developed using Fritzing. For more circuit examples, see the Fritzing project page
Schematic
Code
Controlling a servo position using a potentiometer (variable resistor)
by Michal Rinott <http://people.interaction-ivrea.it/m.rinott>
modified on 8 Nov 2013
by Scott Fitzgerald
http://www.arduino.cc/en/Tutorial/Knob
*/
#include <Servo.h>
Servo myservo; // create servo object to control a servo
int potpin = 0; // analog pin used to connect the potentiometer
int val; // variable to read the value from the analog pin
void setup() {
myservo.attach(9); // attaches the servo on pin 9 to the servo object
}
void loop() {
val = analogRead(potpin); // reads the value of the potentiometer (value between 0 and 1023)
val = map(val, 0, 1023, 0, 180); // scale it to use it with the servo (value between 0 and 180)
myservo.write(val); // sets the servo position according to the scaled value
delay(15); // waits for the servo to get there
}
See also
- attach()
- write()
- map()
- analogRead()
- Servo library reference
- Sweep - Sweep the shaft of a servo motor back and forth.
Last revision 2015/08/18 by SM


