Examples > Robot
Hello User
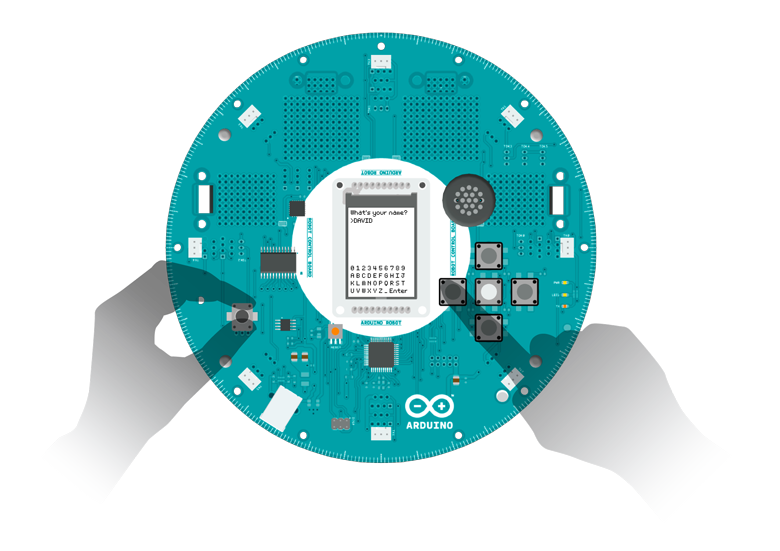
This sketch is the first thing you see when starting the robot. It gives you a warm welcome, shows you some of its really amazing features, and lets you personalize some data.
Hardware Required
- Arduino Robot
Instruction
- Upload the example, you can keep the USB plugged.
- After the starting screen, you'll see a sequence of slides, read through them to see how this example works.
- When it comes to the input step, a virtual keyboard will show up on the bottom half of the TFT.
- You can use the knob and buttons to select your input.
- Use the knob to select key
- Press the middle button to input the key selected
- Press left/right buttons to move the cursor around
- When you're done with an input, input "Enter" on the virtual keyboard
- If you want to erase a character, move the cursor to the desired position, and input an empty space to make it disappear.
- There's a secret hidden in this example, find it out!
Try it out
Fill in your and the robot's names while listening to music
Code
/* Hello User
Hello User! This sketch is the first thing you see
when starting this robot. It gives you a warm welcome,
showing you some of the really amazing abilities of
the robot, and make itself really personal to you.
Circuit:
* Arduino Robot
created 1 May 2013
by X. Yang
modified 12 May 2013
by D. Cuartielles
This example is in the public domain
*/
#include <ArduinoRobot.h> // include the robot library
#include <Wire.h>
// include the utility function for ths sketch
// see the details below
#include <utility/RobotTextManager.h>
char buffer[20];//for storing user name
void setup() {
//necessary initialization sequence
Robot.begin();
Robot.beginTFT();
Robot.beginSD();
// show the logos from the SD card
Robot.displayLogos();
// clear the screen
Robot.clearScreen();
// From now on, display different slides of
// text/pictures in sequence. The so-called
// scripts are strings of text stored in the
// robot's memory
// these functions are explained below
//Script 6
textManager.writeScript(5, 4, 0);
textManager.writeScript(9, 10, 0);
Robot.waitContinue();
delay(500);
Robot.clearScreen();
//Script 7
textManager.writeScript(6, 4, 0);
textManager.writeScript(9, 10, 0);
Robot.waitContinue();
delay(500);
Robot.clearScreen();
//Script 8
// this function enables sound and images at once
textManager.showPicture("init2.bmp", 0, 0);
textManager.writeScript(7, 2, 0);
textManager.writeScript(9, 7, 0);
Robot.waitContinue();
delay(500);
Robot.clearScreen();
//Script 9
textManager.showPicture("init3.bmp", 0, 0);
textManager.writeScript(8, 2, 0);
textManager.writeScript(9, 7, 0);
Robot.waitContinue();
delay(500);
Robot.clearScreen();
//Script 11
textManager.writeScript(10, 4, 0);
textManager.writeScript(9, 10, 0);
Robot.waitContinue();
delay(500);
Robot.clearScreen();
//Input screen
textManager.writeScript(0, 1, 1);
textManager.input(3, 1, USERNAME);
textManager.writeScript(1, 5, 1);
textManager.input(7, 1, ROBOTNAME);
delay(1000);
Robot.clearScreen();
//last screen
textManager.showPicture("init4.bmp", 0, 0);
textManager.writeText(1, 2, "Hello");
Robot.userNameRead(buffer);
textManager.writeText(3, 2, buffer);
textManager.writeScript(4, 10, 0);
Robot.waitContinue(BUTTON_LEFT);
Robot.waitContinue(BUTTON_RIGHT);
textManager.showPicture("kt1.bmp", 0, 0);
}
void loop() {
// do nothing here
}
/**
textManager mostly contains helper functions for
R06_Wheel_Calibration and R01_Hello_User.
The ones used in this example:
textManager.setMargin(margin_left, margin_top):
Configure the left and top margin for text
display. The margins will be used for
textManager.writeText().
Parameters:
margin_left, margin_top: the margin values
from the top and left side of the screen.
Returns:
none
textManager.writeScript(script_number,line,column):
Display a script of Hello User example.
Parameters:
script_number: an int value representing the
script to be displayed.
line, column: in which line,column is the script
displayed. Same as writeText().
Returns:
none
textManager.input(line,column,codename):
Print an input indicator(">") in the line and column,
dispaly and receive input from a virtual keyboard,
and save the value into EEPROM represented by codename
Parameters:
line,column: int values represents where the input
starts. Same as wirteText().
codename: either USERNAME,ROBOTNAME,CITYNAME or
COUNTRYNAME. You can call Robot.userNameRead(),
robotNameRead(),cityNameRead() or countryNameRead()
to access the values later.
Returns:
none;
textManager.writeText(line,column,text):
Display text on the specific line and column.
It's different from Robot.text() as the later
uses pixels for positioning the text.
Parameters:
line:in which line is the text displayed. Each line
is 10px high.
column:in which column is the text displayed. Each
column is 8px wide.
text:a char array(string) of the text to be displayed.
Returns:
none
textManager.showPicture(filename, x, y):
It has the same functionality as Robot.drawPicture(),
while fixing the conflict between drawPicture() and
sound playing. Using Robot.drawPicture(), it'll have
glitches when playing sound at the same time. Using
showPicture(), it'll stop sound when displaying
picture, so preventing the problem.
Parameters:
filename:string, name of the bmp file in sd
x,y: int values, position of the picture
Returns:
none
*/
