Examples > Robot
Inputs
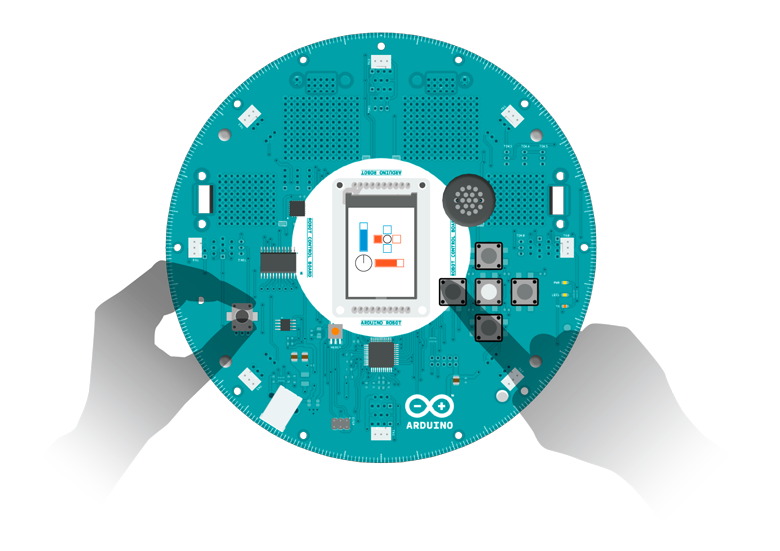
This sketch shows you how to use the control board potentiometer and buttons as a keyboard. It turns the robot into a mobile music machine, have some fun with the music by pressing different buttons.
Hardware Required
- Arduino Robot
Instruction
- Upload the example, you can keep USB plugged in once finished.
- After the starting screen, you will hear the music playing.
- On the screen, the vertical blue bar indicates the tempo of the music. The horizontal bar in orange shows the pitch. The cross shape in the middle represents the buttons, and the circle on the bottom left corresponds to the knob.
- Press different buttons, or try rotating the knob. You should see the interface on the screen change.
Try it out
Test the inputs on the robot
Code
/* Robot Inputs
This sketch shows you how to use the on-board
potentiometer and buttons as inputs.
Turning the potentiometer draws a clock-shaped
circle. The up and down buttons change the pitch,
while the left and right buttons change the tempo.
The middle button resets tempo and pitch.
Circuit:
* Arduino Robot
created 1 May 2013
by X. Yang
modified 12 May 2013
by D. Cuartielles
This example is in the public domain
*/
#include <ArduinoRobot.h>
#include <Wire.h>
// default tempo and pitch of the music
int tempo = 60;
int pitch = 1000;
void setup() {
// initialize the Robot, SD card, speaker, and display
Robot.begin();
Robot.beginTFT();
Robot.beginSpeaker();
Robot.beginSD();
// draw "lg0.bmp" and "lg1.bmp" on the screen
Robot.displayLogos();
// play a sound file
Robot.playFile("Melody.sqm");
}
void loop() {
// check the value of the buttons
keyDown(Robot.keyboardRead());
// check the value of the pot
drawKnob(Robot.knobRead());
}
// Draw the basic interface
void renderUI() {
//fill the buttons blank
Robot.fill(255, 255, 255);
Robot.rect(53, 58, 13, 13); // left
Robot.rect(93, 58, 13, 13); // right
Robot.rect(73, 38, 13, 13); // up
Robot.circle(79, 64, 6); // middle
Robot.rect(73, 78, 13, 13); // down
//draw the knob
Robot.noFill();
Robot.circle(26, 116, 17); // knob
//draw the vertical bargraph
int fullPart = map(pitch, 200, 2000, 0, 58); //length of filled bargraph
Robot.fill(255, 255, 255);
Robot.rect(21, 30, 13, 58 - fullPart);
Robot.fill(0, 0, 255);
Robot.rect(21, 88 - fullPart, 13, fullPart); //58-fullPart+30
//draw the horizontal bargraph
fullPart = map(tempo, 20, 100, 0, 58); // length of filled bargraph
Robot.fill(255, 190, 0);
Robot.rect(53, 110, fullPart, 13);
Robot.fill(255, 255, 255);
Robot.rect(53 + fullPart, 110, 58 - fullPart, 13);
}
void keyDown(int keyCode) {
// use a static int so it is persistent over time
static int oldKey;
switch (keyCode) {
case BUTTON_LEFT:
//left button pressed, reduces tempo
tempo -= 5;
if (tempo < 20) {
tempo = 20; //lowest tempo 20
}
Robot.fill(255, 190, 0);
Robot.rect(53, 58, 13, 13);
break;
case BUTTON_RIGHT:
//right button pressed, increases tempo
tempo += 5;
if (tempo > 100) {
tempo = 100; //highest tempo 100
}
Robot.fill(255, 190, 0);
Robot.rect(93, 58, 13, 13);
break;
case BUTTON_UP:
//up button pressed, increases pitch
pitch += 120;
if (pitch > 2000) {
pitch = 2000;
}
Robot.fill(0, 0, 255);
Robot.rect(73, 38, 13, 13);
break;
case BUTTON_DOWN:
//down button pressed, reduces pitch
pitch -= 120;
if (pitch < 200) {
pitch = 200;
}
Robot.fill(0, 0, 255);
Robot.rect(73, 78, 13, 13);
break;
case BUTTON_MIDDLE:
//middle button pressed, resets tempo and pitch
tempo = 60;
pitch = 1000;
Robot.fill(160, 160, 160);
Robot.circle(79, 64, 6);
break;
case BUTTON_NONE:
//Only when the keys are released(thus BUTTON_NONE is
//encountered the first time), the interface will be
//re-drawn.
if (oldKey != BUTTON_NONE) {
renderUI();
}
break;
}
if (oldKey != keyCode) {
// change the song's tempo
Robot.tempoWrite(tempo);
// change the song's pitch
Robot.tuneWrite(float(pitch / 1000.0));
}
oldKey = keyCode;
}
//Draw a circle according to value
//of the knob.
void drawKnob(int val) {
static int val_old;
int r = map(val, 0, 1023, 1, 15);
//Only updates when the
//value changes.
if (val_old != r) {
Robot.noFill();
//erase the old circle
Robot.stroke(255, 255, 255);
Robot.circle(26, 116, r + 1);
//draw the new circle
Robot.stroke(255, 0, 255);
Robot.circle(26, 116, r);
Robot.stroke(0, 0, 0);
val_old = r;
}
}
See Also:
- begin()
- keyboardRead()
