Simple audio player
The goal of this tutorial is to play a wave file stored on the SD card using the new Audio lilbrary and the 10 bit DAC.
Hardware Required
- Arduino Zero, MKRZero or MKR1000 board
- 8-ohm speaker or headphones
- Arduino shield with an SD card with CS on pin 4 (like the Proto Wireless SD Shield)
Components to build an external audio amplifier
- LM386 (low power audio amplifier)
- 10 kohm potentiometer
- 10 ohm resistor
- 2 x 10 µF capacitor
- 0.05 µF (or 0.1 µF) capacitor
- 250 µF capacitor
The Circuit
To connect a speaker to the board you have add an amplification circuit connected between the DAC0 pin and the speaker. The amplification circuit will increase the volume of the speaker. There are many audio amplifiers available, one of the most common is the LM386.
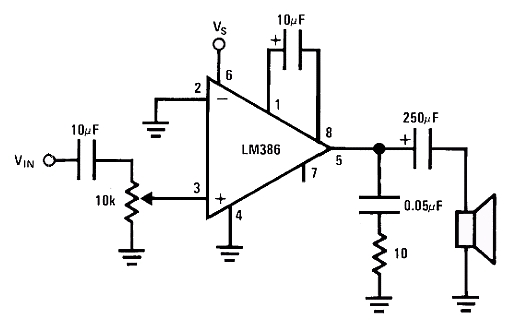
The following scheme shows how to build the circuit using the LM386 and a bunch of components.
You can supply the LM386 connecting the Vs pin with different voltages sources, like for example the +5 V present on the 5V pin of the Arduino Zero / MKRZero or an external 9V battery.
The gain of the amplifier is given by the capacitor connected to pin 1 and 8 of the LM386. With the 10 µF capacitor the gain is set to 200, without the capacitor the gain is 50.
With the potentiometer you can control the volume of the amplifier.

LM386 electronic schematic
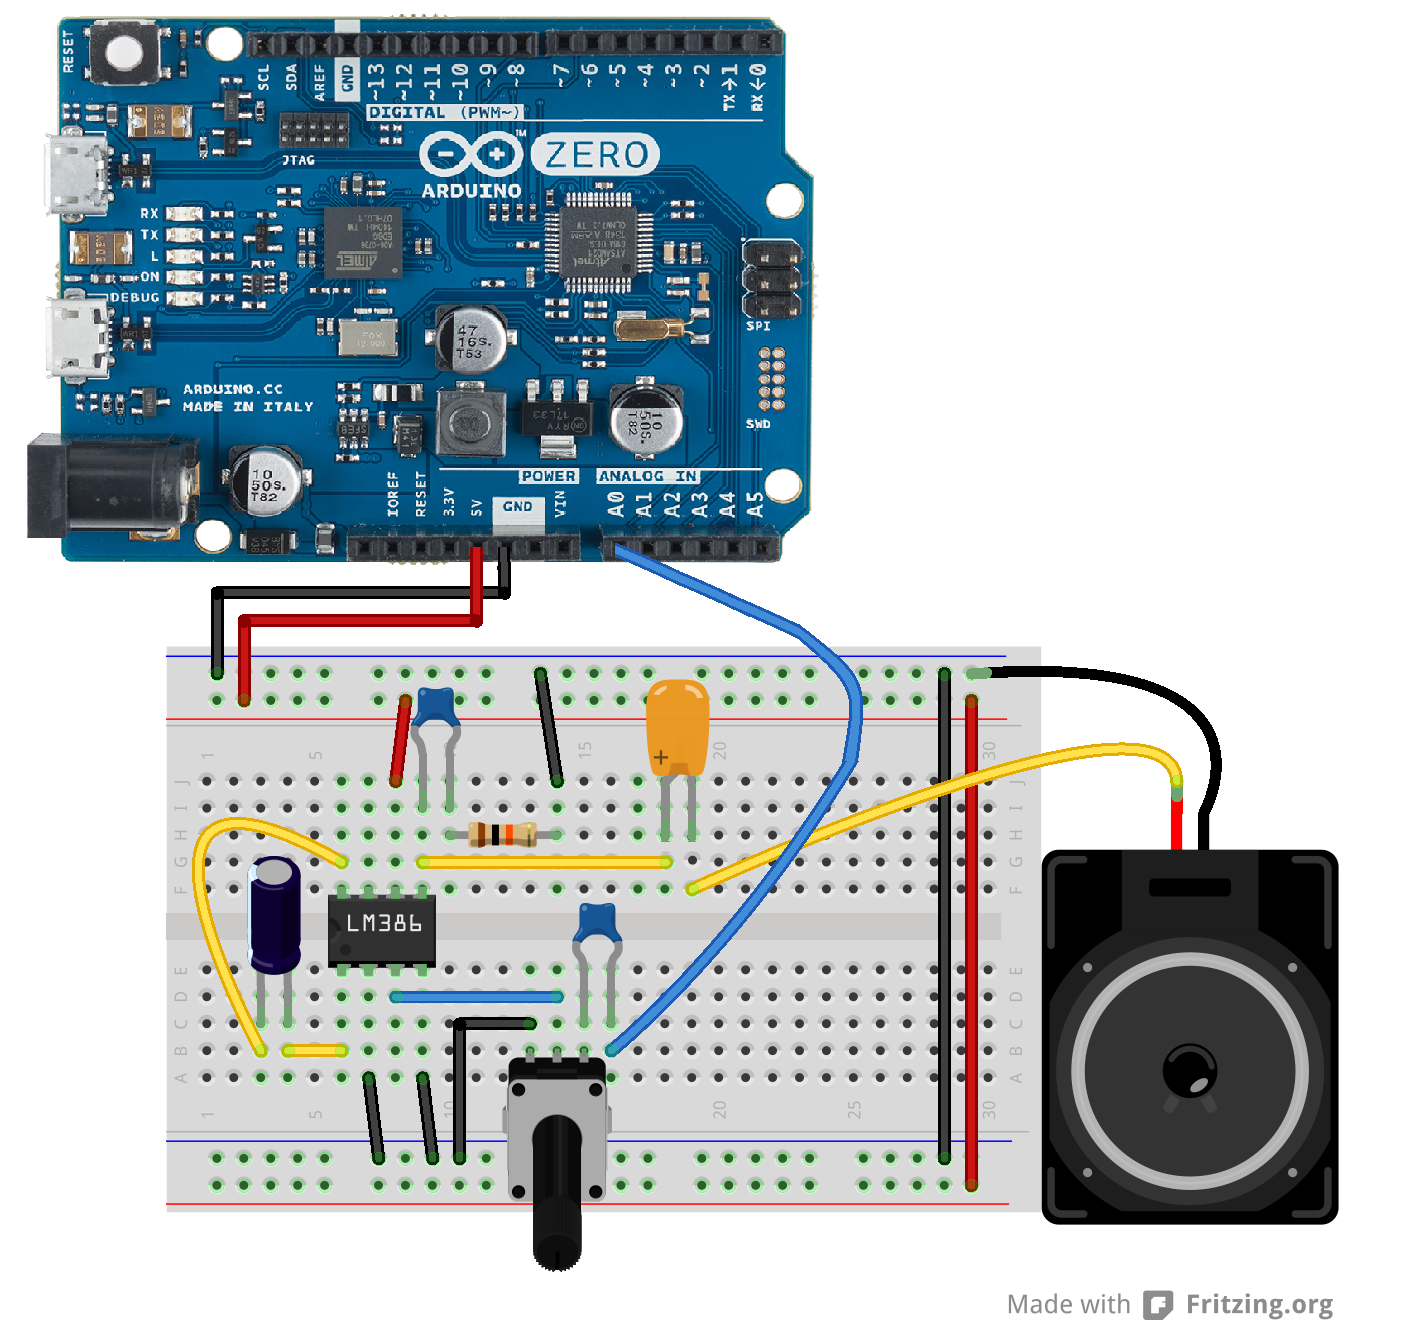
For Arduino Zero and MKR1000 you need to connect shield or module for an SD or microSD card with CS on pin 4.
LM386 mounting on breadboard
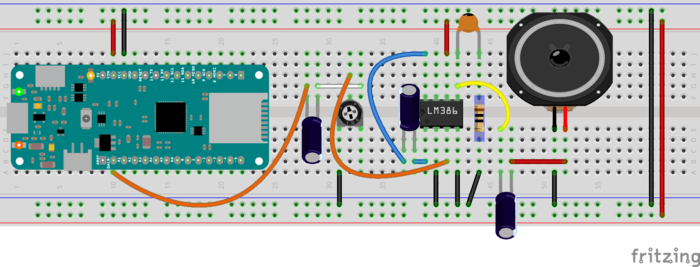
For MKRZero, the microSD Slot is built in. A .wav file named "test.wav" is in the card's root directory. For a simple test you can attach a pair of headphones directly to ground and DAC0, respecting the polarity.
The same circuit made with MKRZero and all the components on a single breadboard
Warning: do not connect the speaker directly to the pins of the Arduino Zero or MKRZero.
Audio File
The Audio file to store on the SD card must be in the .wav format with 88200 Hz, 8-bit unsigned PCM mono quality. This type of file can be easily obtained using audio programs like audacity.
Code
Simple Audio Player for Arduino Zero
Demonstrates the use of the Audio library for the Arduino Zero
Hardware required :
* Arduino shield with a SD card on CS4
* A sound file named "test.wav" in the root directory of the SD card
* An audio amplifier to connect to the DAC0 and ground
* A speaker to connect to the audio amplifier
Arturo Guadalupi <a.guadalupi@arduino.cc>
Angelo Scialabba <a.scialabba@arduino.cc>
Claudio Indellicati <c.indellicati@arduino.cc>
This example code is in the public domain
http://arduino.cc/en/Tutorial/SimpleAudioPlayerZero
*/
#include <SD.h>
#include <SPI.h>
#include <AudioZero.h>
void setup()
{
// debug output at 115200 baud
Serial.begin(115200);
// setup SD-card
Serial.print("Initializing SD card...");
if (!SD.begin(4)) {
Serial.println(" failed!");
while(true);
}
Serial.println(" done.");
// 44100kHz stereo => 88200 sample rate
AudioZero.begin(2*44100);
}
void loop()
{
int count = 0;
// open wave file from sdcard
File myFile = SD.open("test.wav");
if (!myFile) {
// if the file didn't open, print an error and stop
Serial.println("error opening test.wav");
while (true);
}
Serial.print("Playing");
// until the file is not finished
AudioZero.play(myFile);
Serial.println("End of file. Thank you for listening!");
while (true) ;
}


