Building Java & JVM projects
- Introduction
- Declaring your source files via source sets
- Managing your dependencies
- Compiling your code
- Managing resources
- Running tests
- Packaging and publishing
- Generating API documentation
- Cleaning the build
- Building Java libraries
- Building Java applications
- Building Java web applications
- Building Java EE applications
- Building Java Platforms
Gradle uses a convention-over-configuration approach to building JVM-based projects that borrows several conventions from Apache Maven. In particular, it uses the same default directory structure for source files and resources, and it works with Maven-compatible repositories.
We will look at Java projects in detail in this chapter, but most of the topics apply to other supported JVM languages as well, such as Kotlin, Groovy and Scala. If you don’t have much experience with building JVM-based projects with Gradle, take a look at the Java tutorials for step-by-step instructions on how to build various types of basic Java projects.
Introduction
The simplest build script for a Java project applies the Java Plugin and optionally sets the project version and Java compatibility versions:
GroovyKotlinplugins {
id 'java'
}
sourceCompatibility = '1.8'
targetCompatibility = '1.8'
version = '1.2.1'By applying the Java Plugin, you get a whole host of features:
-
A
compileJavatask that compiles all the Java source files under src/main/java -
A
compileTestJavatask for source files under src/test/java -
A
testtask that runs the tests from src/test/java -
A
jartask that packages themaincompiled classes and resources from src/main/resources into a single JAR named <project>-<version>.jar -
A
javadoctask that generates Javadoc for themainclasses
This isn’t sufficient to build any non-trivial Java project — at the very least, you’ll probably have some file dependencies. But it means that your build script only needs the information that is specific to your project.
|
✨
|
Although the properties in the example are optional, we recommend that you specify them in your projects. The compatibility options mitigate against problems with the project being built with different Java compiler versions, and the version string is important for tracking the progression of the project. The project version is also used in archive names by default. |
The Java Plugin also integrates the above tasks into the standard Base Plugin lifecycle tasks:
-
jaris attached toassemble[1] -
testis attached tocheck
The rest of the chapter explains the different avenues for customizing the build to your requirements. You will also see later how to adjust the build for libraries, applications, web apps and enterprise apps.
Declaring your source files via source sets
Gradle’s Java support was the first to introduce a new concept for building source-based projects: source sets. The main idea is that source files and resources are often logically grouped by type, such as application code, unit tests and integration tests. Each logical group typically has its own sets of file dependencies, classpaths, and more. Significantly, the files that form a source set don’t have to be located in the same directory!
Source sets are a powerful concept that tie together several aspects of compilation:
-
the source files and where they’re located
-
the compilation classpath, including any required dependencies (via Gradle configurations)
-
where the compiled class files are placed
You can see how these relate to one another in this diagram:
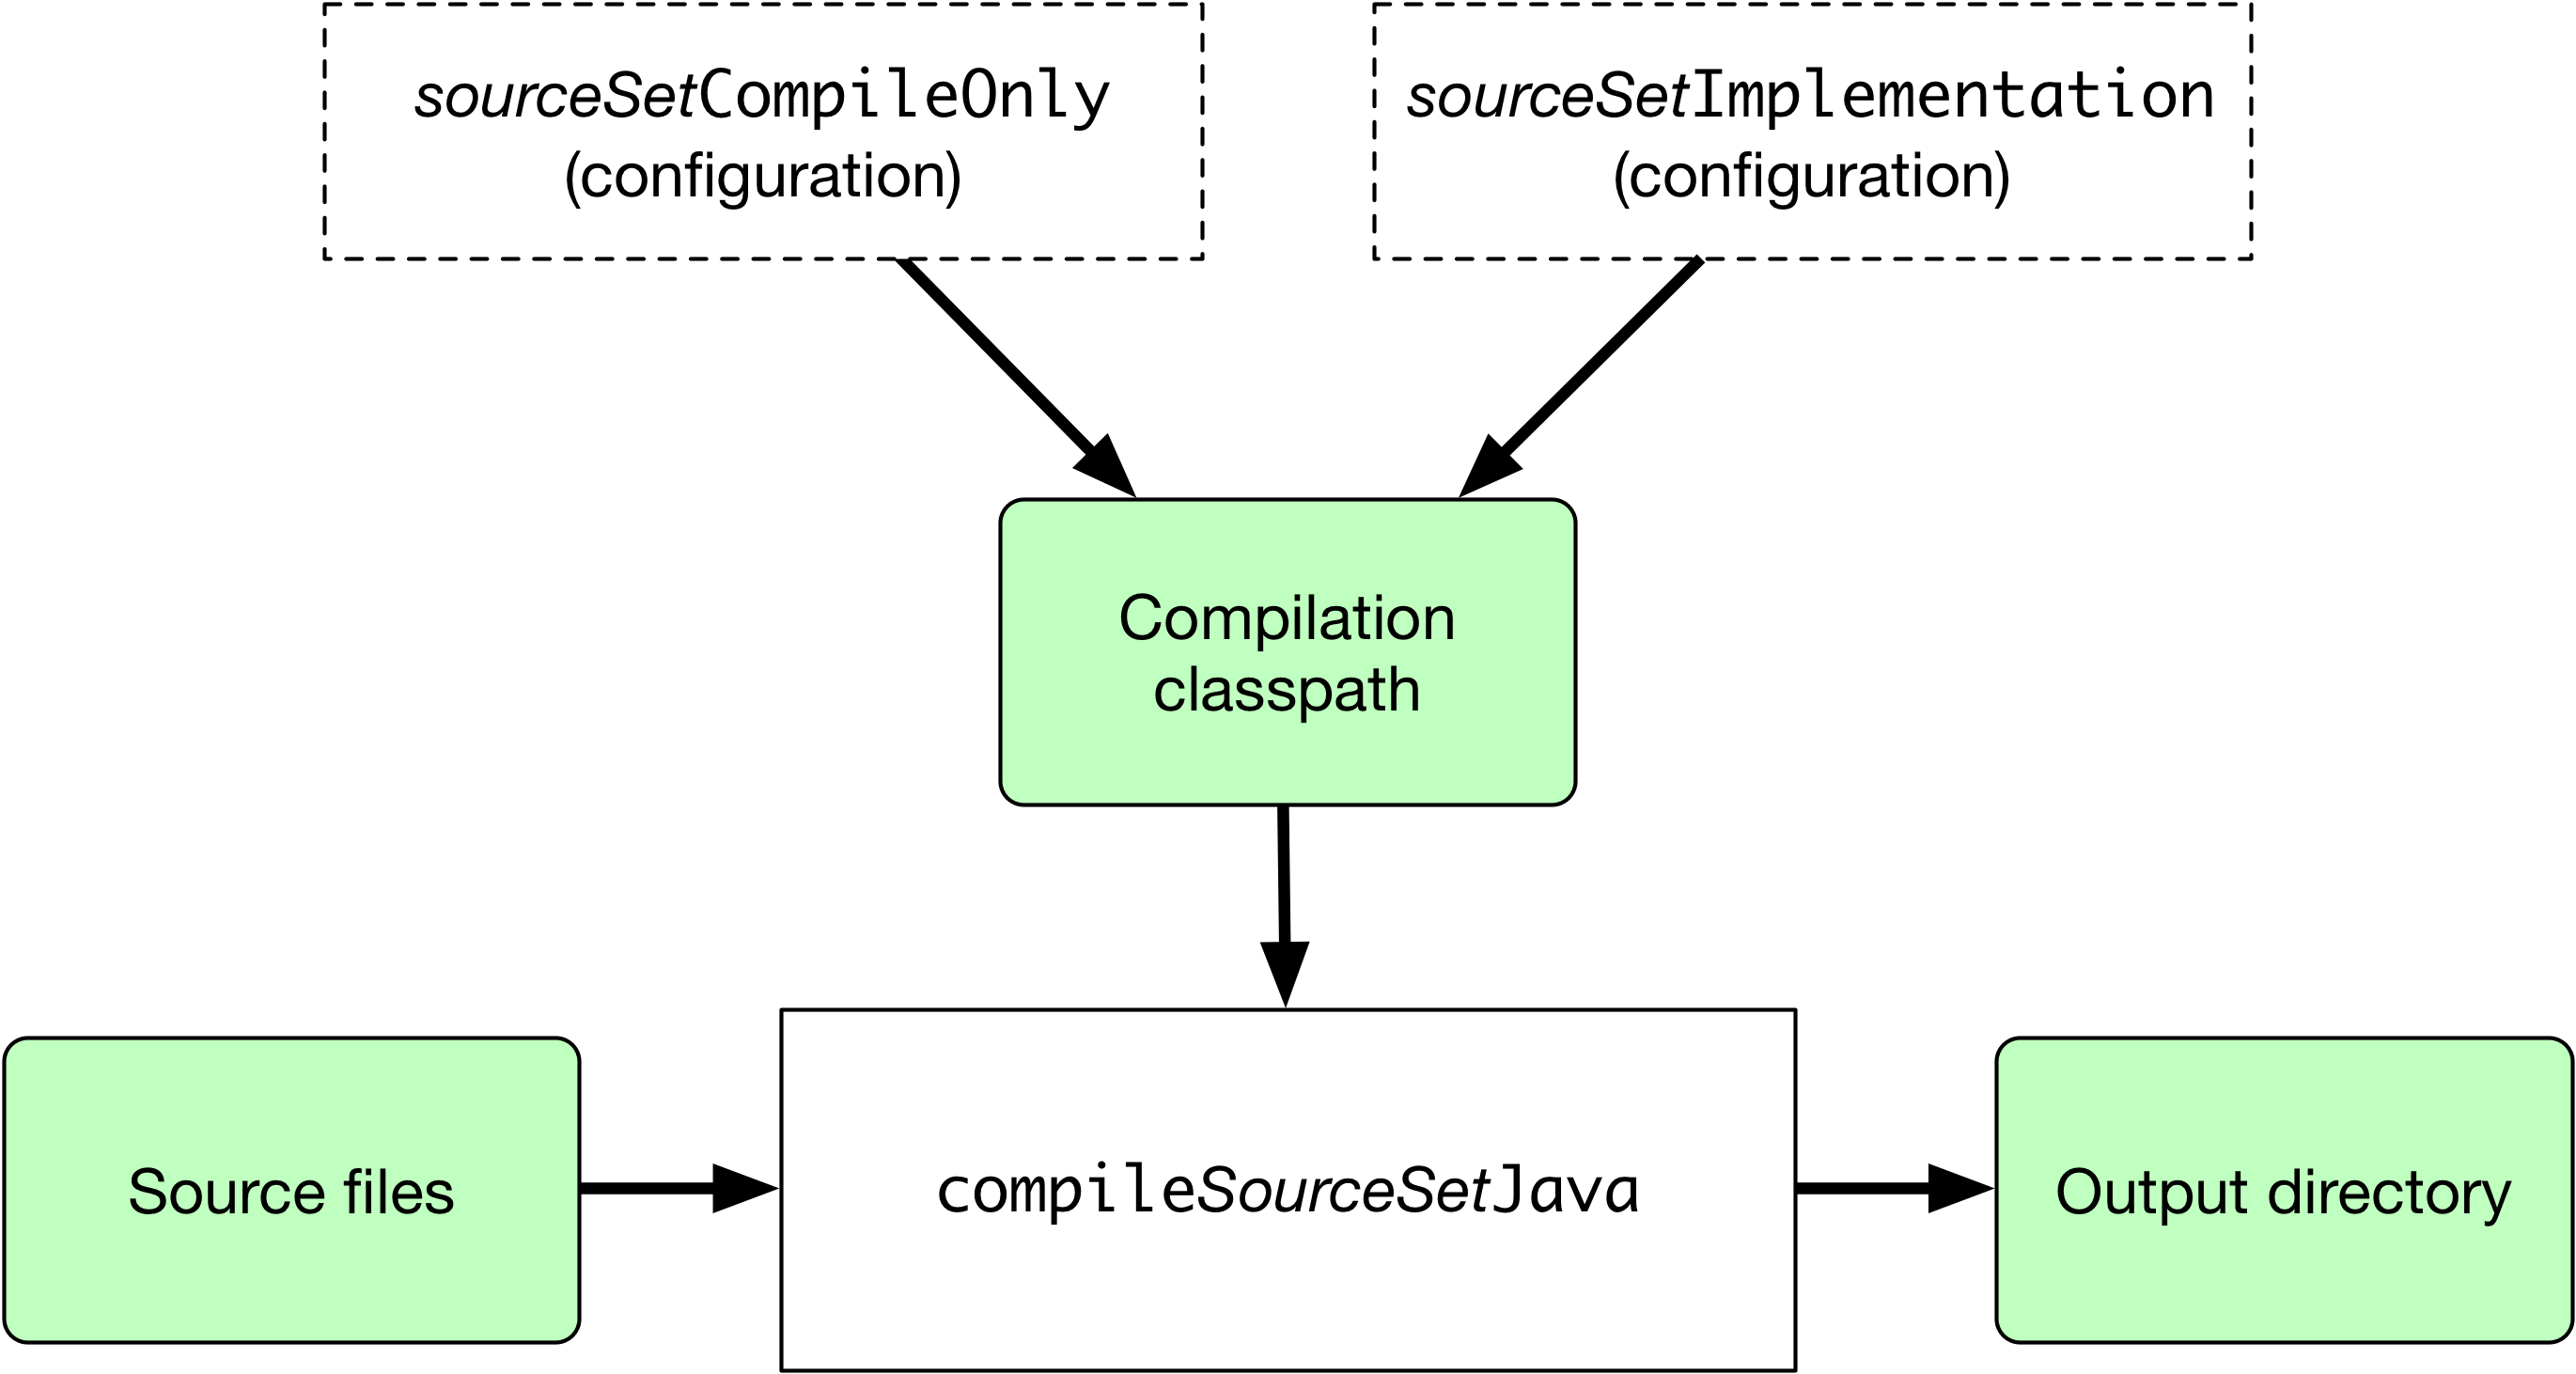
The shaded boxes represent properties of the source set itself. On top of that, the Java Plugin automatically creates a compilation task for every source set you or a plugin defines — named compileSourceSetJava — and several dependency configurations.
|
✨
|
The
main source setMost language plugins, Java included, automatically create a source set called |
Java projects typically include resources other than source files, such as properties files, that may need processing — for example by replacing tokens within the files — and packaging within the final JAR. The Java Plugin handles this by automatically creating a dedicated task for each defined source set called processSourceSetResources (or processResources for the main source set). The following diagram shows how the source set fits in with this task:

As before, the shaded boxes represent properties of the source set, which in this case comprises the locations of the resource files and where they are copied to.
In addition to the main source set, the Java Plugin defines a test source set that represents the project’s tests. This source set is used by the test task, which runs the tests. You can learn more about this task and related topics in the Java testing chapter.
Projects typically use this source set for unit tests, but you can also use it for integration, acceptance and other types of test if you wish. The alternative approach is to define a new source set for each of your other test types, which is typically done for one or both of the following reasons:
-
You want to keep the tests separate from one another for aesthetics and manageability
-
The different test types require different compilation or runtime classpaths or some other difference in setup
You can see an example of this approach in the Java testing chapter, which shows you how to set up integration tests in a project.
You’ll learn more about source sets and the features they provide in:
Managing your dependencies
The vast majority of Java projects rely on libraries, so managing a project’s dependencies is an important part of building a Java project. Dependency management is a big topic, so we will focus on the basics for Java projects here. If you’d like to dive into the detail, check out the introduction to dependency management.
Specifying the dependencies for your Java project requires just three pieces of information:
-
Which dependency you need, such as a name and version
-
What it’s needed for, e.g. compilation or running
-
Where to look for it
The first two are specified in a dependencies {} block and the third in a repositories {} block. For example, to tell Gradle that your project requires version 3.6.7 of Hibernate Core to compile and run your production code, and that you want to download the library from the Maven Central repository, you can use the following fragment:
GroovyKotlinrepositories {
mavenCentral()
}
dependencies {
implementation 'org.hibernate:hibernate-core:3.6.7.Final'
}The Gradle terminology for the three elements is as follows:
-
Repository (ex:
mavenCentral()) — where to look for the modules you declare as dependencies -
Configuration (ex:
implementation) - a named collection of dependencies, grouped together for a specific goal such as compiling or running a module — a more flexible form of Maven scopes -
Module coordinate (ex:
org.hibernate:hibernate-core-3.6.7.Final) — the ID of the dependency, usually in the form '<group>:<module>:<version>' (or '<groupId>:<artifactId>:<version>' in Maven terminology)
You can find a more comprehensive glossary of dependency management terms here.
As far as configurations go, the main ones of interest are:
-
compileOnly— for dependencies that are necessary to compile your production code but shouldn’t be part of the runtime classpath -
implementation(supersedescompile) — used for compilation and runtime -
runtimeOnly(supersedesruntime) — only used at runtime, not for compilation -
testCompileOnly— same ascompileOnlyexcept it’s for the tests -
testImplementation— test equivalent ofimplementation -
testRuntimeOnly— test equivalent ofruntimeOnly
You can learn more about these and how they relate to one another in the plugin reference chapter.
Be aware that the Java Library Plugin creates an additional configuration — api — for dependencies that are required for compiling both the module and any modules that depend on it.
|
✨
|
Why no
compile configuration?The Java Plugin has historically used the |
We have only scratched the surface here, so we recommend that you read the dedicated dependency management chapters once you’re comfortable with the basics of building Java projects with Gradle. Some common scenarios that require further reading include:
-
Defining a custom Maven- or Ivy-compatible repository
-
Using dependencies from a local filesystem directory
-
Declaring dependencies with changing (e.g. SNAPSHOT) and dynamic (range) versions
-
Declaring a sibling project as a dependency
-
Testing your fixes to a 3rd-party dependency via composite builds (a better alternative to publishing to and consuming from Maven Local)
You’ll discover that Gradle has a rich API for working with dependencies — one that takes time to master, but is straightforward to use for common scenarios.
Compiling your code
Compiling both your production and test code can be trivially easy if you follow the conventions:
-
Put your production source code under the src/main/java directory
-
Put your test source code under src/test/java
-
Declare your production compile dependencies in the
compileOnlyorimplementationconfigurations (see previous section) -
Declare your test compile dependencies in the
testCompileOnlyortestImplementationconfigurations -
Run the
compileJavatask for the production code andcompileTestJavafor the tests
Other JVM language plugins, such as the one for Groovy, follow the same pattern of conventions. We recommend that you follow these conventions wherever possible, but you don’t have to. There are several options for customization, as you’ll see next.
Customizing file and directory locations
Imagine you have a legacy project that uses an src directory for the production code and test for the test code. The conventional directory structure won’t work, so you need to tell Gradle where to find the source files. You do that via source set configuration.
Each source set defines where its source code resides, along with the resources and the output directory for the class files. You can override the convention values by using the following syntax:
GroovyKotlinsourceSets {
main {
java {
srcDirs = ['src']
}
}
test {
java {
srcDirs = ['test']
}
}
}Now Gradle will only search directly in src and test for the respective source code. What if you don’t want to override the convention, but simply want to add an extra source directory, perhaps one that contains some third-party source code you want to keep separate? The syntax is similar:
GroovyKotlinsourceSets {
main {
java {
srcDir 'thirdParty/src/main/java'
}
}
}Crucially, we’re using the method srcDir() here to append a directory path, whereas setting the srcDirs property replaces any existing values. This is a common convention in Gradle: setting a property replaces values, while the corresponding method appends values.
You can see all the properties and methods available on source sets in the DSL reference for SourceSet and SourceDirectorySet. Note that srcDirs and srcDir() are both on SourceDirectorySet.
Changing compiler options
Most of the compiler options are accessible through the corresponding task, such as compileJava and compileTestJava. These tasks are of type JavaCompile, so read the task reference for an up-to-date and comprehensive list of the options.
For example, if you want to use a separate JVM process for the compiler and prevent compilation failures from failing the build, you can use this configuration:
GroovyKotlincompileJava {
options.incremental = true
options.fork = true
options.failOnError = false
}That’s also how you can change the verbosity of the compiler, disable debug output in the byte code and configure where the compiler can find annotation processors.
Two common options for the Java compiler are defined at the project level:
sourceCompatibility-
Defines which language version of Java your source files should be treated as.
targetCompatibility-
Defines the minimum JVM version your code should run on, i.e. it determines the version of byte code the compiler generates.
If you need or want more than one compilation task for any reason, you can either create a new source set or simply define a new task of type JavaCompile. We look at setting up a new source set next.
Compiling and testing Java 6/7
Gradle can only run on Java version 8 or higher.
Gradle still supports compiling, testing, generating Javadoc and executing applications for Java 6 and Java 7. Java 5 is not supported.
To use Java 6 or Java 7, the following tasks need to be configured:
-
JavaCompiletask to fork and use the correct Java home -
Javadoctask to use the correctjavadocexecutable -
Testand theJavaExectask to use the correctjavaexecutable.
The following sample shows how the build.gradle needs to be adjusted. In order to be able to make the build machine-independent, the location of the old Java home and target version should be configured in GRADLE_USER_HOME/gradle.properties [2] in the user’s home directory on each developer machine, as shown in the example.
Example: Configure Java 7 build
# in $HOME/.gradle/gradle.properties
javaHome=/Library/Java/JavaVirtualMachines/jdk1.7.0_80.jdk/Contents/Home
targetJavaVersion=1.7GroovyKotlinassert hasProperty('javaHome'): "Set the property 'javaHome' in your your gradle.properties pointing to a Java 6 or 7 installation"
assert hasProperty('targetJavaVersion'): "Set the property 'targetJavaVersion' in your your gradle.properties to '1.6' or '1.7'"
java {
sourceCompatibility = JavaVersion.toVersion(targetJavaVersion)
}
def javaExecutablesPath = new File(javaHome, 'bin')
def javaExecutables = [:].withDefault { execName ->
def executable = new File(javaExecutablesPath, execName)
assert executable.exists(): "There is no ${execName} executable in ${javaExecutablesPath}"
executable
}
tasks.withType(AbstractCompile) {
options.with {
fork = true
forkOptions.javaHome = file(javaHome)
}
}
tasks.withType(Javadoc) {
executable = javaExecutables.javadoc
}
tasks.withType(Test) {
executable = javaExecutables.java
}
tasks.withType(JavaExec) {
executable = javaExecutables.java
}Compiling independent sources separately
Most projects have at least two independent sets of sources: the production code and the test code. Gradle already makes this scenario part of its Java convention, but what if you have other sets of sources? One of the most common scenarios is when you have separate integration tests of some form or other. In that case, a custom source set may be just what you need.
You can see a complete example for setting up integration tests in the Java testing chapter. You can set up other source sets that fulfil different roles in the same way. The question then becomes: when should you define a custom source set?
To answer that question, consider whether the sources:
-
Need to be compiled with a unique classpath
-
Generate classes that are handled differently from the
mainandtestones -
Form a natural part of the project
If your answer to both 3 and either one of the others is yes, then a custom source set is probably the right approach. For example, integration tests are typically part of the project because they test the code in main. In addition, they often have either their own dependencies independent of the test source set or they need to be run with a custom Test task.
Other common scenarios are less clear cut and may have better solutions. For example:
-
Separate API and implementation JARs — it may make sense to have these as separate projects, particularly if you already have a multi-project build
-
Generated sources — if the resulting sources should be compiled with the production code, add their path(s) to the
mainsource set and make sure that thecompileJavatask depends on the task that generates the sources
If you’re unsure whether to create a custom source set or not, then go ahead and do so. It should be straightforward and if it’s not, then it’s probably not the right tool for the job.
Managing resources
Many Java projects make use of resources beyond source files, such as images, configuration files and localization data. Sometimes these files simply need to be packaged unchanged and sometimes they need to be processed as template files or in some other way. Either way, the Java Plugin adds a specific Copy task for each source set that handles the processing of its associated resources.
The task’s name follows the convention of processSourceSetResources — or processResources for the main source set — and it will automatically copy any files in src/[sourceSet]/resources to a directory that will be included in the production JAR. This target directory will also be included in the runtime classpath of the tests.
Since processResources is an instance of the Copy task, you can perform any of the processing described in the Working With Files chapter.
Java properties files and reproducible builds
You can easily create Java properties files via the WriteProperties task, which fixes a well-known problem with Properties.store() that can reduce the usefulness of incremental builds.
The standard Java API for writing properties files produces a unique file every time, even when the same properties and values are used, because it includes a timestamp in the comments. Gradle’s WriteProperties task generates exactly the same output byte-for-byte if none of the properties have changed. This is achieved by a few tweaks to how a properties file is generated:
-
no timestamp comment is added to the output
-
the line separator is system independent, but can be configured explicitly (it defaults to
'\n') -
the properties are sorted alphabetically
Sometimes it can be desirable to recreate archives in a byte for byte way on different machines. You want to be sure that building an artifact from source code produces the same result, byte for byte, no matter when and where it is built. This is necessary for projects like reproducible-builds.org.
These tweaks not only lead to better incremental build integration, but they also help with reproducible builds. In essence, reproducible builds guarantee that you will see the same results from a build execution — including test results and production binaries — no matter when or on what system you run it.
Running tests
Alongside providing automatic compilation of unit tests in src/test/java, the Java Plugin has native support for running tests that use JUnit 3, 4 & 5 (JUnit 5 support came in Gradle 4.6) and TestNG. You get:
-
An automatic
testtask of type Test, using thetestsource set -
An HTML test report that includes the results from all
Testtasks that run -
Easy filtering of which tests to run
-
Fine-grained control over how the tests are run
-
The opportunity to create your own test execution and test reporting tasks
You do not get a Test task for every source set you declare, since not every source set represents tests! That’s why you typically need to create your own Test tasks for things like integration and acceptance tests if they can’t be included with the test source set.
As there is a lot to cover when it comes to testing, the topic has its own chapter in which we look at:
-
How tests are run
-
How to run a subset of tests via filtering
-
How Gradle discovers tests
-
How to configure test reporting and add your own reporting tasks
-
How to make use of specific JUnit and TestNG features
You can also learn more about configuring tests in the DSL reference for Test.
Packaging and publishing
How you package and potentially publish your Java project depends on what type of project it is. Libraries, applications, web applications and enterprise applications all have differing requirements. In this section, we will focus on the bare bones provided by the Java Plugin.
The one and only packaging feature provided by the Java Plugin directly is a jar task that packages all the compiled production classes and resources into a single JAR. This JAR is then added as an artifact — as opposed to a dependency — in the archives configuration, hence why it is automatically built by the assemble task.
If you want any other JAR or alternative archive built, you either have to apply an appropriate plugin or create the task manually. For example, if you want a task that generates a 'sources' JAR, define your own Jar task like so:
GroovyKotlintask sourcesJar(type: Jar) {
archiveClassifier = 'sources'
from sourceSets.main.allJava
}See Jar for more details on the configuration options available to you.
And note that you need to use archiveClassifier rather than archiveAppendix here for correct publication of the JAR.
If you instead want to create an 'uber' (AKA 'fat') JAR, then you can use a task definition like this:
GroovyKotlinplugins {
id 'java'
}
version = '1.0.0'
repositories {
mavenCentral()
}
dependencies {
implementation 'commons-io:commons-io:2.6'
}
task uberJar(type: Jar) {
archiveClassifier = 'uber'
from sourceSets.main.output
dependsOn configurations.runtimeClasspath
from {
configurations.runtimeClasspath.findAll { it.name.endsWith('jar') }.collect { zipTree(it) }
}
}There are several options for publishing a JAR once it has been created:
-
the
uploadArchivestask — the original publishing mechanism — which works with both Ivy and (if you apply the Maven Plugin) Maven
The former two "Publish" plugins are the preferred options.
Modifying the JAR manifest
Each instance of the Jar, War and Ear tasks has a manifest property that allows you to customize the MANIFEST.MF file that goes into the corresponding archive. The following example demonstrates how to set attributes in the JAR’s manifest:
GroovyKotlinjar {
manifest {
attributes("Implementation-Title": "Gradle",
"Implementation-Version": version)
}
}See Manifest for the configuration options it provides.
You can also create standalone instances of Manifest. One reason for doing so is to share manifest information between JARs. The following example demonstrates how to share common attributes between JARs:
GroovyKotlinext.sharedManifest = manifest {
attributes("Implementation-Title": "Gradle",
"Implementation-Version": version)
}
task fooJar(type: Jar) {
manifest = project.manifest {
from sharedManifest
}
}Another option available to you is to merge manifests into a single Manifest object. Those source manifests can take the form of a text for or another Manifest object. In the following example, the source manifests are all text files except for sharedManifest, which is the Manifest object from the previous example:
GroovyKotlintask barJar(type: Jar) {
manifest {
attributes key1: 'value1'
from sharedManifest, 'src/config/basemanifest.txt'
from(['src/config/javabasemanifest.txt', 'src/config/libbasemanifest.txt']) {
eachEntry { details ->
if (details.baseValue != details.mergeValue) {
details.value = baseValue
}
if (details.key == 'foo') {
details.exclude()
}
}
}
}
}Manifests are merged in the order they are declared in the from statement. If the base manifest and the merged manifest both define values for the same key, the merged manifest wins by default. You can fully customize the merge behavior by adding eachEntry actions in which you have access to a ManifestMergeDetails instance for each entry of the resulting manifest. Note that the merge is done lazily, either when generating the JAR or when Manifest.writeTo() or Manifest.getEffectiveManifest() are called.
Speaking of writeTo(), you can use that to easily write a manifest to disk at any time, like so:
GroovyKotlinjar.manifest.writeTo("$buildDir/mymanifest.mf")Generating API documentation
The Java Plugin provides a javadoc task of type Javadoc, that will generate standard Javadocs for all your production code, i.e. whatever source is in the main source set. The task supports the core Javadoc and standard doclet options described in the Javadoc reference documentation. See CoreJavadocOptions and StandardJavadocDocletOptions for a complete list of those options.
As an example of what you can do, imagine you want to use Asciidoc syntax in your Javadoc comments. To do this, you need to add Asciidoclet to Javadoc’s doclet path. Here’s an example that does just that:
GroovyKotlinconfigurations {
asciidoclet
}
dependencies {
asciidoclet 'org.asciidoctor:asciidoclet:1.+'
}
task configureJavadoc {
doLast {
javadoc {
options.doclet = 'org.asciidoctor.Asciidoclet'
options.docletpath = configurations.asciidoclet.files.toList()
}
}
}
javadoc {
dependsOn configureJavadoc
}You don’t have to create a configuration for this, but it’s an elegant way to handle dependencies that are required for a unique purpose.
You might also want to create your own Javadoc tasks, for example to generate API docs for the tests:
GroovyKotlintask testJavadoc(type: Javadoc) {
source = sourceSets.test.allJava
}These are just two non-trivial but common customizations that you might come across.
Cleaning the build
The Java Plugin adds a clean task to your project by virtue of applying the Base Plugin. This task simply deletes everything in the $buildDir directory, hence why you should always put files generated by the build in there. The task is an instance of Delete and you can change what directory it deletes by setting its dir property.
Building Java libraries
The unique aspect of library projects is that they are used (or "consumed") by other Java projects. That means the dependency metadata published with the JAR file — usually in the form of a Maven POM — is crucial. In particular, consumers of your library should be able to distinguish between two different types of dependencies: those that are only required to compile your library and those that are also required to compile the consumer.
Gradle manages this distinction via the Java Library Plugin, which introduces an api configuration in addition to the implementation one covered in this chapter. If the types from a dependency appear in public fields or methods of your library’s public classes, then that dependency is exposed via your library’s public API and should therefore be added to the api configuration. Otherwise, the dependency is an internal implementation detail and should be added to implementation.
|
✨
|
The Java Library Plugin automatically applies the standard Java Plugin as well. |
If you’re unsure of the difference between an API and implementation dependency, the Java Library Plugin chapter has a detailed explanation. In addition, you can see a basic, practical example of building a Java library in the corresponding guide.
Building Java applications
Java applications packaged as a JAR aren’t set up for easy launching from the command line or a desktop environment. The Application Plugin solves the command line aspect by creating a distribution that includes the production JAR, its dependencies and launch scripts Unix-like and Windows systems.
See the plugin’s chapter for more details, but here’s a quick summary of what you get:
-
assemblecreates ZIP and TAR distributions of the application containing everything needed to run it -
A
runtask that starts the application from the build (for easy testing) -
Shell and Windows Batch scripts to start the application
Note that you will need to explicitly apply the Java Plugin in your build script.
You can see a basic example of building a Java application in the corresponding guide.
Building Java web applications
Java web applications can be packaged and deployed in a number of ways depending on the technology you use. For example, you might use Spring Boot with a fat JAR or a Reactive-based system running on Netty. Whatever technology you use, Gradle and its large community of plugins will satisfy your needs. Core Gradle, though, only directly supports traditional Servlet-based web applications deployed as WAR files.
That support comes via the War Plugin, which automatically applies the Java Plugin and adds an extra packaging step that does the following:
-
Copies static resources from src/main/webapp into the root of the WAR
-
Copies the compiled production classes into a WEB-INF/classes subdirectory of the WAR
-
Copies the library dependencies into a WEB-INF/lib subdirectory of the WAR
This is done by the war task, which effectively replaces the jar task — although that task remains — and is attached to the assemble lifecycle task. See the plugin’s chapter for more details and configuration options.
There is no core support for running your web application directly from the build, but we do recommend that you try the Gretty community plugin, which provides an embedded Servlet container.
Building Java EE applications
Java enterprise systems have changed a lot over the years, but if you’re still deploying to JEE application servers, you can make use of the Ear Plugin. This adds conventions and a task for building EAR files. The plugin’s chapter has more details.
Building Java Platforms
A Java platform represents a set of dependency declarations and constraints that form a cohesive unit to be applied on consuming projects. The platform has no source and no artifact of its own. It maps in the Maven world to a BOM.
The support comes via the Java Platform plugin, which sets up the different configurations and publication components.