Introduction to Dependency Management
What is dependency management?
Software projects rarely work in isolation. In most cases, a project relies on reusable functionality in the form of libraries or is broken up into individual components to compose a modularized system. Dependency management is a technique for declaring, resolving and using dependencies required by the project in an automated fashion.
|
✨
|
For a general overview on the terms used throughout the user guide, refer to Dependency Management Terminology. |
Dependency management in Gradle
Gradle has built-in support for dependency management and lives up the task of fulfilling typical scenarios encountered in modern software projects. We’ll explore the main concepts with the help of an example project. The illustration below should give you an rough overview on all the moving parts.
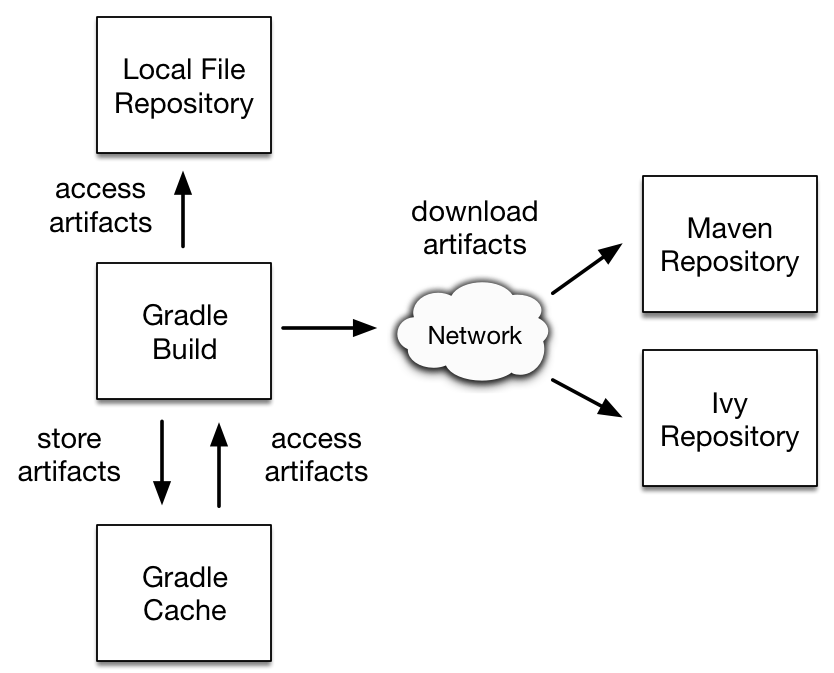
The example project builds Java source code. Some of the Java source files import classes from Google Guava, a open-source library providing a wealth of utility functionality. In addition to Guava, the project needs the JUnit libraries for compiling and executing test code.
Guava and JUnit represent the dependencies of this project. A build script developer can declare dependencies for different scopes e.g. just for compilation of source code or for executing tests. In Gradle, the scope of a dependency is called a configuration. For a full overview, see the reference material on dependency types.
Often times dependencies come in the form of modules. You’ll need to tell Gradle where to find those modules so they can be consumed by the build. The location for storing modules is called a repository. By declaring repositories for a build, Gradle will know how to find and retrieve modules. Repositories can come in different forms: as local directory or a remote repository. The reference on repository types provides a broad coverage on this topic.
At runtime, Gradle will locate the declared dependencies if needed for operating a specific task. The dependencies might need to be downloaded from a remote repository, retrieved from a local directory or requires another project to be built in a multi-project setting. This process is called dependency resolution. You can find a detailed discussion in How dependency resolution works.
Once resolved, the resolution mechanism stores the underlying files of a dependency in a local cache, also referred to as the dependency cache. Future builds reuse the files stored in the cache to avoid unnecessary network calls.
Modules can provide additional metadata. Metadata is the data that describes the module in more detail e.g. the coordinates for finding it in a repository, information about the project, or its authors. As part of the metadata, a module can define that other modules are needed for it to work properly. For example, the JUnit 5 platform module also requires the platform commons module. Gradle automatically resolves those additional modules, so called transitive dependencies. If needed, you can customize the behavior the handling of transitive dependencies to your project’s requirements.
Projects with tens or hundreds of declared dependencies can easily suffer from dependency hell. Gradle provides sufficient tooling to visualize, navigate and analyze the dependency graph of a project either with the help of a build scan or built-in tasks. Learn more in Inspecting Dependencies.
How dependency resolution works
Gradle takes your dependency declarations and repository definitions and attempts to download all of your dependencies by a process called dependency resolution. Below is a brief outline of how this process works.
-
Given a required dependency, Gradle attempts to resolve the dependency by searching for the module the dependency points at. Each repository is inspected in order. Depending on the type of repository, Gradle looks for metadata files describing the module (
.module,.pomorivy.xmlfile) or directly for artifact files.-
If the dependency is declared as a dynamic version (like
1.+,[1.0,),[1.0, 2.0)), Gradle will resolve this to the highest available concrete version (like1.2) in the repository. For Maven repositories, this is done using themaven-metadata.xmlfile, while for Ivy repositories this is done by directory listing. -
If the module metadata is a POM file that has a parent POM declared, Gradle will recursively attempt to resolve each of the parent modules for the POM.
-
-
Once each repository has been inspected for the module, Gradle will choose the 'best' one to use. This is done using the following criteria:
-
For a dynamic version, a 'higher' concrete version is preferred over a 'lower' version.
-
Modules declared by a module metadata file (
.module,.pomorivy.xmlfile) are preferred over modules that have an artifact file only. -
Modules from earlier repositories are preferred over modules in later repositories.
-
When the dependency is declared by a concrete version and a module metadata file is found in a repository, there is no need to continue searching later repositories and the remainder of the process is short-circuited.
-
-
All of the artifacts for the module are then requested from the same repository that was chosen in the process above.
The dependency resolution process is highly customizable to meet enterprise requirements. For more information, see the chapter on customizing dependency resolution.
HTTP Retries
Gradle will make several attempts to connect to a given repository. If it fails, Gradle will retry, increasing the amount of time waiting between each retry. After a max number of failed attempts, the repository will be blacklisted for the whole build.