Publishing
The vast majority of software projects build something that aims to be consumed in some way. It could be a library that other software projects use or it could be an application for end users. Publishing is the process by which the thing being built is made available to consumers.
In Gradle, that process looks like this:
Each of the these steps is dependent on the type of repository to which you want to publish artifacts. The two most common types are Maven-compatible and Ivy-compatible repositories, or Maven and Ivy repositories for short.
|
✨
|
Looking for information on upload tasks and the archives configuration? See the Legacy Publishing chapter.
|
Gradle makes it easy to publish to these types of repository by providing some prepackaged infrastructure in the form of the Maven Publish Plugin and the Ivy Publish Plugin. These plugins allow you to configure what to publish and perform the publishing with a minimum of effort.
Let’s take a look at those steps in more detail:
- What to publish
-
Gradle needs to know what files and information to publish so that consumers can use your project. This is typically a combination of artifacts and metadata that Gradle calls a publication. Exactly what a publication contains depends on the type of repository it’s being published to.
For example, a publication destined for a Maven repository includes one or more artifacts — typically built by the project — plus a POM file describing the primary artifact and its dependencies. The primary artifact is typically the project’s production JAR and secondary artifacts might consist of "-sources" and "-javadoc" JARs.
- Where to publish
-
Gradle needs to know where to publish artifacts so that consumers can get hold of them. This is done via repositories, which store and make available all sorts of artifact. Gradle also needs to interact with the repository, which is why you must provide the type of the repository and its location.
- How to publish
-
Gradle automatically generates publishing tasks for all possible combinations of publication and repository, allowing you to publish any artifact to any repository. If you’re publishing to a Maven repository, the tasks are of type PublishToMavenRepository, while for Ivy repositories the tasks are of type PublishToIvyRepository.
What follows is a practical example that demonstrates the entire publishing process.
Setting up basic publishing
The first step in publishing, irrespective of your project type, is to apply the appropriate publishing plugin. As mentioned in the introduction, Gradle supports both Maven and Ivy repositories via the following plugins:
These provide the specific publication and repository classes needed to configure publishing for the corresponding repository type. Since Maven repositories are the most commonly used ones, they will be the basis for this example and for the other samples in the chapter. Don’t worry, we will explain how to adjust individual samples for Ivy repositories.
Let’s assume we’re working with a simple Java library project, so only the following plugins are applied:
GroovyKotlinplugins {
id 'java-library'
id 'maven-publish'
}Once the appropriate plugin has been applied, you can configure the publications and repositories. For this example, we want to publish the project’s production JAR file — the one produced by the jar task — to a custom, Maven repository. We do that with the following publishing {} block, which is backed by PublishingExtension:
GroovyKotlingroup = 'org.example'
version = '1.0'
publishing {
publications {
myLibrary(MavenPublication) {
from components.java
}
}
repositories {
maven {
name = 'myRepo'
url = "file://${buildDir}/repo"
}
}
}This defines a publication called "myLibrary" that can be published to a Maven repository by virtue of its type: MavenPublication. This publication consists of just the production JAR artifact and its metadata, which combined are represented by the java component of the project.
|
✨
|
Components are the standard way of defining a publication. They are provided by plugins, usually of the language or platform variety. For example, the Java Plugin defines the components.java SoftwareComponent, while the War Plugin defines components.web.
|
The example also defines a file-based Maven repository with the name "myRepo". Such a file-based repository is convenient for a sample, but real-world builds typically work with HTTPS-based repository servers, such as Maven Central or an internal company server.
|
✨
|
You may define one, and only one, repository without a name. This translates to an implicit name of "Maven" for Maven repositories and "Ivy" for Ivy repositories. All other repository definitions must be given an explicit name. |
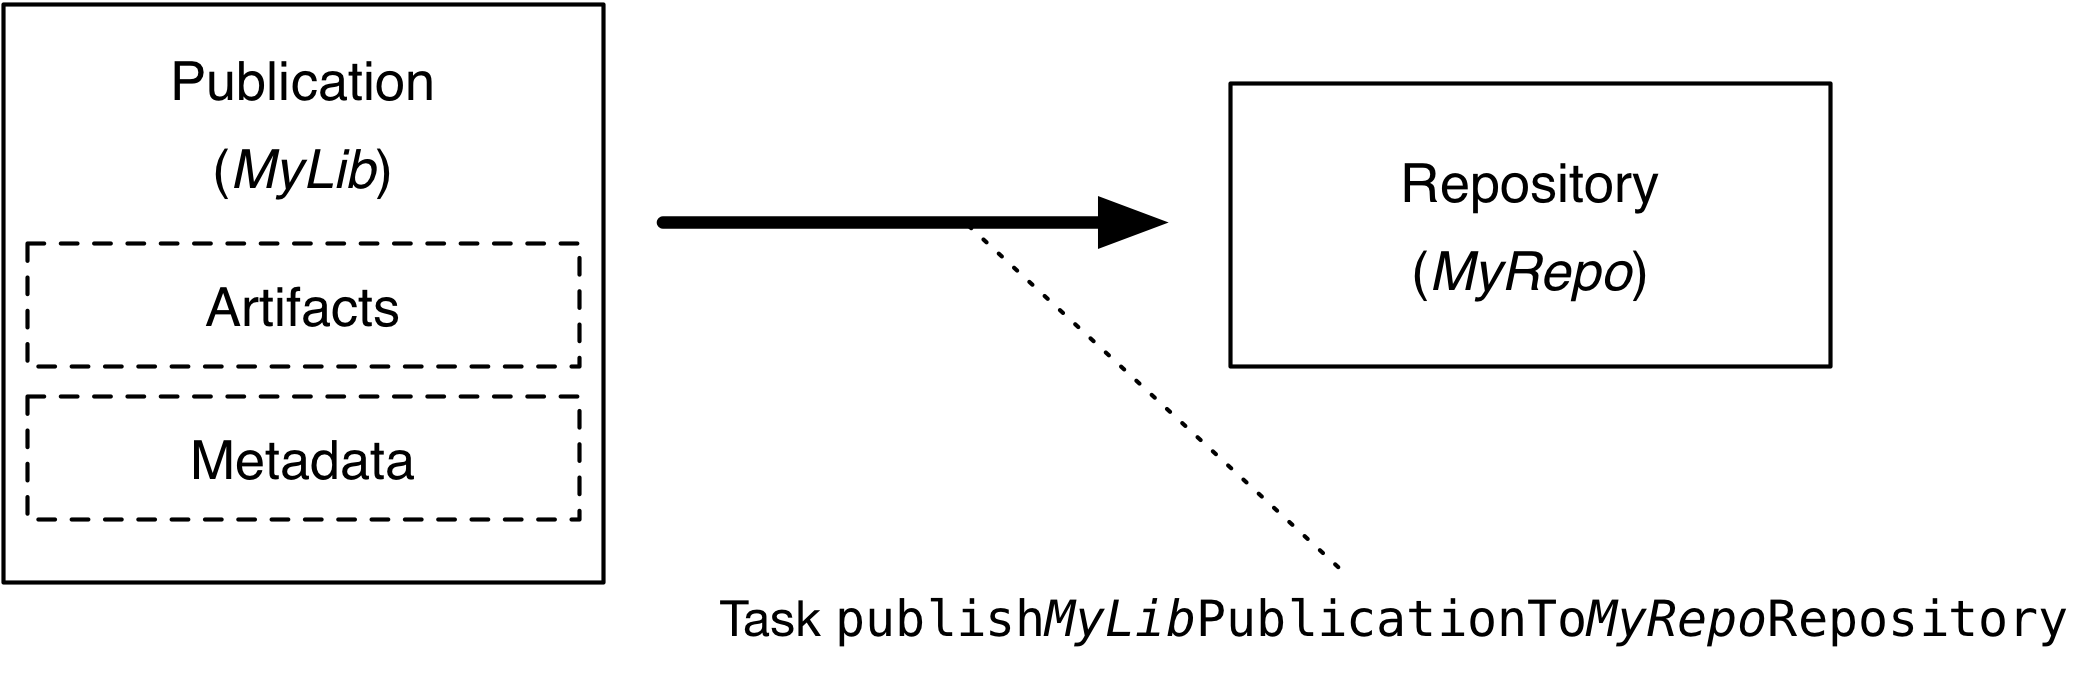
In combination with the project’s group and version, the publication and repository definitions provide everything that Gradle needs to publish the project’s production JAR. Gradle will then create a dedicated publishMyLibraryPublicationToMyRepoRepository task that does just that. Its name is based on the template publishPubNamePublicationToRepoNameRepository. See the appropriate publishing plugin’s documentation for more details on the nature of this task and any other tasks that may be available to you.
You can either execute the individual publishing tasks directly, or you can execute publish, which will run all the available publishing tasks. In this example, publish will just run publishMyLibraryPublicationToMavenRepository.
|
✨
|
Basic publishing to an Ivy repository is very similar: you simply use the Ivy Publish Plugin, replace There are differences between the two types of repository, particularly around the extra metadata that each support — for example, Maven repositories require a POM file while Ivy ones have their own metadata format — so see the plugin chapters for comprehensive information on how to configure both publications and repositories for whichever repository type you’re working with. |
That’s everything for the basic use case. However, many projects need more control over what gets published, so we look at several common scenarios in the following sections.
Adding custom artifacts to a publication
Users often need to include additional artifacts with a publication, one of the most common examples being that of "-sources" and "-javadoc" JARs for JVM libraries. This is easy to do for both Maven- and Ivy-compatible repositories via the artifact configuration.
The following sample configures "-sources" and "-javadoc" JARs for a Java project and attaches them to the main (Maven) publication, i.e. the production JAR:
GroovyKotlintask sourcesJar(type: Jar) {
archiveClassifier = 'sources'
from sourceSets.main.allJava
}
task javadocJar(type: Jar) {
archiveClassifier = 'javadoc'
from javadoc.destinationDir
}
publishing {
publications {
mavenJava(MavenPublication) {
from components.java
artifact sourcesJar
artifact javadocJar
}
}
}There are several important things to note about the sample:
-
The
artifact()method accepts archive tasks as an argument — likesourcesJarin the sample — as well as any type of argument accepted by Project.file(java.lang.Object), such as aFileinstance or string file path. -
Publishing plugins support different artifact configuration properties, so always check the plugin documentation for more details. The
classifierandextensionproperties are supported by both the Maven Publish Plugin and the Ivy Publish Plugin. -
Custom artifacts need to be distinct within a publication, typically via a unique combination of
classifierandextension. See the documentation for the plugin you’re using for the precise requirements. -
If you use
artifact()with an archive task, Gradle automatically populates the artifact’s metadata with theclassifierandextensionproperties from that task. That’s why the above sample does not specify those properties in the artifact configurations.
When you’re attaching extra artifacts to a publication, remember that they are secondary artifacts that support a primary artifact. The metadata that a publication defines — such as dependency information — is associated with that primary artifact only. Thinking about publications in this way should help you determine whether you should be adding custom artifacts to an existing publication, or defining a new publication.
Publishing a custom primary artifact (no component)
If your build produces a primary artifact that isn’t supported by a predefined component, then you will need to configure a custom artifact. This isn’t much different to adding a custom artifact to an existing publication. There are just a couple of extra considerations:
-
You may want to make the artifact available to other projects in the build
-
You will need to manually construct the necessary metadata for publishing
Inter-project dependencies have nothing to do with publishing, but both features typically apply to the same set of artifacts in a Gradle project. So how do you tie them together?
You start by defining a custom artifact and attaching it to a Gradle configuration of your choice. The following sample defines an RPM artifact that is produced by an rpm task (not shown) and attaches that artifact to the archives configuration:
GroovyKotlindef rpmFile = file("$buildDir/rpms/my-package.rpm")
def rpmArtifact = artifacts.add('archives', rpmFile) {
type 'rpm'
builtBy 'rpm'
}The artifacts.add() method — from ArtifactHandler — returns an artifact object of type PublishArtifact that can then be used in defining a publication, as shown in the following sample:
GroovyKotlinpublishing {
publications {
maven(MavenPublication) {
artifact rpmArtifact
}
}
}Now you can publish the RPM as well as depend on it from another project using the project(path: ':my-project', configuration: 'archives') syntax.
|
✨
|
There is currently no easy way to define dependency information for a custom artifact. |
The groupId and artifactId properties are specific to Maven publications. See IvyPublication for the relevant Ivy properties.
Signing artifacts
The Signing Plugin can be used to sign all artifacts and metadata files that make up a publication, including Maven POM files and Ivy module descriptors. In order to use it:
-
Apply the Signing Plugin
-
Configure the signatory credentials — follow the link to see how
-
Specify the publications you want signed
Here’s an example that configures the plugin to sign the mavenJava publication:
GroovyKotlinsigning {
sign publishing.publications.mavenJava
}This will create a Sign task for each publication you specify and wire all publishPubNamePublicationToRepoNameRepository tasks to depend on it. Thus, publishing any publication will automatically create and publish the signatures for its artifacts and metadata, as you can see from this output:
Example: Sign and publish a project
gradle publish> gradle publish > Task :generatePomFileForMavenJavaPublication > Task :compileJava > Task :processResources > Task :classes > Task :jar > Task :javadoc > Task :javadocJar > Task :sourcesJar > Task :signMavenJavaPublication > Task :publishMavenJavaPublicationToMavenRepository > Task :publish BUILD SUCCESSFUL in 0s 9 actionable tasks: 9 executed
Restricting publications to specific repositories
When you have defined multiple publications or repositories, you often want to control which publications are published to which repositories. For instance, consider the following sample that defines two publications — one that consists of just a binary and another that contains the binary and associated sources — and two repositories — one for internal use and one for external consumers:
GroovyKotlinpublishing {
publications {
binary(MavenPublication) {
from components.java
}
binaryAndSources(MavenPublication) {
from components.java
artifact sourcesJar
}
}
repositories {
// change URLs to point to your repos, e.g. http://my.org/repo
maven {
name = 'external'
url = "$buildDir/repos/external"
}
maven {
name = 'internal'
url = "$buildDir/repos/internal"
}
}
}The publishing plugins will create tasks that allow you to publish either of the publications to either repository. They also attach those tasks to the publish aggregate task. But let’s say you want to restrict the binary-only publication to the external repository and the binary-with-sources publication to the internal one. To do that, you need to make the publishing conditional.
Gradle allows you to skip any task you want based on a condition via the Task.onlyIf(org.gradle.api.specs.Spec) method. The following sample demonstrates how to implement the constraints we just mentioned:
GroovyKotlintasks.withType(PublishToMavenRepository) {
onlyIf {
(repository == publishing.repositories.external &&
publication == publishing.publications.binary) ||
(repository == publishing.repositories.internal &&
publication == publishing.publications.binaryAndSources)
}
}
tasks.withType(PublishToMavenLocal) {
onlyIf {
publication == publishing.publications.binaryAndSources
}
}gradle publish> gradle publish > Task :generatePomFileForBinaryAndSourcesPublication > Task :compileJava > Task :processResources > Task :classes > Task :jar > Task :sourcesJar > Task :publishBinaryAndSourcesPublicationToExternalRepository SKIPPED > Task :publishBinaryAndSourcesPublicationToInternalRepository > Task :generatePomFileForBinaryPublication > Task :publishBinaryPublicationToExternalRepository > Task :publishBinaryPublicationToInternalRepository SKIPPED > Task :publish BUILD SUCCESSFUL in 0s 8 actionable tasks: 8 executed
You may also want to define your own aggregate tasks to help with your workflow. For example, imagine that you have several publications that should be published to the external repository. It could be very useful to publish all of them in one go without publishing the internal ones.
The following sample demonstrates how you can do this by defining an aggregate task — publishToExternalRepository — that depends on all the relevant publish tasks:
GroovyKotlintask publishToExternalRepository {
group = 'publishing'
description = 'Publishes all Maven publications to the external Maven repository.'
dependsOn tasks.withType(PublishToMavenRepository).matching {
it.repository == publishing.repositories.external
}
}This particular sample automatically handles the introduction or removal of the relevant publishing tasks by using TaskCollection.withType(java.lang.Class) with the PublishToMavenRepository task type. You can do the same with PublishToIvyRepository if you’re publishing to Ivy-compatible repositories.
Configuring publishing tasks
The publishing plugins create their non-aggregate tasks after the project has been evaluated, which means you cannot directly reference them from your build script. If you would like to configure any of these tasks, you should use deferred task configuration. This can be done in a number of ways via the project’s tasks collection.
For example, imagine you want to change where the generatePomFileForPubNamePublication tasks write their POM files. You can do this by using the TaskCollection.withType(java.lang.Class) method, as demonstrated by this sample:
GroovyKotlintasks.withType(GenerateMavenPom).all {
def matcher = name =~ /generatePomFileFor(\w+)Publication/
def publicationName = matcher[0][1]
destination = "$buildDir/poms/${publicationName}-pom.xml"
}The above sample uses a regular expression to extract the name of the publication from the name of the task. This is so that there is no conflict between the file paths of all the POM files that might be generated. If you only have one publication, then you don’t have to worry about such conflicts since there will only be one POM file.
Terminology
- Artifact
-
A file or directory produced by a build, such as a JAR, a ZIP distribution, or a native executable.
Artifacts are typically designed to be used or consumed by users or other projects, or deployed to hosting systems. In such cases, the artifact is a single file. Directories are common in the case of inter-project dependencies to avoid the cost of producing the publishable artifact.
- Component
-
Any single version of a module.
Components are defined by plugins and provide a simple way to define a publication for publishing. They comprise one or more artifacts as well as the appropriate metadata. For example, the
javacomponent consists of the production JAR — produced by thejartask — and its dependency information.
- Configuration
-
A named collection of dependencies or artifacts.
Gradle’s configurations can be somewhat confusing because they apply to both dependencies and artifacts. The main difference is that dependencies are consumed by the project, while artifacts are produced by it. Even then, the artifacts produced by a project are often consumed as dependencies by other projects.
Configurations allow different aspects of the build to work with known subsets of a project’s dependencies or artifacts, e.g. the dependencies required for compilation, or the artifacts related to a project’s API.
- Publication
-
A description of the files and metadata that should be published to a repository as a single entity for use by consumers.
A publication has a name and consists of one or more artifacts plus information about those artifacts. The nature of that information depends on what type of repository you publish the publication to. In the case of Maven, the information takes the form of a POM.
One thing to bear in mind is that Maven repositories only allow a single primary artifact, i.e. one with metadata, but they do allow secondary artifacts such as packages of the associated source files and documentation ("-sources" and "-javadoc" JARs in the Java world).