Examples > Digital
Input Pullup Serial
This example demonstrates the use of INPUT_PULLUP with pinMode(). It monitors the state of a switch by establishing serial communication between your Arduino and your computer over USB.
Additionally, when the input is HIGH, the onboard LED attached to pin 13 will turn on; when LOW, the LED will turn off.
Hardware Required
- Arduino Board
- A momentary switch, button, or toggle switch
- breadboard
- hook-up wire
Circuit
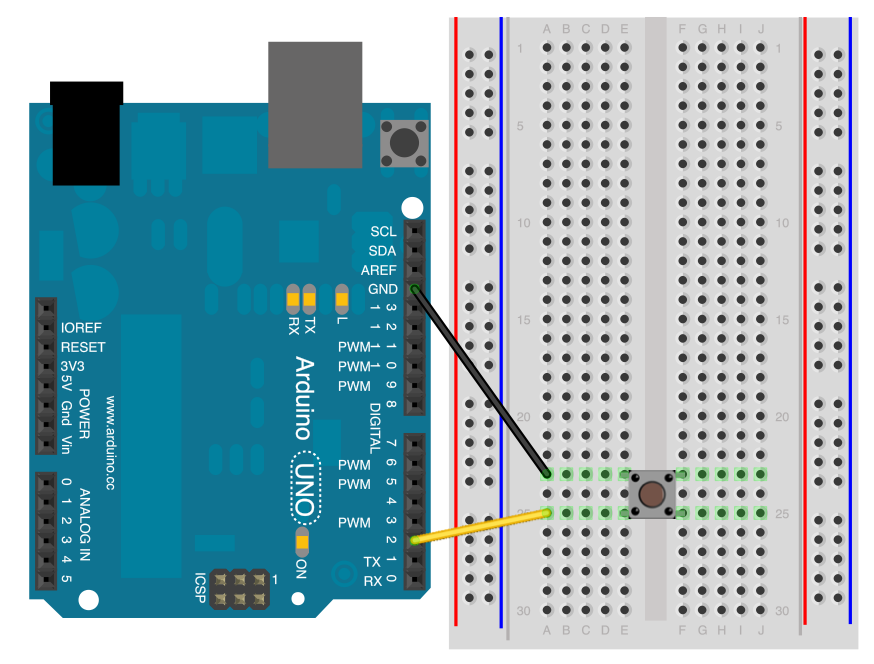
image developed using Fritzing. For more circuit examples, see the Fritzing project page
Connect two wires to the Arduino board. The black wire connects ground to one leg of the pushbutton. The second wire goes from digital pin 2 to the other leg of the pushbutton.
Pushbuttons or switches connect two points in a circuit when you press them. When the pushbutton is open (unpressed) there is no connection between the two legs of the pushbutton. Because the internal pull-up on pin 2 is active and connected to 5V, we read HIGH when the button is open. When the button is closed, the Arduino reads LOW because a connection to ground is completed.
Schematic

Code
In the program below, the very first thing that you do will in the setup function is to begin serial communications, at 9600 bits of data per second, between your Arduino and your computer with the line:
Serial.begin(9600);
Next, initialize digital pin 2 as an input with the internal pull-up resistor enabled:
pinMode(2,INPUT_PULLUP);
The following line make pin 13, with the onboard LED, an output :
pinMode(13, OUTPUT);
Now that your setup has been completed, move into the main loop of your code. When your button is not pressed, the internal pull-up resistor connects to 5 volts. This causes the Arduino to report "1" or HIGH. When the button is pressed, the Arduino pin is pulled to ground, causing the Arduino report a "0", or LOW.
The first thing you need to do in the main loop of your program is to establish a variable to hold the information coming in from your switch. Since the information coming in from the switch will be either a "1" or a "0", you can use an int datatype. Call this variable sensorValue, and set it to equal whatever is being read on digital pin 2. You can accomplish all this with just one line of code:
int sensorValue = digitalRead(2);
Once the Arduino has read the input, make it print this information back to the computer as a decimal (DEC) value. You can do this with the command Serial.println() in our last line of code:
Serial.println(sensorValue, DEC);
Now, when you open your Serial Monitor in the Arduino environment, you will see a stream of "0"s if your switch is closed, or "1"s if your switch is open.
The LED on pin 13 will illuminate when the switch is HIGH, and turn off when LOW.
Input Pull-up Serial
This example demonstrates the use of pinMode(INPUT_PULLUP). It reads a digital
input on pin 2 and prints the results to the Serial Monitor.
The circuit:
- momentary switch attached from pin 2 to ground
- built-in LED on pin 13
Unlike pinMode(INPUT), there is no pull-down resistor necessary. An internal
20K-ohm resistor is pulled to 5V. This configuration causes the input to read
HIGH when the switch is open, and LOW when it is closed.
created 14 Mar 2012
by Scott Fitzgerald
This example code is in the public domain.
http://www.arduino.cc/en/Tutorial/InputPullupSerial
*/
void setup() {
//start serial connection
Serial.begin(9600);
//configure pin 2 as an input and enable the internal pull-up resistor
pinMode(2, INPUT_PULLUP);
pinMode(13, OUTPUT);
}
void loop() {
//read the pushbutton value into a variable
int sensorVal = digitalRead(2);
//print out the value of the pushbutton
Serial.println(sensorVal);
// Keep in mind the pull-up means the pushbutton's logic is inverted. It goes
// HIGH when it's open, and LOW when it's pressed. Turn on pin 13 when the
// button's pressed, and off when it's not:
if (sensorVal == HIGH) {
digitalWrite(13, LOW);
} else {
digitalWrite(13, HIGH);
}
}
See Also:
- setup()
- loop()
- pinMode()
- digitalRead()
- delay()
- int
- serial
- DigitalPins
- Blink Without Delay: blinking an LED without using the delay() function.
- Button: use a pushbutton to control an LED.
- Debounce: read a pushbutton, filtering noise.
- Button State Change: counting the number of button pushes.
- Input Pullup Serial: Demonstrates the use of INPUT_PULLUP with pinMode().
- Tone: play a melody with a Piezo speaker.
- Pitch follower: play a pitch on a piezo speaker depending on an analog input.
- Simple Keyboard: a three-key musical keyboard using force sensors and a piezo speaker.
- Tone4: play tones on multiple speakers sequentially using the tone() command.
