Examples > Robot
Logo
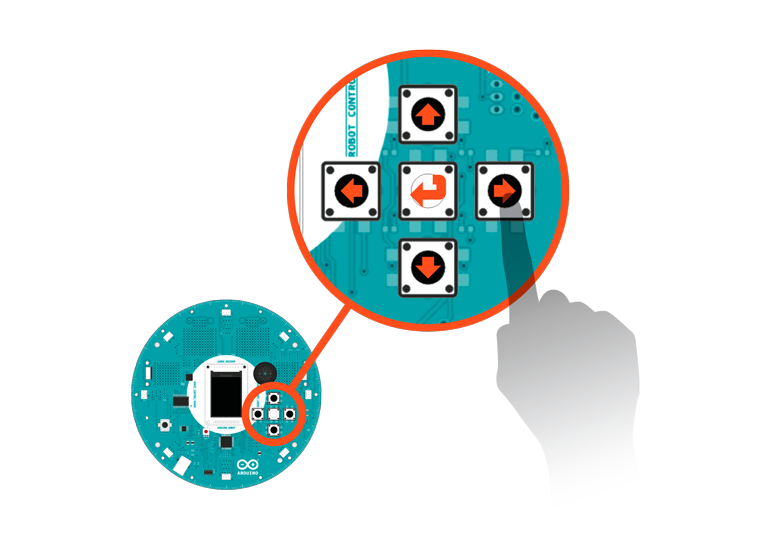
This sketch shows you basic movement with the Robot. When the sketch starts, press the buttons ont he control board to indicate the direction you want the robot to move. After you've keyed in your sequence (up to 20 steps at a time), press the middle button to record the steps to memory. Put your robot on the floor for it to follow the directions you programmed.
Hardware Required
- Arduino Robot
Instruction
- Upload the example, unplug USB and turn on power
- Place the robot on the floor, in a clear space, so it can move around.
- After the starting images on the screen, the robot will ask you to add commands.
- Press the buttons according to how you want the robot to move; the commands will be stored and executed later.
- Left makes the robot turn left for 90 degrees, right makes it turn right. Up makes the robot go forward for 1 second, down makes it go backwards for 1 second.
- After you're done with the commands, press the middle button. The robot will start executing the commands in order. At most, the robot will remember 20 commands. If you fill them all, the robot will start executing before you press the middle button
- After running the sequence, the robot will return to the 3rd step. Adjust your commands and do it again!
Try it out

Program the movements on the D-pad

Repeat the movement sequence
Code
First, explain the code line by line
This sketch demonstrates basic movement of the Robot.
When the sketch starts, press the on-board buttons to tell
the robot how to move. Pressing the middle button will
save the pattern, and the robot will follow accordingly.
You can record up to 20 commands. The robot will move for
one second per command.
This example uses images on an SD card. It looks for
files named "lg0.bmp" and "lg1.bmp" and draws them on the
screen.
Circuit:
* Arduino Robot
created 1 May 2013
by X. Yang
modified 12 May 2013
by D. Cuartielles
This example is in the public domain
*/
#include <ArduinoRobot.h> // include the robot library
#include <Wire.h>
int commands[20]; // array for storing commands
void setup() {
// initialize the Robot, SD card, and display
Robot.begin();
Robot.beginTFT();
Robot.beginSD();
// draw "lg0.bmp" and "lg1.bmp" on the screen
Robot.displayLogos();
}
void loop() {
Robot.drawBMP("intro.bmp", 0, 0); //display background image
iniCommands(); // remove commands from the array
addCommands(); // add commands to the array
delay(1000); // wait for a second
executeCommands(); // follow orders
Robot.stroke(0, 0, 0);
Robot.text("Done!", 5, 103); // write some text to the display
delay(1500); // wait for a moment
}
// empty the commands array
void iniCommands() {
for (int i = 0; i < 20; i++) {
commands[i] = -1;
}
}
// add commands to the array
void addCommands() {
Robot.stroke(0, 0, 0);
// display text on the screen
Robot.text("1. Press buttons to\n add commands.\n\n 2. Middle to finish.", 5, 5);
// read the buttons' state
for (int i = 0; i < 20;) { //max 20 commands
int key = Robot.keyboardRead();
if (key == BUTTON_MIDDLE) { //finish input
break;
} else if (key == BUTTON_NONE) { //if no button is pressed
continue;
}
commands[i] = key; // save the button to the array
PrintCommandI(i, 46); // print the command on the screen
delay(100);
i++;
}
}
// run through the array and move the robot
void executeCommands() {
// print status to the screen
Robot.text("Excuting...", 5, 70);
// read through the array and move accordingly
for (int i = 0; i < 20; i++) {
switch (commands[i]) {
case BUTTON_LEFT:
Robot.turn(-90);
break;
case BUTTON_RIGHT:
Robot.turn(90);
break;
case BUTTON_UP:
Robot.motorsWrite(255, 255);
break;
case BUTTON_DOWN:
Robot.motorsWrite(-255, -255);
break;
case BUTTON_NONE:
return;
}
// print the current command to the screen
Robot.stroke(255, 0, 0);
PrintCommandI(i, 86);
delay(1000);
// stop moving for a second
Robot.motorsStop();
delay(1000);
}
}
// convert the button press to a single character
char keyToChar(int key) {
switch (key) {
case BUTTON_LEFT:
return '<';
case BUTTON_RIGHT:
return '>';
case BUTTON_UP:
return '^';
case BUTTON_DOWN:
return 'v';
}
}
// display a command
void PrintCommandI(int i, int originY) {
Robot.text(keyToChar(commands[i]), i % 14 * 8 + 5, i / 14 * 10 + originY);
}
See Also:
- begin()
- beginTFT()
- motorsWrite()
- turn()
- keyboardRead()
