Serial Call and Response (handshaking) with ASCII-encoded output
This example demonstrates string-based communication from the Arduino or Genuino board to the computer using a call-and-response (handshaking) method.
The sketch sends an ASCII string on startup and repeats that until it gets a serial response from the computer. Then it sends three sensor values as ASCII-encoded numbers, separated by commas and terminated by a linefeed and carriage return, and waits for another response from the computer.
You can use the Arduino Software (IDE) serial monitor to view the sent data, or it can be read by Processing (see code below), Flash, PD, Max/MSP (see example below), etc. The examples below split the incoming string on the commas and convert the string into numbers again.
Compare this to the Serial call and response example. They are similar, in that both use a handshaking method, but this one encodes the sensor readings as strings, while the other sends them as binary values. While sending as ASCII-encoded strings takes more bytes, it means you can easily send values larger than 255 for each sensor reading. It's also easier to read in a serial terminal program.
Hardware Required
- Arduino or Genuino Board
- 2 analog sensors (potentiometer, photocell, FSR, etc.)
- pushbutton
- 3 10K ohm resistors
- hook-up wires
- breadboard
Software Required
Circuit
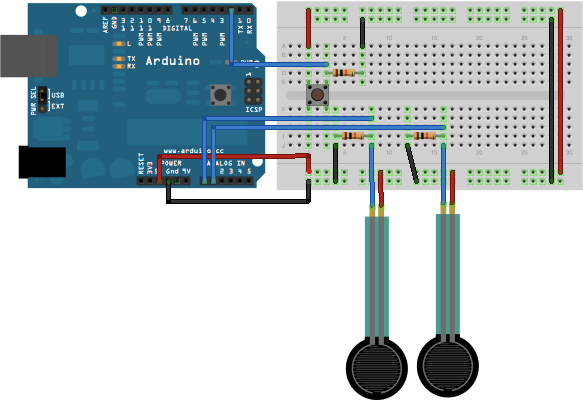
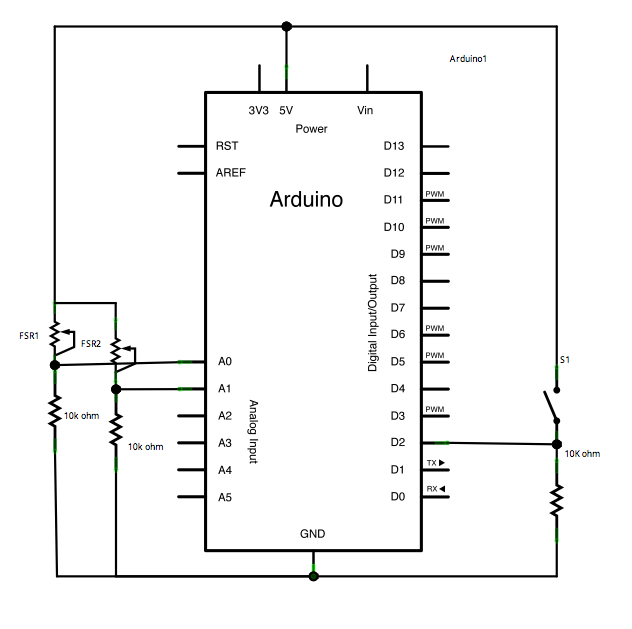
Connect analog sensors to analog input pin 0 and 1 with 10K ohm resistors used as voltage dividers. Connect a pushbutton or switch to digital I/O pin 2 with a 10K ohm resistor as a reference to ground.
click the image to enlarge
image developed using Fritzing. For more circuit examples, see the Fritzing project page
Schematic
click the image to enlarge
Code
Serial Call and Response in ASCII
Language: Wiring/Arduino
This program sends an ASCII A (byte of value 65) on startup and repeats that
until it gets some data in. Then it waits for a byte in the serial port, and
sends three ASCII-encoded, comma-separated sensor values, truncated by a
linefeed and carriage return, whenever it gets a byte in.
The circuit:
- potentiometers attached to analog inputs 0 and 1
- pushbutton attached to digital I/O 2
created 26 Sep 2005
by Tom Igoe
modified 24 Apr 2012
by Tom Igoe and Scott Fitzgerald
Thanks to Greg Shakar and Scott Fitzgerald for the improvements
This example code is in the public domain.
http://www.arduino.cc/en/Tutorial/SerialCallResponseASCII
*/
int firstSensor = 0; // first analog sensor
int secondSensor = 0; // second analog sensor
int thirdSensor = 0; // digital sensor
int inByte = 0; // incoming serial byte
void setup() {
// start serial port at 9600 bps and wait for port to open:
Serial.begin(9600);
while (!Serial) {
; // wait for serial port to connect. Needed for native USB port only
}
pinMode(2, INPUT); // digital sensor is on digital pin 2
establishContact(); // send a byte to establish contact until receiver responds
}
void loop() {
// if we get a valid byte, read analog ins:
if (Serial.available() > 0) {
// get incoming byte:
inByte = Serial.read();
// read first analog input:
firstSensor = analogRead(A0);
// read second analog input:
secondSensor = analogRead(A1);
// read switch, map it to 0 or 255
thirdSensor = map(digitalRead(2), 0, 1, 0, 255);
// send sensor values:
Serial.print(firstSensor);
Serial.print(",");
Serial.print(secondSensor);
Serial.print(",");
Serial.println(thirdSensor);
}
}
void establishContact() {
while (Serial.available() <= 0) {
Serial.println("0,0,0"); // send an initial string
delay(300);
}
}
/* Processing code to run with this example:
// This example code is in the public domain.
import processing.serial.*; // import the Processing serial library
Serial myPort; // The serial port
float bgcolor; // Background color
float fgcolor; // Fill color
float xpos, ypos; // Starting position of the ball
void setup() {
size(640, 480);
// List all the available serial ports
// if using Processing 2.1 or later, use Serial.printArray()
println(Serial.list());
// I know that the first port in the serial list on my Mac is always my
// Arduino board, so I open Serial.list()[0].
// Change the 0 to the appropriate number of the serial port that your
// microcontroller is attached to.
myPort = new Serial(this, Serial.list()[0], 9600);
// read bytes into a buffer until you get a linefeed (ASCII 10):
myPort.bufferUntil('\n');
// draw with smooth edges:
smooth();
}
void draw() {
background(bgcolor);
fill(fgcolor);
// Draw the shape
ellipse(xpos, ypos, 20, 20);
}
// serialEvent method is run automatically by the Processing applet whenever
// the buffer reaches the byte value set in the bufferUntil()
// method in the setup():
void serialEvent(Serial myPort) {
// read the serial buffer:
String myString = myPort.readStringUntil('\n');
// if you got any bytes other than the linefeed:
myString = trim(myString);
// split the string at the commas and convert the sections into integers:
int sensors[] = int(split(myString, ','));
// print out the values you got:
for (int sensorNum = 0; sensorNum < sensors.length; sensorNum++) {
print("Sensor " + sensorNum + ": " + sensors[sensorNum] + "\t");
}
// add a linefeed after all the sensor values are printed:
println();
if (sensors.length > 1) {
xpos = map(sensors[0], 0, 1023, 0, width);
ypos = map(sensors[1], 0, 1023, 0, height);
fgcolor = sensors[2];
}
// send a byte to ask for more data:
myPort.write("A");
}
*/
/* Max/MSP version 5 patch to run with this example:
----------begin_max5_patcher----------
3640.3oc6cs0jZajE94Y9UzKkeHoVloTeSHkm1II0VkeHIthSs6C1obIjZ.E
KjHRhY7jT4+9d5KBj.jTCAXfoV6x.sj5VmyWet127ed6MCFm8EQw.z2f9.5l
a9yau4F0kjW3FS4aFLO3KgIAEpGaPX174hzxAC02qT7kR80mkkUHPAnBQdbP
BZQVdIZRd1bT4r3BDTmkU0YQPY3r3zoeJWDVpe2ttr6cFhvXt7KhyH8W26f9
USkhiTulrw+1czQUszjrzxzf4B0sdP9dqtS5x4woIhREQiWewrkkUW0oViTD
+GpFASt2Qd0+51akeLzRPIU7DPXagIFnH.4653f9WAKKyxVHRQNcfDXlih2w
puvbdWHAlcTPBRKHg4x5mr74EBMINHV1+iFL.8qG.VMWTTDLUrs.TBH+zAvP
nTEhvvxun9pBd6FWH38DWH6DWv6ItbX.RKBOJ7XbP5ztvDesvhBLb6VTwcOg
DmiBjnXfiIrjjED0CpP490PEmtPExwQA5EGUVjK.CKQJqtcYl0nCMRAJi76D
Z7dQflCCVV1i+ENiTy3AwYaghEA4.KVJx+jHMXbhntJPceO3iBpPOPKtZqtU
jUoXtw28fkEimmEIlOI.3Q4iMT9wO+iLxc9O7sN28928t6Ve8uMYo.7EUN6t
ePVoUW+6E4hOW7CAgeaV1meWd1cuWnYLy8mKhhClGDd25F3ce+C2si1Ud42+
bZ3IQJOXg7q96t80e50YvDjqHw7VvkRTXhHHuKEerRwmqfBFsS.g9h.HZN3X
hJf5Qd+xHZHgzc.mrqeYjbn4E84evfIDUjDtjNwD2iRHV6anmGdbmsfKxTTJ
dd93rjtBJ2U42foCwZDqKfYzKkrh4VgYIY4FxVRmN2646f8ck+xw7KrjzOlZ
ZYAVfdZgKlaWn29FzA8nfdR2quj.3ejflBJnKr.Dwpf13cZBm85P0rPj.rOB
6fvztPFGkVI0SAPi5NKHmih7E8Ph2e35uOtYN6x6JEQtJVWpV7gRtm2dZy9W
+YMCxLHrEvAknQktDVdY7v82SFosgmSGHO56BRRt6mEEKxRKDnGd+2812h9X
5GSeODOcAJ.M9YHHAfjPkyD0GIugn.Ht6bQ.7TTS8DoPtCQCQxWobX+jYPUJ
hPn3zgnx7kogphieFZ2j3TwDgH5dzaUscJ77kEnIY4hoYKglVYzcH5KKxJzu
qmgegxl.0MLNGBNDsr.5IUz0iAPZFE.0TtLOEdClQYrAAeORwW+XVo3aP+hb
DHUBCH.mfbEKfGOPyjQhGiCAdNUUBRcQjij4X.u5MZRDzHSyTDQFbcYdHHIM
AzlF1lnoLjKG8UZH5guV1vEkA4kKWbOPGPC9YgjNdJHVy+ZJQ1.Cq.FUWQpA
ke.8DbUwi.YEWBUCDhPyAXCEETFbuhICg9EIRiYnGVjKyt0+io.r+9vrxRz+
Nt7OlJxCRhT35u.X0amlI9X5xEQppQwneJrLarPVU7JkGYWVHz2njevz1UoX
XkoEWOkxDWO9kXYocoTwuzF611zXJyimB3F5qf9nOT9qesryJTJ1EOcV4cIh
IPVWYoOBUMFTl.4sGRRzRT4AOIkRjn8h7LnNJI2mhg6OSk5JZrPJ4i9gfu.R
w+NHLCcpfAMij88n+qTPPMt4UTwj3bAnY.h.aIe.RiAEeF8Pdzx3zLkLUs1Z
mcmczah0FH4ZmpLcp.rVbX3d0zalKhSiKAxBZ9BU2zTP3uPobgL1Q.U0.kl+
jcBZj1AMOpzsJYjdz0n53QXsfYrqELKblH7yUFoDfPVXbrwDGXqCjwjviT7a
rXZbpxOvxzXvpOnPH0GlTJMZog8l2UZJcdPjxjG7ywIYgeFULaInFDk8jpxZ
apvMA4cv9X.7.vaRRGFAcPYHMR0dF2BZC7wEJ2TOKeZnCRD+HzJo.OLWSW6r
qk2wfI6pGf.pdjC4rpfL2YeK8JYloVf93.ocJEvocv9wAcEiMQgBtl.lb0y9
heKnvtGRs+iHOJHM3uaZbN1jDrhED4FfwfLPCEmH8jV.BB0Z+aF.Vkqc4apU
EIb9a5zAcGt5Rf3WdsNJ3R4PXDU0mouHzIca0MWO.KpQjT8oq1SIyqV3mP24
ToxfHpdyOPNqgwoK.W.fxfRNtwsiDSBVlT9ociSMu+jfPQqUtk9paFLMONJK
URFMpq7xUuvOXF1HBuN6ndhzfE6nxPXQkKKFGjKQNyHtSptYYVVRyaspyBD3
CRiA0YQYrlbgHdptY77E4wZk5UWSOf9yJByyRRZzT5673NtiNrvmhiJmoZq5
fI73wKp5DFrBihhmBNxadsxfoEMuRiIbutfVcM4FWuyr.2bvrlNF5.3U+q9C
sKaa5jkMt70iSd8bC2ZbEFUuAa0DWqYF0tJ91p43649br2nZ2usLGuoxrnQq
6TArNx+1CjRLPpVWf62Kj59ZFRa38Y6D0kRo8AnT8b0g0e4p8+f6.P4sBnaX
TqMmPsOdOcjG+dMtOmdzcgLdIGqjX0J+FAVrmSu.L8fAX19Ky1C.e1.z+IB2
qpeCIUV+.I4fARxQGH0i.9ECVZrhZMTheMCkc4XRMsoCgbef2ZFjaF5MXzaH
n2PQugYmhe0WjdcU47Z1Ukhb6CwFISy2HNtcvtaNRWdshHNVgHcNMUlopRm4
tJByyLXfI0UN6GM7eUiFTm8BMbctZQC8atOegDu6oveXrgpeaGnfaETvsBJN
6AKuNsT4n+zRVXJtQd+ciEEYKyCq.8ptRTSdBRQrLNcUd5eXcjoa7fyhihZl
UrNQxBYZo5g.vpdt8klkJi1QyPvdH7UFMStbvYu8Amu1nY7ECMKGXBqnY2KH
Z18Jjl4aYNnEYiQWVzrUxytWNzL0VZ14xglI6isN5kAMi2GZlbYPyNma6FqC
aJRs9qEogO+ovfvYFxxjGV07cLnH3QQzm.R.BG7SAkk4wiWVpC2p9jwX23ka
0zSz4M6e1QZY.8mljMNHwLURqZ9FuzslMk8ZJXtcMPeblVut1XYDhdMCpmjZ
8BAqsU9DezKxJAa8Hmbbfi+wccuVv7c0qELrEHB+UAhHWzCfCbKPEyBki24Z
clythVwfkYSmlHrPdX8tC5v1iPb5ArPuOWc8NVrRZspq24UxhE0wBcAsMyt2
2LLuqvkKZRXjEq5CM6S3tq9Zm6HD+8Prm0F+jDWn1paUe+2ZuF259kxkiR5W
Qf6vzKBtMm+gFrMeuWsKW.6B61VyWOFjz0Zsmwza+.ikxQcAL3iDtbLWMTKm
OtyMEFcjWM9iu0rMa81D8kUl3v2ewcHWP5B2HX6kK7t7DL5fs6JVIrO0Z1l3
bEpOP3zih9.gbspPzKDYbRVAQ7CFhtZsYzhW1ko0WEJcG3oAC0aRIyxKsUEI
+iDPwOLfp0uNA68MmtSUSmRuNb8d1ttWya7sVWf5Iwf.1LQtZUnqNvT1bS6z
E5o2vfqNSH5bufQbuZV09M.E04Mj8XBUiBqNGl5FSt3NGlZaGRpV6wc4kiWi
q0twaaORhul1jjsIi7cMjQlJJUaQuhR495nlfRQWRJXkrgmMGXWjKM4jdGJH
yovkl4HUetutzWuY5tjFHneGn77rtG3iJ92whCVJxKhBwgGtRaFIzabfNrRn
WThd9q24vsZjf9JvHwOKBhprFDmtXYIZ7xISjaO1GE4OK2V9yiS.qFhvrznh
8cKyMZs7EVepT01FlCe0rIC0lUk6NX4N9syCyAE660+ovE9hyGqjaGurrLak
G0YwoMlFO4YMSZjd9DcWucsjUr1Yqgy8TluCY3N9Q8.+k0JCD3ZTS0CW8Qyb
s19nOxrgjw7VFU+3ooYviK66pCfimt8AAxHOOBkK+EajC2yayWtciMzgdvpM
NKORj29YyGcS4wFVlql0wcZTg1yw5wvMNiTpuUzpu.Y0miRlgO0w7wpZI2Em
SUBGayVM5eqU4C+rV4ZSPkvXqLJbAHlR3mKwT5ISL8+Kv0k.GWEKwpP3ewk3
7omKIN7EtDmp4ZtHk0BfatXgLhgasHgZrVYaY8AIO7fq8Pas1fFzjd4ibwpd
XO4GXOeOG+lcyasNh1R+wVx2yBxeTOT+wiZFYA0P48PNyiiVjAhJlNT4Qvpb
uj3aN2qYqJcBfSWhMbf+YCPcsfbNeTC2l9WNc+5eIlkST0RJgupzIn+kysgC
X6GGXnYpdYfP0GP6MKQXM3N1Ih6XVvcLuym7B0B5w8v.ahqBI49qJcJ.TaX.
N+xBP4NGHhhqYfkRNM9q1f3ZweqyYCQYdGCSZGQ5wBx47o.Ssw+CkcgQOmud
KZic4QKzCw+7ROm8nY2LfMsEDtdfeMKSn5Ev95IQhorcqJcBrzPsQUhRNe8M
1X6lhOezC4Bidv1nKcFs8YimJ9n8RWZXiO7aSCxDRLdjd91qU5TnmXCeRvmR
9jnm7b15RmJ9rO4Kr+IgO04BfczyOpqx9npzofOsIlaR8Mo0IUMR48i0mYly
lVMwlw6gbloGRezy4yKEw6BHBBWik.eRi3DNM5KDahS.SOE1EjmXl7Uyqo9T
AtQAO8fG3oLX3cZFxKh0FLNSRfDaoG74gdvW.ZDU9FMGSdFMBt+IQh.6eIvw
FujTkJREGKKcJ3X2WtXf7Ub1HywEqxh2tJnE.FcZhMByrcXQw1x+bOWJYjpy
lv8oq55aEHLcwD8hJjxbVU5EigcNtL7Ql76KVVp69Huhcb87vpoCkRYT+96v
Hd5Ay1rofMqm+FkLYvv0+GL3FkL6bLp21kL6QFNV8BNM48foWBV4zt1wXm5V
4jkNEbL45dtNw13Iltmi9sAyY0S0l8BR+3yWjVXax7eOmKrp4m0QKIal6VYo
SAf5XQxSrCa5l0qk45k5kAzqEgMNgzkz9FmL5abpnu4IhNzZ+0s+OKCSg0.
-----------end_max5_patcher-----------
*/
Processing Code
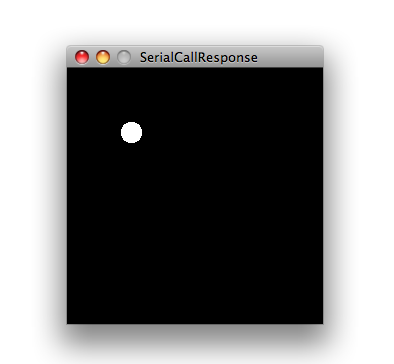
Copy the Processing sketch from the code sample above. As you change the value of the analog sensor, you'll get a ball moving onscreen something like this. The ball will appear only when you push the button:

Max Code
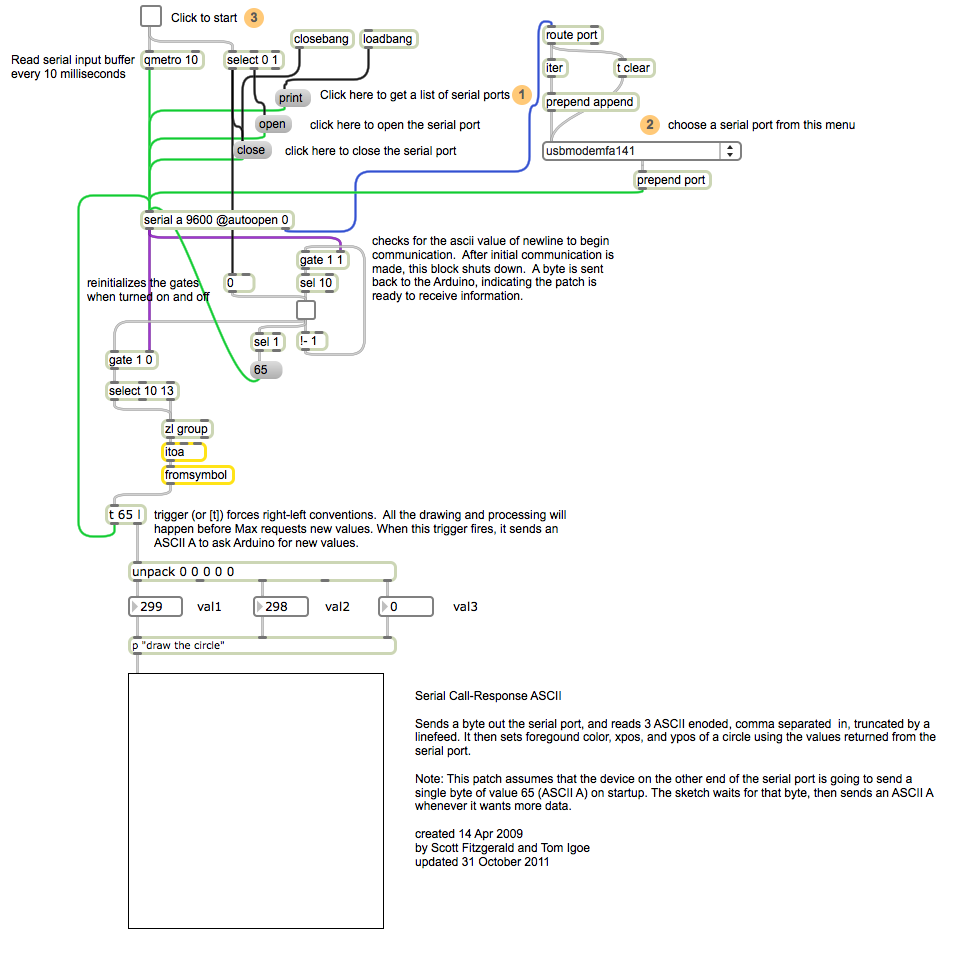
The max patch looks like this. Copy the text from the code sample above and paste it into a new Max window
See Also:
- serial.begin()
- serial.available()
- serial.print()
- analogRead()
- map()
- ASCIITable - Demonstrates Arduino's advanced serial output functions.
- Dimmer - Move the mouse to change the brightness of an LED.
- Graph - Send data to the computer and graph it in Processing.
- Midi - Send MIDI note messages serially.
- MultiSerialMega - Use two of the serial ports available on the Arduino and Genuino Mega.
- PhysicalPixel - Turn a LED on and off by sending data to your board from Processing or Max/MSP.
- ReadASCIIString - Parse a comma-separated string of integers to fade an LED.
- SerialCallResponse - Send multiple variables using a call-and-response (handshaking) method.
- SerialEvent - Demonstrates the use of SerialEvent().
- VirtualColorMixer - Send multiple variables from Arduino to your computer and read them in Processing or Max/MSP.
Last revision 2015/07/29 by SM


