Temperature Web Panel
This example shows how to serve data from an analog input via the Yún device's built-in webserver using the Bridge library.
Prepare your SD card or USB Flash memory stick with an empty folder in the root named "arduino" and a subfolder of that named "www". This will ensure that the Yún device will create a link to the memory to the "/mnt/sd" path.
In this sketch folder is a basic webpage and a copy of zepto.js, a minimized version of jQuery. When you upload your sketch, these files will be placed in the /arduino/www/TemperatureWebPanel folder on your removable memory.
You can then go to http://arduino.local/sd/TemperatureWebPanel to see the output of this sketch.
You can remove the SD card or USB Flash memory stick while the Linux and the sketch are running but be careful not to remove it while the system is writing to it.
Hardware Required
- Yún board or shield
- computer and Yún device on the same wireless or wired network
- TMP36 temperature sensor on analog pin A1
- SD card or USB Flash memory stick
- hook-up wies
- breadboard
Circuit
Attach a TMP36 temperature sensor on A1, and insert a micro-SD card into the slot on the Yún or the USB host of the shield.
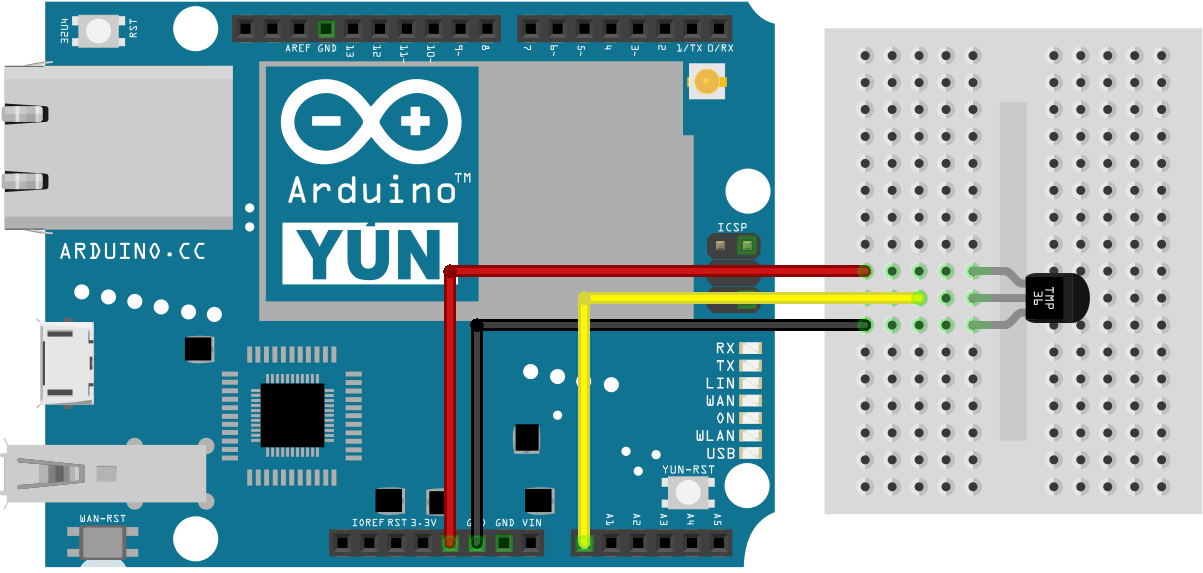
image developed using Fritzing. For more circuit examples, see the Fritzing project page
Schematic
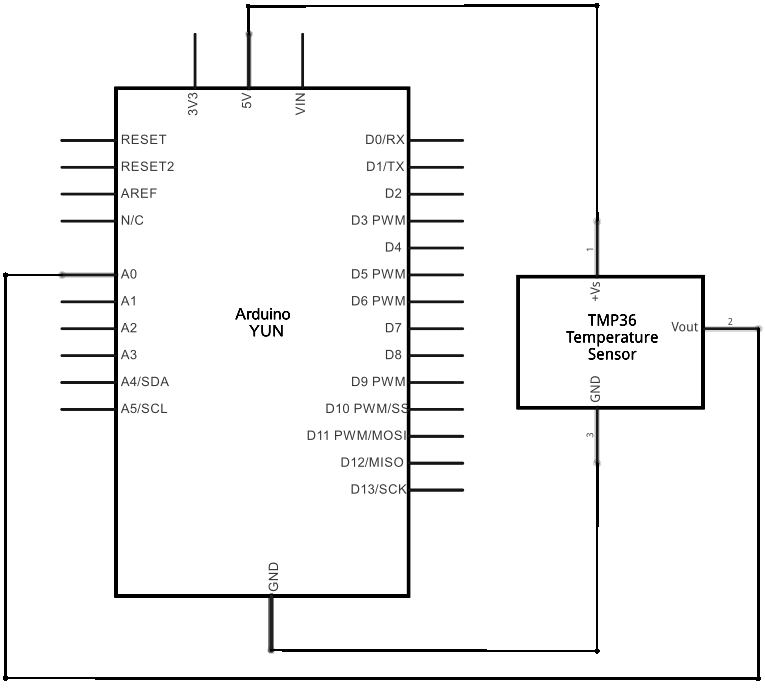
image developed using Fritzing. For more circuit examples, see the Fritzing project page
Code
You need to include the Bridge, YunServer, and YunClient libraries :
#include <YunServer.h>
#include <YunClient.h>
Instantiate a server enabling the the Yún to listen for connected clients.
YunServer server;
Create a string to hold the time the sketch started, and a variable to keep track of the number of times the page has been visited.
long hits = 0;
In setup() , start serial communication and Bridge. It's helpful to use the on-board LED as a status light to know when Bridge has started.
Serial.begin(9600);
pinMode(13,OUTPUT);
digitalWrite(13, LOW);
Bridge.begin();
digitalWrite(13, HIGH);
Set A0 and A2 as power and ground for the TMP36 sensor (this helps avoid using a breadboard).
pinMode(A2, OUTPUT);
digitalWrite(A0, HIGH);
digitalWrite(A2, LOW);
Tell the server to listen for incoming connections only from localhost and start it
server.begin();
Create an instance of Process to get the time the sketch started by running the date command and storing it in the string you created earlier.
startTime.runShellCommand("date");
while(startTime.available()) {
char c = startTime.read();
startString += c;
}
}
In loop(), create a named instance of YunClient to get any clients coming from the server.
YunClient client = server.accept();
If there is a new client connected, read the command the client sent and print it out.
String command = client.readString();
command.trim(); //kill whitespace
Serial.println(command);
If the command is "temperature", get the current time and read the value of the temperature sensor.
Process time;
time.runShellCommand("date");
String timeString = "";
while(time.available()) {
char c = time.read();
timeString += c;
}
Serial.println(timeString);
int sensorValue = analogRead(A1);
Convert the sensor's reading to temperature Celsius :
float voltage = sensorValue * (5000/ 1024);
// convert the millivolts to temperature celsius:
float temperature = (voltage - 500)/10;
Print the current time, temperature, time the sketch was started, and the number of hits since starting to the connected client with client.print().
client.println(timeString);
client.print("<br>Current temperature: ");
client.print(temperature);
client.print(" degrees C");
client.print("<br>This sketch has been running since ");
client.print(startString);
client.print("<br>Hits so far: ");
client.print(hits);
}
Close the connection to free up any unused resources and increment the hit counter.
hits++;
}
Pause for a few moments before polling anew
}
The complete code is below :
Temperature web interface
This example shows how to serve data from an analog input
via the YunShield/Yún built-in webserver using the Bridge library.
The circuit:
* TMP36 temperature sensor on analog pin A1
* SD card attached to SD card slot of the YunShield/Yún
This sketch must be uploaded via wifi. REST API must be set to "open".
Prepare your SD card with an empty folder in the SD root
named "arduino" and a subfolder of that named "www".
This will ensure that the Yún will create a link
to the SD to the "/mnt/sd" path.
In this sketch folder is a basic webpage and a copy of zepto.js, a
minimized version of jQuery. When you upload your sketch, these files
will be placed in the /arduino/www/TemperatureWebPanel folder on your SD card.
You can then go to http://arduino.local/sd/TemperatureWebPanel
to see the output of this sketch.
You can remove the SD card while the Linux and the
sketch are running but be careful not to remove it while
the system is writing to it.
created 6 July 2013
by Tom Igoe
This example code is in the public domain.
http://www.arduino.cc/en/Tutorial/TemperatureWebPanel
*/
#include <Bridge.h>
#include <BridgeServer.h>
#include <BridgeClient.h>
// Listen on default port 5555, the webserver on the Yún
// will forward there all the HTTP requests for us.
BridgeServer server;
String startString;
long hits = 0;
void setup() {
SerialUSB.begin(9600);
// Bridge startup
pinMode(13, OUTPUT);
digitalWrite(13, LOW);
Bridge.begin();
digitalWrite(13, HIGH);
// using A0 and A2 as vcc and gnd for the TMP36 sensor:
pinMode(A0, OUTPUT);
pinMode(A2, OUTPUT);
digitalWrite(A0, HIGH);
digitalWrite(A2, LOW);
// Listen for incoming connection only from localhost
// (no one from the external network could connect)
server.listenOnLocalhost();
server.begin();
// get the time that this sketch started:
Process startTime;
startTime.runShellCommand("date");
while (startTime.available()) {
char c = startTime.read();
startString += c;
}
}
void loop() {
// Get clients coming from server
BridgeClient client = server.accept();
// There is a new client?
if (client) {
// read the command
String command = client.readString();
command.trim(); //kill whitespace
SerialUSB.println(command);
// is "temperature" command?
if (command == "temperature") {
// get the time from the server:
Process time;
time.runShellCommand("date");
String timeString = "";
while (time.available()) {
char c = time.read();
timeString += c;
}
SerialUSB.println(timeString);
int sensorValue = analogRead(A1);
// convert the reading to millivolts:
float voltage = sensorValue * (5000.0f / 1024.0f);
// convert the millivolts to temperature celsius:
float temperature = (voltage - 500.0f) / 10.0f;
// print the temperature:
client.print("Current time on the Yún: ");
client.println(timeString);
client.print("<br>Current temperature: ");
client.print(temperature);
client.print(" °C");
client.print("<br>This sketch has been running since ");
client.print(startString);
client.print("<br>Hits so far: ");
client.print(hits);
}
// Close connection and free resources.
client.stop();
hits++;
}
delay(50); // Poll every 50ms
}
See Also
- Bridge Library - Your reference to the Bridge Library
- Bridge – Simple REST style calls to access analog and digital pins
- Console Ascii Table – A complete ASCII table printed to the Console
- Console Pixel – Turn an LED on and off through the Console
- Console Read - Read data coming from bridge using the Console.read() function
- Data Logger - Log data from three analog sensors to an SD card.
- File Write - How to write file into the Yún filesystem.
- Http Client - A basic HTTP client that connects to the internet and downloads content.
- Http Client Console - HTTP client that connects, downloads content and shows it using WiFi and Console.
- Mailbox Read Message - How to read the messages queue, called Mailbox, using the Bridge library.
- Process - How to run linux processes using an Yún.
- Remote Due Blink - How to upload remotely a sketch on DUE boards.
- Shell Commands - How to run linux shell commands using a Yún.
- Time check - Gets the time from Linux via Bridge then parses out hours, minutes and seconds.
- WiFi Status - Prints information about the status of your wifi connection.
- Yún First Configuration - Easily configure your Yún device using Serial Monitor and USB port.
- Serial Terminal - Use the Yún's 32U4 processor as a serial terminal for the Linux side on the Yún.
Last revision 2016/05/25 by SM
