Docker for Azure setup & prerequisites
Estimated reading time: 5 minutesDocker Enterprise Edition (EE) for Azure
This deployment is fully baked and tested, and comes with the latest Enterprise Edition version of Docker.
This release is maintained and receives security and critical bugfixes for one year.
Deploy Docker Enterprise Edition (EE) for Azure
Docker Community Edition (CE) for Azure
Quickstart
If your account has the proper permissions, you can generate the Service Principal and then bootstrap Docker for Azure using Azure Resource Manager.
Deploy Docker Community Edition (CE) for Azure (stable)
Prerequisites
- Access to an Azure account with admin privileges
- SSH key that you want to use when accessing your completed Docker install on Azure
Configuration
Docker for Azure is installed with an Azure template that configures Docker in swarm mode, running on VMs backed by a custom virtual hard drive (VHD). There are two ways you can deploy Docker for Azure. You can use the Azure Portal (browser based), or use the Azure CLI. Both have the following configuration options.
Configuration options
Manager count
The number of Managers in your swarm. You can pick either 1, 3 or 5 managers. We only recommend 1 manager for testing and dev setups. There are no failover guarantees with 1 manager — if the single manager fails the swarm goes down as well. Additionally, upgrading single-manager swarms is not currently guaranteed to succeed.
We recommend at least 3 managers, and if you have a lot of workers, you should pick 5 managers.
Manager VM size
The VM type for your manager nodes. The larger your swarm, the larger the VM size you should use.
Worker VM size
The VM type for your worker nodes.
Worker count
The number of workers you want in your swarm (1-100).
Service principal
A
Service Principal
is required to set up Docker for Azure. The Service Principal is used to invoke Azure APIs as you scale the number of nodes up
and down or deploy apps on your swarm that require configuration of the Azure Load Balancer. Docker provides a
containerized helper script called docker4x/create-sp-azure to help you create the Service Principal.
- On a Linux machine, download the latest version of
docker4x/create-sp-azureto your local environment:
docker pull docker4x/create-sp-azure:latest
- Run the
sp-azurescript with the following arguments:
   $ docker run -ti docker4x/create-sp-azure sp-name [rg-name rg-region]

   ...
   Your access credentials =============================
   AD App ID:       <app-id>
   AD App Secret:   <secret>
   AD Tenant ID:   <tenant-id>
If you have multiple Azure subscriptions, make sure to create the Service Principal with the subscription ID that you use to deploy Docker for Azure. The arguments are provided below.
| Argument | Description | Example values |
|---|---|---|
sp-name |
The name of the authentication app that the script creates with Azure. The name is not important. Choose something recognizable in the Azure portal. | sp1 |
rg-name |
The name of the new resource group to be created to deploy the resources (VMs, networks, storage accounts) associated with the swarm. The Service Principal is scoped to this resource group. Specify this when deploying Docker Community Edition for Azure. Do not specify this when deploying Docker Enterprise Edition for Azure. | swarm1 |
rg-region |
The name of Azure’s region/location where the resource group is to be created. This needs to be one of the regions supported by Azure. Specify this when deploying Docker Community Edition for Azure. Do not specify this when deploying Docker Enterprise Edition for Azure. | westus, centralus, eastus. See our FAQs for a list of regions. |
If you do not supply the rg-name and rg-region here, you are prompted
for that information each time you create a new service. The resource group
is created automatically and services are scoped to that resource
group.
If the script fails, it may be because your Azure user account does not have sufficient privileges. Contact your Azure administrator.
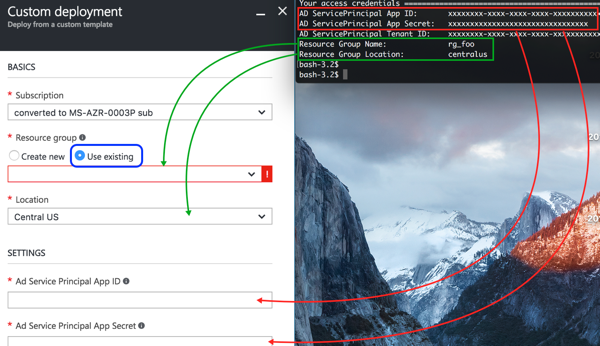
When setting up the Azure Resource Manager (ARM) template, you are prompted
for the App ID (a UUID) and the app secret. If you are deploying Docker
Community Edition for Azure and specify the resource group name and location
parameters, choose the option to deploy the template into an **existing resource
group and pass the same name and region/location that you used when running
the create-sp-azure helper script.**
SSH Key
Docker for Azure uses SSH for accessing the Docker swarm once it’s deployed. During setup, you are prompted for a SSH public key. If you don’t have a SSH key, you can generate one with puttygen or ssh-keygen. You only need the public key component to set up Docker for Azure. Here’s how to get the public key from a .pem file:
ssh-keygen -y -f my-key.pem
Install with the CLI
You can also invoke the Docker for Azure template from the Azure CLI:
The Docker for Azure Template provides default values for the number and type of manager and worker nodes, but you may need to provide the following values:
- AppID
- AppSecret
- Public SSH Key
Below is an example of how to use the CLI. Make sure you populate all requested parameter values.
The command below assumes there is a resource group called docker-resource-group present. This resource group can be created
- Via the Azure Portal web interface
- Via the Azure CLI (
az group create --name docker-resource-group) - Via the
docker4x/create-sp-azurecontainer mentioned above.
If you use the AppID / AppSecret from the docker4x/create-sp-azure helper script, it’s important it was created for the same resource-group.
$ az group deployment create --resource-group docker-resource-group --name docker.template --template-uri https://download.docker.com/azure/stable/Docker.tmpl
Parameters can be provided interactively, on the command line, or via a parameters file. For more info on how to use the Azure CLI, visit the Deploy resources with Resource Manager templates and Azure CLI page.