

Chef Client Overview
Note
For the chef-client command line tool, see chef-client(executable)
The chef-client executable can be run as a daemon.
A chef-client is an agent that runs locally on every node that is under management by Chef. When a chef-client is run, it will perform all of the steps that are required to bring the node into the expected state, including:
RSA public key-pairs are used to authenticate the chef-client with the Chef server every time a chef-client needs access to data that is stored on the Chef server. This prevents any node from accessing data that it shouldn’t and it ensures that only nodes that are properly registered with the Chef server can be managed. |
The chef-client Run
A “chef-client run” is the term used to describe a series of steps that are taken by the chef-client when it is configuring a node. The following diagram shows the various stages that occur during the chef-client run, and then the list below the diagram describes in greater detail each of those stages.
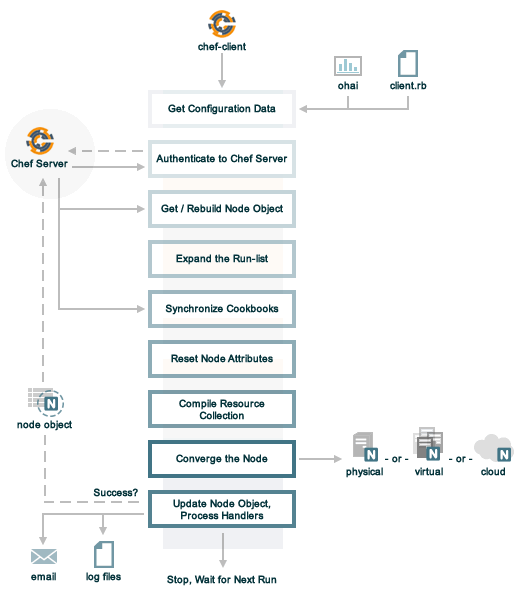
During every chef-client run, the following happens:
| Stages | Description |
|---|---|
| Get configuration data | The chef-client gets process configuration data from the client.rb file on the node, and then gets node configuration data from Ohai. One important piece of configuration data is the name of the node, which is found in the node_name attribute in the client.rb file or is provided by Ohai. If Ohai provides the name of a node, it is typically the FQDN for the node, which is always unique within an organization. |
| Authenticate to the Chef Server | The chef-client authenticates to the Chef server using an RSA private key and the Chef server API. The name of the node is required as part of the authentication process to the Chef server. If this is the first chef-client run for a node, the chef-validator will be used to generate the RSA private key. |
| Get, rebuild the node object | The chef-client pulls down the node object from the Chef server. If this is the first chef-client run for the node, there will not be a node object to pull down from the Chef server. After the node object is pulled down from the Chef server, the chef-client rebuilds the node object. If this is the first chef-client run for the node, the rebuilt node object will contain only the default run-list. For any subsequent chef-client run, the rebuilt node object will also contain the run-list from the previous chef-client run. |
| Expand the run-list | The chef-client expands the run-list from the rebuilt node object, compiling a full and complete list of roles and recipes that will be applied to the node, placing the roles and recipes in the same exact order they will be applied. (The run-list is stored in each node object’s JSON file, grouped under run_list.) |
| Synchronize cookbooks | The chef-client asks the Chef server for a list of all cookbook files (including recipes, templates, resources, providers, attributes, libraries, and definitions) that will be required to do every action identified in the run-list for the rebuilt node object. The Chef server provides to the chef-client a list of all of those files. The chef-client compares this list to the cookbook files cached on the node (from previous chef-client runs), and then downloads a copy of every file that has changed since the previous chef-client run, along with any new files. |
| Reset node attributes | All attributes in the rebuilt node object are reset. All attributes from attribute files, environments, roles, and Ohai are loaded. Attributes that are defined in attribute files are first loaded according to cookbook order. For each cookbook, attributes in the default.rb file are loaded first, and then additional attribute files (if present) are loaded in lexical sort order. If attribute files are found within any cookbooks that are listed as dependencies in the metadata.rb file, these are loaded as well. All attributes in the rebuilt node object are updated with the attribute data according to attribute precedence. When all of the attributes are updated, the rebuilt node object is complete. |
| Compile the resource collection | The chef-client identifies each resource in the node object and builds the resource collection. Libraries are loaded first to ensure that all language extensions and Ruby classes are available to all resources. Next, attributes are loaded, followed by custom resources, and then all definitions (to ensure that any pseudo-resources within definitions are available). Finally, all recipes are loaded in the order specified by the expanded run-list. This is also referred to as the “compile phase”. |
| Converge the node | The chef-client configures the system based on the information that has been collected. Each resource is executed in the order identified by the run-list, and then by the order in which each resource is listed in each recipe. Each resource in the resource collection is mapped to a provider. The provider examines the node, and then does the steps necessary to complete the action. And then the next resource is processed. Each action configures a specific part of the system. This process is also referred to as convergence. This is also referred to as the “execution phase”. |
| Update the node object, process exception and report handlers | When all of the actions identified by resources in the resource collection have been done, and when the chef-client run finished successfully, the chef-client updates the node object on the Chef server with the node object that was built during this chef-client run. (This node object will be pulled down by the chef-client during the next chef-client run.) This makes the node object (and the data in the node object) available for search. The chef-client always checks the resource collection for the presence of exception and report handlers. If any are present, each one is processed appropriately. |
| Stop, wait for the next run | When everything is configured and the chef-client run is complete, the chef-client stops and waits until the next time it is asked to run. |
About why-run Mode
why-run mode is a way to see what the chef-client would have configured, had an actual chef-client run occurred. This approach is similar to the concept of “no-operation” (or “no-op”): decide what should be done, but then don’t actually do anything until it’s done right. This approach to configuration management can help identify where complexity exists in the system, where inter-dependencies may be located, and to verify that everything will be configured in the desired manner.
When why-run mode is enabled, a chef-client run will occur that does everything up to the point at which configuration would normally occur. This includes getting the configuration data, authenticating to the Chef server, rebuilding the node object, expanding the run-list, getting the necessary cookbook files, resetting node attributes, identifying the resources, and building the resource collection and does not include mapping each resource to a provider or configuring any part of the system.
Note
why-run mode is not a replacement for running cookbooks in a test environment that mirrors the production environment. Chef uses why-run mode to learn more about what is going on, but also Kitchen on developer systems, along with an internal OpenStack cloud and external cloud providers to test more thoroughly.
When the chef-client is run in why-run mode, certain assumptions are made:
- If the service resource cannot find the appropriate command to verify the status of a service, why-run mode will assume that the command would have been installed by a previous resource and that the service would not be running
- For
not_ifandonly_ifattribute, why-run mode will assume these are commands or blocks that are safe to run. These conditions are not designed to be used to change the state of the system, but rather to help facilitate idempotency for the resource itself. That said, it may be possible that these attributes are being used in a way that modifies the system state - The closer the current state of the system is to the desired state, the more useful why-run mode will be. For example, if a full run-list is run against a fresh system, that run-list may not be completely correct on the first try, but also that run-list will produce more output than a smaller run-list
For example, the service resource can be used to start a service. If the action is :start and the service is not running, then start the service (if it is not running) and do nothing (if it is running). What about a service that is installed from a package? The chef-client cannot check to see if the service is running until after the package is installed. A simple question that why-run mode can answer is what the chef-client would say about the state of the service after installing the package because service actions often trigger notifications to other resources. So it can be important to know in advance that any notifications are being triggered correctly.
For a detailed explanation of the dry-run concept and how it relates to the why-run mode, see this blog post.
Authentication
All communication with the Chef server must be authenticated using the Chef server API, which is a REST API that allows requests to be made to the Chef server. Only authenticated requests will be authorized. Most of the time, and especially when using knife, the chef-client, or the Chef server web interface, the use of the Chef server API is transparent. In some cases, the use of the Chef server API requires more detail, such as when making the request in Ruby code, with a knife plugin, or when using cURL.
The authentication process ensures the Chef server responds only to requests made by trusted users. Public key encryption is used by the Chef server. When a node and/or a workstation is configured to run the chef-client, both public and private keys are created. The public key is stored on the Chef server, while the private key is returned to the user for safe keeping. (The private key is a .pem file located in the .chef directory or in /etc/chef.)
Both the chef-client and knife use the Chef server API when communicating with the Chef server. The chef-validator uses the Chef server API, but only during the first chef-client run on a node.
Each request to the Chef server from those executables sign a special group of HTTP headers with the private key. The Chef server then uses the public key to verify the headers and verify the contents.
chef-validator
Every request made by the chef-client to the Chef server must be an authenticated request using the Chef server API and a private key. When the chef-client makes a request to the Chef server, the chef-client authenticates each request using a private key located in /etc/chef/client.pem.
However, during the first chef-client run, this private key does not exist. Instead, the chef-client will attempt to use the private key assigned to the chef-validator, located in /etc/chef/validation.pem. (If, for any reason, the chef-validator is unable to make an authenticated request to the Chef server, the initial chef-client run will fail.)
During the initial chef-client run, the chef-client will register with the Chef server using the private key assigned to the chef-validator, after which the chef-client will obtain a client.pem private key for all future authentication requests to the Chef server.
After the initial chef-client run has completed successfully, the chef-validator is no longer required and may be deleted from the node. Use the delete_validation recipe found in the chef-client cookbook (https://github.com/chef-cookbooks/chef-client) to remove the chef-validator.
SSL Certificates
An SSL certificate is used between the chef-client and the Chef server to ensure that each node has access to the right data.
Signed Headers
Signed header authentication is used to validate communications between the Chef server and any node that is being managed by the Chef server. An API client manages each authentication request. A public and private key pair is used for the authentication itself. The public key is stored in the database on the Chef server. The private key is stored locally on each node and is kept separate from node data (typically in the /etc/chef/client.pem directory). Each request to the Chef server by a node must include a request signature in the HTTP headers. This signature is computed from a hash of request content and is encrypted using the private key.
During a chef-client Run
As part of every chef-client run, the chef-client authenticates to the Chef server using an RSA private key and the Chef server API.
SSL Verification
Warning
The following information does not apply to hosted Chef server 12, only to on-premises Chef server 12.
Chef server 12 enables SSL verification by default for all requests made to the server, such as those made by knife and the chef-client. The certificate that is generated during the installation of the Chef server is self-signed, which means the certificate is not signed by a trusted certificate authority (CA) that ships with the chef-client. The certificate generated by the Chef server must be downloaded to any machine from which knife and/or the chef-client will make requests to the Chef server.
For example, without downloading the SSL certificate, the following knife command:
$ knife client list
responds with an error similar to:
ERROR: SSL Validation failure connecting to host: chef-server.example.com ...
ERROR: OpenSSL::SSL::SSLError: SSL_connect returned=1 errno=0 state=SSLv3 ...
This is by design and will occur until a verifiable certificate is added to the machine from which the request is sent.
/.chef/trusted_certs
The /.chef/trusted_certs directory stores trusted SSL certificates used to access the Chef server:
- On each workstation, this directory is the location into which SSL certificates are placed after they are downloaded from the Chef server using the
knife ssl fetchsubcommand - On every node, this directory is the location into which SSL certificates are placed when a node has been bootstrapped with the chef-client from a workstation
SSL_CERT_FILE
Use the SSL_CERT_FILE environment variable to specify the location for the SSL certificate authority (CA) bundle that is used by the chef-client.
A value for SSL_CERT_FILE is not set by default. Unless updated, the locations in which Chef will look for SSL certificates are:
- chef-client:
/opt/chef/embedded/ssl/certs/cacert.pem - Chef development kit:
/opt/chefdk/embedded/ssl/certs/cacert.pem
Keeping the default behavior is recommended. To use a custom CA bundle, update the environment variable to specify the path to the custom CA bundle. If (for some reason) SSL certificate verification stops working, ensure the correct value is specified for SSL_CERT_FILE.
client.rb Settings
Use following client.rb settings to manage SSL certificate preferences:
| Setting | Description |
|---|---|
local_key_generation |
Whether the Chef server or chef-client generates the private/public key pair. When true, the chef-client generates the key pair, and then sends the public key to the Chef server. Default value: true. |
ssl_ca_file |
The file in which the OpenSSL key is saved. This setting is generated automatically by the chef-client and most users do not need to modify it. |
ssl_ca_path |
The path to where the OpenSSL key is located. This setting is generated automatically by the chef-client and most users do not need to modify it. |
ssl_client_cert |
The OpenSSL X.509 certificate used for mutual certificate validation. This setting is only necessary when mutual certificate validation is configured on the Chef server. Default value: nil. |
ssl_client_key |
The OpenSSL X.509 key used for mutual certificate validation. This setting is only necessary when mutual certificate validation is configured on the Chef server. Default value: nil. |
ssl_verify_mode |
Set the verify mode for HTTPS requests.
Depending on how OpenSSL is configured, the |
verify_api_cert |
Verify the SSL certificate on the Chef server. When true, the chef-client always verifies the SSL certificate. When false, the chef-client uses the value of ssl_verify_mode to determine if the SSL certificate requires verification. Default value: false. |
Knife Subcommands
The chef-client includes two knife commands for managing SSL certificates:
- Use knife ssl check to troubleshoot SSL certificate issues
- Use knife ssl fetch to pull down a certificate from the Chef server to the
/.chef/trusted_certsdirectory on the workstation.
After the workstation has the correct SSL certificate, bootstrap operations from that workstation will use the certificate in the /.chef/trusted_certs directory during the bootstrap operation.
knife ssl check
Run the knife ssl check subcommand to verify the state of the SSL certificate, and then use the reponse to help troubleshoot issues that may be present.
Verified
If the SSL certificate can be verified, the response to
$ knife ssl check
is similar to:
Connecting to host chef-server.example.com:443
Successfully verified certificates from 'chef-server.example.com'
Unverified
If the SSL certificate cannot be verified, the response to
$ knife ssl check
is similar to:
Connecting to host chef-server.example.com:443
ERROR: The SSL certificate of chef-server.example.com could not be verified
Certificate issuer data:
  /C=US/ST=WA/L=S/O=Corp/OU=Ops/CN=chef-server.example.com/emailAddress=you@example.com

Configuration Info:

OpenSSL Configuration:
* Version: OpenSSL 1.0.1j 15 Oct 2014
* Certificate file: /opt/chefdk/embedded/ssl/cert.pem
* Certificate directory: /opt/chefdk/embedded/ssl/certs
Chef SSL Configuration:
* ssl_ca_path: nil
* ssl_ca_file: nil
* trusted_certs_dir: "/Users/grantmc/Downloads/chef-repo/.chef/trusted_certs"

TO FIX THIS ERROR:

If the server you are connecting to uses a self-signed certificate,
you must configure chef to trust that certificate.

By default, the certificate is stored in the following location on the
host where your chef-server runs:

  /var/opt/opscode/nginx/ca/SERVER_HOSTNAME.crt

Copy that file to your trusted_certs_dir (currently:

  /Users/grantmc/Downloads/chef-repo/.chef/trusted_certs)

using SSH/SCP or some other secure method, then re-run this command to
confirm that the certificate is now trusted.
knife ssl fetch
Run the knife ssl fetch to download the self-signed certificate from the Chef server to the /.chef/trusted_certs directory on a workstation. For example:
The SSL certificate that is downloaded to the /.chef/trusted_certs directory should be verified to ensure that it is, in fact, the same certificate as the one located on the Chef server. This can be done by comparing the SHA-256 checksums.
View the checksum on the Chef server:
$ ssh ubuntu@chef-server.example.com sudo sha256sum /var/opt/opscode/nginx/ca/chef-server.example.com.crt
The response is similar to:
<ABC123checksum> /var/opt/opscode/nginx/ca/chef-server.example.com.crt
View the checksum on the workstation:
$ gsha256sum .chef/trusted_certs/chef-server.example.com.crt
The response is similar to:
<ABC123checksum> .chef/trusted_certs/chef-server.example.com.crt
Verify that the checksum values are identical.
Verify Checksums
The SSL certificate that is downloaded to the /.chef/trusted_certs directory should be verified to ensure that it is, in fact, the same certificate as the one located on the Chef server. This can be done by comparing the SHA-256 checksums.
View the checksum on the Chef server:
$ ssh ubuntu@chef-server.example.com sudo sha256sum /var/opt/opscode/nginx/ca/chef-server.example.com.crt
The response is similar to:
<ABC123checksum> /var/opt/opscode/nginx/ca/chef-server.example.com.crt
View the checksum on the workstation:
$ gsha256sum .chef/trusted_certs/chef-server.example.com.crt
The response is similar to:
<ABC123checksum> .chef/trusted_certs/chef-server.example.com.crt
Verify that the checksum values are identical.
Bootstrap Operations
The knife bootstrap command is a common way to install the chef-client on a node. The default for this approach assumes that a node can access the Chef website so that it may download the chef-client package from that location.
The Chef installer will detect the version of the operating system, and then install the appropriate version of the chef-client using a single command to install the chef-client and all of its dependencies, including an embedded version of Ruby, RubyGems, OpenSSL, key-value stores, parsers, libraries, and command line utilities.
The Chef installer puts everything into a unique directory (/opt/chef/) so that the chef-client will not interfere with other applications that may be running on the target machine. Once installed, the chef-client requires a few more configuration steps before it can perform its first chef-client run on a node.
A node is any physical, virtual, or cloud machine that is configured to be maintained by a chef-client. In order to bootstrap a node, you will first need a working installation of the Chef software package. A bootstrap is a process that installs the chef-client on a target system so that it can run as a chef-client and communicate with a Chef server. There are two ways to do this:
- Use the
knife bootstrapsubcommand to bootstrap a node using the Chef installer - Use an unattended install to bootstrap a node from itself, without using SSH or WinRM
The following diagram shows the stages of the bootstrap operation, and then the list below the diagram describes in greater detail each of those stages.
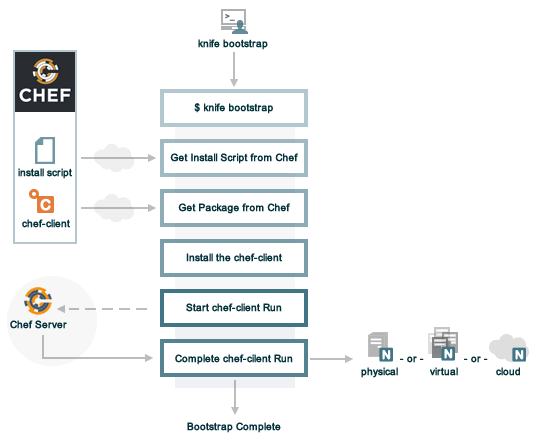
During a knife bootstrap bootstrap operation, the following happens:
| Stages | Description |
|---|---|
| $ knife bootstrap | On UNIX- and Linux-based machines: The On Microsoft Windows machines: The |
| Get the install script from Chef | On UNIX- and Linux-based machines: The shell script that is derived from the chef-full.erb bootstrap template will make a request to the Chef website to get the most recent version of a second shell script ( On Microsoft Windows machines: The batch file that is derived from the windows-chef-client-msi.erb bootstrap template will make a request to the Chef website to get the .msi installer. |
| Get the chef-client package from Chef | The second shell script (or batch file) then gathers system-specific information and determines the correct package for the chef-client, and then downloads the appropriate package from omnitruck-direct.chef.io. |
| Install the chef-client | The chef-client is installed on the target node. |
| Start the chef-client run | On UNIX- and Linux-based machines: The second shell script executes the On Microsoft Windows machines: The batch file that is derived from the windows-chef-client-msi.erb bootstrap template executes the |
| Complete the chef-client run | The chef-client run proceeds, using HTTPS (port 443), and registers the node with the Chef server. The first chef-client run, by default, contains an empty run-list. A run-list can be specified as part of the initial bootstrap operation using the |