knife analytics
Note
This documentation is meant to support existing Chef customers using Analytics.
If you are a new Chef customer, or are looking to gain better insight into your fleet, try Chef Automate. You’ll get a graphical interface and query language that gives you insight into operational, compliance, and workflow events. Download Chef Automate here.
Use the knife analytics subcommand to view information about actions, audits, notifications, and rules that are managed by Chef Analytics.
Note
Review the list of common options available to this (and all) knife subcommands and plugins.
Note
This feature is included as part of the Chef Automate license agreement and is available via subscription.
Install this plugin
To install the knife analytics plugin using RubyGems, run the following command:
$ /opt/chef/embedded/bin/gem install knife-analytics
where /opt/chef/embedded/bin/ is the path to the location where the chef-client expects knife plugins to be located. If the chef-client was installed using RubyGems, omit the path in the previous example.
Configure SSL
The knife analytics subcommand requires the SSL certificate for Chef Analytics to be present on the workstation from which commands will be run. Fetch the SSL certificate from Chef Analytics by using the knife ssl fetch subcommand:
$ knife ssl fetch ANALYTICS_URL
For example:
$ knife ssl fetch https://ec2-52-27-166-146.us-west-2.compute.amazonaws.com
Configure config.rb
The config.rb file may be configured for the URL for Chef Analytics. Add the following setting to the config.rb file:
analytics_server_url 'https://ANALYTICS_URL/organizations/ORG_NAME'
For example:
analytics_server_url 'https://ec2-52-27-166-146.us-west-2.compute.amazonaws.com/organizations/learnchef'
action list
Use the action list argument to view a list of actions on the Chef Analytics server for the specified dates and times.
Options
This argument has the following options:
--analytics-server-url HOST- The URL of the server on which Chef Analytics is running, including the organization name. For example:
https://analytics.chef.io/org-name. -b TIME,--before TIME- The time before which data is returned.
--identity-server-url HOST- The URL of the server on which the oc-id service is running. The oc-id service is used by Chef Analytics when communicating with the Chef server.
-p N,--page N- The number of pages to be returned. Default value:
1. -s TIME,--since TIME- The time after which data is returned.
action show
Use the action show argument to view the specified action.
Options
This argument has the following options:
--analytics-server-url HOST- The URL of the server on which Chef Analytics is running, including the organization name. For example:
https://analytics.chef.io/org-name. --identity-server-url HOST- The URL of the server on which the oc-id service is running. The oc-id service is used by Chef Analytics when communicating with the Chef server.
alert list
Use the alert list argument to view a list of alerts on the Chef Analytics server for the specified dates and times.
Options
This argument has the following options:
--analytics-server-url HOST- The URL of the server on which Chef Analytics is running, including the organization name. For example:
https://analytics.chef.io/org-name. -b TIME,--before TIME- The time before which data is returned.
--identity-server-url HOST- The URL of the server on which the oc-id service is running. The oc-id service is used by Chef Analytics when communicating with the Chef server.
-p N,--page N- The number of pages to be returned. Default value:
1. -s TIME,--since TIME- The time after which data is returned.
alert show
Use the alert show argument to view the specified alert.
Options
This argument has the following options:
--analytics-server-url HOST- The URL of the server on which Chef Analytics is running, including the organization name. For example:
https://analytics.chef.io/org-name. --identity-server-url HOST- The URL of the server on which the oc-id service is running. The oc-id service is used by Chef Analytics when communicating with the Chef server.
notification create
Use the notification create argument to create a notifications on the Chef Analytics server.
Options
This argument has the following options:
--analytics-server-url HOST- The URL of the server on which Chef Analytics is running, including the organization name. For example:
https://analytics.chef.io/org-name. --identity-server-url HOST- The URL of the server on which the oc-id service is running. The oc-id service is used by Chef Analytics when communicating with the Chef server.
Example
Create a notification
To create a notification, run the following command:
$ knife notification create FILE_NAME.json
where the FILE_NAME.json is similar to:
{
  "name": "chef-splunk-example",
  "notification_type": "Splunk",
  "modified_by": "admin",
  "delivery_options": {
    "hostname": "splunk.chef.inc.com",
    "port": 8089,
    "username": "username",
    "password": "password",
    "index": "chef-analytics",
    "sourcetype": "chef-analytics-data"
  }
}
notification list
Use the notification list argument to view a list of notifications on the Chef Analytics server for the specified dates and times.
Options
This argument has the following options:
--analytics-server-url HOST- The URL of the server on which Chef Analytics is running, including the organization name. For example:
https://analytics.chef.io/org-name. -b TIME,--before TIME- The time before which data is returned.
--identity-server-url HOST- The URL of the server on which the oc-id service is running. The oc-id service is used by Chef Analytics when communicating with the Chef server.
-p N,--page N- The number of pages to be returned. Default value:
1. -s TIME,--since TIME- The time after which data is returned.
notification show
Use the notification show argument to view the specified notification.
Options
This argument has the following options:
--analytics-server-url HOST- The URL of the server on which Chef Analytics is running.
--identity-server-url HOST- The URL of the server on which the oc-id service is running. The oc-id service is used by Chef Analytics when communicating with the Chef server.
rule create
Use the rule create argument to create a rule on the Chef Analytics server.
Options
This argument has the following options:
--analytics-server-url HOST- The URL of the server on which Chef Analytics is running.
--identity-server-url HOST- The URL of the server on which the oc-id service is running. The oc-id service is used by Chef Analytics when communicating with the Chef server.
Example
Create a rule
To create a rule, run the following command:
$ knife rule create FILE_NAME.json
where the FILE_NAME.json is similar to:
{
  "name": "Rule name.",
  "modified_by": "user_name",
  "with": {
    "priority": 0
  },
  "active":true,
  "rule":"rules 'Rule group 1'\n
    rule on action\n
    when\n
      true\n
    then\n
      noop()\n
    end\n
  end"
}
Create a Slack incoming webhooks notification
A webhook for Chef Analytics enables real-time event streams to be sent to arbitrary locations that support webhooks integrations. For example, channels in Slack may be configured to receive notifications from Chef Analytics by integrating with the incoming webhooks functionality in Slack.
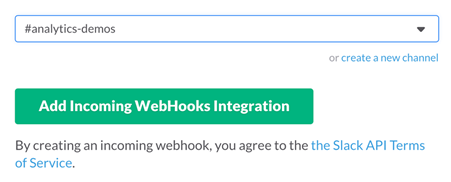
Create an incoming webhook in Slack. Choose the channel that will receive the incoming notification:

and then click Add Incoming Webhooks Integration. Copy the URL that is generated by Slack. This will be needed by Chef Analytics.
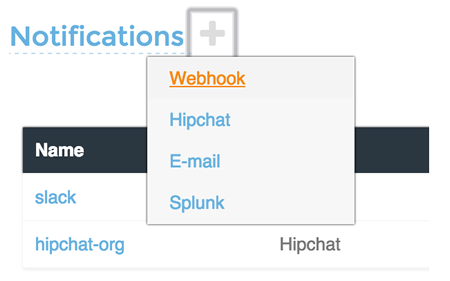
Log into Chef Analytics and create a Webhook notification:

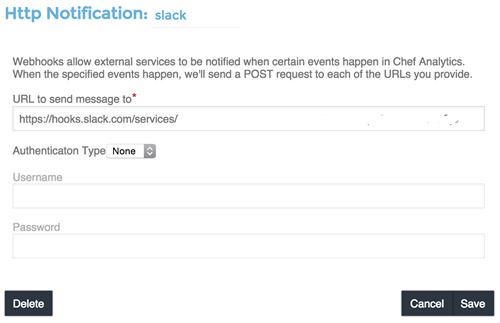
Name the webhook—
slack, for example—and then paste the URL that was provided by Slack:
Click Save.
Create a rule that uses this integration and test it. For example, configuring Chef Analytics to send a notification to Slack when a audit-mode run fails. First, create a simple rule to test the Slack integration. Configure a message to be sent to Slack for any action event that comes into Chef Analytics:
rules 'org notifier'
  rule on action
  when
    true
  then
    notify('slack', '{
      "text": "test from the blog post"
    }')
  end
end
Slack expects a JSON document to be sent to the incoming webhook integration from Chef Analytics. Chef Analytics supports multi-line notifications to be written. Use the
'text'property in the rule to send the data as a JSON document.Finally, create a rule that is more specific to the Chef Analytics data, such as assigning an emoji and a name for the notification:
rules 'failed-audit'
  rule on run_control_group
  when
    status != 'success'
  then
    notify('slack', '{
      "username": "Audit Alarm",
      "icon_emoji": ":rotating_light:",
      "text": "{{message.name}} (cookbook {{message.cookbook_name}})\n
        had \'{{message.number_failed}}\' failed audit test(s)\n
        on node \'{{message.run.node_name}}\'\n
        in organization \'{{message.organization_name}}\'"
    }')
  end
end
This will generate a message similar to:

rule list
Use the rule list argument to view a list of rules on the Chef Analytics server for the specified dates and times.
Options
This argument has the following options:
--analytics-server-url HOST- The URL of the server on which Chef Analytics is running.
-b TIME,--before TIME- The time before which data is returned.
--identity-server-url HOST- The URL of the server on which the oc-id service is running. The oc-id service is used by Chef Analytics when communicating with the Chef server.
-p N,--page N- The number of pages to be returned. Default value:
1. -s TIME,--since TIME- The time after which data is returned.
rule show
Use the rule show argument to view the specified rule.
Options
This argument has the following options:
--analytics-server-url HOST- The URL of the server on which Chef Analytics is running.
--identity-server-url HOST- The URL of the server on which the oc-id service is running. The oc-id service is used by Chef Analytics when communicating with the Chef server.

