

Install the chef-client on Windows Nodes
Nodes
A node is any machine—physical, virtual, cloud, network device, etc.—that is under management by Chef.
The chef-client can be installed on machines running Microsoft Windows in the following ways:
- By using knife windows to bootstrap the chef-client; this process requires the target node be available via the WinRM port (typically port 5985)
- By downloading the chef-client to the target node, and then running the Microsoft Installer Package (MSI) locally
- By using an existing process already in place for managing Microsoft Windows machines, such as System Center
To run the chef-client at periodic intervals (so that it can check in with the Chef server automatically), configure the chef-client to run as a service or as a scheduled task. (The chef-client can be configured to run as a service during the setup process.)
Use knife windows
The knife windows subcommand is used to configure and interact with nodes that exist on server and/or desktop machines that are running Microsoft Windows. Nodes are configured using WinRM, which allows native objects—batch scripts, Windows PowerShell scripts, or scripting library variables—to be called by external applications. The knife windows subcommand supports NTLM and Kerberos methods of authentication.
Ports
WinRM requires that a target node be accessible via the ports configured to support access via HTTP or HTTPS.
Msiexec.exe
Msiexec.exe is used to install the chef-client on a node as part of a bootstrap operation. The actual command that is run by the default bootstrap script is:
$ msiexec /qn /i "%LOCAL_DESTINATION_MSI_PATH%"
where /qn is used to set the user interface level to “No UI”, /i is used to define the location in which the chef-client is installed, and "%LOCAL_DESTINATION_MSI_PATH%" is a variable defined in the default windows-chef-client-msi.erb bootstrap template. See http://msdn.microsoft.com/en-us/library/aa367988%28v=vs.85%29.aspx for more information about the options available to Msiexec.exe.
ADDLOCAL Options
The ADDLOCAL parameter adds two setup options that are specific to the chef-client. These options can be passed along with an Msiexec.exe command:
| Option | Description |
|---|---|
ChefClientFeature |
Use to install the chef-client. |
ChefSchTaskFeature |
Use to configure the chef-client as a scheduled task in Microsoft Windows. |
ChefPSModuleFeature |
Used to install the chef PowerShell module. This will enable chef command line utilities within PowerShell. |
First install the chef-client, and then enable it to run as a scheduled task. For example:
$ msiexec /qn /i C:\inst\chef-client-14.5.27-1-x64.msi ADDLOCAL="ChefClientFeature,ChefSchTaskFeature,ChefPSModuleFeature"
Use MSI Installer
A Microsoft Installer Package (MSI) is available for installing the chef-client on a Microsoft Windows machine at Chef Downloads
Run as a Scheduled Task
The chef-client can be run as a scheduled task. On the Microsoft Windows platform, a scheduled task provides more visibility, configurability, and reliability around log rotation and permissions, as compared to running the chef-client as a service. A scheduled task:
- Prevents log rotation issues, such as filling a disk partition
- Does not have an indeterminate status, such as a service for which only the watcher is “running”
- Prevents insufficient permissions related to service context
- Prevents issues related to a system reboot
Scheduled Task Options
To run the chef-client at periodic intervals (so that it can check in with the Chef server automatically), configure the chef-client to run as a scheduled task. This can be done via the MSI, by selecting the Chef Unattended Execution Options –> Chef Client Scheduled Task option on the Custom Setup page or by running the following command after the chef-client is installed:
For example:
$ SCHTASKS.EXE /CREATE /TN ChefClientSchTask /SC MINUTE /MO 30 /F /RU "System" /RP /RL HIGHEST /TR "cmd /c \"C:\opscode\chef\embedded\bin\ruby.exe C:\opscode\chef\bin\chef-client -L C:\chef\chef-client.log -c C:\chef\client.rb\""
Refer Schedule a Task for more details.
After the chef-client is configured to run as a scheduled task, the default file path is: c:\chef\chef-client.log.
Use an Existing Process
Many organizations already have processes in place for managing the applications and settings on various Microsoft Windows machines. For example, System Center. The chef-client can be installed using this method.
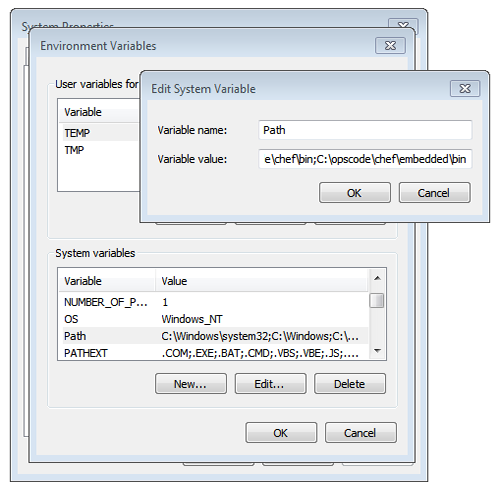
PATH System Variable
On Microsoft Windows, the chef-client must have two entries added to the PATH environment variable:
C:\opscode\chef\binC:\opscode\chef\embedded\bin
This is typically done during the installation of the chef-client automatically. If these values (for any reason) are not in the PATH environment variable, the chef-client will not run properly.
This value can be set from a recipe. For example, from the php cookbook:
#  the following code sample comes from the ``package`` recipe in the ``php`` cookbook: https://github.com/chef-cookbooks/php

if platform?('windows')

  include_recipe 'iis::mod_cgi'

  install_dir = File.expand_path(node['php']['conf_dir']).gsub('/', '\\')
  windows_package node['php']['windows']['msi_name'] do
    source node['php']['windows']['msi_source']
    installer_type :msi

    options %W[
      /quiet
      INSTALLDIR="#{install_dir}"
      ADDLOCAL=#{node['php']['packages'].join(',')}
    ].join(' ')
end

...

ENV['PATH'] += ";#{install_dir}"
windows_path install_dir

...