IAP Promo Product Catalogs
Unity IAP provides quick and easy tools to create and export Product Catalogs. Use the Unity Editor’s IAP Catalog window to populate Product metadata, then export the catalog to the Developer Dashboard to configure each Product’s creative assetsAny media or data that can be used in your game or Project. An asset may come from a file created outside of Unity, such as a 3D model, an audio file or an image. You can also create some asset types in Unity, such as an Animator Controller, an Audio Mixer or a Render Texture. More info
See in Glossary. Note that you can also manually add Products to your catalog in the dashboard, as detailed below.
Creating a Product Catalog
Adding Products in the IAP Catalog window
In the Editor, select Window > UnityIAP > IAP Catalog to open the IAP Catalog window. This GUI lists all of your previously configured Products, and allows you to define the following attributes for each:
- Name
- Product ID
- Type (IAP Promo now supports both Consumable and Non-consumable Product types)
- Price (Unity recommends specifying price points for Google and Apple stores independently if your app supports both)
Note: A Product Catalog must have at least one Product configured to export. For a complete walkthrough on setting up Products, see documentation on Codeless IAP.
You may already use a builder script to populate your Product Catalog for Unity IAPSee IAP More info
See in Glossary. For example:
var builder = ConfigurationBuilder.Instance(StandardPurchasingModule.Instance());
builder.AddProduct(product_coins, ProductType.Consumable);
builder.AddProduct(product_hat, ProductType.NonConsumable);
builder.AddProduct(product_elite, ProductType.Subscription);
Because IAP Promo only supports JSON exports from the Editor IAP Catalog GUI, we recommend modifying your approach as follows:
- Copy-paste your Products into the IAP Catalog GUI.
- Remove or comment out existing
builder.AddProduct()code from your purchasing script. - Add the following code before initializing IAP to fetch your Product list from the IAP Catalog GUI:
StandardPurchasingModule module = StandardPurchasingModule.Instance();
ProductCatalog catalog = ProductCatalog.LoadDefaultCatalog();
ConfigurationBuilder builder = ConfigurationBuilder.Instance(module);
IAPConfigurationHelper.PopulateConfigurationBuilder(ref builder, catalog);

UnityPurchasing.Initialize(this, builder);
Exporting a Product Catalog
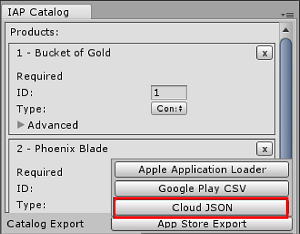
In the IAP Catalog window, select App Store Export > Cloud JSON to export a local copy of the Product Catalog.

Configuring creative assets in the Developer Dashboard
Manage your Product Catalog on the Operate page of the Developer Dashboard. Your active Project appears in the top-left corner. To manage Products, select Monetization > In-App Purchases from the left navigation bar.
You can populate your Products manually, or bulk-populate them by importing a JSON file.
Creating a Product manually
From the Product configuration menu of the dashboard (Monetization > In-App Purchases), click the ADD NEW PRODUCT button in the top-right corner, then enter the following details:
- Product ID (for reference in your IAP code)
- Name
- Type (Consumable or Non-Consumable)
- Apple App Store Price (USD)
- Google Play Store Price (USD)

Click the SAVE button to store the Product in your catalog.
Importing a Product Catalog
To set up a new Product Catalog or update existing Products in the catalog:
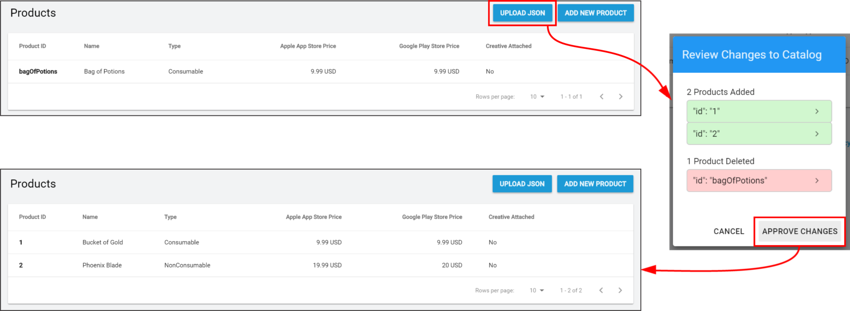
- Select UPLOAD JSON.
- Select the JSON file you exported from the Unity Editor. A diff log then prompts you to approve changes. Check the contents of the file, then select APPROVE CHANGES.

The imported Products appear in the Product Catalog list. However, in order to be eligible for Promotions, each Product must have an associated creative asset (otherwise there is nothing for the Placement to display).
Assigning creative assets
To add creative assets, follow these steps:
Select a Product from the Product Catalog list, then scroll down to the Creative Uploads section.
Note: While each Product’s Product ID, Name, Price, and Type appear in the dashboard, you can only edit these attributes from the Editor’s IAP Catalog window.
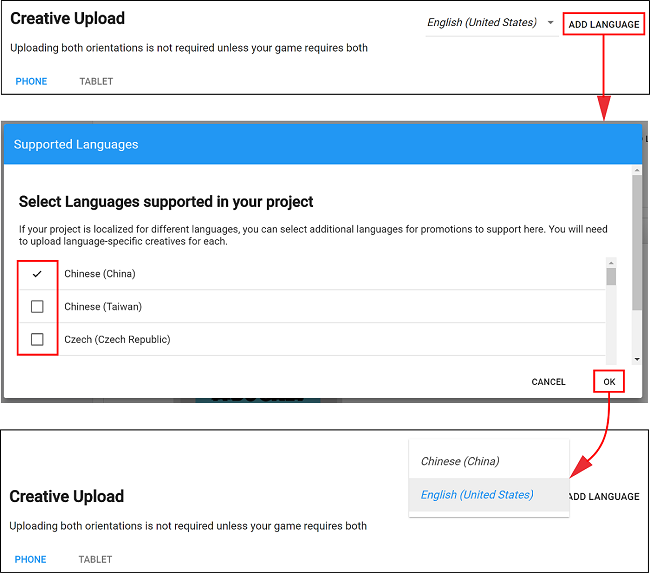
To specify unique creative assets for different regions, select ADD LANGUAGE, then check the languages to include.

Note: The drop-down indicates the current language you are editing. If an included language has no creative assets, it defaults to using its English (United States) creative assets.
- Upload Portrait or Landscape creative assets for phone and tablet devices, with the following guidelines:
- PNG or JPG file format.
- Each Product requires a creative asset for at least one configuration to be eligible for Promotions. For a better consumer experience, provide optimized creative assets for each device and orientation.
-
Phone creative asset dimensions are 580 x 1035 pixelsThe smallest unit in a computer image. Pixel size depends on your screen resolution. Pixel lighting is calculated at every screen pixel. More info
See in Glossary for portrait orientation, and 1035 x 580 pixels for landscape orientation. - Tablet creative asset dimensions are 900 x 1200 pixels for portrait orientation, and 1200 x 900 pixels for landscape orientation.
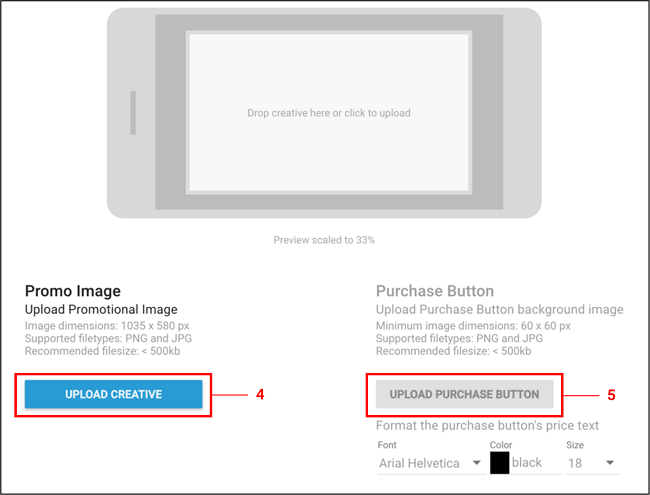
Select UPLOAD CREATIVE to upload a creative asset. A preview appears on the left.
- Select UPLOAD PURCHASE BUTTON to place an interactive button on the creative asset, with the following guidelines:
- You must upload a purchase button to proceed.
- Minimum file size for the button asset is 60 x 60 pixels.
- You can click and drag the purchase button on the preview window to place it.
- You can format the font, color, and size of the button text.

Select SAVE to proceed. Upon returning to the Product Catalog page, your Product is now Promotion-eligible__, as indicated by the Creative Attached column.

Note: You must also submit your Product Catalog to the appropriate Google Play or iTunes store for the purchase flow to work. Please see the Export section in the documentation on Codeless IAP.
- 2019–04–11 Page amended with editorial review
Did you find this page useful? Please give it a rating: