Introduction
Warning
C# support is a new feature available since Godot 3.0. As such, you may still run into some issues, or find spots where the documentation could be improved. Please report issues with C# in Godot on the engine GitHub page, and any documentation issues on the documentation GitHub page.
This page provides a brief introduction to C#, both what it is and how to use it in Godot. Afterwards, you may want to look at how to use specific features, read about the differences between the C# and the GDScript API and (re)visit the Scripting section of the step-by-step tutorial.
C# is a high-level programming language developed by Microsoft. In Godot, it is implemented with the Mono 6.x .NET framework, including full support for C# 8.0. Mono is an open source implementation of Microsoft’s .NET Framework based on the ECMA standards for C# and the Common Language Runtime. A good starting point for checking its capabilities is the Compatibility page in the Mono documentation.
Note
This is not a full-scale tutorial on the C# language as a whole. If you aren’t already familiar with its syntax or features, see the Microsoft C# guide or look for a suitable introduction elsewhere.
Setting up C# for Godot
Windows (Visual Studio)
Download and install the latest version of Visual Studio (not Visual Studio Code), which contains utilities required to use C# in Godot. If you don’t plan on using the Visual Studio IDE, you can download just the Visual Studio Build Tools instead. Make sure you at least have the .NET Framework 4.5 targeting pack installed, you can get it using any of the installers mentioned above inside the “Individual components” tab.
Windows (JetBrains Rider)
JetBrains Rider comes with bundled MSBuild, so you just need a recent .NET Framework Developer Pack. Make sure to set the following preferences:
In Godot:
- Mono External Editor to JetBrains Rider
- Mono Build Tool to JetBrains Mono.
In Rider:
TargetFrameworkVersionincsprojshould match the installed .NET Framework Developer Pack.- Install Godot support plugin.
macOS and Linux
Download and install the latest version of the Mono SDK. As of Godot 3.1 beta 3, the version number doesn’t matter since Godot bundles its own Mono 5.18 installation. We only need the Mono installation for NuGet and MSBuild which are required to use C# in Godot.
Note
To download Mono on macOS, use the “Stable Channel” link from the Mono Downloads Page. The Visual Studio channel is an earlier version of Mono and will not work.
Additional notes
Your Godot version must have Mono support enabled, so make sure to download the Mono version of Godot. If you are building Godot from source, make sure to follow the steps to enable Mono support in your build as outlined in the Compiling with Mono page.
In summary, you must have installed Visual Studio or Mono (depending on your operating system) and the Mono-enabled version of Godot.
Configuring an external editor
C# support in Godot’s script editor is minimal. Consider using an external IDE or editor, such as Visual Studio Code or MonoDevelop. These provide autocompletion, debugging, and other useful features for C#. To select an external editor in Godot, click on Editor → Editor Settings and scroll down to Mono. Under Mono, click on Editor, and select your external editor of choice. Godot currently supports the following external editors:
- Visual Studio 2019
- Visual Studio Code
- MonoDevelop
- Visual Studio for Mac
- JetBrains Rider
Note
If you are using Visual Studio Code, ensure you download and install the C# extension to enable features like syntax highlighting and IntelliSense.
Note
If you are using Visual Studio 2019, you must follow the instructions found in the “Configure VS2019 for Debugging” section below.
Creating a C# script
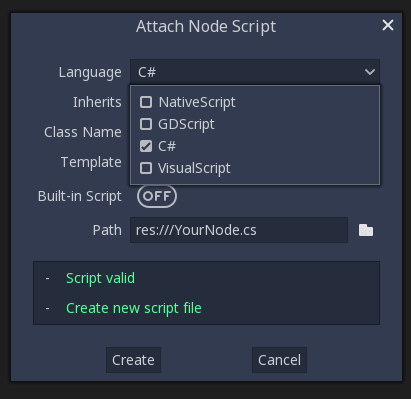
After you successfully set up C# for Godot, you should see the following option
when selecting Attach script in the context menu of a node in your scene:
Note that while some specifics change, most concepts work the same when using C# for scripting. If you’re new to Godot, you may want to follow the tutorials on Scripting at this point. While some places in the documentation still lack C# examples, most concepts can be transferred easily from GDScript.
Project setup and workflow
When you create the first C# script, Godot initializes the C# project files
for your Godot project. This includes generating a C# solution (.sln)
and a project file (.csproj), as well as some utility files and folders
(.mono and Properties/AssemblyInfo.cs).
All of these but .mono are important and should be committed to your
version control system. .mono can be safely added to the ignore list of your VCS.
When troubleshooting, it can sometimes help to delete the .mono folder
and let it regenerate.
Note that currently, there are some issues where Godot and the C# project don’t stay in sync; if you delete, rename or move a C# script, the change may not be reflected in the C# project file. In cases like this, you will have to edit the C# project file manually.
For example, if you created a script (e.g. Test.cs) and delete it in Godot,
compilation will fail because the missing file is still expected to be there
by the C# project file. For now, you can simply open up the .csproj file
and look for the ItemGroup, there should be a line included
like the following:
<ItemGroup>
    <Compile Include="Test.cs" />
    <Compile Include="AnotherTest.cs" />
</ItemGroup>
Simply remove that line and your project should build correctly again. Same for renaming and moving things, simply rename and move them in the project file if needed.
Example
Here’s a blank C# script with some comments to demonstrate how it works.
using Godot;
using System;

public class YourCustomClass : Node
{
    // Member variables here, example:
    private int a = 2;
    private string b = "textvar";

    public override void _Ready()
    {
        // Called every time the node is added to the scene.
        // Initialization here.
        GD.Print("Hello from C# to Godot :)");
    }

    public override void _Process(float delta)
    {
        // Called every frame. Delta is time since the last frame.
        // Update game logic here.
    }
}
As you can see, functions normally in global scope in GDScript like Godot’s
print function are available in the GD class which is part of
the Godot namespace. For a list of methods in the GD class, see the
class reference pages for
@GDScript and @GlobalScope.
Note
Keep in mind that the class you wish to attach to your node should have the same
name as the .cs file. Otherwise, you will get the following error
and won’t be able to run the scene:
“Cannot find class XXX for script res://XXX.cs”
General differences between C# and GDScript
The C# API uses PascalCase instead of snake_case in GDScript/C++.
Where possible, fields and getters/setters have been converted to properties.
In general, the C# Godot API strives to be as idiomatic as is reasonably possible.
For more information, see the API differences to GDScript page.
Current gotchas and known issues
As C# support is quite new in Godot, there are some growing pains and things that need to be ironed out. Below is a list of the most important issues you should be aware of when diving into C# in Godot, but if in doubt, also take a look over the official issue tracker for Mono issues.
- As explained above, the C# project isn’t always kept in sync automatically when things are deleted, renamed or moved in Godot (#12917).
- Writing editor plugins is possible, but it is currently quite convoluted.
- State is currently not saved and restored when hot-reloading, with the exception of exported variables.
- Exporting Mono projects is supported for desktop platforms (Linux, Windows and macOS), Android, HTML5, and iOS. UWP is not currently supported. (#20271).
- Attached C# scripts should refer to a class that has a class name that matches the file name.
- There are some methods such as
Get()/Set(),Call()/CallDeferred()and signal connection methodConnect()that rely on Godot’ssnake_caseAPI naming conventions. So when using e.g.CallDeferred("AddChild"),AddChildwill not work because the API is expecting the originalsnake_caseversionadd_child. However, you can use any custom properties or methods without this limitation.
Performance of C# in Godot
According to some preliminary benchmarks, the performance of C# in Godot — while generally in the same order of magnitude — is roughly ~4× that of GDScript in some naive cases. C++ is still a little faster; the specifics are going to vary according to your use case. GDScript is likely fast enough for most general scripting workloads. C# is faster, but requires some expensive marshalling when talking to Godot.
Using NuGet packages in Godot
NuGet packages can be installed and used with Godot,
as with any C# project. Many IDEs are able to add packages directly.
They can also be added manually by adding the package reference in
the .csproj file located in the project root:
    <ItemGroup>
        <PackageReference Include="Newtonsoft.Json">
          <Version>11.0.2</Version>
        </PackageReference>
    </ItemGroup>
    ...
</Project>
Note
By default, tools like NuGet put Version as an attribute of the `PackageReference` Node. You must manually create a Version node as shown above. This is because the version of MSBuild used requires this. (This will be fixed in Godot 4.0.)
Whenever packages are added or modified, run nuget restore (not dotnet restore) in the root of the
project directory. To ensure that NuGet packages will be available for
msbuild to use, run:
msbuild /t:restore
Profiling your C# code
- Mono log profiler is available for Linux and macOS. Due to a Mono change, it does not work on Windows currently.
- External Mono profiler like JetBrains dotTrace can be used as described here.
Configuring VS 2019 for debugging
Note
Godot has built-in support for workflows involving several popular C# IDEs. Built-in support for Visual Studio will be including in future versions, but in the meantime, the steps below can let you configure VS 2019 for use with Godot C# projects.
- Install VS 2019 with
.NET desktop developmentandDesktop development with C++workloads selected. - Ensure that you do not have Xamarin installed. Do not choose the
Mobile development with .NETworkload. Xamarin changes the DLLs used by MonoDebugger, which breaks debugging. - Install the VSMonoDebugger extension.
- In VS 2019 –> Extensions –> Mono –> Settings:
- Select
Debug/Deploy to local Windows. - Leave
Local Deploy Pathblank. - Set the
Mono Debug Portto the port in Godot –> Project –> Project Settings –> Mono –> Debugger Agent. - Also select
Wait for Debuggerin the Godot Mono options. This Godot Addon may be helpful.
- Select
- Run the game in Godot. It should hang at the Godot splash screen while it waits for your debugger to attach.
- In VS 2019, open your project and choose Extensions –> Mono –> Attach to Mono Debugger.
Configuring Visual Studio Code for debugging
To configure Visual Studio Code for debugging open up a project in Godot. Click on Project and open the project settings. Scroll down and click on Debugger Agent under the Mono category. Then turn on the setting “wait for debugger.” Next, copy the port number and open up Visual Studio Code.
You need to download the Mono Debug extension from Microsoft. Then open the Godot project folder. Go to the run tab and click on create a launch.json file. Select C# Mono from the dropdown menu. When the launch.json file is automatically opened, change the port number to the number you copied previously and save the file. On the run tab, switch the run setting from launch to attach. Whenever you want to debug, make sure Wait for Debugger is turned on in Godot, run the project, and run the debugger in Visual Studio Code.