Install DDC in a sandbox for evaluation
Estimated reading time: 11 minutesThis page introduces Docker Datacenter (also known as DDC): a combination of Docker Universal Control Plane (UCP) and Docker Trusted Registry (DTR), and walks you through installing it on a local (non-production) host or sandbox. Once you’ve installed, we also give you a guided tour so you can evaluate its features.
The instructions here are for a sandbox installation on Mac OS X or Windows systems. If you’re an experienced Linux user, or if you want more detailed technical information, you might want to skip this evaluation and go directly to Plan a production installation and then to Install UCP for production.
Note: This evaluation installs using the open source software version of Docker Engine inside of a VirtualBox VM which runs the small-footprint
boot2docker.isoLinux. This configuration is not a production configuration.
Introduction: About this example
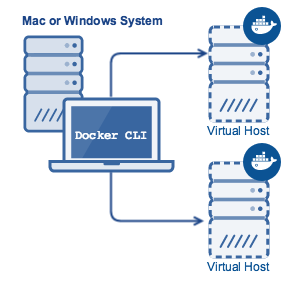
In this tutorial, we use Docker’s provisioning tool - Docker Machine - to
create two virtual hosts. These two hosts are VirtualBox VMs running a small
footprint Linux image called boot2docker.iso, with the open source version of
Docker Engine installed.
A UCP installation consists of an UCP controller and one or more hosts. We install UCP on one host, then join the second node to UCP as a swarm member. The two VMs create a simple swarm cluster with one controller, which by default secures the cluster via self-signed TLS certificates.
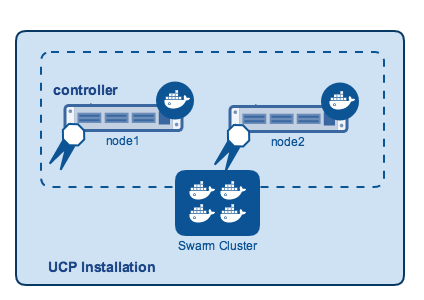
DDC’s second component is DTR, which must be installed on a host that’s a member of the UCP swarm. So next, we install DTR on that second node.
Once you’ve installed UCP and DTR, use this tutorial to deploy a container through UCP, and explore the user interface.
Note: The command examples in this page were tested for a macOS environment. If you are in another, you may need to adjust to use analogous commands for your environment.
Verify the prerequisites
This example requires that you have:
- Docker Toolbox installed (contains Docker Machine and Docker Engine)
- A free Docker ID account
Step 1: Provision hosts with Engine
In this step, you provision two VMs for your UCP sandbox installation. One will run UCP and one will be used to run containers, so the host specifications will be slightly different.
In a production environment you would use enterprise-grade hosts instead of local VMs. These nodes could be on your company’s private network or in the cloud. You would also use the Commercially Supported (CS Engine) version of Docker Engine required by UCP.
Set up the nodes for your evaluation:
-
Open a terminal on your computer.
-
Use Docker Machine to list any VMs in VirtualBox.
$ docker-machine ls NAME ACTIVE DRIVER STATE URL SWARM default * virtualbox Running tcp://192.168.99.100:2376 -
Create a VM named
node1using the following command.$ docker-machine create -d virtualbox \ --virtualbox-memory "2500" \ --virtualbox-disk-size "5000" node1When you create your virtual host you specify the memory and disk size options. UCP requires a minimum of 3.00 GB disk space and runs best with a minimum of 2 GB of memory.
-
Create a VM named
node2using the command below.$ docker-machine create -d virtualbox \ --virtualbox-memory "2500" \ --virtualbox-disk-size "5000" node2 -
Use the
docker-machine lscommand to list your hosts.$ docker-machine ls NAME ACTIVE DRIVER STATE URL SWARM DOCKER ERRORS default - virtualbox Stopped Unknown node1 - virtualbox Running tcp://192.168.99.100:2376 v1.12.1 node2 - virtualbox Running tcp://192.168.99.101:2376 v1.12.1At this point, both nodes are in the
Runningstate and ready for UCP installation.
About the ucp tool
To install UCP, use the Docker CLI to pull and run the docker/ucp
image, which contains a bootstrapper tool designed to make UCP easier
to install than many enterprise-grade applications. The ucp tool runs
docker run commands to install a UCP controller or join a node to a UCP
controller.
The general format of these commands is docker run --rm -it docker/ucp with
one or more subcommands, which are discussed later in this document. For this
tutorial, we use the -i option for “interactive” install mode, but
you can run these commands without -i (unattended) in production.
Regardless of how you use the docker/ucp tool, the default install supplies
default options for both data volumes and the certificate authority (CA). In a
production installation you can also optionally:
- use the high availability feature
- customize the port used by the UCP web application
- customize the port used by the Swarm manager
- create your own data volumes
- use your own TLS certificates
You can learn more about these when you plan a production installation.
Step 2. Install the UCP controller
In this step, you install the UCP controller on the node1 you provisioned
earlier. A controller serves the UCP application and runs the processes that
manage an installation’s Docker objects.
In a production installation, a system administrator can set up UCP’s high availability feature, which allows you to designate several nodes as controller replicas. This way if one controller fails, a replica node is ready to take its place.
For this sandbox installation, we don’t need high availability, so a single host for the controller works fine.
-
Open a terminal on your computer if you don’t have one open already.
-
Connect the terminal environment to the
node1you created.a. Use the
docker-machine envcommand to get the settings.$ docker-machine env node1 export DOCKER_TLS_VERIFY="1" export DOCKER_HOST="tcp://192.168.99.100:2376" export DOCKER_CERT_PATH="/Users/ldr/.docker/machine/machines/node1" export DOCKER_MACHINE_NAME="node1" # Run this command to configure your shell: # eval $(docker-machine env node1)b. Run the
evalcommand found in the final line to set your environment.$ eval $(docker-machine env node1)Running this
evalcommand sends thedockercommands in the following steps to the Docker Engine onnode1.c. Verify that
node1is the active environment.You can do this by running
docker-machine lsand checking that there is an*(asterisk) in theACTIVEfield next tonode1. -
Start the
ucptool to install interactively.$ docker run --rm -it \ -v /var/run/docker.sock:/var/run/docker.sock \ --name ucp docker/ucp install -i \ --swarm-port 3376 --host-address $(docker-machine ip node1)Note: If you are on a Windows system, your shell can’t resolve the
$(docker-machine ip node1)variable. Instead, edit the command supplied to replace it with the actual IP address.The first time you run the
ucptool, thedocker runcommand pulls the UCP bootstrapper image from Docker Hub. The tool downloads the packages it needs, and verifies that your system will support a UCP installation. -
Enter a password for UCP when prompted, and then confirm it.
The system prompts you for Subject alternative names (SANs). In this sandbox, you’ve already provided the IP address and the
ucptool discovered this for you and shows it in the controller list. -
Press enter to proceed using the list the
ucptool provided.UCP requires that all clients, including the Docker Engine, use a Swarm TLS certificate chain signed by the UCP Swarm Root CA. You can provide the certificate system with subject alternative names or SANs, which allow you to set up individual “leaf certificates.”
When it completes, the
ucptool prompts you to log in into the UCP web interface and gives you its location. You do this in the next step so you can install a license.
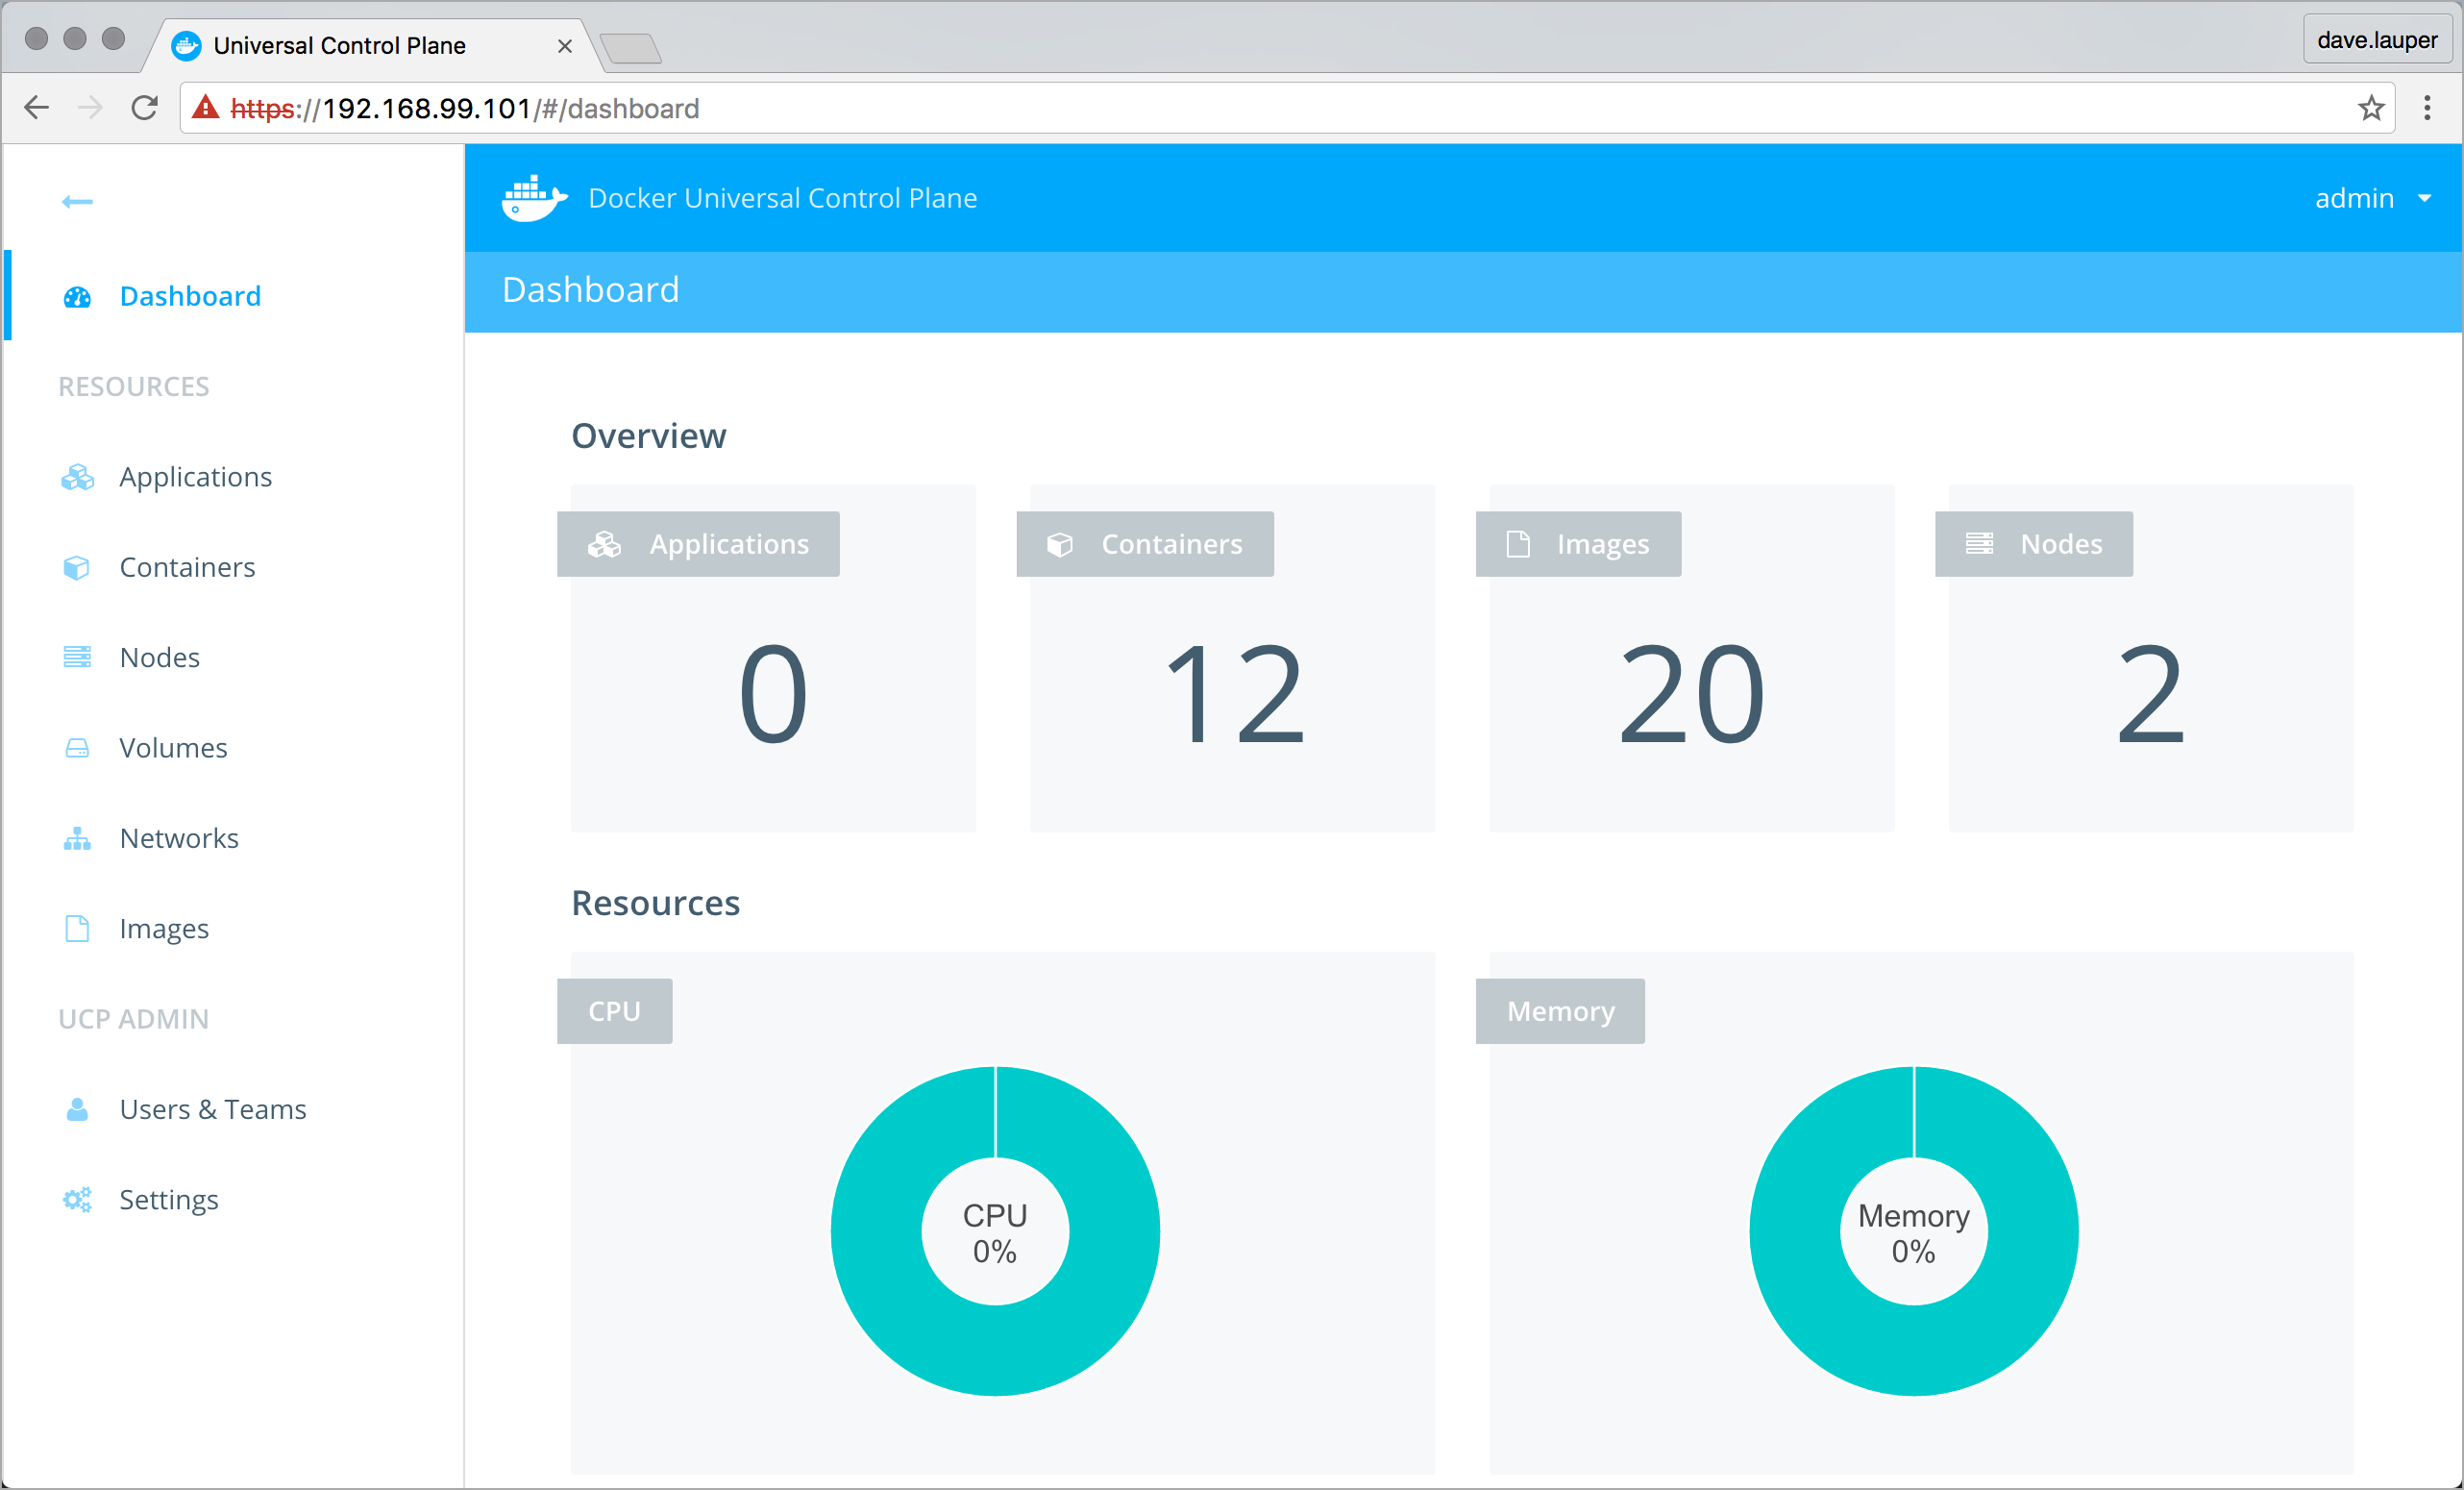
Step 3. License your installation
In this step, you get a license, log in to the UCP web interface and install the license. Docker allows you to run an evaluation version of UCP with a single controller and node for up to 30 days.
Learn how to get a trial license.
In your terminal window you should have instructions on how to access the UCP web UI. It should look like this:
INFO[0056] Login as "admin"/(your admin password) to UCP at https://192.168.99.100:443
In your browser navigate to that IP address, and upload your trial license.

Step 4. Join a node
In this step, you join your node2 to the controller using the ucp join
command. In a production installation, you’d do this step for each node
you want to add.
-
Open a terminal on your computer if you don’t already have one open.
-
Connect the terminal environment to the
node2you provisioned earlier.- Use
docker-machine envcommand to get the settings command fornode2.
$ docker-machine env node2

export DOCKER_TLS_VERIFY="1"
export DOCKER_HOST="tcp://192.168.99.101:2376"
export DOCKER_CERT_PATH="/Users/ldr/.docker/machine/machines/node2"
export DOCKER_MACHINE_NAME="node2"
# Run this command to configure your shell:
# eval $(docker-machine env node2)
b. Run the
evalcommand to set your environment.$ eval $(docker-machine env node2)Running this
evalcommand sends thedockercommands in the following steps to the Docker Engine onnode2. - Use
-
Run the
docker/ucp joincommand.Note: If you are on a Windows system, your shell can’t resolve the
$(docker-machine ip node2)variable. Instead, edit the command supplied to replace it with the actual IP address.$ docker run --rm -it \ -v /var/run/docker.sock:/var/run/docker.sock \ --name ucp docker/ucp join -i \ --host-address $(docker-machine ip node2)The
joincommand pulls several images, then prompts you for the URL of the UCP Server. -
Enter the URL of the UCP server to continue.
-
Press
ywhen prompted to continue and join the node to the swarm. -
Enter the admin username and password for the UCP server when prompted.
The installer continues and prompts you for SANs. In this sandbox, you’ve already provided the IP address and the
ucptool discovered this for you and shows it in the controller list. -
Press
enterto proceed without providing a SAN.The installation is complete when you see the message
Starting local swarm containers. -
Log in to UCP with your browser and confirm that the new node appears.
Step 5: Install Docker Trusted Registry
Next, we install Docker Trusted Registry (DTR). DTR provides a secure location to store your organization’s Docker images. Images are used by UCP to run containers that make up a service. By providing a secure connection between DTR and UCP, you can verify that your production services contain only signed code produced by your own organization.
-
First, make sure you know the IP addresses of both your UCP and DTR nodes. You can find this easily by running
docker-machine ls. -
Run the
docker-machine env node2command to make sure that you are passing commands to the node on which you will install DTR. -
Next, use the following command to install DTR on
node2.$ docker run -it --rm docker/dtr install \ --ucp-url $(docker-machine ip node1) \ --ucp-insecure-tls \ --ucp-node node2 \ --dtr-external-url $(docker-machine ip node2)You are prompted for the credentials of the UCP administrator.
-
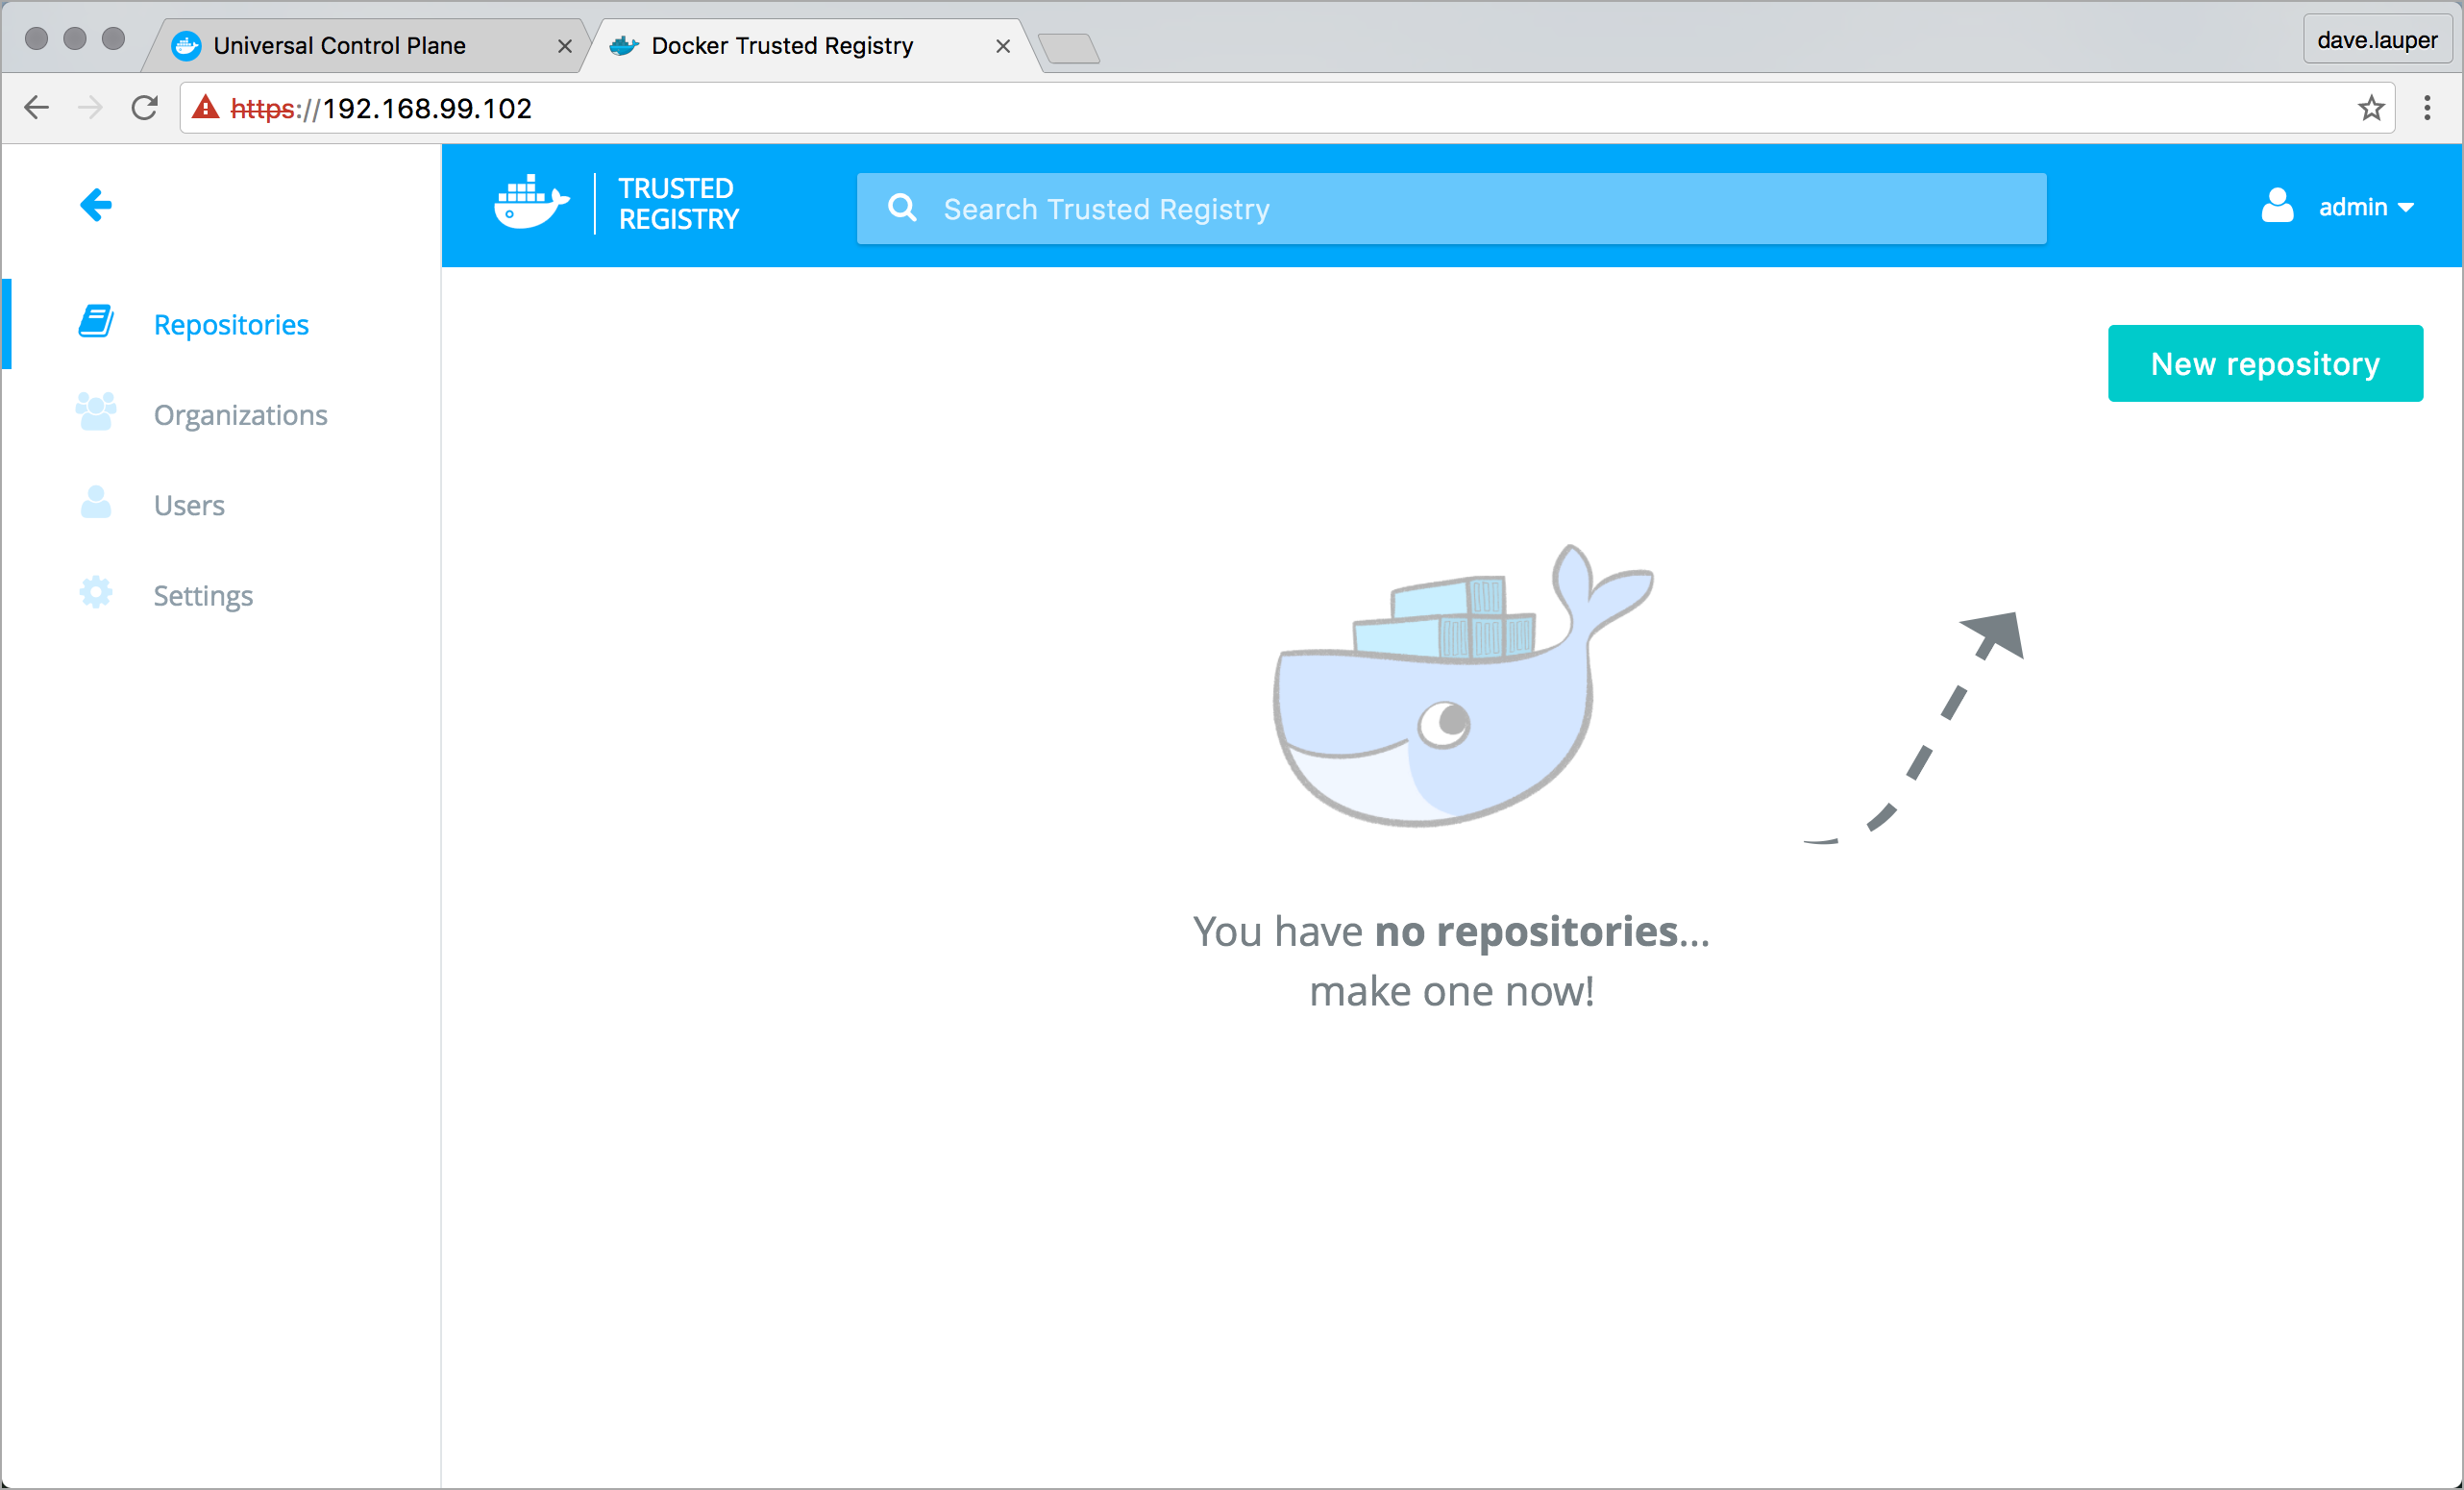
Verify that DTR is running by navigating your browser to the DTR server’s IP.
-
Confirm that you can log in using your UCP administrator credentials.
Congratulations! You now have a working installation of Docker Datacenter running in your sandbox. You can explore on your own, or continue your evaluation by walking through our guided tour.