Configure layer 7 routing for production
Estimated reading time: 4 minutesThis section includes documentation on configuring Interlock
for a production environment. If you have not yet deployed Interlock, refer to Deploying Interlock because this information builds upon the basic deployment. This topic does not cover infrastructure deployment -
it assumes you have a vanilla Swarm cluster (docker init and docker swarm join from the nodes).
Refer to the Swarm documentation if you need help
getting a Swarm cluster deployed.
The layer 7 solution that ships with UCP is highly available and fault tolerant. It is also designed to work independently of how many nodes you’re managing with UCP.

For a production-grade deployment, you need to perform the following actions:
- Pick two nodes that are going to be dedicated to run the proxy service.
- Apply labels to those nodes, so that you can constrain the proxy service to only run on nodes with those labels.
- Update the
ucp-interlockservice to deploy proxies using that constraint. - Configure your load balancer to only route traffic to the dedicated nodes.
Select dedicated nodes
Tuning the default deployment to
have two nodes dedicated for running the two replicas of the
ucp-interlock-proxy service ensures:
- The proxy services have dedicated resources to handle user requests. You can configure these nodes with higher performance network interfaces.
- No application traffic can be routed to a manager node. This makes your deployment secure.
- The proxy service is running on two nodes. If one node fails, layer 7 routing continues working.
Apply node labels
Configure the selected nodes as load balancer worker nodes ( for example, lb-00 and lb-01) with node labels in order to pin the Interlock Proxy service. After you log in to one of the Swarm managers, run the following commands to add node labels
to the dedicated ingress workers:
$> docker node update --label-add nodetype=loadbalancer lb-00
lb-00
$> docker node update --label-add nodetype=loadbalancer lb-01
lb-01
You can inspect each node to ensure the labels were successfully added:
$> docker node inspect -f '{{ .Spec.Labels  }}' lb-00
map[nodetype:loadbalancer]
$> docker node inspect -f '{{ .Spec.Labels  }}' lb-01
map[nodetype:loadbalancer]
The command should print “loadbalancer”.
Update proxy service
Now that your nodes are labelled, you need to update the ucp-interlock-proxy
service configuration to deploy the proxy service with the correct constraints (constrained to those
workers). From a manager, add a constraint to the ucp-interlock-proxy service to update the running service:
$> docker service update --replicas=2 \
    --constraint-add node.labels.nodetype==loadbalancer \
    --stop-signal SIGQUIT \
    --stop-grace-period=5s \
    $(docker service ls -f 'label=type=com.docker.interlock.core.proxy' -q)
This updates the proxy service to have two (2) replicas and ensure they are constrained to
the workers with the label nodetype==loadbalancer as well as configure the stop signal for the tasks
to be a SIGQUIT with a grace period of five (5) seconds. This will ensure that Nginx uses a graceful shutdown
before exiting to ensure the client request is finished.
Inspect the service to ensure the replicas have started on the desired nodes:
$> docker service ps $(docker service ls -f 'label=type=com.docker.interlock.core.proxy' -q)
ID                  NAME                    IMAGE               NODE                DESIRED STATE       CURRENT STATE                     ERROR               PORTS
o21esdruwu30        interlock-proxy.1       nginx:alpine        lb-01               Running             Preparing 3 seconds ago
n8yed2gp36o6         \_ interlock-proxy.1   nginx:alpine        mgr-01              Shutdown            Shutdown less than a second ago
aubpjc4cnw79        interlock-proxy.2       nginx:alpine        lb-00               Running             Preparing 3 seconds ago
Then add the constraint to the ProxyConstraints array in the interlock-proxy service
configuration so it takes effect if Interlock is restored from backup:
[Extensions]
  [Extensions.default]
    ProxyConstraints = ["node.labels.com.docker.ucp.orchestrator.swarm==true", "node.platform.os==linux", "node.labels.nodetype==loadbalancer"]
Learn how to configure ucp-interlock.
Once reconfigured, you can check if the proxy service is running on the dedicated nodes:
docker service ps ucp-interlock-proxy
Configure load balancer
Update the settings in the upstream load balancer (ELB, F5, etc) with the addresses of the dedicated ingress workers. This directs all traffic to these nodes.
You have now configured Interlock for a dedicated ingress production environment. Refer to the configuration information if you want to continue tuning.
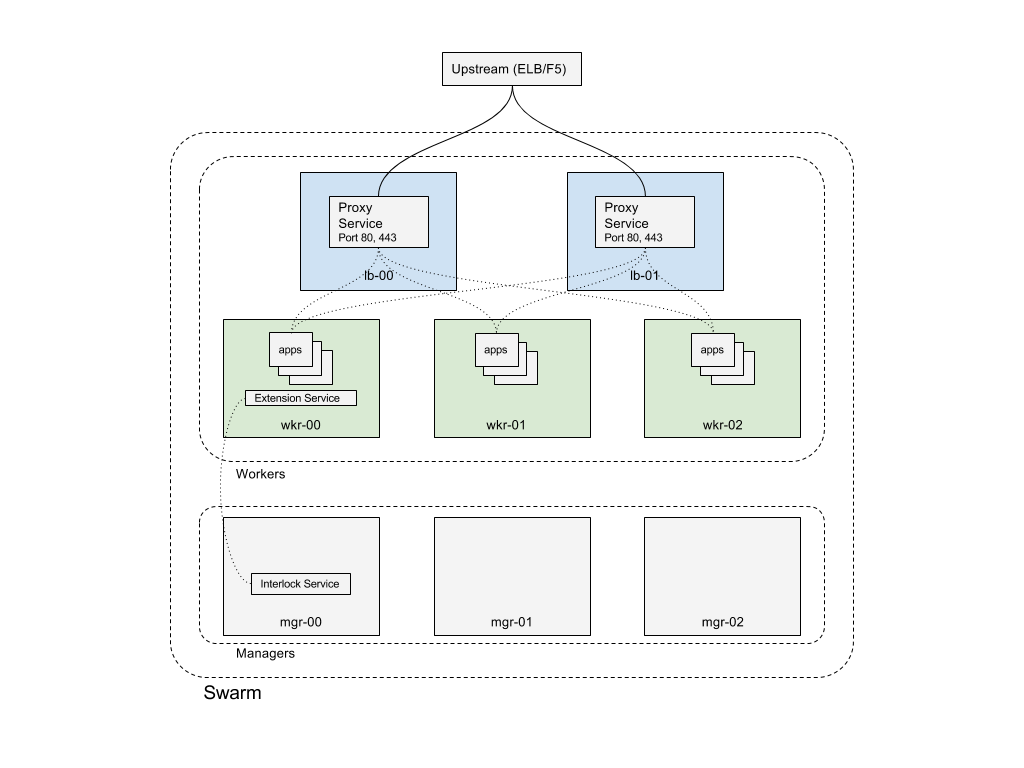
Production deployment configuration example
The following example shows the configuration of an eight (8) node Swarm cluster. There are three (3) managers and five (5) workers. Two of the workers are configured with node labels to be dedicated ingress cluster load balancer nodes. These will receive all application traffic. There is also an upstream load balancer (such as an Elastic Load Balancer or F5). The upstream load balancers will be statically configured for the two load balancer worker nodes.
This configuration has several benefits. The management plane is both isolated and redundant. No application traffic hits the managers and application ingress traffic can be routed to the dedicated nodes. These nodes can be configured with higher performance network interfaces to provide more bandwidth for the user services.