Learn the application architecture
Estimated reading time: 3 minutesYou are viewing docs for legacy standalone Swarm. These topics describe standalone Docker Swarm. In Docker 1.12 and higher, Swarm mode is integrated with Docker Engine. Most users should use integrated Swarm mode — a good place to start is Getting started with swarm mode, Swarm mode CLI commands, and the Get started with Docker walkthrough). Standalone Docker Swarm is not integrated into the Docker Engine API and CLI commands.
On this page, you learn about the Swarm at scale example. Make sure you have read through the introduction to get an idea of the skills and time required first.
Learn the example back story
Your company is a pet food company that has bought a commercial during the Superbowl. The commercial drives viewers to a web survey that asks users to vote – cats or dogs. You are developing the web survey.
Your survey must ensure that millions of people can vote concurrently without your website becoming unavailable. You don’t need real-time results, a company press release announces the results. However, you do need confidence that every vote is counted.
Understand the application architecture
The voting application is composed of several microservices. It uses a parallel web frontend that sends jobs to asynchronous background workers. The application’s design can accommodate arbitrarily large scale. The diagram below shows the application’s high level architecture:
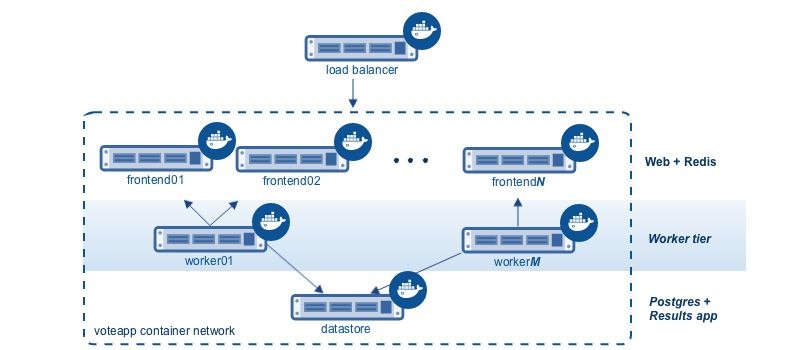
All the servers are running Docker Engine. The entire application is fully “Dockerized” in that all services are running inside of containers.
The frontend consists of a load balancer with N frontend instances. Each
frontend consists of a web server and a Redis queue. The load balancer can
handle an arbitrary number of web containers behind it (frontend01-
frontendN). The web containers run a simple Python application that takes a
vote between two options. It queues the votes to a Redis container running on
the datastore.
Behind the frontend is a worker tier which runs on separate nodes. This tier:
- scans the Redis containers
- dequeues votes
- deduplicates votes to prevent double voting
- commits the results to a Postgres database
Just like the frontend, the worker tier can also scale arbitrarily. The worker count and frontend count are independent from each other.
The application’s Dockerized microservices are deployed to a container network. Container networks are a feature of Docker Engine that allows communication between multiple containers across multiple Docker hosts.
Swarm cluster architecture
To support the application, the design calls for a Swarm cluster with a single Swarm manager and four nodes as shown below.
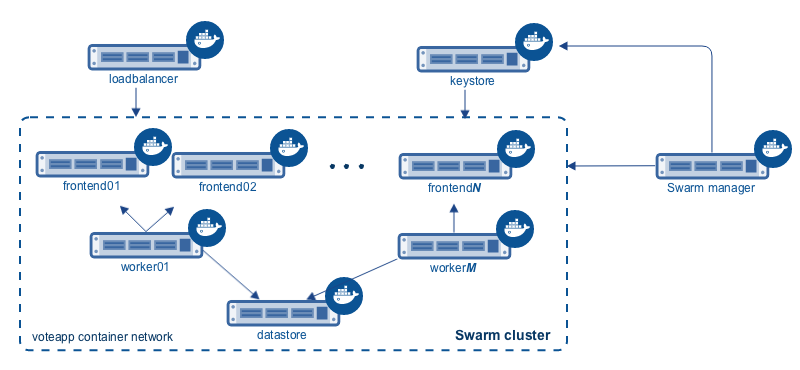
All four nodes in the cluster are running the Docker daemon, as is the Swarm manager and the load balancer. The Swarm manager is part of the cluster and is considered out of band for the application. A single host running the Consul server acts as a keystore for both Swarm discovery and for the container network. The load balancer could be placed inside of the cluster, but for this demonstration it is not.
After completing the example and deploying your application, this is what your environment should look like.
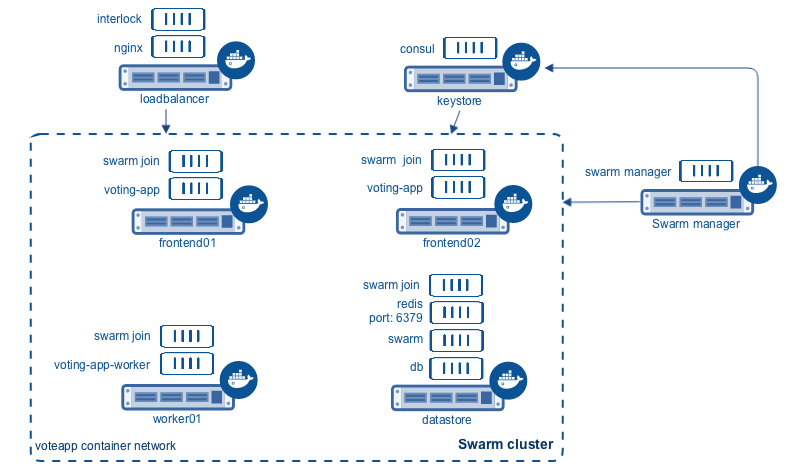
As the previous diagram shows, each node in the cluster runs the following containers:
frontend01:- Container: voting-app
- Container: Swarm agent
frontend02:- Container: voting-app
- Container: Swarm agent
worker01:- Container: voting-app-worker
- Container: Swarm agent
dbstore:- Container: voting-app-result-app
- Container: db (Postgres 9.4)
- Container: redis
- Container: Swarm agent
After deploying the application, configure your local system so that you can test the application from your local browser. In production, of course, this step wouldn’t be needed.
Next step
Now that you understand the application architecture, you need to deploy a network configuration that can support it. In the next step, you deploy network infrastructure for use in this sample.