Get started with Docker for Windows
Estimated reading time: 17 minutesWelcome to Docker Desktop for Windows!
Docker is a full development platform for creating containerized apps, and Docker Desktop for Windows is the best way to get started with Docker on Windows.
See Install Docker Desktop for Windows for information on system requirements and stable & edge channels.
Test your installation
-
Open a terminal window (Command Prompt or PowerShell, but not PowerShell ISE).
-
Run
docker --versionto ensure that you have a supported version of Docker:> docker --version Docker version 18.03.0-ce, build 0520e24 -
Pull the hello-world image from Docker Hub and run a container:
> docker run hello-world docker : Unable to find image 'hello-world:latest' locally ... latest: Pulling from library/hello-world ca4f61b1923c: Pulling fs layer ca4f61b1923c: Download complete ca4f61b1923c: Pull complete Digest: sha256:97ce6fa4b6cdc0790cda65fe7290b74cfebd9fa0c9b8c38e979330d547d22ce1 Status: Downloaded newer image for hello-world:latest Hello from Docker! This message shows that your installation appears to be working correctly. ... -
List the
hello-worldimage that was downloaded from Docker Hub:> docker image ls -
List the
hello-worldcontainer (that exited after displaying “Hello from Docker!”):> docker container ls --all -
Explore the Docker help pages by running some help commands:
> docker --help
> docker container --help
> docker container ls --help
> docker run --help
Explore the application
In this section, we demonstrate the ease and power of Dockerized applications by running something more complex, such as an OS and a webserver.
-
Pull an image of the Ubuntu OS and run an interactive terminal inside the spawned container:
> docker run --interactive --tty ubuntu bash

docker : Unable to find image 'ubuntu:latest' locally
...

latest:
Pulling from library/ubuntu
22dc81ace0ea:
Pulling fs layer
1a8b3c87dba3:
Pulling fs layer
91390a1c435a:
Pulling fs layer
...
Digest: sha256:e348fbbea0e0a0e73ab0370de151e7800684445c509d46195aef73e090a49bd6
Status: Downloaded newer image for ubuntu:latest
Do not use PowerShell ISE
Interactive terminals do not work in PowerShell ISE (but they do in PowerShell). See docker/for-win/issues/223.
-
You are in the container. At the root
#prompt, check thehostnameof the container:root@8aea0acb7423:/# hostname 8aea0acb7423Notice that the hostname is assigned as the container ID (and is also used in the prompt).
-
Exit the shell with the
exitcommand (which also stops the container):root@8aea0acb7423:/# exit > -
List containers with the
--alloption (because no containers are running).The
hello-worldcontainer (randomly named,relaxed_sammet) stopped after displaying its message. Theubuntucontainer (randomly named,laughing_kowalevski) stopped when you exited the container.> docker container ls --all CONTAINER ID IMAGE COMMAND CREATED STATUS PORTS NAMES 8aea0acb7423 ubuntu "bash" 2 minutes ago Exited (0) 2 minutes ago laughing_kowalevski 45f77eb48e78 hello-world "/hello" 3 minutes ago Exited (0) 3 minutes ago relaxed_sammet -
Pull and run a Dockerized nginx web server that we name,
webserver:> docker run --detach --publish 80:80 --name webserver nginx Unable to find image 'nginx:latest' locally latest: Pulling from library/nginx fdd5d7827f33: Pull complete a3ed95caeb02: Pull complete 716f7a5f3082: Pull complete 7b10f03a0309: Pull complete Digest: sha256:f6a001272d5d324c4c9f3f183e1b69e9e0ff12debeb7a092730d638c33e0de3e Status: Downloaded newer image for nginx:latest dfe13c68b3b86f01951af617df02be4897184cbf7a8b4d5caf1c3c5bd3fc267f -
Point your web browser at
http://localhostto display the nginx start page. (You don’t need to append:80because you specified the default HTTP port in thedockercommand.)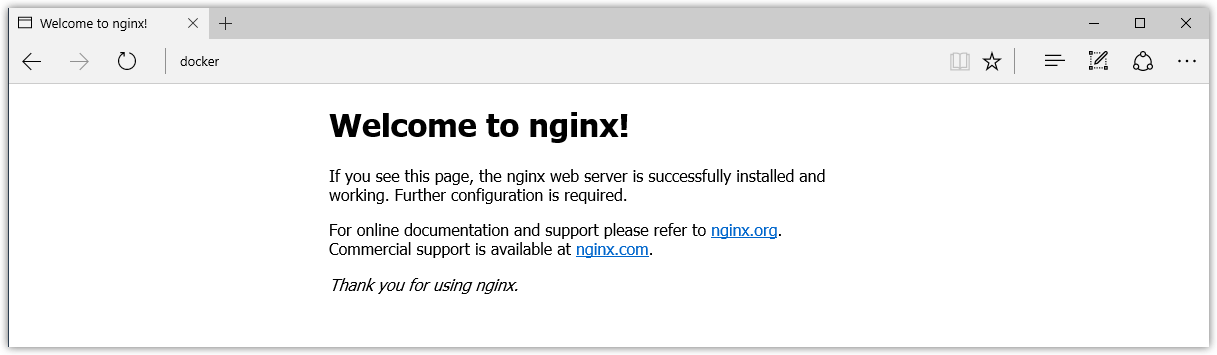
-
List only your running containers:
> docker container ls CONTAINER ID IMAGE COMMAND CREATED STATUS PORTS NAMES 0e788d8e4dfd nginx "nginx -g 'daemon of…" 2 minutes ago Up 2 minutes 0.0.0.0:80->80/tcp webserver -
Stop the running nginx container by the name we assigned it,
webserver:> docker container stop webserver -
Remove all three containers by their names -- the latter two names will differ for you:
> docker container rm webserver laughing_kowalevski relaxed_sammet
Docker Settings dialog
The Docker Desktop for Windows menu is a popup by which you can configure your Docker settings -- installation, updates, version channels, Docker Hub login, and more.
This section explains the configuration options accessible from the Settings dialog.
-
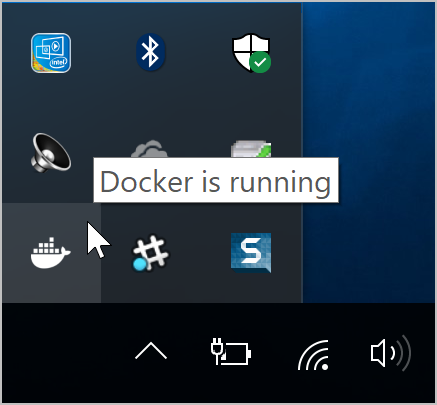
Open the Docker Desktop for Windows menu by right-clicking the Docker icon in the Notifications area (or System tray):
-
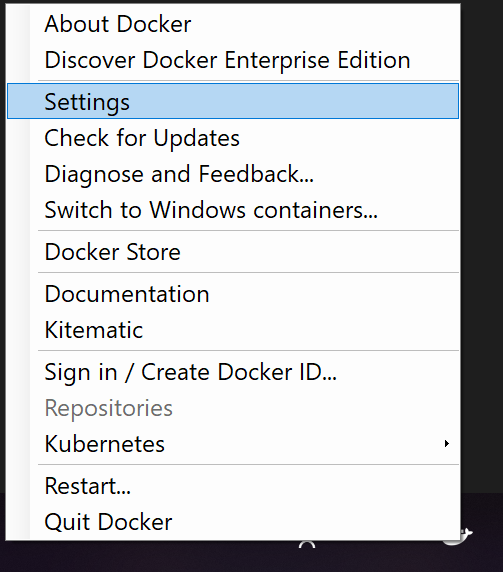
Select Settings... to open the Settings dialog:
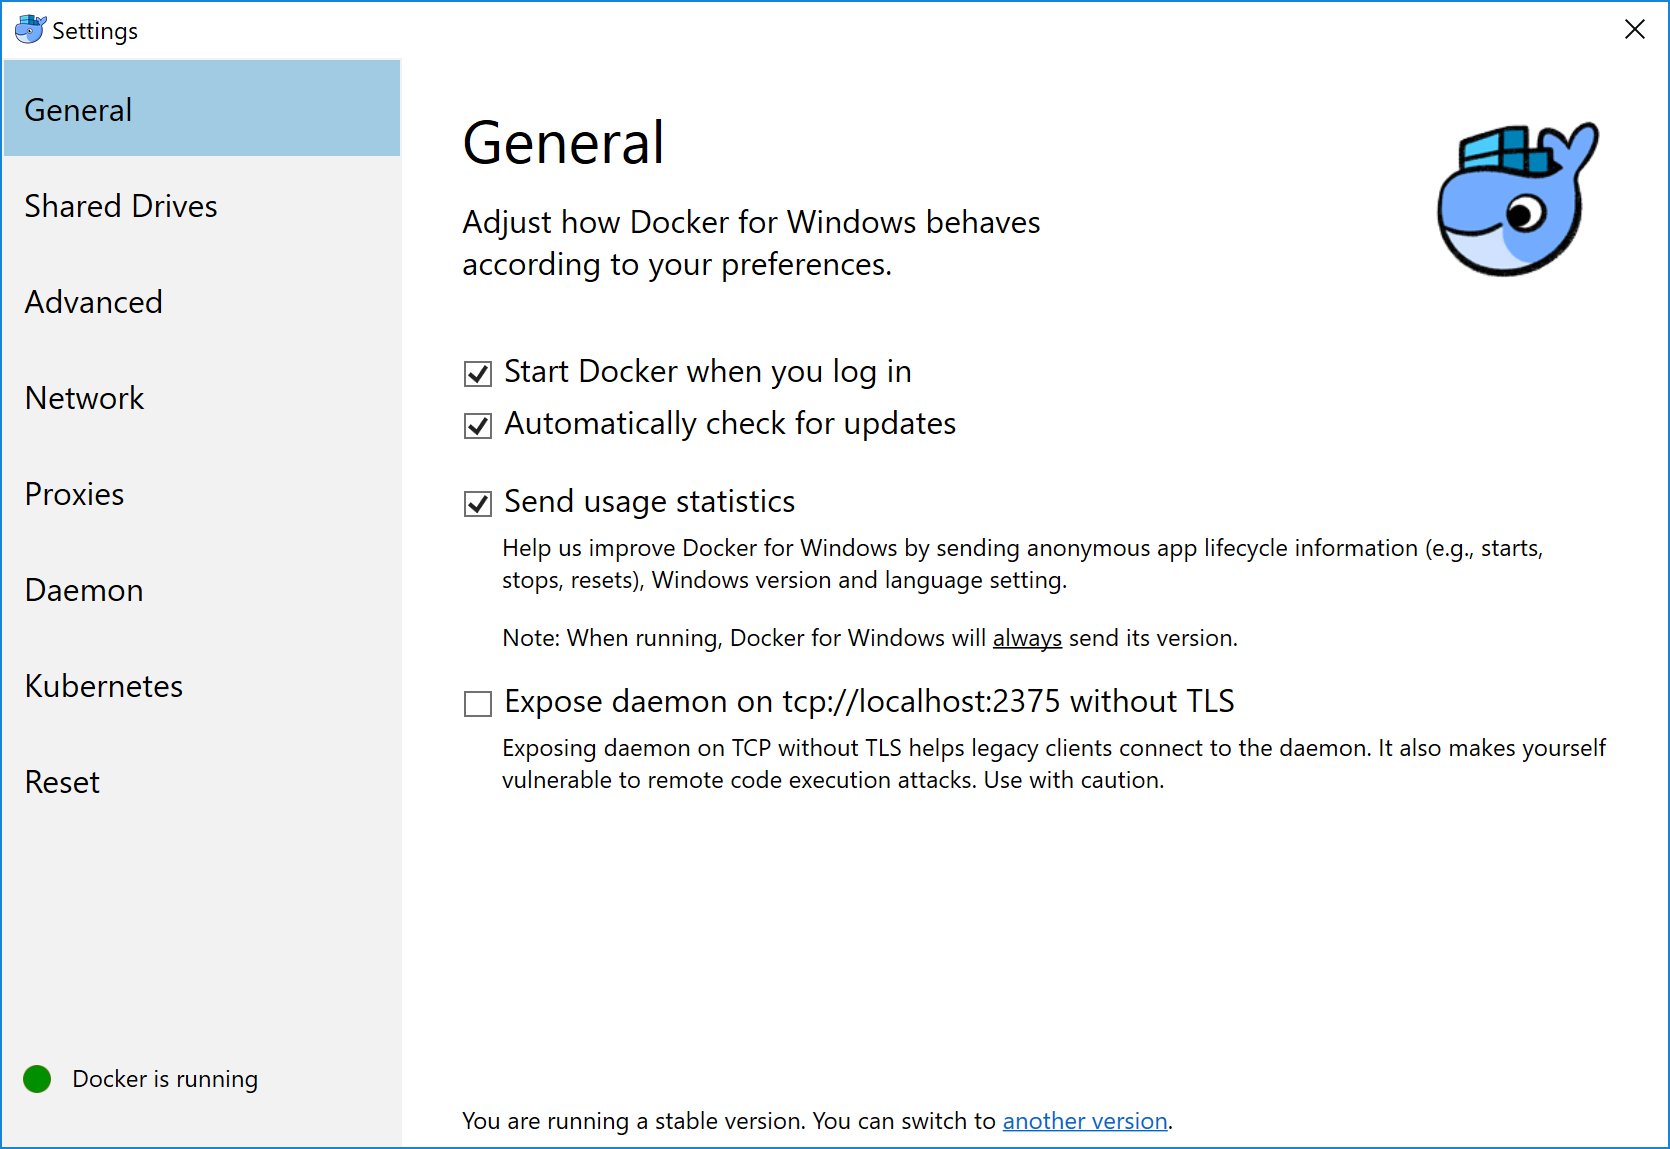
General
On the General tab of the Settings dialog, you can configure when to start and update Docker.
-
Start Docker when you log in - Automatically start the Docker Desktop for Windows application upon Windows system login.
-
Automatically check for updates - By default, Docker Desktop for Windows automatically checks for updates and notifies you when an update is available. Click OK to accept and install updates (or cancel to keep the current version). You can manually update by choosing Check for Updates from the main Docker menu.
-
Send usage statistics - By default, Docker Desktop for Windows sends diagnostics, crash reports, and usage data. This information helps Docker improve and troubleshoot the application. Uncheck to opt out. Docker may also sometimes prompt you for more information.
Shared drives
Share your local drives (volumes) with Docker Desktop for Windows, so that they are available to your Linux containers.
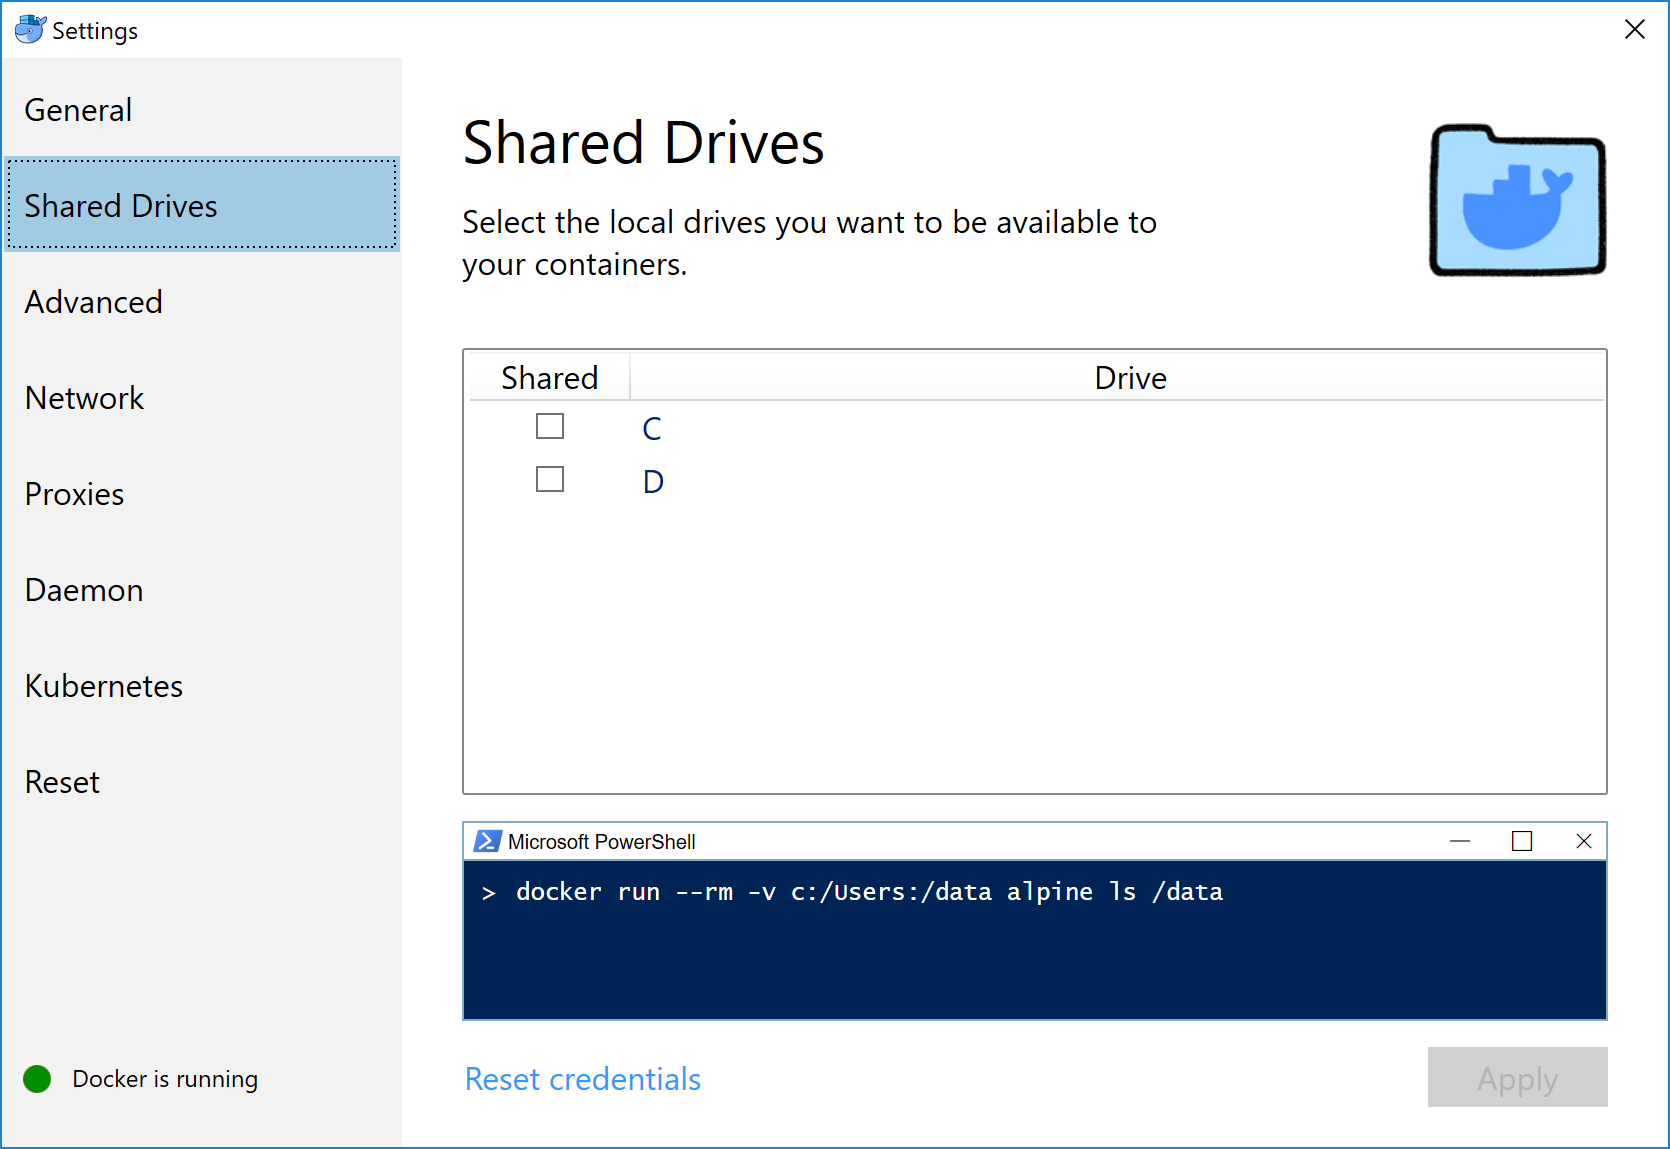
Permission for shared drives are tied to the credentials you provide here. If
you run docker commands under a different username than the one configured
here, your containers cannot access the mounted volumes.
To apply shared drives, you are prompted for your Windows system (domain) username and password. You can select an option to have Docker store the credentials so that you don’t need to enter them every time.
Tips on shared drives, permissions, and volume mounts
Shared drives are only required for mounting volumes in Linux containers, not for Windows containers. For Linux containers, you need to share the drive where the Dockerfile and volume are located. If you get errors such as
file not foundorcannot start serviceyou may need to enable shared drives. See Volume mounting requires shared drives for Linux containers.)If possible, avoid volume mounts from the Windows host, and instead mount on the Linux VM, or use a data volume (named volume) or data container. There are a number of issues with using host-mounted volumes and network paths for database files. See Volume mounts from host paths use a nobrl option to override database locking.
Docker Desktop for Windows sets permissions to read/write/execute for users, groups and others 0777 or a+rwx. This is not configurable. See Permissions errors on data directories for shared volumes.
Ensure the domain user has access to shared drives, as described in Verify domain user has permissions for shared drives.
You can share local drives with your containers but not with Docker Machine nodes. See the FAQ, Can I share local drives and filesystem with my Docker Machine VMs?.
Firewall rules for shared drives
Shared drives require port 445 to be open between the host machine and the virtual machine that runs Linux containers. Docker detects if port 445 is closed and shows the following message when you try to add a shared drive:
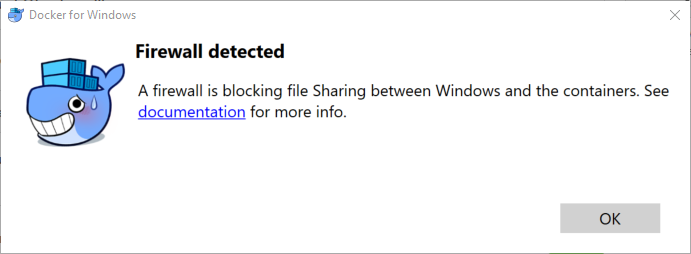
To share the drive, allow connections between the Windows host machine and the virtual machine in Windows Firewall or your third party firewall software. You do not need to open port 445 on any other network.
By default, allow connections to 10.0.75.1 on port 445 (the Windows host) from
10.0.75.2 (the virtual machine). If your firewall rules seem correct, you may
need to toggle or
reinstall the File and Print sharing service on the Hyper-V virtual network card
Shared drives on demand
You can share a drive “on demand” the first time a particular mount is requested.
If you run a Docker command from a shell with a volume mount (as shown in the example below) or kick off a Compose file that includes volume mounts, you get a popup asking if you want to share the specified drive.
You can select to Share it, in which case it is added your Docker Desktop for Windows Shared Drives list and available to containers. Alternatively, you can opt not to share it by hitting Cancel.

Advanced
The Linux VM restarts after changing the settings on the Advanced tab. This takes a few seconds.
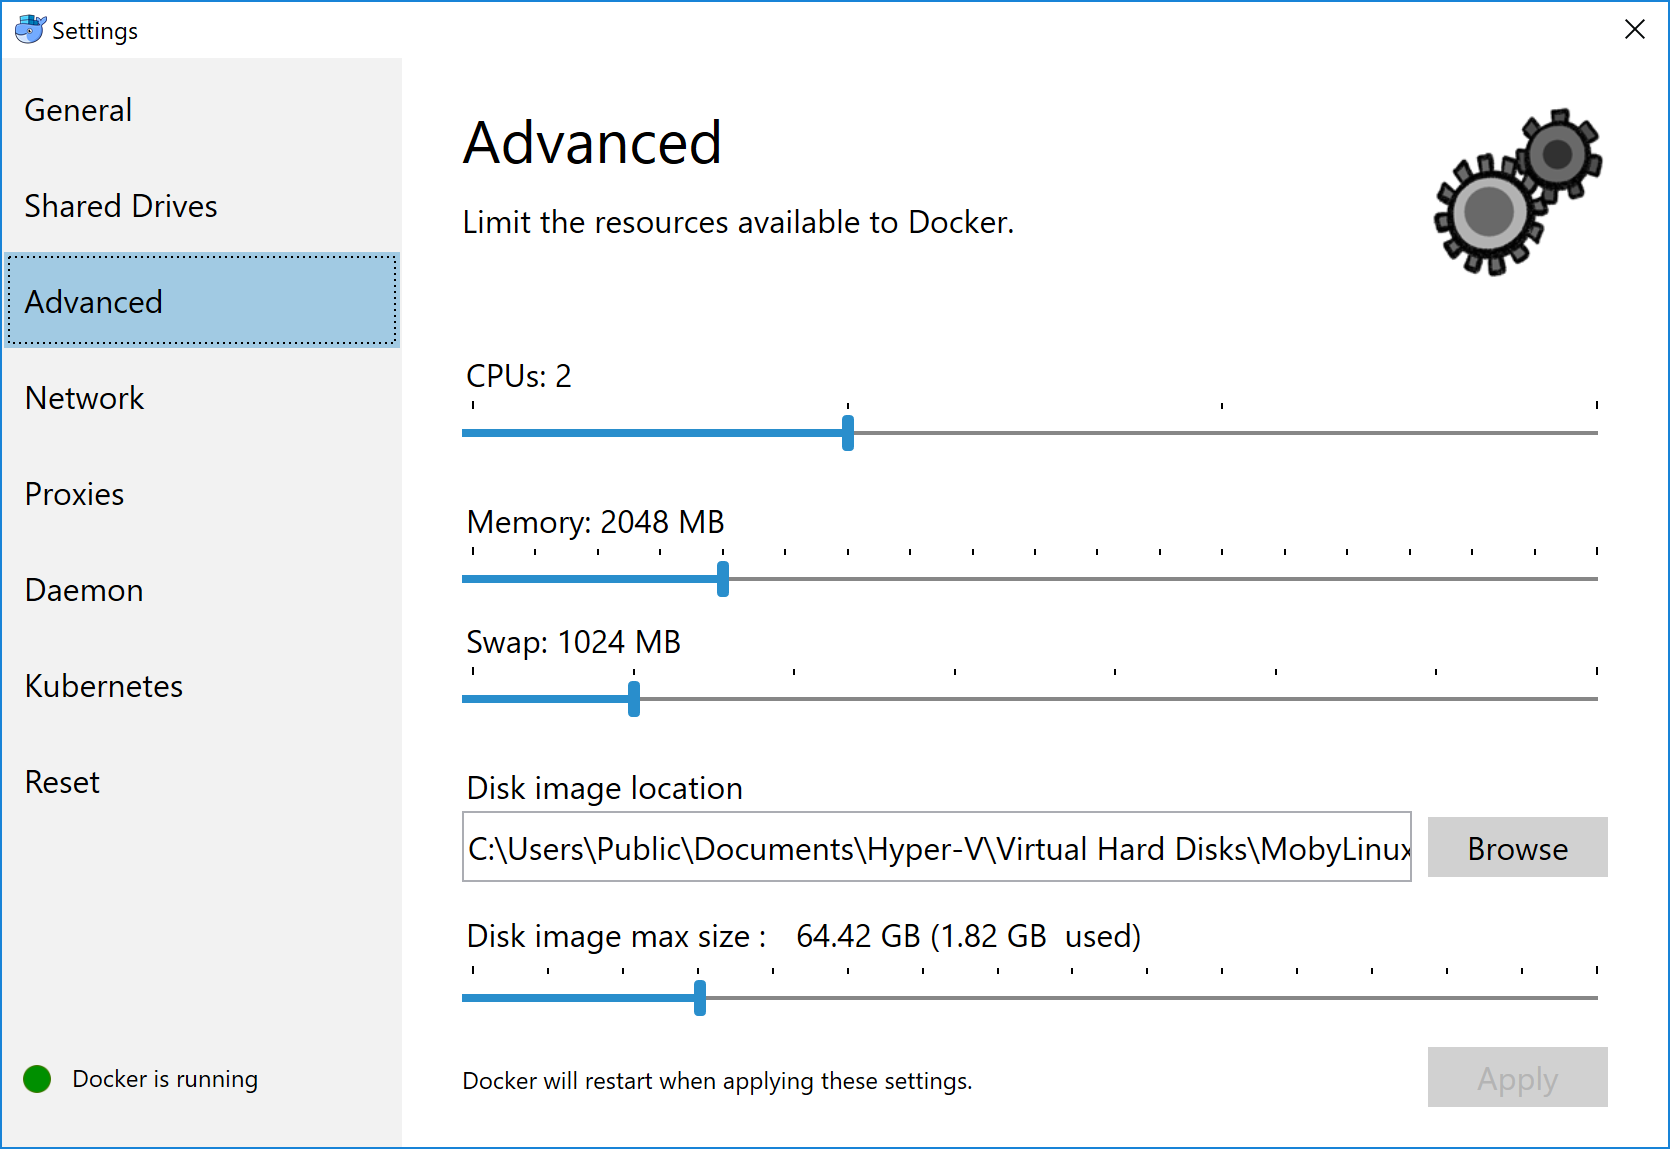
-
CPUs - Change the number of processors assigned to the Linux VM.
-
Memory - Change the amount of memory the Docker Desktop for Windows Linux VM uses.
Network
You can configure Docker Desktop for Windows networking to work on a virtual private network (VPN).
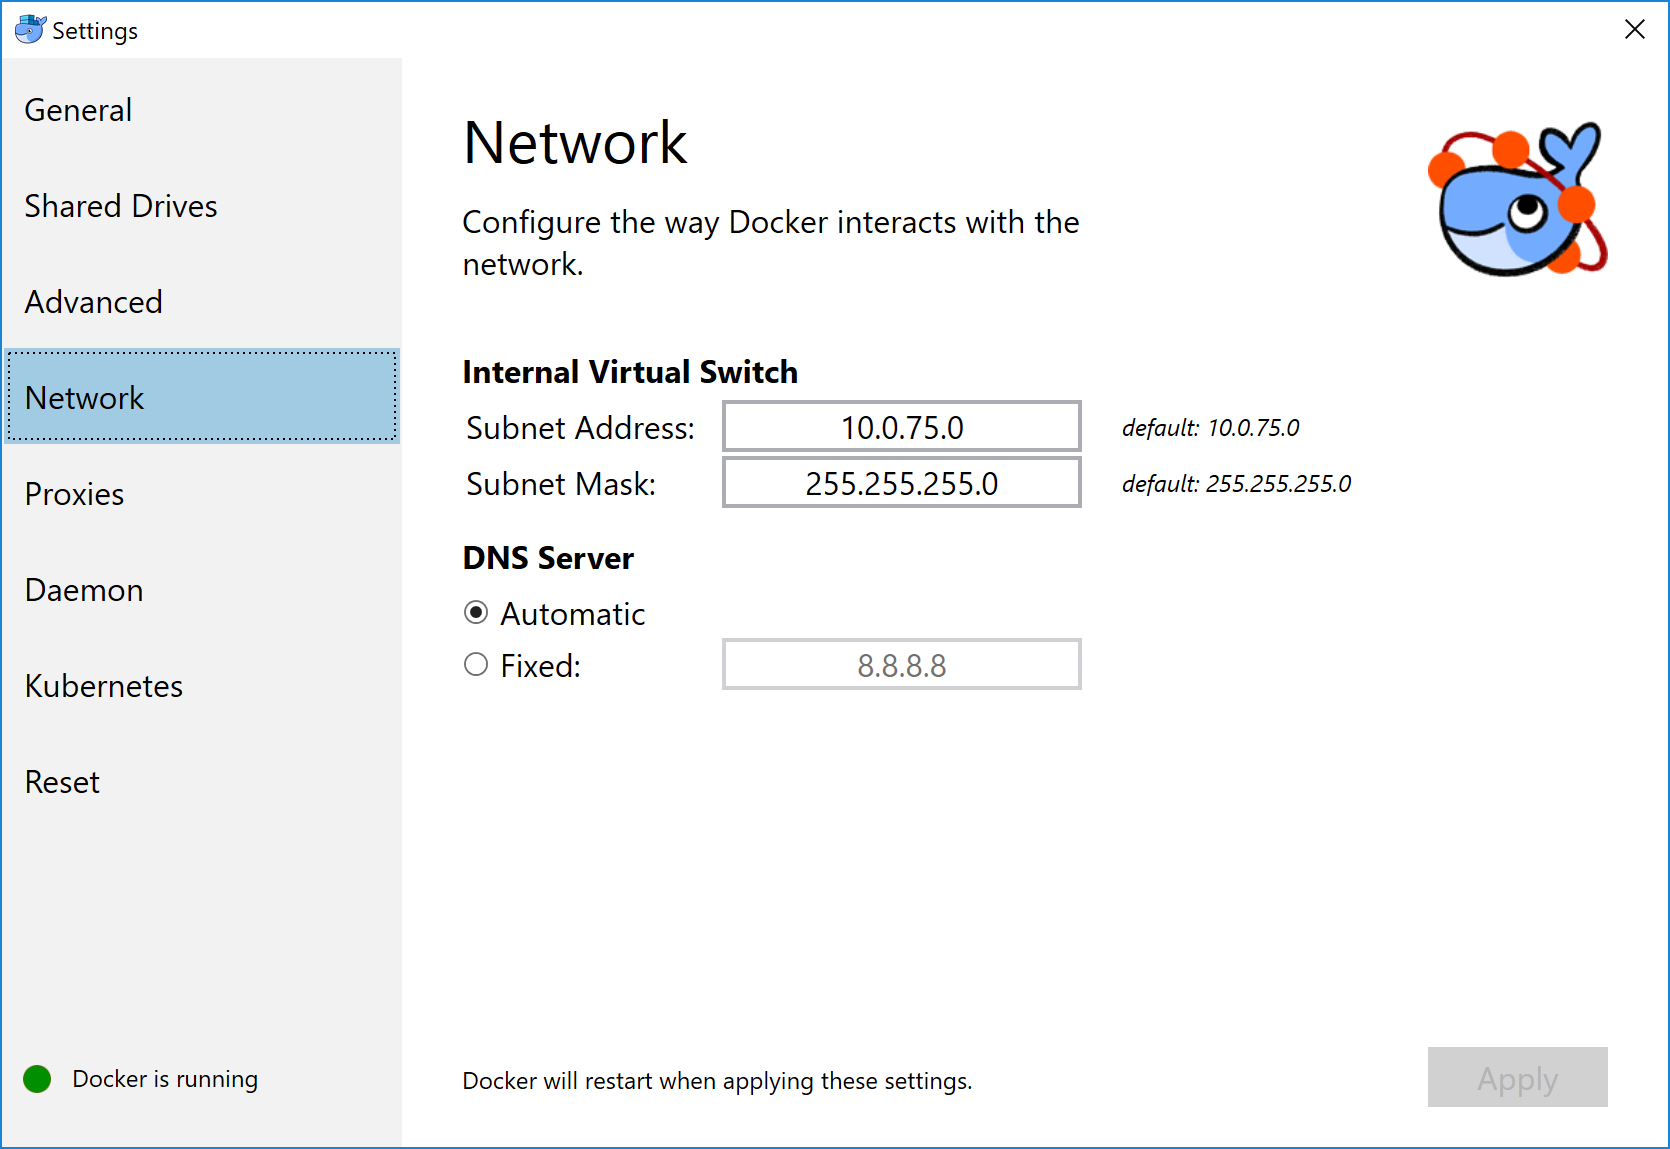
-
Internal Virtual Switch - You can specify a network address translation (NAT) prefix and subnet mask to enable Internet connectivity.
-
DNS Server - You can configure the DNS server to use dynamic or static IP addressing.
Note: Some users reported problems connecting to Docker Hub on Docker Desktop for Windows stable version. This would manifest as an error when trying to run
dockercommands that pull images from Docker Hub that are not already downloaded, such as a first time run ofdocker run hello-world. If you encounter this, reset the DNS server to use the Google DNS fixed address:8.8.8.8. For more information, see Networking issues in Troubleshooting.
Updating these settings requires a reconfiguration and reboot of the Linux VM.
Proxies
Docker Desktop for Windows lets you configure HTTP/HTTPS Proxy Settings and
automatically propagates these to Docker and to your containers. For example,
if you set your proxy settings to http://proxy.example.com, Docker uses this
proxy when pulling containers.
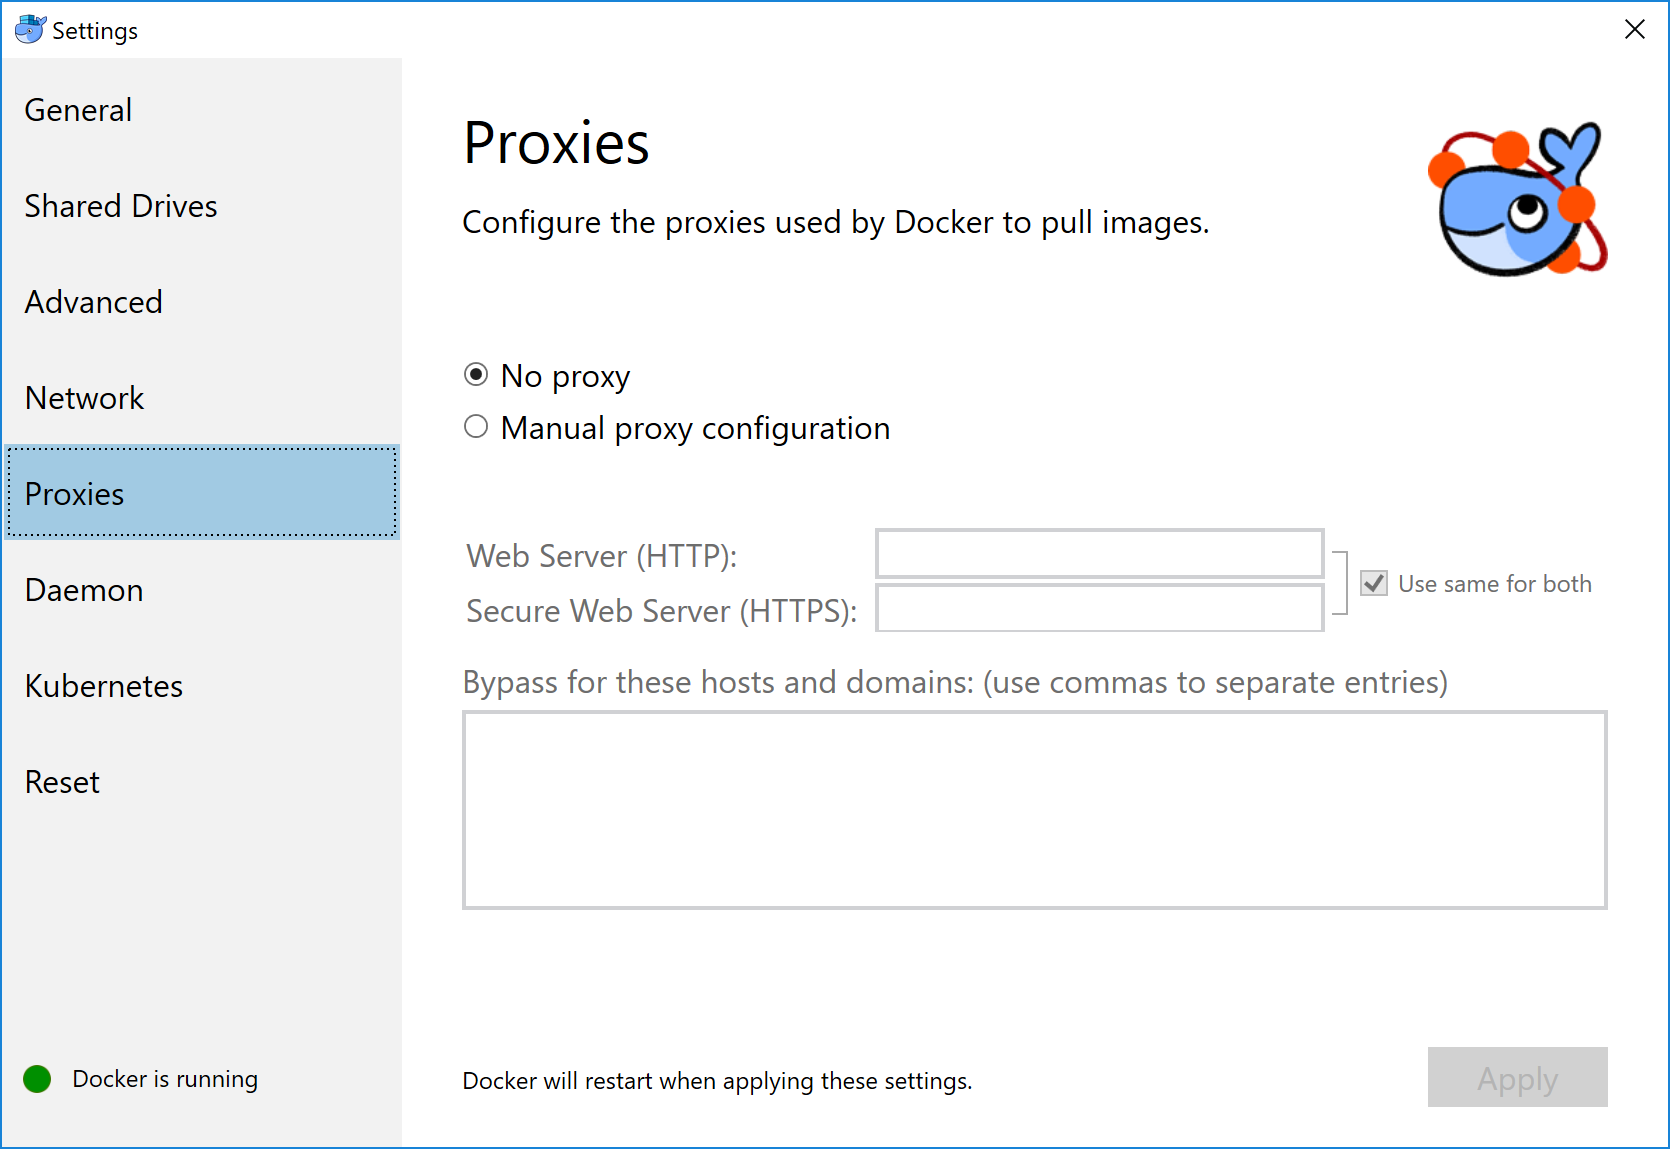
When you start a container, your proxy settings propagate into the containers. For example:
> docker run alpine env

PATH=/usr/local/sbin:/usr/local/bin:/usr/sbin:/usr/bin:/sbin:/bin
HOSTNAME=b7edf988b2b5
TERM=xterm
HOME=/root
HTTP_PROXY=http://proxy.example.com:3128
http_proxy=http://proxy.example.com:3128
no_proxy=*.local, 169.254/16
In the output above, the HTTP_PROXY, http_proxy, and no_proxy environment
variables are set. When your proxy configuration changes, Docker restarts
automatically to pick up the new settings. If you have containers that you wish
to keep running across restarts, you should consider using
restart policies.
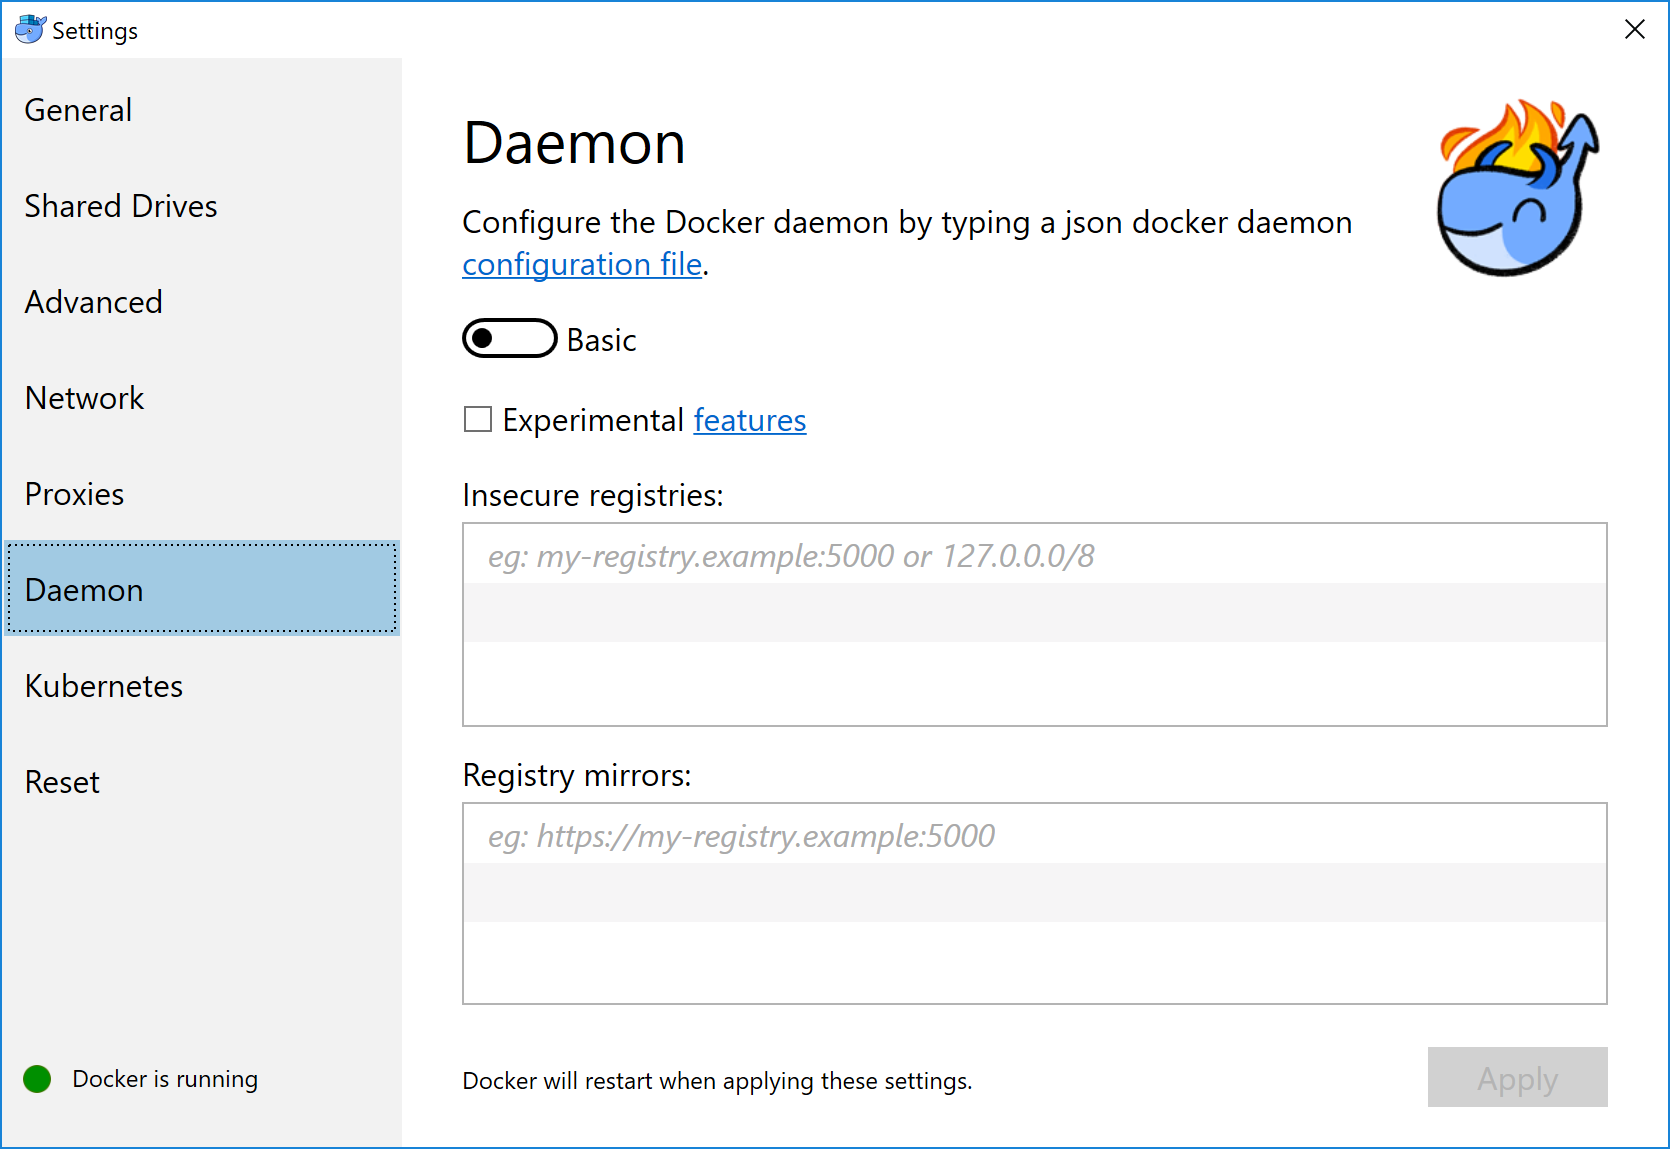
Daemon
You can configure the Docker daemon to hone how your containers run. Advanced mode lets you edit the JSON directly. Basic mode lets you configure the more common daemon options with interactive settings (and also JSON).
Experimental mode
Both Docker Desktop for Windows Stable and Edge releases have the experimental version of Docker Engine enabled, described in the Docker Experimental Features README on GitHub.
Experimental features are not appropriate for production environments or workloads. They are meant to be sandbox experiments for new ideas. Some experimental features may become incorporated into upcoming stable releases, but others may be modified or pulled from subsequent Edge releases, and never released on Stable.
On both Edge and Stable releases, you can toggle experimental mode on and off. If you toggle it off, Docker Desktop for Windows uses the current generally available release of Docker Engine.
Run docker version to see if you are in Experimental mode. Experimental mode
is listed under Server data. If Experimental is true, then Docker is
running in experimental mode, as shown here:
> docker version

Client:
 Version:       18.03.0-ce
 API version:   1.37
 Go version:    go1.9.4
 Git commit:    0520e24
 Built: Wed Mar 21 23:06:28 2018
 OS/Arch:       windows/amd64
 Experimental:  true
 Orchestrator:  swarm

Server:
 Engine:
  Version:      18.03.0-ce
  API version:  1.37 (minimum version 1.24)
  Go version:   go1.9.4
  Git commit:   0520e24
  Built:        Wed Mar 21 23:21:06 2018
  OS/Arch:      windows/amd64
  Experimental: true
Custom registries
You can set up your own registries on the Basic Daemon settings.
Normally, you store public or private images in Docker Hub and Docker Trusted Registry. Here, you can use Docker to set up your own insecure registry. Simply add URLs for insecure registries and registry mirrors on which to host your images.
See How do I add custom CA certificates? and How do I add client certificates? in the FAQs.
Daemon configuration file
The Advanced daemon settings provide the original option to directly edit the JSON configuration file for the daemon.
Updating these settings requires a reconfiguration and reboot of the Linux VM.
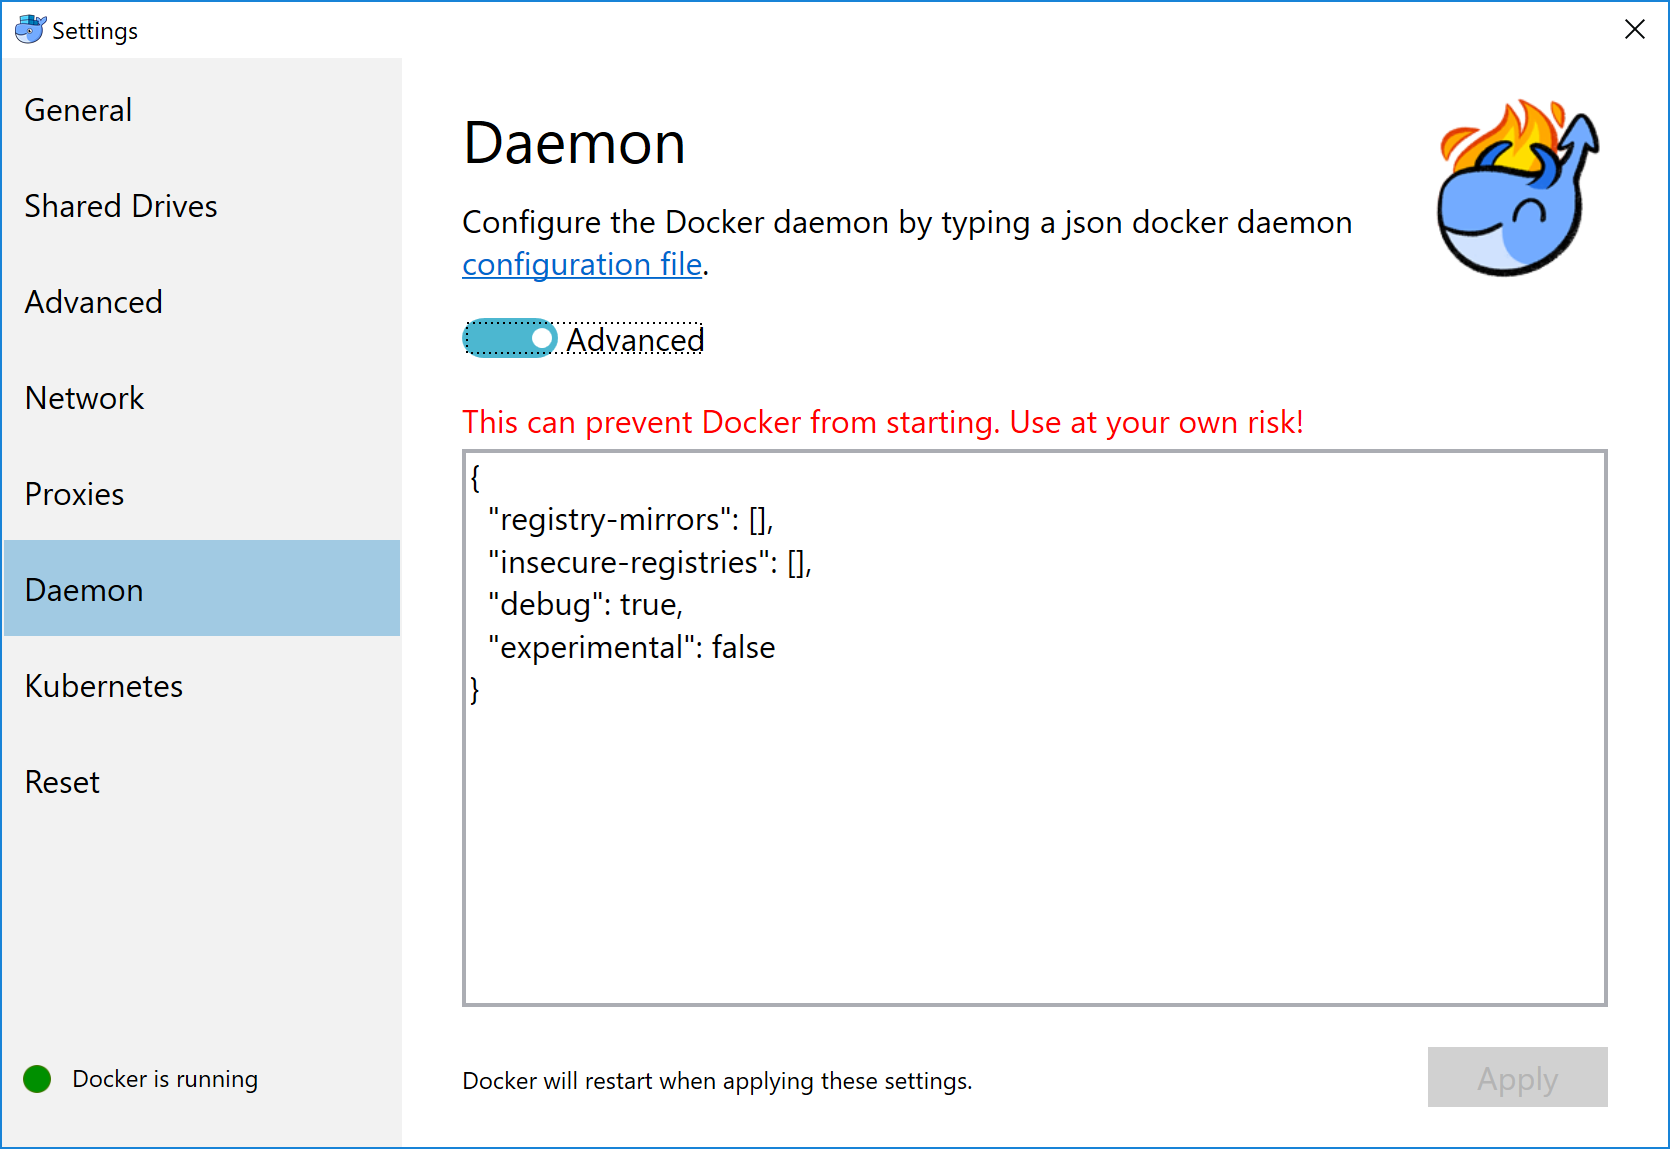
For a full list of options on the Docker daemon, see daemon, and also sub-topics:
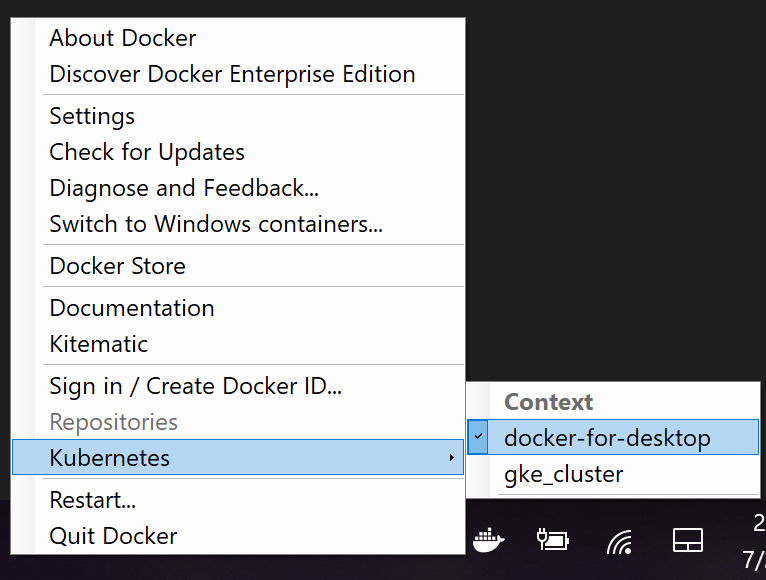
Kubernetes
Kubernetes on Docker Desktop for Windows is available in 18.02 Edge (win50) and higher, and in 18.06 Stable (win70) and higher.
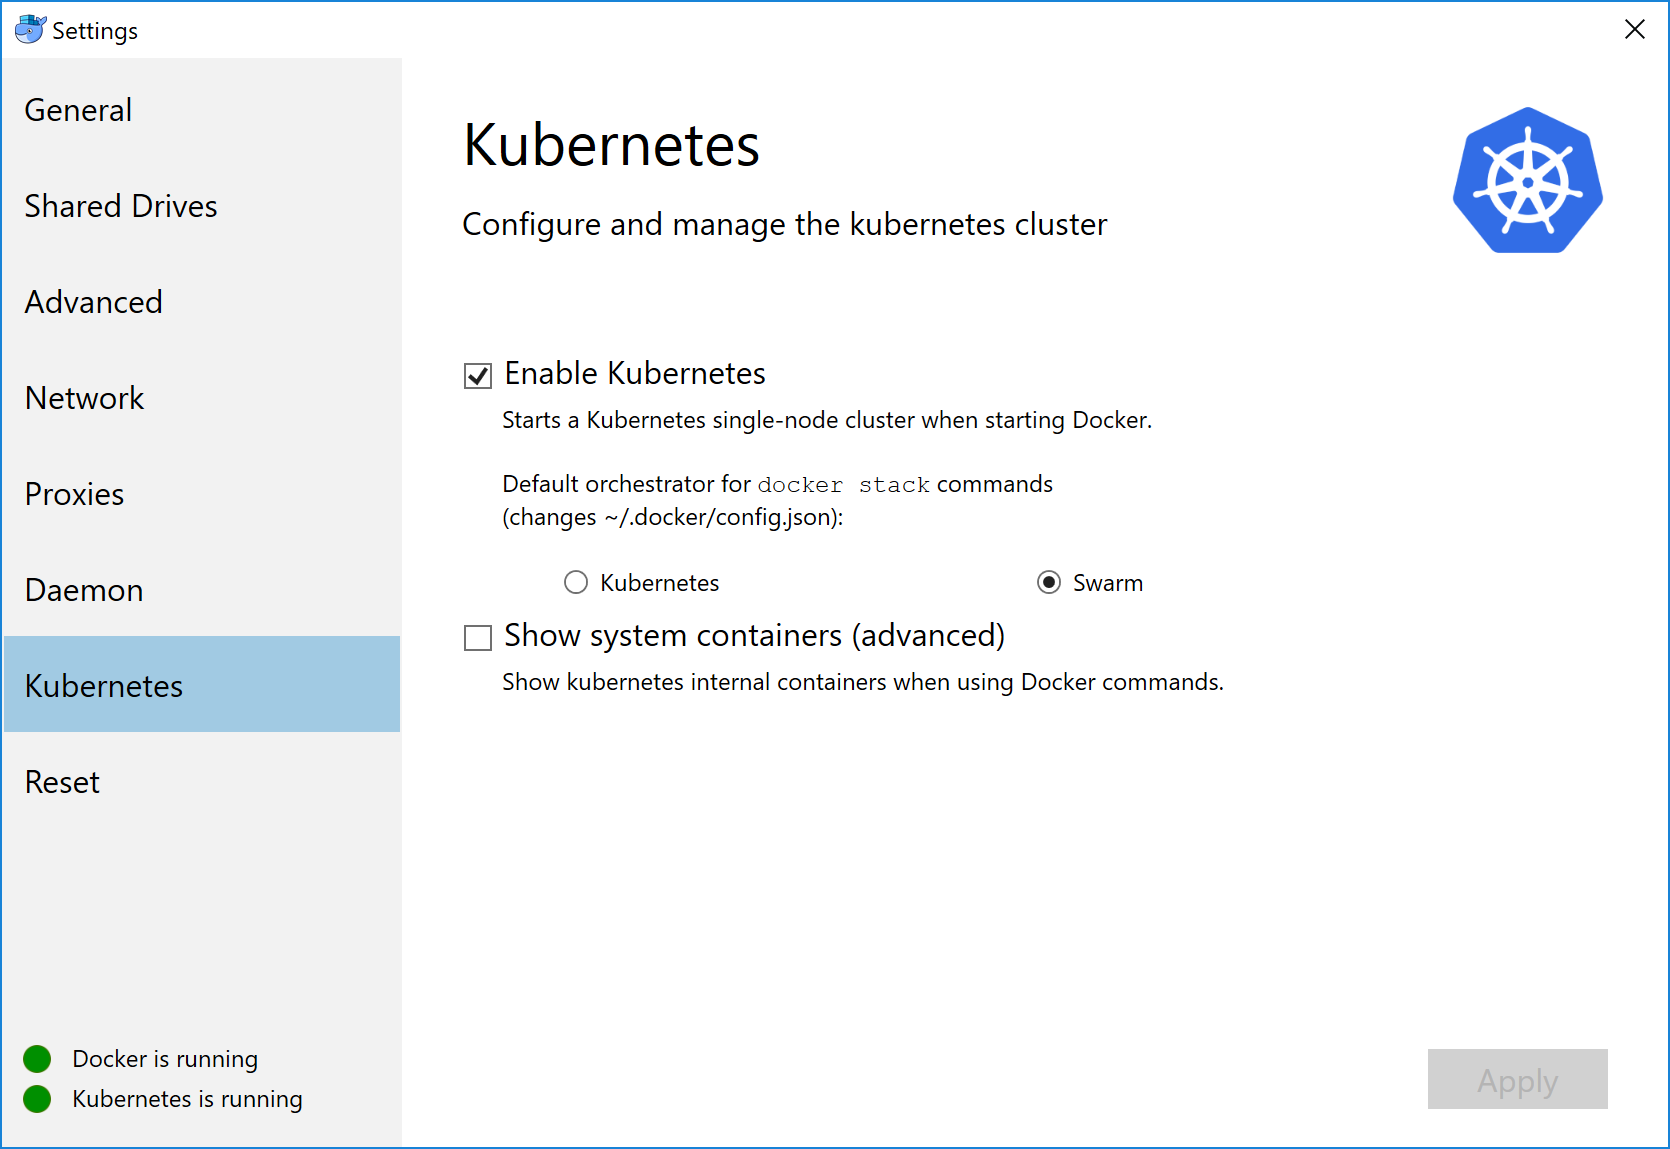
From Docker Desktop for Windows 18.02 CE Edge and 18.06 CE Stable a standalone Kubernetes server is included that runs on your Windows host, so that you can test deploying your Docker workloads on Kubernetes.
The Kubernetes client command, kubectl, is included and configured to connect
to the local Kubernetes server. If you have kubectl already installed and
pointing to some other environment, such as minikube or a GKE cluster, be sure
to change context so that kubectl is pointing to docker-for-desktop:
> kubectl config get-contexts
> kubectl config use-context docker-for-desktop
You can also change it through the Docker Desktop for Windows menu:
If you installed kubectl by another method, and
experience conflicts, remove it.
-
To enable Kubernetes support and install a standalone instance of Kubernetes running as a Docker container, select Enable Kubernetes and click the Apply and restart button.
An Internet connection is required. Images required to run the Kubernetes server are downloaded and instantiated as containers, and the
Program Files\Docker\Docker\Resources\bin\kubectl.exe` command is installed.
-
By default, Kubernetes containers are hidden from commands like
docker
service ls
, because managing them manually is not supported. To make them visible, select Show system containers (advanced) and click Apply and restart. Most users do not need this option. -
To disable Kubernetes support at any time, deselect Enable Kubernetes. The Kubernetes containers are stopped and removed, and the
/usr/local/bin/kubectlcommand is removed.For more about using the Kubernetes integration with Docker Desktop for Windows, see Deploy on Kubernetes.
Reset
On the Reset tab, you can restart Docker or reset its configuration.

-
Restart Docker - Shuts down and restarts the Docker application.
-
Reset to factory defaults - Resets Docker to factory defaults. This is useful in cases where Docker stops working or becomes unresponsive.
Diagnose & feedback
Visit our Logs and Troubleshooting guide for more details.
Log on to our Docker Desktop for Windows forum to get help from the community, review current user topics, or join a discussion.
Log on to Docker Desktop for Windows issues on GitHub to report bugs or problems and review community reported issues.
To give feedback on the documentation or update it yourself, use the Feedback options at the bottom of each docs page.
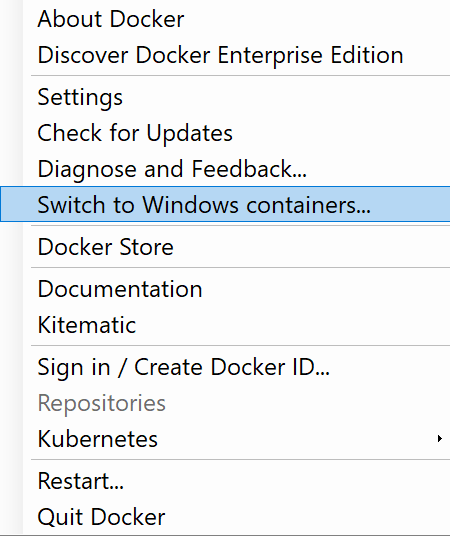
Switch between Windows and Linux containers
From the Docker Desktop for Windows menu, you can toggle which daemon (Linux or Windows) the Docker CLI talks to. Select Switch to Windows containers to use Windows containers, or select Switch to Linux containers to use Linux containers (the default).
For more information on Windows containers, refer to this documentation:
-
Microsoft documentation on Windows containers.
-
Build and Run Your First Windows Server Container (Blog Post) gives a quick tour of how to build and run native Docker Windows containers on Windows 10 and Windows Server 2016 evaluation releases.
-
Getting Started with Windows Containers (Lab) shows you how to use the MusicStore application with Windows containers. The MusicStore is a standard .NET application and, forked here to use containers, is a good example of a multi-container application.
-
To understand how to connect to Windows containers from the local host, see: Limitations of Windows containers for
localhostand published ports
Settings dialog changes with Windows containers
When you switch to Windows containers, the Settings dialog only shows those tabs that are active and apply to your Windows containers:
If you set proxies or daemon configuration in Windows containers mode, these apply only on Windows containers. If you switch back to Linux containers, proxies and daemon configurations return to what you had set for Linux containers. Your Windows container settings are retained and become available again when you switch back.
Adding TLS certificates
To your Docker daemon, you can add trusted Certificate Authorities (CAs), to verify registry server certificates, and client certificates, to authenticate to registries.
See How do I add custom CA certificates? and How do I add client certificates? in the FAQs.
Docker Hub
Select Sign in /Create Docker ID from the Docker Desktop for Windows menu to access your Docker Hub account. Once logged in, you can access your Docker Hub repositories directly from the Docker Desktop for Windows menu.
See these Docker Hub topics to learn more:
Where to go next
-
Try out the walkthrough at Get Started.
-
Dig in deeper with Docker Labs example walkthroughs and source code.
-
Refer to the Docker CLI Reference Guide.